引文
假如我有一部安卓手机,我想把手机上的全部流量打到指定的代理上(即透明代理),代理外接外部的VPN,以达到分散IP出口的目的。
这是这个系列的第一篇文章,本文将简单介绍一下 SOCKS 、iptable 、透明代理 的概念,以及一点小小的实践。
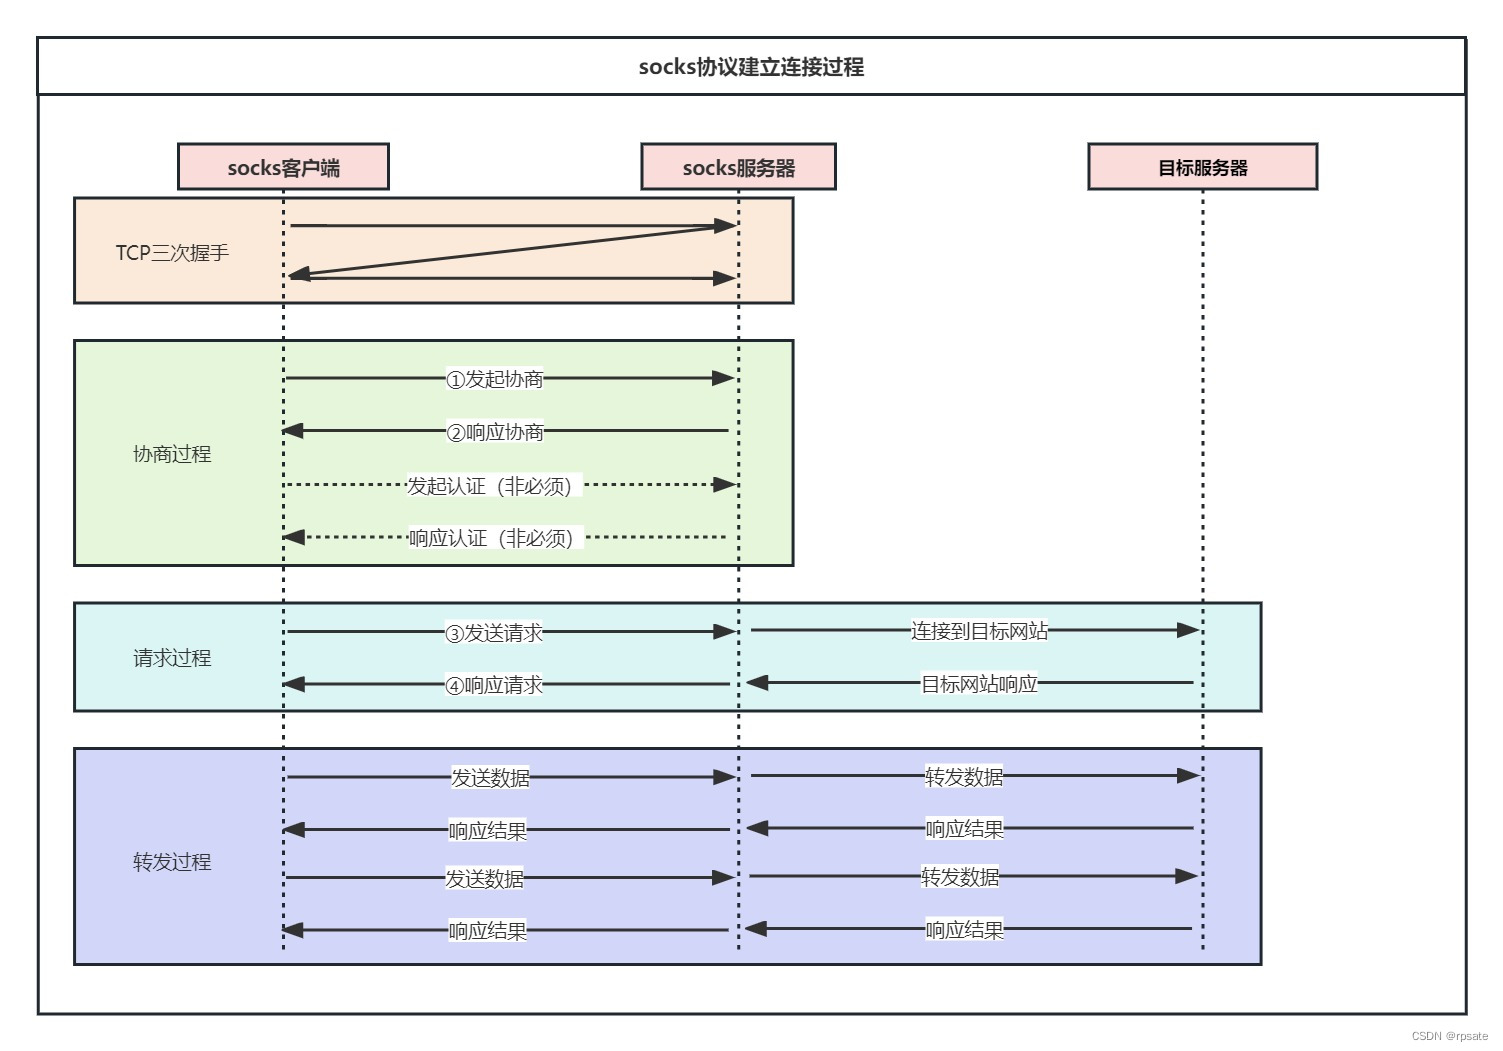
SOCKS
SOCKS是一种网络传输协议,当防火墙后的客户端要访问外部的服务器时,就跟SOCKS代理服务器连接。这个代理服务器控制客户端访问外网的资格,允许的话,就将客户端的请求发往外部的服务器。
SOCKS5协议
参考
rfc:https://tools.ietf.org/html/rfc1928
wikipadia:https://zh.wikipedia.org/wiki/SOCKS
协议这里不展开了。
iptable
参考
wikipadia:https://zh.wikipedia.org/wiki/Iptables
Archlinux: https://wiki.archlinux.org/index.php/Iptables_(简体中文)
iptables 是一个配置 Linux 内核 防火墙 的命令行工具,是 netfilter 项目的一部分。术语 iptables 也经常代指该内核级防火墙。iptables 用于 ipv4,ip6tables 用于 ipv6。
iptables 可以检测、修改、转发、重定向和丢弃 IPv4 数据包。过滤 IPv4 数据包的代码已经内置于内核中,并且按照不同的目的被组织成 表 的集合。表 由一组预先定义的 链 组成,链 包含遍历顺序规则。每一条规则包含一个谓词的潜在匹配和相应的动作(称为 目标),如果谓词为真,该动作会被执行。也就是说条件匹配。iptables 是用户工具,允许用户使用 链 和 规则。
透明代理
透明代理可以是通过配置iptable(设置防火墙规则),将电脑上的网络请求全部 、自动 代理出去。
下面,我用 redsocks 做一下实践。
参考
http://darkk.net.ru/redsocks/
https://github.com/darkk/redsocks
redsocks只是一个TCP-to-proxy的转向器,支持把流量打到SSH、SOCKS5等
有几个步骤:
0,开启redsocks
sudo apt-get install iptables git-core libevent-1.4-2 libevent-dev
git clone http://github.com/darkk/redsocks.git
cd redsocks
make
vim redsocks.conf
redsocks.conf
base{log_debug = on;log_info = on;log = "file:/tmp/reddi.log";daemon = on;redirector = iptables;
}
redsocks {local_ip = 127.0.0.1;local_port = 20182;ip = 127.0.0.1;port = 20183;type = socks5;
}
./redsocks -c redsocks.conf
1,把设置iptable的规则,把流量打到redsocks上
# 创建规则
root# iptables -t nat -N REDSOCKS
# 忽略内网流量
root# iptables -t nat -A REDSOCKS -d 0.0.0.0/8 -j RETURN
root# iptables -t nat -A REDSOCKS -d 10.0.0.0/8 -j RETURN
root# iptables -t nat -A REDSOCKS -d 100.64.0.0/10 -j RETURN
root# iptables -t nat -A REDSOCKS -d 127.0.0.0/8 -j RETURN
root# iptables -t nat -A REDSOCKS -d 169.254.0.0/16 -j RETURN
root# iptables -t nat -A REDSOCKS -d 172.16.0.0/12 -j RETURN
root# iptables -t nat -A REDSOCKS -d 192.168.0.0/16 -j RETURN
root# iptables -t nat -A REDSOCKS -d 198.18.0.0/15 -j RETURN
root# iptables -t nat -A REDSOCKS -d 224.0.0.0/4 -j RETURN
root# iptables -t nat -A REDSOCKS -d 240.0.0.0/4 -j RETURN
# 外网流量
# TCP
root# iptables -t nat -A REDSOCKS -p tcp -o eth0 -j DNAT --to 127.0.0.1:20182
root# iptables -t nat -A OUTPUT -p tcp -j REDSOCKS
ps:iptable关机时所有配置会丢失。可以将当前配置保存到文件
# 保存
root# iptables-save > proxy.iptablesv
# 恢复
root# iptables-restore proxy.iptables
2.1,在20183端口建立ssh通道
Local
# ServerB :root@192.168.0.92
ssh -fqND 20183 root@192.168.0.92
检查
ServerB
watch -n 1 -d "netstat -an | grep 118.89.53.151"
Local
wget 118.89.53.151
result(ServerB)
Every 1.0s: netstat -an | grep 118.89.53.151                                                                   Wed Feb 28 15:41:05 2018tcp        0      0 192.168.0.92:44426      118.89.53.151:443       TIME_WAIT
tcp        0      0 192.168.0.92:46026      118.89.53.151:80        TIME_WAIT
可以看到,在本地执行的wget 在ServerB上能看到建立的端口,流量就这样自动通过ssh出去了。
这里我们已经用iptable、redsocks、ssh做了一层透明代理。
2.2,设置redsocks的出口为socks5
a,部署一个简单的 socks server
python2.7 ServerB:192.168.0.92
git clone https://github.com/fengyouchao/pysocks.git
cd pysocks
python socks5.py start
ServerB
# 关闭
python socks5.py stop
b,修改步骤0中的redsocks.conf
改成:
Local
base{log_debug = on;log_info = on;log = "file:/tmp/reddi.log";daemon = on;redirector = iptables;
}
redsocks {local_ip = 127.0.0.1;local_port = 20182;ip = 192.168.0.92;port = 1080;type = socks5;
}
ps aux | grep redsocks
# 24588
kill -9 24588
./redsocks -c redsocks.conf
c,检查
ServerB
watch -n 1 -d "netstat -an | grep 118.89.53.151"
Local
wget 118.89.53.151
result(ServerB)
Every 1.0s: netstat -an | grep 118.89.53.151                                                                   Wed Feb 28 15:41:05 2018tcp        0      0 192.168.0.92:44426      118.89.53.151:443       TIME_WAIT
tcp        0      0 192.168.0.92:46026      118.89.53.151:80        TIME_WAIT
这样过了一轮之后,概念也熟悉了,本机的流量就可以想怎么发就怎么发了。
只用tcp的话,看到这里就可以拉源码下来看了~
2018.3.10 更新
支持UDP代理
redsocks.conf
base{log_debug = on;log_info = on;log = "file:/tmp/reddi.log";daemon = on;redirector = iptables;
}
redsocks {local_ip = 127.0.0.1;local_port = 31338;ip = 192.168.0.92;port = 1080;type = socks5;
}redudp {local_ip = 127.0.0.1;local_port = 10053;ip = 192.168.0.92;port = 1080;dest_ip = 8.8.8.8;dest_port = 53;udp_timeout = 30;udp_timeout_stream = 180;
}dnstc {local_ip = 127.0.0.1;local_port = 5300;
}dnsu2t {local_ip = 127.0.0.1;local_port = 5313;remote_ip = 8.8.8.8;remote_port = 53;
}
iptables
# Create new chain
root# iptables -t nat -N REDSOCKS# Ignore LANs and some other reserved addresses.
# See Wikipedia and RFC5735 for full list of reserved networks.
root# iptables -t nat -A REDSOCKS -d 0.0.0.0/8 -j RETURN
root# iptables -t nat -A REDSOCKS -d 10.0.0.0/8 -j RETURN
root# iptables -t nat -A REDSOCKS -d 127.0.0.0/8 -j RETURN
root# iptables -t nat -A REDSOCKS -d 169.254.0.0/16 -j RETURN
root# iptables -t nat -A REDSOCKS -d 172.16.0.0/12 -j RETURN
root# iptables -t nat -A REDSOCKS -d 192.168.0.0/16 -j RETURN
root# iptables -t nat -A REDSOCKS -d 224.0.0.0/4 -j RETURN
root# iptables -t nat -A REDSOCKS -d 240.0.0.0/4 -j RETURN# TCP
# Anything else should be redirected to port 31338
root# iptables -t nat -A REDSOCKS -p tcp -j REDIRECT --to-ports 31338
root# iptables -t nat -A OUTPUT -p tcp -j REDSOCKS# UDP
root# iptables -t nat -A REDSOCKS -p udp -j REDIRECT --to-ports 10053
root# iptables -t nat -A OUTPUT -p udp -j REDSOCKS
检查配置是否完成
root@ys:~# iptables -t nat -L -n -v
Chain PREROUTING (policy ACCEPT 58 packets, 7428 bytes)pkts bytes target     prot opt in     out     source               destination4   268 DOCKER     all  --  *      *       0.0.0.0/0            0.0.0.0/0            ADDRTYPE match dst-type LOCALChain INPUT (policy ACCEPT 27 packets, 5718 bytes)pkts bytes target     prot opt in     out     source               destinationChain OUTPUT (policy ACCEPT 4 packets, 266 bytes)pkts bytes target     prot opt in     out     source               destination0     0 DOCKER     all  --  *      *       0.0.0.0/0           !127.0.0.0/8          ADDRTYPE match dst-type LOCAL4   240 REDSOCKS   tcp  --  *      *       0.0.0.0/0            0.0.0.0/04   222 REDSOCKS   udp  --  *      *       0.0.0.0/0            0.0.0.0/0Chain POSTROUTING (policy ACCEPT 6 packets, 342 bytes)pkts bytes target     prot opt in     out     source               destination0     0 MASQUERADE  all  --  *      !docker0  172.17.0.0/16        0.0.0.0/0Chain DOCKER (2 references)pkts bytes target     prot opt in     out     source               destinationChain REDSOCKS (2 references)pkts bytes target     prot opt in     out     source               destination0     0 RETURN     all  --  *      *       0.0.0.0/0            0.0.0.0/80     0 RETURN     all  --  *      *       0.0.0.0/0            10.0.0.0/80     0 RETURN     all  --  *      *       0.0.0.0/0            127.0.0.0/80     0 RETURN     all  --  *      *       0.0.0.0/0            169.254.0.0/160     0 RETURN     all  --  *      *       0.0.0.0/0            172.16.0.0/123   180 RETURN     all  --  *      *       0.0.0.0/0            192.168.0.0/162   146 RETURN     all  --  *      *       0.0.0.0/0            224.0.0.0/40     0 RETURN     all  --  *      *       0.0.0.0/0            240.0.0.0/41    60 REDIRECT   tcp  --  *      *       0.0.0.0/0            0.0.0.0/0            redir ports 313382    76 REDIRECT   udp  --  *      *       0.0.0.0/0            0.0.0.0/0            redir ports 10053
2018.3.17 更新
在浏览器上设置代理进行调试
以firefox为例
打开这个地址
about:preferences#general
红框中填写代理服务器的地址和端口,入下图
项目开源在 github -> wuyisheng/socks
扫码关注,实时互动