Dozer的学习
此教程基于黑马程序员Java品达通用权限项目,哔哩哔哩链接:https://www.bilibili.com/video/BV1tw411f79E?p=44
1.dozer介绍
Dozer是Java Bean到Java Bean映射器,它以递归方式将数据从一个对象复制到另一个对象。 dozer是用来对两个对象之间属性转换的工具,有了这个工具之后,我们将一个对象的所有属性值转给另一个对象时,就不需要再去写重复的调用set和get方法了。
dozer其实是对我们熟知的beanutils的封装。
dozer的maven坐标:
<dependency><groupId>com.github.dozermapper</groupId><artifactId>dozer-core</artifactId><version>6.5.0</version>
</dependency>
为了简化使用方式,dozer还提供了starter,其maven坐标为:
<dependency><groupId>com.github.dozermapper</groupId><artifactId>dozer-spring-boot-starter</artifactId><version>6.5.0</version>
</dependency>
2.dozer入门案例
第一步:创建maven工程dozer_demo并配置pom.xml文件
<?xml version="1.0" encoding="UTF-8"?>
<project xmlns="http://maven.apache.org/POM/4.0.0"xmlns:xsi="http://www.w3.org/2001/XMLSchema-instance"xsi:schemaLocation="http://maven.apache.org/POM/4.0.0 http://maven.apache.org/xsd/maven-4.0.0.xsd"><modelVersion>4.0.0</modelVersion><parent><groupId>org.springframework.boot</groupId><artifactId>spring-boot-starter-parent</artifactId><version>2.2.2.RELEASE</version><relativePath/></parent><groupId>cn.itcast</groupId><artifactId>dozer_demo</artifactId><version>1.0-SNAPSHOT</version><dependencies><!-- dozer --><dependency><groupId>com.github.dozermapper</groupId><artifactId>dozer-spring-boot-starter</artifactId><version>6.5.0</version></dependency><!-- 单元测试 --><dependency><groupId>junit</groupId><artifactId>junit</artifactId></dependency><dependency><groupId>org.springframework.boot</groupId><artifactId>spring-boot-starter-test</artifactId></dependency><!-- lombok --><dependency><groupId>org.projectlombok</groupId><artifactId>lombok</artifactId></dependency></dependencies></project>
第二步:创建UserDTO和UserEntity ,此处我们故意对某些属性、数据类型设置不一致,如在UserDTO中的属性UserId和UserEntity 中的id,UserDTO的birthday的数据类型为String,而UserEntity的birthday数据类型为Date
DTO一般表示数据传输对象,Entity 一般与数据库表进行映射
package com.itheima.dto;import lombok.Data;@Data
public class UserDTO {private String userId;private String userName;private int userAge;private String address;private String birthday;
}
package com.itheima.entity;import lombok.Data;
import java.util.Date;@Data
public class UserEntity {private String id;private String name;private int age;private String address;private Date birthday;
}
第三步:在resources/dozer/目录下创建dozer的全局配置文件global.dozer.xml
<?xml version="1.0" encoding="UTF-8"?>
<mappings xmlns:xsi="http://www.w3.org/2001/XMLSchema-instance"xmlns="http://dozermapper.github.io/schema/bean-mapping"xsi:schemaLocation="http://dozermapper.github.io/schema/bean-mapping http://dozermapper.github.io/schema/bean-mapping.xsd"><!--全局配置:<date-format>表示日期格式--><configuration><date-format>yyyy-MM-dd</date-format></configuration>
</mappings>
注:全局配置文件名称可以任意
第四步:在resources/dozer/目录下创建dozer的映射文件biz.dozer.xml ,用于映射UserDTO和UserEntity之间的关系
<?xml version="1.0" encoding="UTF-8"?>
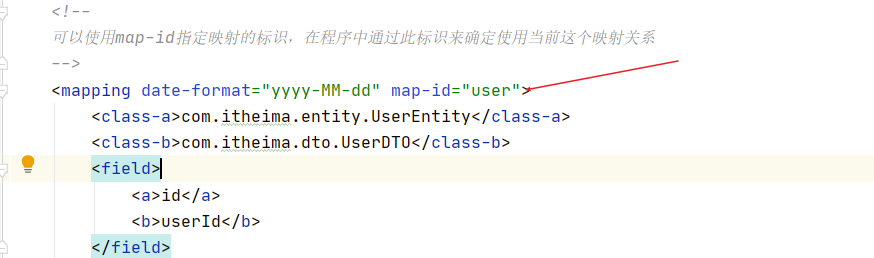
<mappings xmlns:xsi="http://www.w3.org/2001/XMLSchema-instance"xmlns="http://dozermapper.github.io/schema/bean-mapping"xsi:schemaLocation="http://dozermapper.github.io/schema/bean-mappinghttp://dozermapper.github.io/schema/bean-mapping.xsd"><!--描述两个类中属性的对应关系,对于两个类中同名的属性可以不映射--><mapping date-format="yyyy-MM-dd"><class-a>com.itheima.entity.UserEntity</class-a><class-b>com.itheima.dto.UserDTO</class-b><!-- field:属性对应,这里表示 UserEntity的id属性与 UserDTO的userId进行对应如果是完全相同的属性就可以不用进行配置--><field><a>id</a><b>userId</b></field><field><a>name</a><b>userName</b></field><field><a>age</a><b>userAge</b></field></mapping><!--可以使用map-id指定映射的标识,在程序中通过此标识来确定使用当前这个映射关系--><mapping date-format="yyyy-MM-dd" map-id="user"><class-a>com.itheima.entity.UserEntity</class-a><class-b>com.itheima.dto.UserDTO</class-b><field><a>id</a><b>userId</b></field><field><a>name</a><b>userName</b></field><field><a>age</a><b>userAge</b></field></mapping>
</mappings>
注:映射文件名称可以任意
第五步:编写application.yml文件
dozer:mappingFiles: # mappingFiles 为一个数组- classpath:dozer/global.dozer.xml # dozer全局配置文件- classpath:dozer/biz.dozer.xml # UserDTO与UserEntity的映射文件
第六步:编写启动类DozerApp
package com.itheima;import org.springframework.boot.SpringApplication;
import org.springframework.boot.autoconfigure.SpringBootApplication;@SpringBootApplication
public class DozerApp {public static void main(String[] args) {SpringApplication.run(DozerApp.class,args);}
}
第七步:编写单元测试DozerTest
package cn.itcast.test;import com.github.dozermapper.core.DozerBeanMapper;
import com.github.dozermapper.core.DozerBeanMapperBuilder;
import com.github.dozermapper.core.Mapper;
import com.github.dozermapper.core.metadata.MappingMetadata;
import com.itheima.DozerApp;
import com.itheima.dto.UserDTO;
import com.itheima.entity.UserEntity;
import org.junit.Test;
import org.junit.runner.RunWith;
import org.springframework.beans.factory.annotation.Autowired;
import org.springframework.boot.test.context.SpringBootTest;
import org.springframework.test.context.junit4.SpringRunner;@RunWith(SpringRunner.class)
@SpringBootTest(classes = DozerApp.class) // 指定启动类
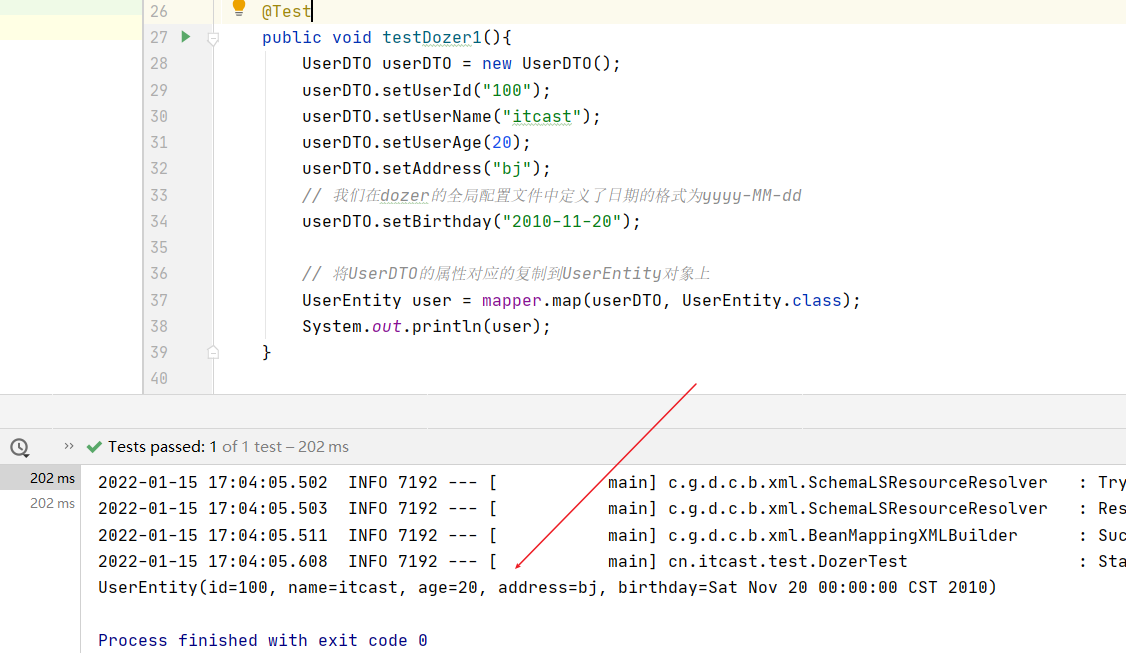
public class DozerTest {// 注入mapper对象,因为我们在pom文件中已经引入了dozer-spring-boot-starter依赖,它已经帮我们完成了自动配置// 使用mapper对象可以完成两个对象之间属性的复制@Autowiredprivate Mapper mapper;@Testpublic void testDozer1(){UserDTO userDTO = new UserDTO();userDTO.setUserId("100");userDTO.setUserName("itcast");userDTO.setUserAge(20);userDTO.setAddress("bj");// 我们在dozer的全局配置文件中定义了日期的格式为yyyy-MM-dduserDTO.setBirthday("2010-11-20");// 将UserDTO的属性对应的复制到UserEntity对象上UserEntity user = mapper.map(userDTO, UserEntity.class);System.out.println(user);}
}
我们发现dozer帮我们把UserDTO的属性对应的复制到了UserEntity对象上
继续编写测试,
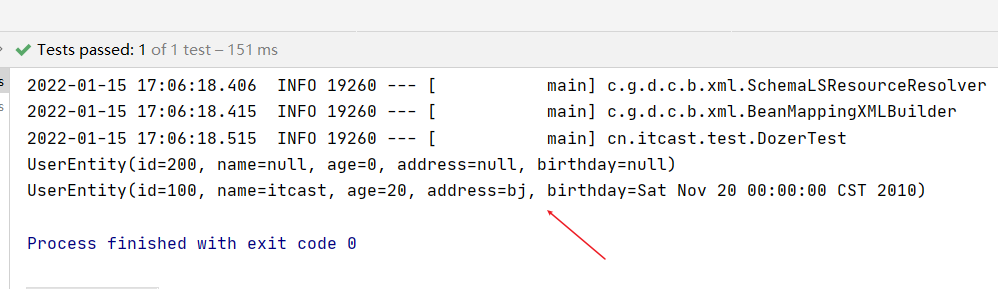
@Testpublic void testDozer2(){UserDTO userDTO = new UserDTO();userDTO.setUserId("100");userDTO.setUserName("itcast");userDTO.setUserAge(20);userDTO.setAddress("bj");userDTO.setBirthday("2010-11-20");UserEntity user = new UserEntity();user.setId("200");System.out.println(user);// 调用map方法进行复制后,user对象的值会被覆盖mapper.map(userDTO, user);System.out.println(user);}
我们发现,调用map方法进行复制后,user对象的值会被覆盖
我们想要使用在biz.dozer映射文件中具体的某个map-id的配置,如此处我们使用map-id为user的映射配置
我们在map方法中添加第三个参数指定map-id即可
// 使用我们映射文件中的map—id为user的配置
mapper.map(userDTO, user, "user");
3.定制starter
我们在实际的项目中可以将dozer的配置定制为一个starter,之后在我们的项目中直接引入即可。
1.首先我们新建一个maven项目,并命名为pd-tools-dozer,引入dozer依赖,具体pom.xml文件如下:
<?xml version="1.0" encoding="UTF-8"?>
<project xmlns="http://maven.apache.org/POM/4.0.0"xmlns:xsi="http://www.w3.org/2001/XMLSchema-instance"xsi:schemaLocation="http://maven.apache.org/POM/4.0.0 http://maven.apache.org/xsd/maven-4.0.0.xsd"><modelVersion>4.0.0</modelVersion><parent><groupId>org.springframework.boot</groupId><artifactId>spring-boot-starter-parent</artifactId><version>2.2.2.RELEASE</version><relativePath/></parent><groupId>cn.itcast</groupId><artifactId>pd-tools-dozer</artifactId><version>1.0-SNAPSHOT</version><dependencies><!-- dozer --><dependency><groupId>com.github.dozermapper</groupId><artifactId>dozer-spring-boot-starter</artifactId><version>6.5.0</version></dependency></dependencies></project>
2.新建util包并在其包下新建一个工具类DozerUtils,使用Mapper对象进行操作,具体代码如下:
DozerUtils.java
package com.itheima.util;import com.github.dozermapper.core.Mapper;import java.util.Collection;
import java.util.Collections;
import java.util.List;
import java.util.Set;
import java.util.stream.Collectors;/*** DozerUtils 工具类**/
public class DozerUtils {private Mapper mapper;public DozerUtils(Mapper mapper) {this.mapper = mapper;}public Mapper getMapper() {return this.mapper;}/*** Constructs new instance of destinationClass and performs mapping between from source** @param source* @param destinationClass* @param <T>* @return*/public <T> T map(Object source, Class<T> destinationClass) {if (source == null) {return null;}return mapper.map(source, destinationClass);}public <T> T map2(Object source, Class<T> destinationClass) {if (source == null) {try {return destinationClass.newInstance();} catch (Exception e) {}}return mapper.map(source, destinationClass);}/*** Performs mapping between source and destination objects** @param source* @param destination*/public void map(Object source, Object destination) {if (source == null) {return;}mapper.map(source, destination);}/*** Constructs new instance of destinationClass and performs mapping between from source** @param source* @param destinationClass* @param mapId* @param <T>* @return*/public <T> T map(Object source, Class<T> destinationClass, String mapId) {if (source == null) {return null;}return mapper.map(source, destinationClass, mapId);}/*** Performs mapping between source and destination objects** @param source* @param destination* @param mapId*/public void map(Object source, Object destination, String mapId) {if (source == null) {return;}mapper.map(source, destination, mapId);}/*** 将集合转成集合* List<A> -->  List<B>** @param sourceList       源集合* @param destinationClass 待转类型* @param <T>* @return*/public <T, E> List<T> mapList(Collection<E> sourceList, Class<T> destinationClass) {return mapPage(sourceList, destinationClass);}public <T, E> List<T> mapPage(Collection<E> sourceList, Class<T> destinationClass) {if (sourceList == null || sourceList.isEmpty() || destinationClass == null) {return Collections.emptyList();}List<T> destinationList = sourceList.stream().filter(item -> item != null).map((sourceObject) -> mapper.map(sourceObject, destinationClass)).collect(Collectors.toList());return destinationList;}public <T, E> Set<T> mapSet(Collection<E> sourceList, Class<T> destinationClass) {if (sourceList == null || sourceList.isEmpty() || destinationClass == null) {return Collections.emptySet();}return sourceList.stream().map((sourceObject) -> mapper.map(sourceObject, destinationClass)).collect(Collectors.toSet());}
}
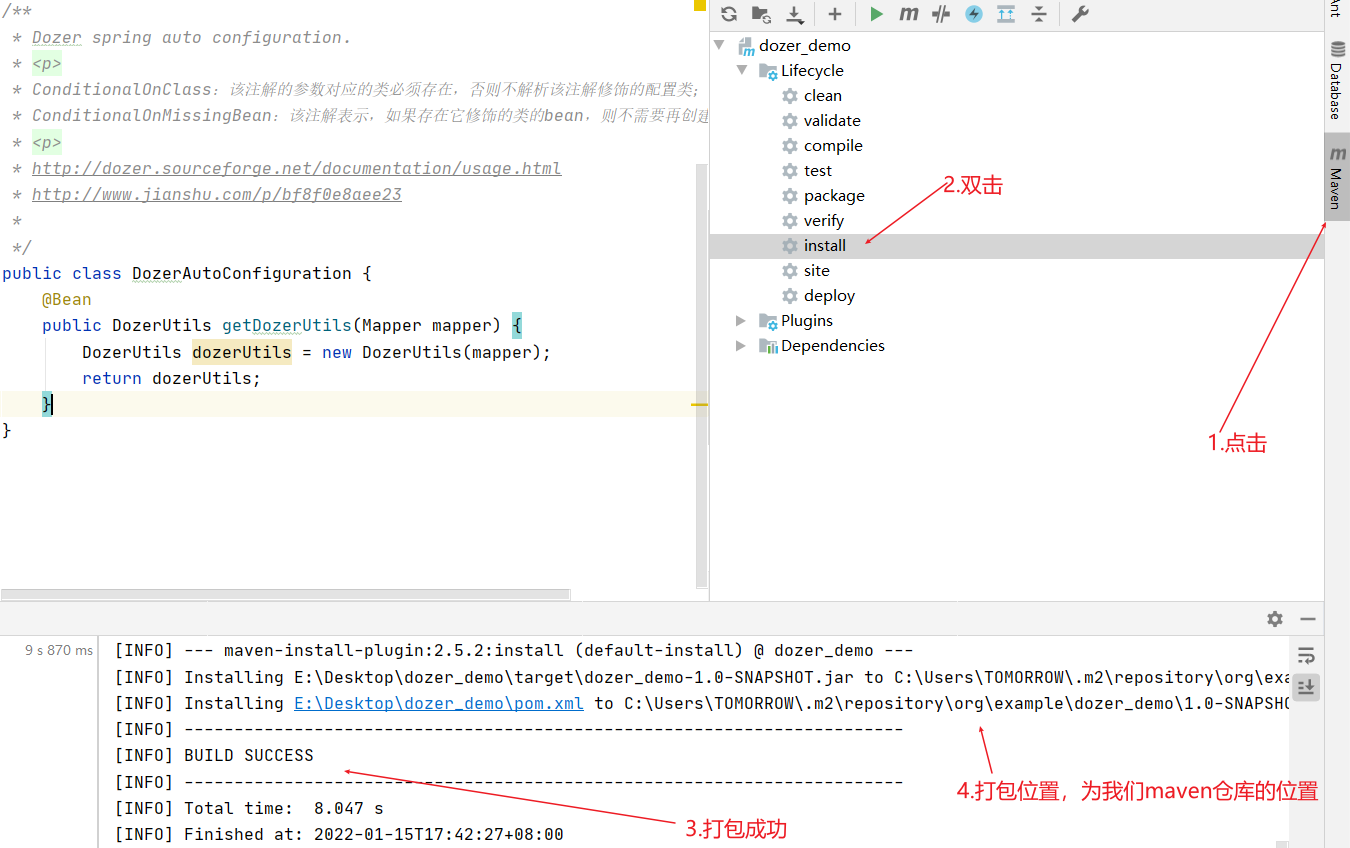
3.新建config包并在其包下新建DozerAutoConfiguration配置类,在配置类DozerAutoConfiguration中完成DozerUtils对象的创建,这样其他的程序如果需要使用dozer进行对象转换,只需要引入这个模块的maven坐标并且提供对应的映射文件就可以在程序中直接注入DozerUtils对象进行操作了。具体代码如下:
DozerAutoConfiguration.java
package com.itheima.config;import com.github.dozermapper.core.Mapper;
import com.itheima.util.DozerUtils;
import org.springframework.context.annotation.Bean;/*** Dozer spring auto configuration.* <p>* ConditionalOnClass:该注解的参数对应的类必须存在,否则不解析该注解修饰的配置类;* ConditionalOnMissingBean:该注解表示,如果存在它修饰的类的bean,则不需要再创建这个bean;* <p>* http://dozer.sourceforge.net/documentation/usage.html* http://www.jianshu.com/p/bf8f0e8aee23**/
public class DozerAutoConfiguration {@Beanpublic DozerUtils getDozerUtils(Mapper mapper) {DozerUtils dozerUtils = new DozerUtils(mapper);return dozerUtils;}
}
4.在resources目录下新建dozer全局配置文件 global.dozer.xml
global.dozer.xml
<?xml version="1.0" encoding="UTF-8"?>
<mappings xmlns:xsi="http://www.w3.org/2001/XMLSchema-instance"xmlns="http://dozermapper.github.io/schema/bean-mapping"xsi:schemaLocation="http://dozermapper.github.io/schema/bean-mapping http://dozermapper.github.io/schema/bean-mapping.xsd"><!--@see: http://www.jianshu.com/p/bf8f0e8aee23@see: http://blog.csdn.net/whhahyy/article/details/48594657全局配置:<date-format>表示日期格式<stop-on-errors>错误处理开关<wildcard>通配符<trim-strings>裁剪字符串开关--><configuration><date-format>yyyy-MM-dd HH:mm:ss</date-format></configuration>
</mappings>
5.按照Spring Boot starter的规范(没有starter基础的可以去看我的starter博客,点击前往)编写/resources/META-INF/spring.factories文件,内容如下:
org.springframework.boot.autoconfigure.EnableAutoConfiguration=\com.itheima.config.DozerAutoConfiguration
注:如果有多个配置,以英文逗号分隔即可
6.之后对该maven项目进行打包的操作,
4.使用starter
第一步:创建maven工程myDozerApp并配置pom.xml
<?xml version="1.0" encoding="UTF-8"?>
<project xmlns="http://maven.apache.org/POM/4.0.0"xmlns:xsi="http://www.w3.org/2001/XMLSchema-instance"xsi:schemaLocation="http://maven.apache.org/POM/4.0.0 http://maven.apache.org/xsd/maven-4.0.0.xsd"><modelVersion>4.0.0</modelVersion><parent><groupId>org.springframework.boot</groupId><artifactId>spring-boot-starter-parent</artifactId><version>2.2.2.RELEASE</version><relativePath/></parent><groupId>com.itheima</groupId><artifactId>myDozerApp</artifactId><version>1.0-SNAPSHOT</version><dependencies><!--引入我们自己定义的dozer基础模块--><dependency><groupId>com.itheima</groupId><artifactId>pd-tools-dozer</artifactId><version>1.0-SNAPSHOT</version></dependency><dependency><groupId>org.projectlombok</groupId><artifactId>lombok</artifactId></dependency><dependency><groupId>org.springframework.boot</groupId><artifactId>spring-boot-starter-web</artifactId></dependency></dependencies>
</project>
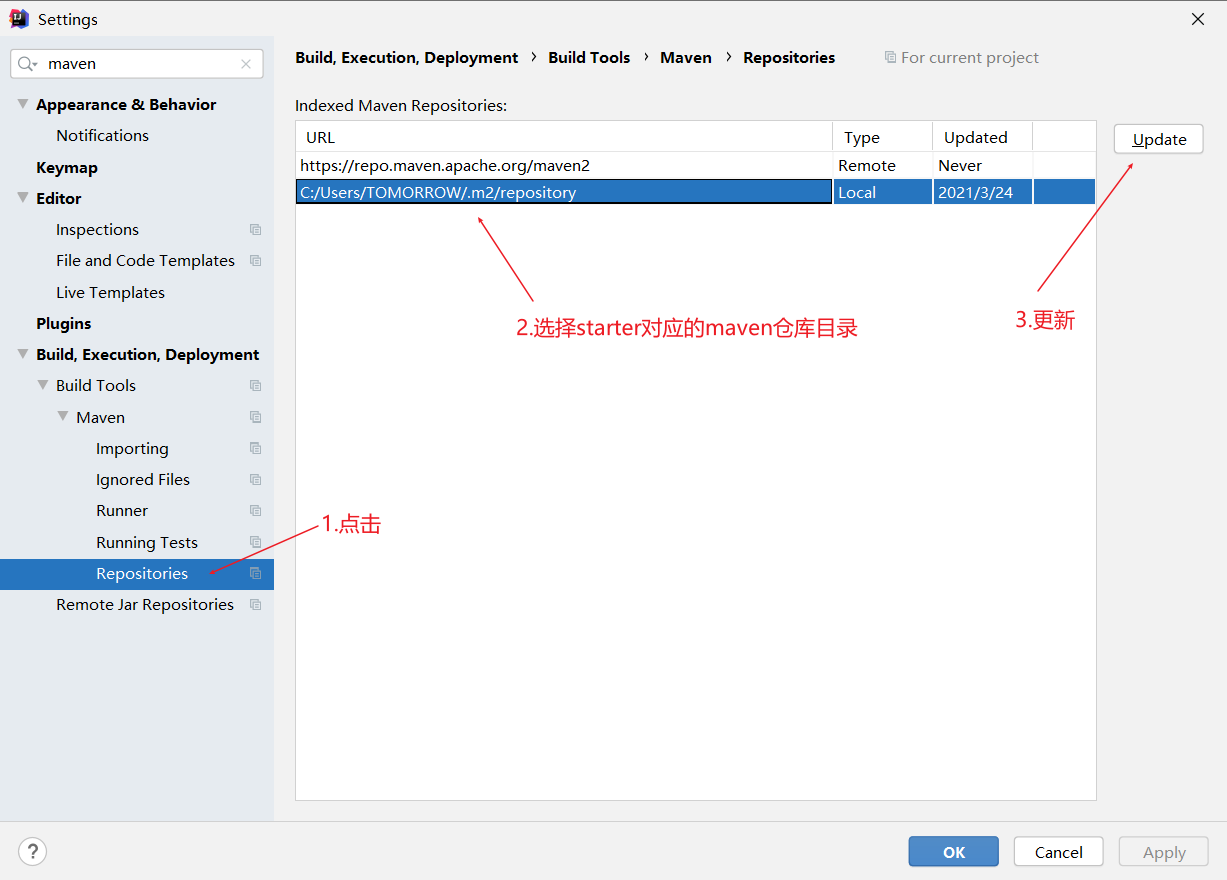
注意:为防止我们自定义的starter识别不到,我们需要更新一下maven仓库,
第二步:创建UserEntity和UserDTO
package com.itheima.entity;import lombok.Data;@Data
public class UserEntity {private Integer id;private String name;private int age;
}
package com.itheima.dto;import lombok.Data;@Data
public class UserDTO {private Integer id;private String name;private int age;
}
第三步:创建UserController
package com.itheima.controller;import com.itheima.dto.UserDTO;
import com.itheima.entity.UserEntity;
import com.itheima.util.DozerUtils;
import org.springframework.beans.factory.annotation.Autowired;
import org.springframework.web.bind.annotation.GetMapping;
import org.springframework.web.bind.annotation.RequestMapping;
import org.springframework.web.bind.annotation.RestController;@RestController
@RequestMapping("/user")
public class UserController {@Autowiredprivate DozerUtils dozerUtils; //在pd-tools-dozer中已经完成了自动配置,可以直接注入@GetMapping("/mapper")public UserEntity mapper(){UserDTO userDTO = new UserDTO();userDTO.setId(10);userDTO.setName("itcast");userDTO.setAge(20);UserEntity userEntity = dozerUtils.map(userDTO, UserEntity.class);return userEntity;}
}
第四步:创建application.yml
server:port: 8080
第五步:创建启动类
package com.itheima;import org.springframework.boot.SpringApplication;
import org.springframework.boot.autoconfigure.SpringBootApplication;@SpringBootApplication
public class MyDozerApplication {public static void main(String[] args) {SpringApplication.run(MyDozerApplication.class,args);}
}
启动项目,访问地址:http://localhost:8080/user/mapper ,我们发现dozer已经帮我们把UserDTO转换为了UserEntity

注意:由于当前我们创建的UserEntity和UserDTO中的属性完全一致,所以并没有提供映射文件,如果这两个类中的属性存在不一致的情况,需要创建映射文件进行映射,并且还需要在application.yml中配置映射文件的位置,例如:
dozer:mappingFiles:- classpath:dozer/biz.dozer.xml #指定dozer的映射文件位置
喜欢请关注我
至此,我们的Dozer的学习就讲解完毕了。喜欢我的话可以关注我的微信公众号 我爱学习呀嘻嘻 ,不定期分享各类资源哦。