matlab 代码:
[img,map]=imread(“/home/zhongjia/test.png”);
LOW_HIGH=stretchlim(img);
J=imadjust(img,[LOW_HIGH(1) LOW_HIGH(2)],[0 1],1);
imwrite(J,"/home/zhongjia/test_result.png");
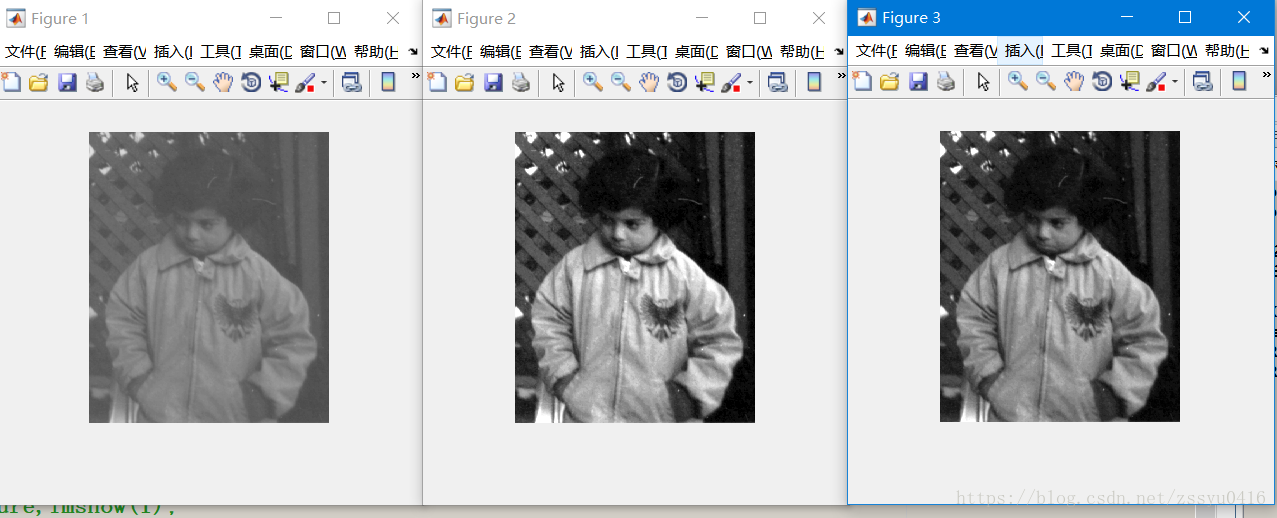
实现功能是:对16位深度1024*1024大小的test.png图像进行自适应灰度拉伸。
stretchlim函数是寻找最合适的阈值,imadjust函数是进行灰度变换。
python代码:
(1)实现stretchlim函数
matlab 的stretchlim函数默认是将累计像素点占整个像素点比例在0.01 ~0.99之间的像素值进行灰度变换,所以以下python代码仅仅实现stretchlim默认参数情况下的功能。
计算每个像素值的像素点数量,绘制像素值直方图,找到某个阈值满足该阈值以下累计像素点数量占整个像素点(1024*1024)的比例低于0.01的像素值A1、A2、A3……,A1<A2<A3,同时找到某个像素阈值以上累计像素点占比低于0.01的像素值B1、B2、B3……,B1<B2<B3……。以A3和B1作为imadjust函数灰度变换时映射的端点
import cv2
import numpy as np
import scipy
from scipy import misc
import matplotlib.pyplot as plt
def calcGrayHist(I):
# 计算灰度直方图
h, w = I.shape[:2]
#grayHist = np.zeros([256], np.uint64)
grayHist = np.zeros([65536], np.uint64)
for i in range(h):
for j in range(w):
grayHist[I[i][j]] += 1
return grayHist
img = cv2.imread('/home/zhongjia/plasmabubble/example_wk/plasma_bubble_20130929-30/20130929195902_gpi408_3_6300_180000_B1_G3.png.raw.png',2)
plt.figure()
plt.imshow(img,cmap='Greys_r')
total_pixels = img.shape[0]*img.shape[1]
print(total_pixels)
grayHist = calcGrayHist(img)
sum = np.zeros([65536],np.uint64)
for i in range(65536):
sum[i] = np.sum(grayHist[0:i+1])
print(sum)
cdf = np.zeros([65536],np.uint64)
cdf = sum/total_pixels
min_pix = np.where(cdf < 0.01)
max_pix = np.where(cdf >= 1 - 0.01)
img_copy = img.copy()
img_copy = np.rot90(img_copy,-1)# 顺时针旋转90度,np.rot90(img, -1) 顺时针旋转90度
cv2.imwrite('pre_test.png',img_copy)
plt.figure()
plt.imshow(img_copy,cmap='Greys_r')
结果:


再实现imadjust函数:
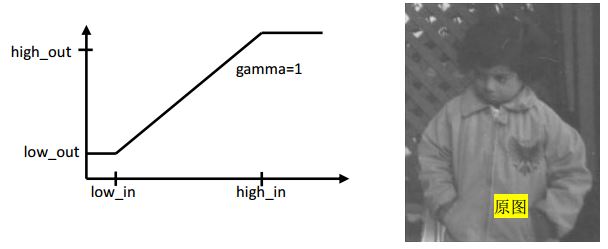
matlab imadjust函数如下:

这个部分代码是将前面找到的阈值端点A3和B1输入到imadjust函数中,进行图像灰度拉伸。使得A3以下的像素值最后映射结果和A3映射结果相同,B1以上像素值映射结果和B1映射结果相同,从而将占比更大累计像素点的A3~B1像素值映射到新的像素空间。
import cv2
import numpy as np
import scipy
from scipy import misc
import matplotlib.pyplot as plt
def imadjust(img, low_in, high_in, low_out, high_out, gamma, c):
#f = misc.imread(img).astype(np.int16)
#f = misc.imread(img,2).astype(np.uint16)
f = misc.imread(img,2)
print(f.shape,f.dtype,f,f.max())
plt.figure(1)
plt.imshow(f, cmap='gray')
plt.axis('off')
plt.title('原始图像')
plt.show()
w, h = f.shape
f1 = np.zeros([w, h])
# imadjust函数运算部分
for x in range(0, w):
for y in range(0, h):
if f[x, y] <= low_in:
f1[x, y] = low_out
elif f[x, y] >= high_in:
f1[x, y] = high_out
else:
f1[x, y] = c * (f[x, y]**gamma)
f1 = np.rot90(f1,-1)# 顺时针旋转90度,np.rot90(img, -1) 顺时针旋转90度
scipy.misc.imsave('figure2.png', f1)
plt.figure(2)
plt.imshow(f1, cmap='gray')
plt.axis('off')
plt.title('变换图像')
plt.show()
plt.figure(3)
f2 = np.abs(f-f1) #差值的绝对值
scipy.misc.imsave('figure3.png', f2)
plt.imshow(f2, cmap='gray')
plt.axis('off')
plt.title('差值图像')
plt.show()
imadjust('/home/zhongjia/plasmabubble/test.png', 740, 2218, 0, 255, 1, 1)


注意事项:
本文是在stretchlim函数和imadjust函数中都保留图片uint16位深度,并没用直接通过imread函数读取时,先转换为uint8位深度,再进行stretch和imadjust函数变换。
如果先通过imread函数默认读取,则自动将0-65535线性映射到0-255,如下测试代码:
import cv2 as cv
import numpy as np
import matplotlib.pyplot as plt
import math
import os
import glob
import shutil
import scipy
from scipy import misc
img = cv.imread("/home/zhongjia/aurora/2005/alread_format/N20050101G_F/N050101G03508.png",0)
print(img.dtype,img.min(),img.max(),img[300][200])
# img = np.array(img,dtype='uint16')
# print(img.dtype,img.min(),img.max(),img[60][200])
# img = np.array(img,dtype='uint8')
# print(img.dtype,img.min(),img.max(),img[60][200])
img = cv.imread("/home/zhongjia/aurora/2005/alread_format/N20050101G_F/N050101G03508.png",2)
print(img.dtype,img.min(),img.max(),img[300][200])
输出结果: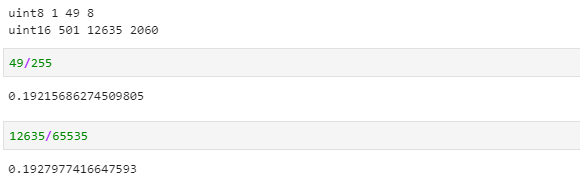
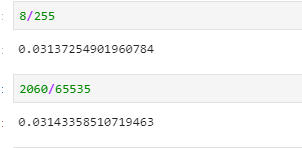
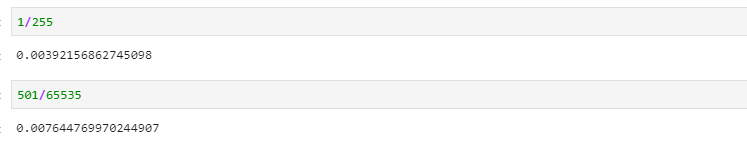
从保留两位小数看,确实imread函数读取uint16位图时(0~65535),若取深度uint8,则压缩到0~255
压缩了像素值空间,有可能导致如下问题:原来像素空间里面,累积像素点占比0.01的阈值端点精确阈值是A3和B1,在新的像素空间里面,累计像素点占比0.01的点不是精确的两个阈值点,因为像素空间分辨率降低了,从65536到256,每个像素值对应的点变多了。所以原来A3阈值映射到新空间是0,B1映射到255,而现在可能是C3映射到新空间的0,D1映射到255。
我们看一下先转换uint8时,再进行后续操作的结果: