第一章 Reactive Stream
第1节 jdk9的响应式流
就是reactive stream,也就是flow。其实和jdk8的stream没有一点关系。说白了就一个发布-订阅模式,一共只有4个接口,3个对象,非常简单清晰。
什么是背压?
背压是指订阅者能和发布者交互(通过代码里面的调用request和cancel方法交互),可以调节发布者发布数据的速率,解决把订阅者压垮的问题。关键在于上面例子里面的订阅关系Subscription这个接口,他有request和cancel 2个方法,用于通知发布者需要数据和通知发布者不再接受数据。
我们重点理解背压在jdk9里面是如何实现的。关键在于发布者Publisher的实现类SubmissionPublisher的submit方法是block方法。订阅者会有一个缓冲池,默认为Flow.defaultBufferSize() = 256。当订阅者的缓冲池满了之后,发布者调用submit方法发布数据就会被阻塞,发布者就会停(慢)下来;订阅者消费了数据之后(调用Subscription.request方法),缓冲池有位置了,submit方法就会继续执行下去,就是通过这样的机制,实现了调节发布者发布数据的速率,消费得快,生成就快,消费得慢,发布者就会被阻塞,当然就会慢下来了。
怎么样实现发布者和多个订阅者之间的阻塞和同步呢?使用的jdk7的Fork/Join的ManagedBlocker,有兴趣的请自己查找相关资料。
如何使用Flow Api代码示例
自定义 Processer(中间处理器,相当于是发布者的同时又是订阅者)代码示例
package jdk9;/*** 带 process 的 flow demo*/import java.util.concurrent.Flow;
import java.util.concurrent.SubmissionPublisher;/*** Processor, 需要继承SubmissionPublisher并实现Processor接口** 输入源数据 integer, 过滤掉小于0的, 然后转换成字符串发布出去*/
class MyProcessor extends SubmissionPublisher<String>implements Flow.Processor<Integer, String> {private Flow.Subscription subscription;@Overridepublic void onSubscribe(Flow.Subscription subscription) {// 保存订阅关系, 需要用它来给发布者响应this.subscription = subscription;// 请求一个数据this.subscription.request(1);}@Overridepublic void onNext(Integer item) {// 接受到一个数据, 处理System.out.println("处理器接受到数据: " + item);// 过滤掉小于0的, 然后发布出去if (item > 0) {this.submit("转换后的数据:" + item);}// 处理完调用request再请求一个数据this.subscription.request(1);// 或者 已经达到了目标, 调用cancel告诉发布者不再接受数据了// this.subscription.cancel();}@Overridepublic void onError(Throwable throwable) {// 出现了异常(例如处理数据的时候产生了异常)throwable.printStackTrace();// 我们可以告诉发布者, 后面不接受数据了this.subscription.cancel();}@Overridepublic void onComplete() {// 全部数据处理完了(发布者关闭了)System.out.println("处理器处理完了!");// 关闭发布者this.close();}
}public class FlowDemo2 {public static void main(String[] args) throws Exception {// 1. 定义发布者, 发布的数据类型是 Integer// 直接使用jdk自带的SubmissionPublisherSubmissionPublisher<Integer> publisher = new SubmissionPublisher<>();// 2. 定义处理器, 对数据进行过滤, 并转换为String类型MyProcessor processor = new MyProcessor();// 3. 发布者 和 处理器 建立订阅关系publisher.subscribe(processor);// 4. 定义最终订阅者, 消费 String 类型数据Flow.Subscriber<String> subscriber = new Flow.Subscriber<>() {private Flow.Subscription subscription;@Overridepublic void onSubscribe(Flow.Subscription subscription) {// 保存订阅关系, 需要用它来给发布者响应this.subscription = subscription;// 请求一个数据this.subscription.request(1);}@Overridepublic void onNext(String item) {// 接受到一个数据, 处理System.out.println("接受到数据: " + item);// 处理完调用request再请求一个数据this.subscription.request(1);// 或者 已经达到了目标, 调用cancel告诉发布者不再接受数据了// this.subscription.cancel();}@Overridepublic void onError(Throwable throwable) {// 出现了异常(例如处理数据的时候产生了异常)throwable.printStackTrace();// 我们可以告诉发布者, 后面不接受数据了this.subscription.cancel();}@Overridepublic void onComplete() {// 全部数据处理完了(发布者关闭了)System.out.println("处理完了!");}};// 5. 处理器 和 最终订阅者 建立订阅关系processor.subscribe(subscriber);// 6. 生产数据, 并发布// 这里忽略数据生产过程publisher.submit(-111);publisher.submit(111);// 7. 结束后 关闭发布者// 正式环境 应该放 finally 或者使用 try-resouce 确保关闭publisher.close();// 主线程延迟停止, 否则数据没有消费就退出Thread.currentThread().join(1000);}}
发布者生产的数据会存储到默认缓冲池的数组中发送给订阅者,默认缓冲池是256个长度,当缓冲区满了而订阅者还没来的及处理数据时,发布者就会被block(阻塞)而停止生产数据,直到订阅者消费完缓冲区中的数据而产生空位时发布者才会重新生成新的数据
第二章 Spring WebFlux
第1节 初识Spring WebFlux
Spring WebFlux 是 Spring Framework 5.0中引入的新的响应式web框架。与Spring MVC不同,它不需要Servlet API,是完全异步且非阻塞的,并且通过Reactor项目实现了Reactive Streams规范。
Spring WebFlux 用于创建基于事件循环执行模型的完全异步且非阻塞的应用程序。
(PS:所谓异步非阻塞是针对服务端而言的,是说服务端可以充分利用CPU资源去做更多事情,这与客户端无关,客户端该怎么请求还是怎么请求。)
Reactive Streams是一套用于构建高吞吐量、低延迟应用的规范。而Reactor项目是基于这套规范的实现,它是一个完全非阻塞的基础,且支持背压。Spring WebFlux基于Reactor实现了完全异步非阻塞的一套web框架,是一套响应式堆栈。
【spring-webmvc + Servlet + Tomcat】命令式的、同步阻塞的
【spring-webflux + Reactor + Netty】响应式的、异步非阻塞的
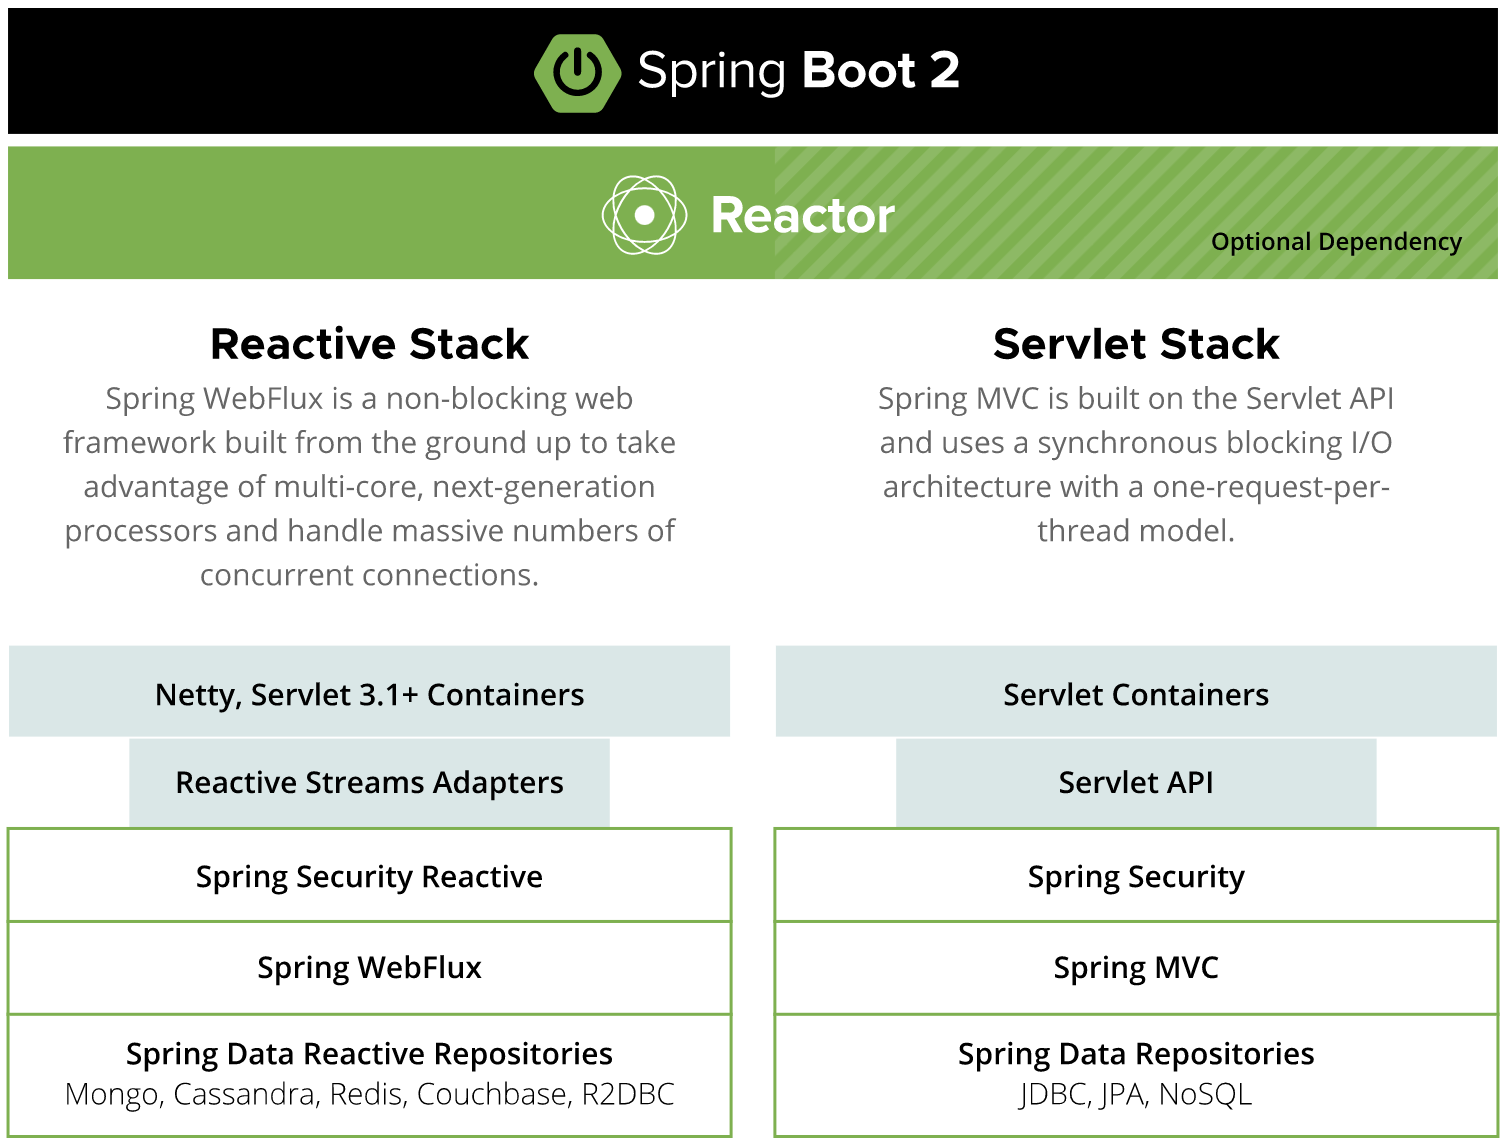
上面的基础和原理掌握之后,学习webflux就水到渠成了!webflux的关键是自己编写的代码里面返回流(Flux/Mono),spring框架来负责处理订阅。 spring框架提供2种开发模式来编写响应式代码,使用mvc之前的注解模式和使用router function模式,都需要我们的代码返回流,spring的响应式数据库spring data jpa,如使用mongodb,也是返回流,订阅都需要交给框架,自己不能订阅。而编写响应式代码之前,我们还需要了解2个重要的概念,就是异步servlet和SSE。
关于WebFlux和Mvc性能对比参考
https://blog.csdn.net/m0_46413295/article/details/106634819
第2节 异步servlet
学习异步servlet我们最重要的了解同步servlet阻塞了什么?为什么需要异步servlet?异步servlet能支持高吞吐量的原理是什么?
servlet容器(如tomcat)里面,每处理一个请求会占用一个线程,同步servlet里面,业务代码处理多久,servlet容器的线程就会等(阻塞)多久,而servlet容器的线程是由上限的,当请求多了的时候servlet容器线程就会全部用完,就无法再处理请求(这个时候请求可能排队也可能丢弃,得看如何配置),就会限制了应用的吞吐量!
而异步serlvet里面,servlet容器的线程不会傻等业务代码处理完毕,而是直接返回(继续处理其他请求),给业务代码一个回调函数(asyncContext.complete()),业务代码处理完了再通知我!这样就可以使用少量的线程处理更加高的请求,从而实现高吞吐量!
同步servlet代码示例:(我们需要新建一个webapplication项目且不需要创建web.xml,并且需要配置tomcat进行启动)
package servlet3;import javax.servlet.ServletException;
import javax.servlet.annotation.WebServlet;
import javax.servlet.http.HttpServlet;
import javax.servlet.http.HttpServletRequest;
import javax.servlet.http.HttpServletResponse;
import java.io.IOException;
import java.util.concurrent.TimeUnit;@WebServlet(name = "SyncServlet", urlPatterns="/SyncServlet")
public class SyncServlet extends HttpServlet {protected void doPost(HttpServletRequest request, HttpServletResponse response)throws ServletException, IOException {}protected void doGet(HttpServletRequest request, HttpServletResponse response)throws ServletException, IOException {long t1 = System.currentTimeMillis();// 执行业务代码doSomeTing(request, response);System.out.println("sync use:" + (System.currentTimeMillis() - t1));}private void doSomeTing(HttpServletRequest request, HttpServletResponse response) throws IOException {// 模拟耗时操作try {TimeUnit.SECONDS.sleep(5);} catch (InterruptedException e) {e.printStackTrace();}response.getWriter().append("done");}
}
异步servlet代码示例:
package servlet3;import javax.servlet.AsyncContext;
import javax.servlet.ServletException;
import javax.servlet.ServletRequest;
import javax.servlet.ServletResponse;
import javax.servlet.annotation.WebServlet;
import javax.servlet.http.HttpServlet;
import javax.servlet.http.HttpServletRequest;
import javax.servlet.http.HttpServletResponse;
import java.io.IOException;
import java.util.concurrent.CompletableFuture;
import java.util.concurrent.TimeUnit;@WebServlet(name = "AsyncServlet", urlPatterns = "/AsyncServlet", asyncSupported = true)
public class AsyncServlet extends HttpServlet {protected void doPost(HttpServletRequest request, HttpServletResponse response)throws ServletException, IOException {}protected void doGet(HttpServletRequest request, HttpServletResponse response)throws ServletException, IOException {long t1 = System.currentTimeMillis();// 1.开启异步AsyncContext asyncContext = request.startAsync();// 2.把我们要执行的代码放到一个独立的线程中,多线程/线程池CompletableFuture.runAsync(() ->// 执行业务代码{try {doSomeTing(asyncContext, asyncContext.getRequest(), asyncContext.getResponse());} catch (IOException e) {e.printStackTrace();}});System.out.println("async use:" + (System.currentTimeMillis() - t1));}private void doSomeTing(AsyncContext asyncContext, ServletRequest request, ServletResponse response) throws IOException {// 模拟耗时操作try {TimeUnit.SECONDS.sleep(5);} catch (InterruptedException e) {e.printStackTrace();}response.getWriter().append("async done");// 3.业务代码处理完毕,通知结束asyncContext.complete();}
}
运行上面代码,业务代码花了5秒,但servlet容器的线程几乎没有任何耗时。而如果是同步servlet的,线程就会傻等5秒,这5秒内这个线程只处理了这一个请求/。
异步servlet在处理耗时任务时会立马执行完成并且将任务放到另一个线程中去运行,这样我们的这个servlet主线程就不会被阻塞从而能够去执行其他的任务
第3节 webflux开发
我们使用Spring Initionlizer创建一个spring boot项目,并且勾选 Spring Reactive Web 和 lombok插件,创建后 pom.xml 如下:
<?xml version="1.0" encoding="UTF-8"?>
<project xmlns="http://maven.apache.org/POM/4.0.0" xmlns:xsi="http://www.w3.org/2001/XMLSchema-instance"xsi:schemaLocation="http://maven.apache.org/POM/4.0.0 https://maven.apache.org/xsd/maven-4.0.0.xsd"><modelVersion>4.0.0</modelVersion><parent><groupId>org.springframework.boot</groupId><artifactId>spring-boot-starter-parent</artifactId><version>2.4.5</version><relativePath/> <!-- lookup parent from repository --></parent><groupId>cn.ayulong</groupId><artifactId>flux</artifactId><version>0.0.1-SNAPSHOT</version><name>flux</name><description>Demo project for Spring Boot</description><properties><java.version>11</java.version></properties><dependencies><dependency><groupId>org.springframework.boot</groupId><artifactId>spring-boot-starter-webflux</artifactId></dependency><dependency><groupId>org.projectlombok</groupId><artifactId>lombok</artifactId><optional>true</optional></dependency><dependency><groupId>org.springframework.boot</groupId><artifactId>spring-boot-starter-test</artifactId><scope>test</scope></dependency><dependency><groupId>io.projectreactor</groupId><artifactId>reactor-test</artifactId><scope>test</scope></dependency></dependencies><build><plugins><plugin><groupId>org.springframework.boot</groupId><artifactId>spring-boot-maven-plugin</artifactId><configuration><excludes><exclude><groupId>org.projectlombok</groupId><artifactId>lombok</artifactId></exclude></excludes></configuration></plugin></plugins></build></project>
先创建一个 ReactorDemo示例体验Flux 的使用(Flux和Mono只有元素个数的区别)
package cn.ayulong.flux.demo;import org.reactivestreams.Subscriber;
import org.reactivestreams.Subscription;
import reactor.core.publisher.Flux;
import reactor.util.context.Context;public class ReactorDemo {public static void main(String[] args) {// reactor = jdk8 stream + jdk9 reactive stream// Mono 0-1个元素// Flux 0-N个元素String[] strs = {"1", "2", "3"};// 2. 定义订阅者Subscriber<Integer> subscriber = new Subscriber<>() {private Subscription subscription;@Overridepublic void onSubscribe(Subscription subscription) {// 保存订阅关系,需要用它来给发布者响应this.subscription = subscription;// 请求一个数据this.subscription.request(1);}@Overridepublic void onNext(Integer item) {// 接受到一个数据,处理System.out.println("接收到数据:" + item);// 处理完调用request再请求一个数据this.subscription.request(1);// 或者已经达到了目标,调用cancel告诉发布者不再接受数据了// this.subscription.cancel()}@Overridepublic void onError(Throwable throwable) {// 出现了异常(例如处理数据的时候产生了异常)throwable.printStackTrace();// 我们可以告诉发布者,后面不接受数据了this.subscription.cancel();}@Overridepublic void onComplete() {// 全部数据处理完了(发布者关闭了)System.out.println("处理完了!");}};// 这里就是jdk8的streamFlux.fromArray(strs).map(Integer::parseInt)// 最终操作// 这里就是jdk9的响应式流(reactive stream).subscribe(subscriber);// 另外一种写法// 创建一个空的上下文对象Context context = Context.empty();// 这里就是jdk8的streamFlux.fromArray(strs).map(Integer::parseInt)// 最终操作// 这里就是jdk9的响应式流(reactive stream).subscribe(// 处理成功得到打印变量值item -> System.out.println("接收到数据:" + item),// 处理失败打印错误信息,相当于onErrorSystem.err::println,// 处理完成相当于onComplete() -> System.out.println("处理完了!"),// 这个参数我没弄懂是个啥,总之就是上下文context);}
}
然后新建一个TestController进行测试 Mono的使用
package cn.ayulong.flux.controller;import lombok.extern.slf4j.Slf4j;
import org.springframework.web.bind.annotation.GetMapping;
import org.springframework.web.bind.annotation.RestController;
import reactor.core.publisher.Mono;import java.util.concurrent.TimeUnit;@RestController
@Slf4j
public class TestController {@GetMapping("/1")private String get1() {log.info("get1 start");String result = createStr();log.info("get1 end");return result;}private String createStr() {try {TimeUnit.SECONDS.sleep(5);} catch (InterruptedException e) {e.printStackTrace();}return "some thing";}@GetMapping("/2")private Mono<String> get2() {log.info("get2 start");// 如果直接使用just方法那么它的线程耗时和get1结果一样,等到方法执行结束后才结束// Mono<String> result = Mono.just(createStr());// 注意需要使用流编程模式,惰性求值,实现异步Mono<String> result = Mono.fromSupplier(this::createStr);log.info("get2 end");return result;}
}
在Controller中添加以下方法测试Flux 的使用
 /*** Flux 返回 1-N个元素* produces = "text/event-stream" 设置后像流一样返回数据,不设置就会一次全部返回* @return*/
//    @GetMapping(value = "/3", produces = "text/event-stream")@GetMapping(value = "/3", produces = MediaType.TEXT_EVENT_STREAM_VALUE)private Flux<String> get3() {log.info("get3 start");Flux<String> result = Flux.fromStream(IntStream.range(1, 5).mapToObj(i -> {try {TimeUnit.SECONDS.sleep(1);} catch (InterruptedException e) {e.printStackTrace();}return "flux data--" + i;}));log.info("get3 end");return result;}
第4节 SSE(Server-Sent Events)
响应式流里面,可以多次返回数据(其实和响应式没有关系),使用的技术就是H5的SSE。我们学习技术,API的使用只是最初级也是最简单的,更加重要的是需要知其然并知其所以然,否则你只能死记硬背不用就忘!我们不满足在spring里面能实现sse效果,更加需要知道spring是如何做到的。其实SSE很简单,我们花一点点时间就可以掌握,我们在纯servlet环境里面实现。我们看代码,这里一个最简单的示例。
package servlet3;import javax.servlet.ServletException;
import javax.servlet.annotation.WebServlet;
import javax.servlet.http.HttpServlet;
import javax.servlet.http.HttpServletRequest;
import javax.servlet.http.HttpServletResponse;
import java.io.IOException;
import java.util.concurrent.TimeUnit;@WebServlet(name = "SSE", urlPatterns = "/SSE")
public class SSE extends HttpServlet {protected void doPost(HttpServletRequest request, HttpServletResponse response)throws ServletException, IOException {doGet(request, response);}protected void doGet(HttpServletRequest request, HttpServletResponse response)throws ServletException, IOException {response.setContentType("text/event-stream");response.setCharacterEncoding("utf-8");for (int i = 0; i < 5; i++) {// 指定事件标识response.getWriter().write("event:me\n");// 格式:data: + 数据 + 2个回车response.getWriter().write("data:" + i + "\n\n");response.getWriter().flush();try {TimeUnit.SECONDS.sleep(1);} catch (InterruptedException e) {e.printStackTrace();}}}
}
关键是ContentType 是 "text/event-stream",然后返回的数据有固定的要求格式即可。
如果我们想要在前端接受和使用事件流,可以使用以下方式
<!DOCTYPE html>
<html lang="en">
<head><meta charset="UTF-8"><title>Title</title>
</head>
<body>
<script type="text/javascript">// 初始化,参数为url// 依赖H5var sse = new EventSource("SSE")// 监听消息并打印sse.onmessage = function (evt) {console.log("message", evt.data, evt)}// 如果指定了事件标识需要用这种方式来进行监听事件流sse.addEventListener("me", function (evt) {console.log("me event", evt.data)// 事件流如果不关闭会自动刷新请求,所以我们需要根据条件手动关闭if (evt.data == 3) {sse.close()}})
</script>
</body>
</html>
使用场景:服务器向客户端推送数据,例如聊天室
第三章 WebFlux完整案例
第1节 环境搭建
这里我们继续使用上节课的 flux项目
- 添加mongodb-reactive依赖
<dependency><groupId>org.springframework.boot</groupId><artifactId>spring-boot-starter-data-mongodb-reactive</artifactId>
</dependency>
- 添加mongodb注解
@SpringBootApplication
// 设置开启mongodb响应式存储
@EnableReactiveMongoRepositories
public class FluxApplication {public static void main(String[] args) {SpringApplication.run(FluxApplication.class, args);}}
- 添加user对象(对应mongodb的collection)
package cn.ayulong.flux.domain;import lombok.Data;
import org.springframework.data.annotation.Id;
import org.springframework.data.mongodb.core.mapping.Document;@Document(collection = "user")
@Data
public class User {@Idprivate String id;private String name;private int age;
}
- 新建user的数据库操作对象UserRepository
package cn.ayulong.flux.repository;import cn.ayulong.flux.domain.User;
import org.springframework.data.mongodb.repository.ReactiveMongoRepository;
import org.springframework.stereotype.Repository;@Repository
public interface UserRepository extends ReactiveMongoRepository<User, String> {}
- 新建controller
package cn.ayulong.flux.controller;import cn.ayulong.flux.domain.User;
import cn.ayulong.flux.repository.UserRepository;
import org.springframework.http.MediaType;
import org.springframework.web.bind.annotation.GetMapping;
import org.springframework.web.bind.annotation.RequestMapping;
import org.springframework.web.bind.annotation.RestController;
import reactor.core.publisher.Flux;@RestController
@RequestMapping("/user")
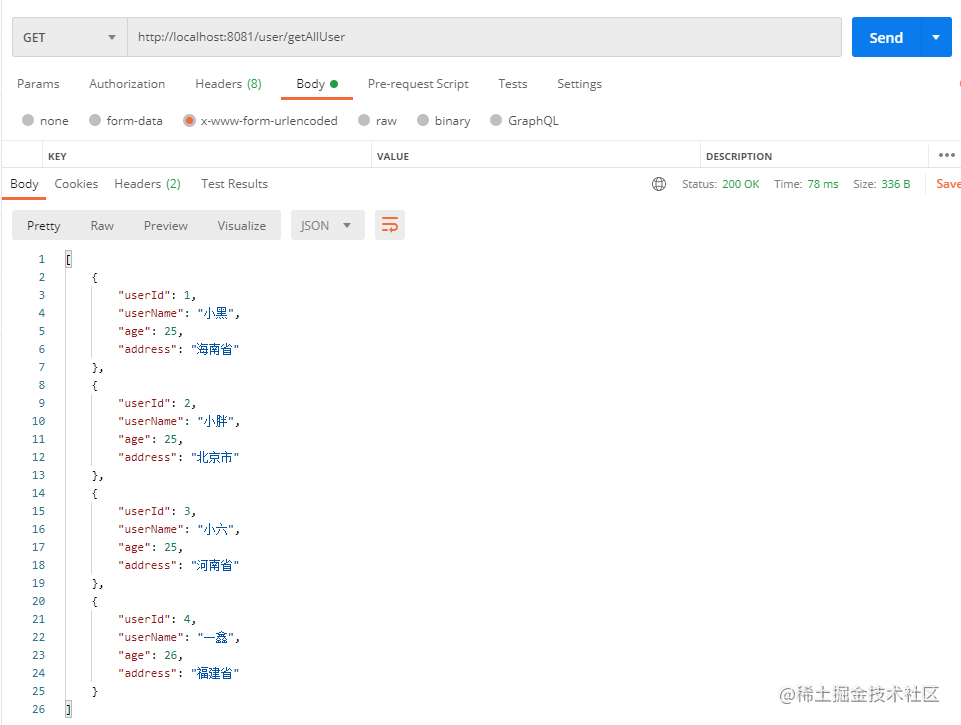
public class UserController {private final UserRepository userRepository;/*** 构造函数的方式注入(官方推荐,降低耦合)*/public UserController(UserRepository userRepository) {this.userRepository = userRepository;}@GetMapping("/")public Flux<User> getAll() {return userRepository.findAll();}/*** 推荐新增另一个相同的方法通过流的方式获取数据* @return*/@GetMapping(value = "/stream/all", produces = MediaType.TEXT_EVENT_STREAM_VALUE)public Flux<User> streamGetAll() {return userRepository.findAll();}}
- 安装和启动mongodb
点击安装mongodb
安装教程
第2节 CRUD
package cn.ayulong.flux.controller;import cn.ayulong.flux.domain.User;
import cn.ayulong.flux.repository.UserRepository;
import org.springframework.http.HttpStatus;
import org.springframework.http.MediaType;
import org.springframework.http.ResponseEntity;
import org.springframework.web.bind.annotation.*;
import reactor.core.publisher.Flux;
import reactor.core.publisher.Mono;@RestController
@RequestMapping("/user")
public class UserController {private final UserRepository userRepository;/*** 构造函数的方式注入(官方推荐,降低耦合)*/public UserController(UserRepository userRepository) {this.userRepository = userRepository;}/*** 以数组形式一次性返回数据* @return*/@GetMapping("/")public Flux<User> getAll() {return userRepository.findAll();}/*** 推荐当返回Flux时新增另一个相同的方法通过流的方式获取数据* 以SSE形式多次放回数据* @return*/@GetMapping(value = "/stream/all", produces = MediaType.TEXT_EVENT_STREAM_VALUE)public Flux<User> streamGetAll() {return userRepository.findAll();}/*** 新增数据* @param user* @return*/@PostMapping("/")public Mono<User> createUser(@RequestBody User user) {// spring data jpa里面,新增和修改都是save,有id是修改,id为空时新增// 根据实际情况是否置空iduser.setId(null);return this.userRepository.save(user);}/*** 根据id删除用户* 存在的时候返回200,不存在返回404* @param id* @return*/@DeleteMapping("/{id}")public Mono<ResponseEntity<Void>> deleteUser(@PathVariable("id") String id) {// deleteById 没有返回值,不能判断数据是否存在// this.userRepository.deleteById(id);return this.userRepository.findById(id)// 当你要操作数据,并返回一个Mono,这个时候使用flatMap// 如果不操作数据,只是转换数据,使用map.flatMap(user -> this.userRepository.delete(user).then(Mono.just(new ResponseEntity<Void>(HttpStatus.OK)))).defaultIfEmpty(new ResponseEntity<>(HttpStatus.NOT_FOUND));}/*** 修改数据* 存在的时候返回200和修改后的数据,不存在的时候返回404* @param id* @param user* @return*/@PutMapping("/{id}")public Mono<ResponseEntity<User>> updateUser(@PathVariable("id") String id,@RequestBody User user) {return this.userRepository.findById(id)// flatMap: 操作数据.flatMap(u -> {u.setAge(user.getAge());u.setName(user.getName());return this.userRepository.save(u);})// map: 转换数据.map(u -> new ResponseEntity<>(u, HttpStatus.OK)).defaultIfEmpty(new ResponseEntity<>(HttpStatus.NOT_FOUND));}/*** 根据ID查找用户* 存在返回用户信息,不存在返回404* @param id* @return*/@GetMapping("/{id}")public Mono<ResponseEntity<User>> findUser(@PathVariable("id") String id) {return this.userRepository.findById(id).map(u -> new ResponseEntity<>(u, HttpStatus.OK)).defaultIfEmpty(new ResponseEntity<>(HttpStatus.NOT_FOUND));}/*** 根据年龄查找用户* @param start* @param end* @return*/@GetMapping("/age/{start}/{end}")public Flux<User> findByAge(@PathVariable("start") int start,@PathVariable("end") int end) {return this.userRepository.findByAgeBetween(start, end);}}
第3节 mongodb jpa
修改UserRepository,
package cn.ayulong.flux.repository;import cn.ayulong.flux.domain.User;
import org.springframework.data.mongodb.repository.Query;
import org.springframework.data.mongodb.repository.ReactiveMongoRepository;
import org.springframework.stereotype.Repository;
import reactor.core.publisher.Flux;@Repository
public interface UserRepository extends ReactiveMongoRepository<User, String> {/*** 根据年龄查找用户* @param start* @param end* @return*/Flux<User> findByAgeBetween(int start, int end);/*** 使用查询语句查询20-30岁的用户* @return*/@Query("{'age':{'$gte':20, '$lte':30}}")Flux<User> oldUser();
}
在 UserController中添加以下方法
/*** 根据年龄查找用户* @param start* @param end* @return*/
@GetMapping("/age/{start}/{end}")
public Flux<User> findByAge(@PathVariable("start") int start,@PathVariable("end") int end
) {return this.userRepository.findByAgeBetween(start, end);
}/*** 根据年龄查找用户,以SSE形式多次放回数据* @param start* @param end* @return*/
@GetMapping(value = "/stream/age/{start}/{end}", produces = MediaType.TEXT_EVENT_STREAM_VALUE)
public Flux<User> streamFindByAge(@PathVariable("start") int start,@PathVariable("end") int end
) {return this.userRepository.findByAgeBetween(start, end);
}/*** 得到20-30岁用户* @return*/
@GetMapping(value = "/stream/old", produces = MediaType.TEXT_EVENT_STREAM_VALUE)
public Flux<User> streamOldUser() {return this.userRepository.oldUser();
}/*** 得到20-30岁用户,以SSE形式多次放回数据* @return*/
@GetMapping("/old")
public Flux<User> oldUser() {return this.userRepository.oldUser();
}
第4节 参数校验
首先,我们使用spring boot 集成的hibernate validation组件来进行字段校验
引入依赖:
<dependency><groupId>org.springframework.boot</groupId><artifactId>spring-boot-starter-validation</artifactId>
</dependency>
修改User实体类(这里我们就不多写别的传输类了)
package cn.ayulong.flux.domain;import lombok.Data;
import org.hibernate.validator.constraints.Range;
import org.springframework.data.annotation.Id;
import org.springframework.data.mongodb.core.mapping.Document;import javax.validation.constraints.NotBlank;@Document(collection = "user")
@Data
public class User {@Idprivate String id;@NotBlankprivate String name;@Range(min = 10, max = 50)private int age;
}
在用到 @RequestBody User user 的地方加上@Valid注解
/*** 新增数据* @param user* @return*/@PostMapping("/")public Mono<User> createUser(@Valid @RequestBody User user) {// 这里是代码}/*** 修改数据* 存在的时候返回200和修改后的数据,不存在的时候返回404* @param id* @param user* @return*/@PutMapping("/{id}")public Mono<ResponseEntity<User>> updateUser(@PathVariable("id") String id,@Valid @RequestBody User user) {// 这里是代码}
当校验错误时会抛出WebExchangeBindException异常,所以我们需要在advice包下新建一个异常处理切面,代码如下
package cn.ayulong.flux.advice;import cn.ayulong.flux.exception.CheckException;
import org.springframework.http.HttpStatus;
import org.springframework.http.ResponseEntity;
import org.springframework.web.bind.annotation.ControllerAdvice;
import org.springframework.web.bind.annotation.ExceptionHandler;
import org.springframework.web.bind.support.WebExchangeBindException;/*** 异常处理切面*/
@ControllerAdvice
public class CheckAdvice {@ExceptionHandler(WebExchangeBindException.class)public ResponseEntity handleBindException(WebExchangeBindException e) {return new ResponseEntity<>(toStr(e), HttpStatus.BAD_REQUEST);}/*** 把校验异常转换为字符串* @param ex* @return*/private String toStr(WebExchangeBindException ex) {return ex.getFieldErrors().stream().map(e -> e.getField() + ":" + e.getDefaultMessage()).reduce( (s1, s2) -> s1 + "\n" + s2).orElse("");}}
这样我们就能轻松校验字段是否合法了
另外如果我们需要其他的校验的话,例如敏感词屏蔽等等,我们就需要另外再做校验
我们先在exception包下自定义一个CheckException运行时异常,以便我们抛出自定义的错误
package cn.ayulong.flux.exception;import lombok.Data;@Data
public class CheckException extends RuntimeException {/*** 出错字段的名字*/private String fieldName;/*** 出错字段的值*/private String fieldValue;public CheckException() {super();}public CheckException(String message) {super(message);}public CheckException(String message, Throwable cause) {super(message, cause);}public CheckException(Throwable cause) {super(cause);}protected CheckException(String message, Throwable cause, boolean enableSuppression, boolean writableStackTrace) {super(message, cause, enableSuppression, writableStackTrace);}public CheckException(String fieldName, String fieldValue) {super();this.fieldName = fieldName;this.fieldValue = fieldValue;}
}
接着新建一个工具类 CheckUtil
package cn.ayulong.flux.util;import cn.ayulong.flux.exception.CheckException;import javax.naming.Name;
import java.util.stream.Stream;public class CheckUtil {private static final String[] INVALID_NAMES = {"admin", "guanliyuan"};/*** 校验名字,不成功抛出校验异常* @param value*/public static void checkName(String value) {Stream.of(INVALID_NAMES).filter(name -> name.equalsIgnoreCase(value)).findAny().ifPresent(name -> {throw new CheckException("name", value);});}
}
然后再在异常处理切面CheckAdvice中添加以下方法,用以拦截和处理我们自定义的异常
@ExceptionHandler(CheckException.class)
public ResponseEntity handleCheckException(CheckException e) {return new ResponseEntity<>(toStr(e), HttpStatus.BAD_REQUEST);
}private String toStr(CheckException e) {return e.getFieldName() + ":不合法的值->" + e.getFieldValue();
}
最后在需要校验的地方添加上CheckUtil的校验方法即可
代码示例:
/*** 新增数据* @param user* @return*/@PostMapping("/")public Mono<User> createUser(@Valid @RequestBody User user) {// 校验name字段CheckUtil.checkName(user.getName());// spring data jpa里面,新增和修改都是save,有id是修改,id为空时新增// 根据实X际情况是否置空iduser.setId(null);return this.userRepository.save(user);}/*** 修改数据* 存在的时候返回200和修改后的数据,不存在的时候返回404* @param id* @param user* @return*/@PutMapping("/{id}")public Mono<ResponseEntity<User>> updateUser(@PathVariable("id") String id,@Valid @RequestBody User user) {CheckUtil.checkName(user.getName());return this.userRepository.findById(id)// flatMap: 操作数据.flatMap(u -> {u.setAge(user.getAge());u.setName(user.getName());return this.userRepository.save(u);})// map: 转换数据.map(u -> new ResponseEntity<>(u, HttpStatus.OK)).defaultIfEmpty(new ResponseEntity<>(HttpStatus.NOT_FOUND));}
第四章 RouterFunction模式
webflux的另一种开发模式,和以前的Controller进行对应
HandlerFunction(输入ServerRequest返回ServerResponse)
-> RouterFunction(请求URL和HandlerFunction对应起来)
-> HttpHandler
-> Server处理
第1节 环境搭建
首先我们先新建一个新的springboot项目flux2,pom.xml如下:
<?xml version="1.0" encoding="UTF-8"?>
<project xmlns="http://maven.apache.org/POM/4.0.0" xmlns:xsi="http://www.w3.org/2001/XMLSchema-instance"xsi:schemaLocation="http://maven.apache.org/POM/4.0.0 https://maven.apache.org/xsd/maven-4.0.0.xsd"><modelVersion>4.0.0</modelVersion><parent><groupId>org.springframework.boot</groupId><artifactId>spring-boot-starter-parent</artifactId><version>2.4.5</version><relativePath/> <!-- lookup parent from repository --></parent><groupId>cn.ayulong</groupId><artifactId>flux2</artifactId><version>0.0.1-SNAPSHOT</version><name>flux2</name><description>Demo project for Spring Boot</description><properties><java.version>11</java.version></properties><dependencies><dependency><groupId>org.springframework.boot</groupId><artifactId>spring-boot-starter-data-mongodb-reactive</artifactId></dependency><dependency><groupId>org.springframework.boot</groupId><artifactId>spring-boot-starter-webflux</artifactId></dependency><dependency><groupId>org.springframework.boot</groupId><artifactId>spring-boot-starter-validation</artifactId></dependency><dependency><groupId>org.projectlombok</groupId><artifactId>lombok</artifactId><optional>true</optional></dependency><dependency><groupId>org.springframework.boot</groupId><artifactId>spring-boot-starter-test</artifactId><scope>test</scope></dependency><dependency><groupId>io.projectreactor</groupId><artifactId>reactor-test</artifactId><scope>test</scope></dependency></dependencies><build><plugins><plugin><groupId>org.springframework.boot</groupId><artifactId>spring-boot-maven-plugin</artifactId><configuration><excludes><exclude><groupId>org.projectlombok</groupId><artifactId>lombok</artifactId></exclude></excludes></configuration></plugin></plugins></build></project>
然后将flux项目中的repository和domain复制到本项目中
将application.properties也复制过来
之后新建一个handlers包,对应之前的controller
编写UserHandler
package cn.ayulong.flux2.handlers;import cn.ayulong.flux2.domain.User;
import cn.ayulong.flux2.repository.UserRepository;
import org.springframework.http.MediaType;
import org.springframework.stereotype.Component;
import org.springframework.web.reactive.function.server.ServerRequest;
import org.springframework.web.reactive.function.server.ServerResponse;
import reactor.core.publisher.Mono;@Component
public class UserHandler {private final UserRepository userRepository;public UserHandler(UserRepository userRepository) {this.userRepository = userRepository;}/*** 得到所有用户* @param request* @return*/public Mono<ServerResponse> getAllUser(ServerRequest request) {return ServerResponse.ok().contentType(MediaType.APPLICATION_JSON).body(this.userRepository.findAll(), User.class);}/*** 创建用户* @param request* @return*/public Mono<ServerResponse> createUser(ServerRequest request) {Mono<User> user = request.bodyToMono(User.class);return ServerResponse.ok().contentType(MediaType.APPLICATION_JSON).body(this.userRepository.saveAll(user), User.class);}/*** 根据id删除用户* @param request* @return*/public Mono<ServerResponse> deleteUserById(ServerRequest request) {String id = request.pathVariable("id");return this.userRepository.findById(id).flatMap(user -> this.userRepository.delete(user).then(ServerResponse.ok().build())).switchIfEmpty(ServerResponse.notFound().build());}
}
使用handler时所有方法返回对象和参数都相同
然后在routers包下编写路由类
package cn.ayulong.flux2.routers;import cn.ayulong.flux2.handlers.UserHandler;
import org.springframework.context.annotation.Bean;
import org.springframework.context.annotation.Configuration;
import org.springframework.http.MediaType;
import org.springframework.web.reactive.function.server.*;@Configuration
public class AllRouters {@BeanRouterFunction<ServerResponse> userRouter(UserHandler userHandler) {return RouterFunctions.nest(// 相当于类上面的@RequestMapping("/user")RequestPredicates.path("/user"),RouterFunctions// 相当于类里面的@GetMapping("/")// 得到所有用户.route(RequestPredicates.GET("/"),userHandler::getAllUser)// 创建用户.andRoute(RequestPredicates.POST("/").and(RequestPredicates.accept(MediaType.APPLICATION_JSON)),userHandler::createUser)// 删除用户.andRoute(RequestPredicates.DELETE("/{id}"),userHandler::deleteUserById));}
}
启动项目运行即可,我们只要把这种模式和Controller对比就能够比较快的理解了
第2节 参数验证
首先我们把flux项目中的util和exception包引入过来
然后类似@ControllerAdvice,我们可以编写一个错误拦截器来进行错误拦截和处理
在handlers包下新建ExceptionHandler
package cn.ayulong.flux2.handlers;import cn.ayulong.flux2.exception.CheckException;
import org.springframework.core.annotation.Order;
import org.springframework.core.io.buffer.DataBuffer;
import org.springframework.http.HttpStatus;
import org.springframework.http.MediaType;
import org.springframework.http.server.reactive.ServerHttpResponse;
import org.springframework.stereotype.Component;
import org.springframework.web.server.ServerWebExchange;
import org.springframework.web.server.WebExceptionHandler;
import reactor.core.publisher.Mono;@Component
// 设置优先级,最少要调到-2,否则不会工作,数值越小优先级越高
@Order(-2)
public class ExceptionHandler implements WebExceptionHandler {@Overridepublic Mono<Void> handle(ServerWebExchange exchange, Throwable ex) {ServerHttpResponse response = exchange.getResponse();// 设置响应头400response.setStatusCode(HttpStatus.BAD_REQUEST);// 设置返回类型response.getHeaders().setContentType(MediaType.TEXT_PLAIN);// 异常信息String errorMsg = toStr(ex);DataBuffer db = response.bufferFactory().wrap(errorMsg.getBytes());return response.writeWith(Mono.just(db));}private String toStr(Throwable ex) {// 已知异常if (ex instanceof CheckException) {CheckException e = (CheckException) ex;return e.getFieldName() + ":不合法的值->" + e.getFieldValue();} else {// 未知异常,需要打印堆栈,方便定位ex.printStackTrace();return ex.toString();}}
}
之后修改我们UserHandler中的方法,加入我们自定义的字段验证
/*** 创建用户* @param request* @return*/
public Mono<ServerResponse> createUser(ServerRequest request) {// 不能直接调用block返回user对象,这样做会阻塞当前线程Mono<User> user = request.bodyToMono(User.class);return user.flatMap(u -> {// 校验代码需要放在这里CheckUtil.checkName(u.getName());return ServerResponse.ok().contentType(MediaType.APPLICATION_JSON).body(this.userRepository.save(u), User.class);});
}
之后测试运行即可
第五章 WebClient框架开发
WebClient是从Spring WebFlux 5.0版本开始提供的一个非阻塞的基于响应式编程的进行Http请求的客户端工具。它的响应式编程的基于Reactor的。WebClient中提供了标准Http请求方式对应的get、post、put、delete等方法,可以用来发起相应的请求。
所以这节内容是基于WebClient自己编写一个类似于Feign或者Retrofit的框架
这节内容会比较难,所以我是抱着见识一下的心态来学习,所以只是跟着教程来做的,并没有太过于深究它的原理
第1节 测试环境搭建
我们先创建一个springboot工程 flux-client,pom.xml依赖如下:
<?xml version="1.0" encoding="UTF-8"?>
<project xmlns="http://maven.apache.org/POM/4.0.0" xmlns:xsi="http://www.w3.org/2001/XMLSchema-instance"xsi:schemaLocation="http://maven.apache.org/POM/4.0.0 https://maven.apache.org/xsd/maven-4.0.0.xsd"><modelVersion>4.0.0</modelVersion><parent><groupId>org.springframework.boot</groupId><artifactId>spring-boot-starter-parent</artifactId><version>2.4.5</version><relativePath/> <!-- lookup parent from repository --></parent><groupId>cn.ayulong</groupId><artifactId>flux-client</artifactId><version>0.0.1-SNAPSHOT</version><name>flux-client</name><description>Demo project for Spring Boot</description><properties><java.version>11</java.version></properties><dependencies><dependency><groupId>org.springframework.boot</groupId><artifactId>spring-boot-starter-webflux</artifactId></dependency><dependency><groupId>org.projectlombok</groupId><artifactId>lombok</artifactId><optional>true</optional></dependency><dependency><groupId>org.springframework.boot</groupId><artifactId>spring-boot-starter-test</artifactId><scope>test</scope></dependency><dependency><groupId>io.projectreactor</groupId><artifactId>reactor-test</artifactId><scope>test</scope></dependency></dependencies><build><plugins><plugin><groupId>org.springframework.boot</groupId><artifactId>spring-boot-maven-plugin</artifactId><configuration><excludes><exclude><groupId>org.projectlombok</groupId><artifactId>lombok</artifactId></exclude></excludes></configuration></plugin></plugins></build></project>
之后在domain包下新建User实体类
package cn.ayulong.fluxclient.domain;import lombok.AllArgsConstructor;
import lombok.Builder;
import lombok.Data;
import lombok.NoArgsConstructor;/*** 类名可以随意,字段需要保持一致*/
@Data
@Builder
@NoArgsConstructor
@AllArgsConstructor
public class User {private String id;private String name;private int age;
}
修改 application.properties
server.port=8081
在main/java的同一层新建main/ayu(随便起名)包,右键make as root
之后在下面新建和java下同样的层级,例如cn.ayulong.fluxclient,用于存放我们自己写的框架代码
然后在下面新建注解 @ApiServer,用于注入服务器相关信息
package cn.ayulong.fluxclient;import java.lang.annotation.ElementType;
import java.lang.annotation.Retention;
import java.lang.annotation.RetentionPolicy;
import java.lang.annotation.Target;/*** 服务器相关的信息*/
@Target(ElementType.TYPE)
@Retention(RetentionPolicy.RUNTIME)
public @interface ApiServer {String value() default "";
}
之后在main/java下的api包下新建 IUserApi
package cn.ayulong.fluxclient.api;import cn.ayulong.fluxclient.domain.User;
import cn.ayulong.fluxclient.ApiServer;
import org.springframework.web.bind.annotation.*;
import reactor.core.publisher.Flux;
import reactor.core.publisher.Mono;@ApiServer("http://localhost:8080/user")
public interface IUserApi {@GetMapping("/")Flux<User> getAllUser();@GetMapping("/{id}")Mono<User> getUserById(@PathVariable("id") String id);@DeleteMapping("/{id}")Mono<Void> deleteUserById(@PathVariable("id") String id);@PostMapping("/")Mono<User> createUser(@RequestBody Mono<User> user);
}
在main/java的controller下新建TestController
package cn.ayulong.fluxclient.controller;import cn.ayulong.fluxclient.api.IUserApi;
import cn.ayulong.fluxclient.domain.User;
import org.springframework.web.bind.annotation.GetMapping;
import org.springframework.web.bind.annotation.RestController;
import reactor.core.publisher.Flux;import javax.annotation.Resource;@RestController
public class TestController {// 直接注入定义的接口@ResourceIUserApi userApi;@GetMapping("/")public void test() {// 直接调用实现调用rest接口的效果Flux<User> users = userApi.getAllUser();users.subscribe(System.out::println);}
}
到这里我们之后测试用的环境就差不多了,但是现在还不能跑,我们还需要定义我们自己的调用框架
第2节 设计思路
程序 = 数据结构 + 算法
设计最重要的解耦
实现解耦最关键的是设计自己的数据结构 + 抽象接口
第3节 框架初步搭建
因为我是看完一集后才做的笔记,所以这里的顺序没有按照视频的来,而是按照类之间的依赖关系梳理的
我们在main/ayu下的beans包下新建我们需要用到的实体类
ServerInfo,用于存储服务器信息
package cn.ayulong.fluxclient.beans;import lombok.AllArgsConstructor;
import lombok.Builder;
import lombok.Data;
import lombok.NoArgsConstructor;/*** 服务器信息类*/
@Data
@Builder
// Data和Builder共同使用时必须手动添加无参和有参构造
@NoArgsConstructor
@AllArgsConstructor
public class ServerInfo {/*** 服务器url*/private String url;
}
MethodInfo,用于存储方法调用信息
package cn.ayulong.fluxclient.beans;import lombok.AllArgsConstructor;
import lombok.Builder;
import lombok.Data;
import lombok.NoArgsConstructor;
import org.springframework.http.HttpMethod;
import reactor.core.publisher.Mono;import java.util.Map;/*** 方法调用信息类*/
@Data
@Builder
@NoArgsConstructor
@AllArgsConstructor
public class MethodInfo {/*** 请求url*/private String url;/*** 请求方法*/private HttpMethod method;/*** 请求参数(url)*/private Map<String, Object> params;/*** 请求body*/private Mono<?> body;/*** 请求body的类型*/private Class<?> bodyElementType;/*** 返回是flux还是mono*/private boolean returnFlux;/*** 返回对象的类型*/private Class<?> returnElementType;
}
然后在main/ayu下的interfaces下新建 RestHandler接口,用以调用服务器接口并返回信息
package cn.ayulong.fluxclient.interfaces;import cn.ayulong.fluxclient.beans.MethodInfo;
import cn.ayulong.fluxclient.beans.ServerInfo;/*** rest请求调用handler*/
public interface RestHandler {/*** 初始化服务器信息* @param serverInfo*/void init(ServerInfo serverInfo);/*** 调用rest请求,返回结果* @param methodInfo* @return*/Object invokeRest(MethodInfo methodInfo);
}
在main/ayu下的interfaces包下新建一个ProxyCreator接口,用以代理创建我们远程调用的接口实例
package cn.ayulong.fluxclient.interfaces;/*** 创建代理类接口*/
public interface ProxyCreator {/*** 创建代理类* @param type* @return*/Object createProxy(Class<?> type);
}
在main/ayu的proxys包下新建 JDKProxyCreator具体实现ProxyCreator接口
package cn.ayulong.fluxclient.proxys;import cn.ayulong.fluxclient.ApiServer;
import cn.ayulong.fluxclient.beans.MethodInfo;
import cn.ayulong.fluxclient.beans.ServerInfo;
import cn.ayulong.fluxclient.interfaces.ProxyCreator;
import cn.ayulong.fluxclient.interfaces.RestHandler;
import cn.ayulong.fluxclient.resthandlers.WebClientRestHandler;
import lombok.extern.slf4j.Slf4j;
import org.springframework.http.HttpMethod;
import org.springframework.web.bind.annotation.*;
import reactor.core.publisher.Flux;
import reactor.core.publisher.Mono;import java.lang.annotation.Annotation;
import java.lang.reflect.*;
import java.util.LinkedHashMap;
import java.util.Map;/*** 使用jdk动态代理实现代理类*/
@Slf4j
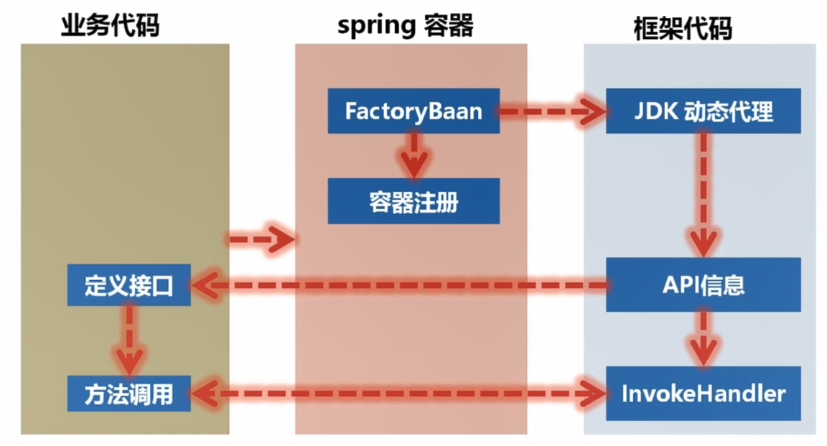
public class JDKProxyCreator implements ProxyCreator {@Overridepublic Object createProxy(Class<?> type) {log.info("createProxy: {}", type);// 根据接口得到API服务器ServerInfo serverInfo = extractServerInfo(type);log.info("serverInfo: {}", serverInfo);// 给每一个代理类创建一个实例RestHandler handler = new WebClientRestHandler();// 初始化服务器信息(初始化webclient)handler.init(serverInfo);return Proxy.newProxyInstance(this.getClass().getClassLoader(), new Class[]{type}, new InvocationHandler() {@Overridepublic Object invoke(Object proxy, Method method, Object[] args) throws Throwable {// 根据方法和参数得到调用信息MethodInfo methodInfo = extractMethodInfo(method, args);log.info("methodInfo: {}", methodInfo);// 调用restreturn handler.invokeRest(methodInfo);}});}/*** 根据方法定义和调用参数得到调用的相关信息** @param method* @param args* @return*/private MethodInfo extractMethodInfo(Method method, Object[] args) {MethodInfo methodInfo = new MethodInfo();extractUrlAndMethod(method, methodInfo);extractRequestParamAndBody(method, args, methodInfo);// 提取返回对象的信息extractReturnInfo(method, methodInfo);return methodInfo;}/*** 提取返回对象信息** @param method* @param methodInfo*/private void extractReturnInfo(Method method, MethodInfo methodInfo) {// 返回flux还是mono// isAssignableFrom 判断类型是否是某个类的子类// instanceof 判断实例是否是某个类的子类boolean isFlux = method.getReturnType().isAssignableFrom(Flux.class);methodInfo.setReturnFlux(isFlux);// 得到返回对象的实际类型Class<?> elementType = extractElementType(method.getGenericReturnType());methodInfo.setReturnElementType(elementType);}/*** 得到反省类型的实际类型** @param genericReturnType* @return*/private Class<?> extractElementType(Type genericReturnType) {Type[] actualTypeArguments = ((ParameterizedType) genericReturnType).getActualTypeArguments();return (Class<?>) actualTypeArguments[0];}/*** 得到请求的param和body** @param method* @param args* @param methodInfo*/private void extractRequestParamAndBody(Method method, Object[] args, MethodInfo methodInfo) {// 得到调用的参数和bodyParameter[] parameters = method.getParameters();// 参数和值对应的mapMap<String, Object> params = new LinkedHashMap<>();for (int i = 0; i < parameters.length; i++) {// 是否带 @PathVariable注解PathVariable annoPath = parameters[i].getAnnotation(PathVariable.class);if (annoPath != null) {params.put(annoPath.value(), args[i]);}// 是否带了 RequestBodyRequestBody annoBody = parameters[i].getAnnotation(RequestBody.class);if (annoBody != null) {methodInfo.setBody((Mono<?>) args[i]);// 请求对象的实际类型methodInfo.setBodyElementType(extractElementType(parameters[i].getParameterizedType()));}}methodInfo.setParams(params);}/*** 得到请求的url和方法** @param method* @param methodInfo*/private void extractUrlAndMethod(Method method, MethodInfo methodInfo) {// 得到请求URL和请求方法Annotation[] annotations = method.getAnnotations();for (Annotation annotation : annotations) {// GETif (annotation instanceof GetMapping) {GetMapping a = (GetMapping) annotation;methodInfo.setUrl(a.value()[0]);methodInfo.setMethod(HttpMethod.GET);}// POSTelse if (annotation instanceof PostMapping) {PostMapping a = (PostMapping) annotation;methodInfo.setUrl(a.value()[0]);methodInfo.setMethod(HttpMethod.POST);}// DELETEelse if (annotation instanceof DeleteMapping) {DeleteMapping a = (DeleteMapping) annotation;methodInfo.setUrl(a.value()[0]);methodInfo.setMethod(HttpMethod.DELETE);}// PUTelse if (annotation instanceof PutMapping) {PutMapping a = (PutMapping) annotation;methodInfo.setUrl(a.value()[0]);methodInfo.setMethod(HttpMethod.PUT);}}}/*** 提取服务器信息** @param type* @return*/private ServerInfo extractServerInfo(Class<?> type) {ServerInfo serverInfo = new ServerInfo();ApiServer annotation = type.getAnnotation(ApiServer.class);serverInfo.setUrl(annotation.value());return serverInfo;}
}最后我们在main/java 下的FluxClientApplication类中注入我们创建的远程调用接口
package cn.ayulong.fluxclient.proxys;import cn.ayulong.fluxclient.ApiServer;
import cn.ayulong.fluxclient.beans.MethodInfo;
import cn.ayulong.fluxclient.beans.ServerInfo;
import cn.ayulong.fluxclient.interfaces.ProxyCreator;
import cn.ayulong.fluxclient.interfaces.RestHandler;
import cn.ayulong.fluxclient.resthandlers.WebClientRestHandler;
import lombok.extern.slf4j.Slf4j;
import org.springframework.http.HttpMethod;
import org.springframework.web.bind.annotation.*;
import reactor.core.publisher.Flux;
import reactor.core.publisher.Mono;import java.lang.annotation.Annotation;
import java.lang.reflect.*;
import java.util.LinkedHashMap;
import java.util.Map;/*** 使用jdk动态代理实现代理类*/
@Slf4j
public class JDKProxyCreator implements ProxyCreator {@Overridepublic Object createProxy(Class<?> type) {log.info("createProxy: {}", type);// 根据接口得到API服务器ServerInfo serverInfo = extractServerInfo(type);log.info("serverInfo: {}", serverInfo);// 给每一个代理类创建一个实例RestHandler handler = new WebClientRestHandler();// 初始化服务器信息(初始化webclient)handler.init(serverInfo);return Proxy.newProxyInstance(this.getClass().getClassLoader(), new Class[]{type}, new InvocationHandler() {@Overridepublic Object invoke(Object proxy, Method method, Object[] args) throws Throwable {// 根据方法和参数得到调用信息MethodInfo methodInfo = extractMethodInfo(method, args);log.info("methodInfo: {}", methodInfo);// 调用restreturn handler.invokeRest(methodInfo);}});}/*** 根据方法定义和调用参数得到调用的相关信息** @param method* @param args* @return*/private MethodInfo extractMethodInfo(Method method, Object[] args) {MethodInfo methodInfo = new MethodInfo();extractUrlAndMethod(method, methodInfo);extractRequestParamAndBody(method, args, methodInfo);// 提取返回对象的信息extractReturnInfo(method, methodInfo);return methodInfo;}/*** 提取返回对象信息** @param method* @param methodInfo*/private void extractReturnInfo(Method method, MethodInfo methodInfo) {// 返回flux还是mono// isAssignableFrom 判断类型是否是某个类的子类// instanceof 判断实例是否是某个类的子类boolean isFlux = method.getReturnType().isAssignableFrom(Flux.class);methodInfo.setReturnFlux(isFlux);// 得到返回对象的实际类型Class<?> elementType = extractElementType(method.getGenericReturnType());methodInfo.setReturnElementType(elementType);}/*** 得到泛型类型的实际类型** @param genericReturnType* @return*/private Class<?> extractElementType(Type genericReturnType) {Type[] actualTypeArguments = ((ParameterizedType) genericReturnType).getActualTypeArguments();return (Class<?>) actualTypeArguments[0];}/*** 得到请求的param和body** @param method* @param args* @param methodInfo*/private void extractRequestParamAndBody(Method method, Object[] args, MethodInfo methodInfo) {// 得到调用的参数和bodyParameter[] parameters = method.getParameters();// 参数和值对应的mapMap<String, Object> params = new LinkedHashMap<>();for (int i = 0; i < parameters.length; i++) {// 是否带 @PathVariable注解PathVariable annoPath = parameters[i].getAnnotation(PathVariable.class);if (annoPath != null) {params.put(annoPath.value(), args[i]);}// 是否带了 RequestBodyRequestBody annoBody = parameters[i].getAnnotation(RequestBody.class);if (annoBody != null) {methodInfo.setBody((Mono<?>) args[i]);// 请求对象的实际类型methodInfo.setBodyElementType(extractElementType(parameters[i].getParameterizedType()));}}methodInfo.setParams(params);}/*** 得到请求的url和方法** @param method* @param methodInfo*/private void extractUrlAndMethod(Method method, MethodInfo methodInfo) {// 得到请求URL和请求方法Annotation[] annotations = method.getAnnotations();for (Annotation annotation : annotations) {// GETif (annotation instanceof GetMapping) {GetMapping a = (GetMapping) annotation;methodInfo.setUrl(a.value()[0]);methodInfo.setMethod(HttpMethod.GET);}// POSTelse if (annotation instanceof PostMapping) {PostMapping a = (PostMapping) annotation;methodInfo.setUrl(a.value()[0]);methodInfo.setMethod(HttpMethod.POST);}// DELETEelse if (annotation instanceof DeleteMapping) {DeleteMapping a = (DeleteMapping) annotation;methodInfo.setUrl(a.value()[0]);methodInfo.setMethod(HttpMethod.DELETE);}// PUTelse if (annotation instanceof PutMapping) {PutMapping a = (PutMapping) annotation;methodInfo.setUrl(a.value()[0]);methodInfo.setMethod(HttpMethod.PUT);}}}/*** 提取服务器信息** @param type* @return*/private ServerInfo extractServerInfo(Class<?> type) {ServerInfo serverInfo = new ServerInfo();ApiServer annotation = type.getAnnotation(ApiServer.class);serverInfo.setUrl(annotation.value());return serverInfo;}
}
到这里我们的框架已经初步搭建完成,但是具体很多细节也还没有实现,所以暂时还是跑不起来的,我们接着往下学习
第4节 信息提取
在main/ayu的resthandlers包下新建 RestHandler的实现类
package cn.ayulong.fluxclient.resthandlers;import cn.ayulong.fluxclient.beans.MethodInfo;
import cn.ayulong.fluxclient.beans.ServerInfo;
import cn.ayulong.fluxclient.interfaces.RestHandler;public class WebClientRestHandler implements RestHandler {@Overridepublic void init(ServerInfo serverInfo) {}@Overridepublic Object invokeRest(MethodInfo methodInfo) {return null;}
}
完善 JDKProxyCreator,获取接口和方法上的参数
package cn.ayulong.fluxclient.proxys;import cn.ayulong.fluxclient.ApiServer;
import cn.ayulong.fluxclient.beans.MethodInfo;
import cn.ayulong.fluxclient.beans.ServerInfo;
import cn.ayulong.fluxclient.interfaces.ProxyCreator;
import cn.ayulong.fluxclient.interfaces.RestHandler;
import cn.ayulong.fluxclient.resthandlers.WebClientRestHandler;
import lombok.extern.slf4j.Slf4j;
import org.springframework.http.HttpMethod;
import org.springframework.web.bind.annotation.*;
import reactor.core.publisher.Flux;
import reactor.core.publisher.Mono;import java.lang.annotation.Annotation;
import java.lang.reflect.*;
import java.util.LinkedHashMap;
import java.util.Map;/*** 使用jdk动态代理实现代理类*/
@Slf4j
public class JDKProxyCreator implements ProxyCreator {@Overridepublic Object createProxy(Class<?> type) {log.info("createProxy: {}", type);// 根据接口得到API服务器ServerInfo serverInfo = extractServerInfo(type);log.info("serverInfo: {}", serverInfo);// 给每一个代理类创建一个实例RestHandler handler = new WebClientRestHandler();// 初始化服务器信息(初始化webclient)handler.init(serverInfo);return Proxy.newProxyInstance(this.getClass().getClassLoader(), new Class[]{type}, new InvocationHandler() {@Overridepublic Object invoke(Object proxy, Method method, Object[] args) throws Throwable {// 根据方法和参数得到调用信息MethodInfo methodInfo = extractMethodInfo(method, args);log.info("methodInfo: {}", methodInfo);// 调用restreturn handler.invokeRest(methodInfo);}});}/*** 根据方法定义和调用参数得到调用的相关信息* @param method* @param args* @return*/private MethodInfo extractMethodInfo(Method method, Object[] args) {MethodInfo methodInfo = new MethodInfo();extractUrlAndMethod(method, methodInfo);extractRequestParamAndBody(method, args, methodInfo);// 提取返回对象的信息extractReturnInfo(method, methodInfo);return methodInfo;}/*** 提取返回对象信息* @param method* @param methodInfo*/private void extractReturnInfo(Method method, MethodInfo methodInfo) {// 返回flux还是mono// isAssignableFrom 判断类型是否是某个类的子类// instanceof 判断实例是否是某个类的子类boolean isFlux = method.getReturnType().isAssignableFrom(Flux.class);methodInfo.setReturnFlux(isFlux);// 得到返回对象的实际类型Class<?> elementType = extractElementType(method.getGenericReturnType());methodInfo.setReturnElementType(elementType);}/*** 得到反省类型的实际类型* @param genericReturnType* @return*/private Class<?> extractElementType(Type genericReturnType) {Type[] actualTypeArguments = ((ParameterizedType) genericReturnType).getActualTypeArguments();return (Class<?>) actualTypeArguments[0];}/*** 得到请求的param和body* @param method* @param args* @param methodInfo*/private void extractRequestParamAndBody(Method method, Object[] args, MethodInfo methodInfo) {// 得到调用的参数和bodyParameter[] parameters = method.getParameters();// 参数和值对应的mapMap<String, Object> params = new LinkedHashMap<>();for (int i = 0; i < parameters.length; i++) {// 是否带 @PathVariable注解PathVariable annoPath = parameters[i].getAnnotation(PathVariable.class);if (annoPath != null) {params.put(annoPath.value(), args[i]);}// 是否带了 RequestBodyRequestBody annoBody = parameters[i].getAnnotation(RequestBody.class);if (annoBody != null) {methodInfo.setBody((Mono<?>) args[i]);}}methodInfo.setParams(params);}/*** 得到请求的url和方法* @param method* @param methodInfo*/private void extractUrlAndMethod(Method method, MethodInfo methodInfo) {// 得到请求URL和请求方法Annotation[] annotations = method.getAnnotations();for (Annotation annotation : annotations) {// GETif (annotation instanceof GetMapping) {GetMapping a = (GetMapping)annotation;methodInfo.setUrl(a.value()[0]);methodInfo.setMethod(HttpMethod.GET);}// POSTelse if (annotation instanceof PostMapping) {PostMapping a = (PostMapping)annotation;methodInfo.setUrl(a.value()[0]);methodInfo.setMethod(HttpMethod.POST);}// DELETEelse if (annotation instanceof DeleteMapping) {DeleteMapping a = (DeleteMapping)annotation;methodInfo.setUrl(a.value()[0]);methodInfo.setMethod(HttpMethod.DELETE);}// PUTelse if (annotation instanceof PutMapping) {PutMapping a = (PutMapping)annotation;methodInfo.setUrl(a.value()[0]);methodInfo.setMethod(HttpMethod.PUT);}}}/*** 提取服务器信息* @param type* @return*/private ServerInfo extractServerInfo(Class<?> type) {ServerInfo serverInfo = new ServerInfo();ApiServer annotation = type.getAnnotation(ApiServer.class);serverInfo.setUrl(annotation.value());return serverInfo;}
}
修改TestController进行测试
package cn.ayulong.fluxclient.controller;import cn.ayulong.fluxclient.api.IUserApi;
import cn.ayulong.fluxclient.domain.User;
import org.springframework.web.bind.annotation.GetMapping;
import org.springframework.web.bind.annotation.RestController;
import reactor.core.publisher.Flux;
import reactor.core.publisher.Mono;import javax.annotation.Resource;@RestController
public class TestController {// 直接注入定义的接口@ResourceIUserApi userApi;@GetMapping("/")public void test() {// 测试信息提取// 不订阅不会实际发出请求,但会进入我们的代理类userApi.getAllUser();userApi.getUserById("999");userApi.deleteUserById("777");userApi.createUser(Mono.just(User.builder().name("xfq").age(33).build()));// 直接调用实现调用rest接口的效果
//        Flux<User> users = userApi.getAllUser();
//        users.subscribe(System.out::println);}
}
访问查看是否获取到信息
第5节 处理请求
完善WebClientRestHandler,使用WebClient发起请求
package cn.ayulong.fluxclient.resthandlers;import cn.ayulong.fluxclient.beans.MethodInfo;
import cn.ayulong.fluxclient.beans.ServerInfo;
import cn.ayulong.fluxclient.interfaces.RestHandler;
import org.springframework.http.MediaType;
import org.springframework.web.reactive.function.client.WebClient;public class WebClientRestHandler implements RestHandler {private WebClient client;/*** 初始化webclient* @param serverInfo*/@Overridepublic void init(ServerInfo serverInfo) {this.client = WebClient.create(serverInfo.getUrl());}/*** 处理rest* @param methodInfo* @return*/@Overridepublic Object invokeRest(MethodInfo methodInfo) {// 返回结果Object result = null;WebClient.RequestBodySpec request = this.client// 请求方法.method(methodInfo.getMethod())// 请求url.uri(methodInfo.getUrl(), methodInfo.getParams())// 接收类型.accept(MediaType.APPLICATION_JSON);WebClient.ResponseSpec retrieve = null;// 判断是否带了bodyif (methodInfo.getBody() != null) {// 发出请求retrieve = request.body(methodInfo.getBody(), methodInfo.getBodyElementType()).retrieve();} else {retrieve = request.retrieve();}// 处理bodyif (methodInfo.isReturnFlux()) {result = retrieve.bodyToFlux(methodInfo.getReturnElementType());} else {result = retrieve.bodyToMono(methodInfo.getReturnElementType());}return result;}
}
之后修改TestController,增加方法模拟传输数据进行测试
	@GetMapping("/{id}")public void testFindAndDeleteAndCreate(@PathVariable("id") String id) {// 直接调用实现调用rest接口的效果
//        Mono<User> user = userApi.getUserById(id);
//        user.subscribe(u -> System.out.println("getUserById: " + u));
//
//        Mono<Void> delete = userApi.deleteUserById(id);
//        delete.subscribe();// 创建用户userApi.createUser(Mono.just(User.builder().name("kaka").age(33).build())).subscribe(System.out::println);}
webclient 用法参考链接:
https://www.cnblogs.com/grasp/p/12179906.html
第6节 异常处理
我们可以用查找方法来进行测试(如果不进行异常处理会在后台报一大堆错,添加长处理后会更加简洁)
     @GetMapping("/{id}")public void testFindAndDeleteAndCreate(@PathVariable("id") String id) {// 直接调用实现调用rest接口的效果Mono<User> user = userApi.getUserById(id);user.subscribe(u -> System.out.println("找到用户: " + u),// 异常处理e -> System.err.println("找不到用户:" + e.getMessage()));
//
//        Mono<Void> delete = userApi.deleteUserById(id);
//        delete.subscribe();// 创建用户
//        userApi.createUser(
//                Mono.just(User.builder().name("kaka").age(33).build()))
//                .subscribe(System.out::println);}
修改WebClientRestHandler,添加异常处理
package cn.ayulong.fluxclient.resthandlers;import cn.ayulong.fluxclient.beans.MethodInfo;
import cn.ayulong.fluxclient.beans.ServerInfo;
import cn.ayulong.fluxclient.interfaces.RestHandler;
import org.springframework.http.MediaType;
import org.springframework.web.reactive.function.client.WebClient;
import reactor.core.publisher.Mono;public class WebClientRestHandler implements RestHandler {private WebClient client;/*** 初始化webclient* @param serverInfo*/@Overridepublic void init(ServerInfo serverInfo) {this.client = WebClient.create(serverInfo.getUrl());}/*** 处理rest* @param methodInfo* @return*/@Overridepublic Object invokeRest(MethodInfo methodInfo) {// 返回结果Object result = null;WebClient.RequestBodySpec request = this.client// 请求方法.method(methodInfo.getMethod())// 请求url.uri(methodInfo.getUrl(), methodInfo.getParams())// 接收类型.accept(MediaType.APPLICATION_JSON);WebClient.ResponseSpec retrieve = null;// 判断是否带了bodyif (methodInfo.getBody() != null) {// 发出请求retrieve = request.body(methodInfo.getBody(), methodInfo.getBodyElementType()).retrieve();} else {retrieve = request.retrieve();}// 处理异常retrieve.onStatus(status -> status.value() == 404,response -> Mono.just(new RuntimeException("Not Found")));// 处理bodyif (methodInfo.isReturnFlux()) {result = retrieve.bodyToFlux(methodInfo.getReturnElementType());} else {result = retrieve.bodyToMono(methodInfo.getReturnElementType());}return result;}
}
原文地址