用它完成批量代码生成的工作啦.
下面我会一步步的解释如何用CodeSmith实现预期的结果的,事先声明一下,在此只做一个简单的Demo,并不详细的讲解CodeSmith各个强大的功能,有兴趣的朋友可以打开CodeSmith的帮助文档了解.我只做个抛砖引玉,希望能激起大家更多思想的火花~
先看看CodeSmith的工作原理:

简单的说:CodeSmith首先会去数据库获取数据库的结构,如各个表的名称,表的字段,表间的关系等等,之后再根据用户自定义好的模板文件,用数据库结构中的关键字替代模板的动态变量,最终输出并保存为我们需要的目标文件.好,原理清楚了,就开始实践吧:
1. 运行CodeSmith,可以看到如下界面:

2. CodeSmith是创建模板的地方,首先当然是创建一个模板啦,点击工具栏最左边的New Document—C# Template,如图所示:

3. 点击运行按钮,运行结果如下:

好,我们来分析为什么会得到这样的运行结果吧,点击运行窗口左下角的Template按钮返回模板设计窗口,可以发现,只要是没有被<%%>或者<scriptrunat="template"></script>包含的文字均被直接输出了,这些以后就要被换成我们分层架构中一些一成不变的模板代码:

4. 好了,简单了解啦一些CodeSmith的代码结构,下面就开始用它来生成我们的分层代码吧,在此我就不介绍分层架构的概念了,不然就偏离主题了.为了能更简单明了的说明,我们在此就只用CodeSmith生成分层架构的实体层吧.先看看如果我们不使用CodeSmith需要手动敲出哪些代码:
Major.cs
using System;
using System.Collections.Generic;
using System.Linq;
using System.Text;
namespace Entity
{
publicpartialclass Major
{
publicInt32 MajorID{ get;set; }
publicString Name{ get;set; }
publicString Remark{ get;set; }
}
}
5. 那么就开始我们的实践吧,就在刚刚创建好的文件开始吧,先随意保存到一个目录下,命名为test.cst,接着删除多余的代码,只保留第一行,该行表明我们的模板使用何种语言,这里我们使用C#.
<%@ CodeTemplateLanguage="C#" TargetLanguage="Text" Src="" Inherits=""Debug="False" CompilerVersion="v3.5"Description="Template description here."%>

6. 参照CodeSmith的工作原理,我们首先要为CodeSmith提供一个数据库,要怎么使它和SQL Server 2005关联起来呢?只要添加以下2个文件
test.cst 和 Entity.cst
test.cst<%--
作者:黄聪
网址:http://www.cnblogs.com/huangcong
--%>
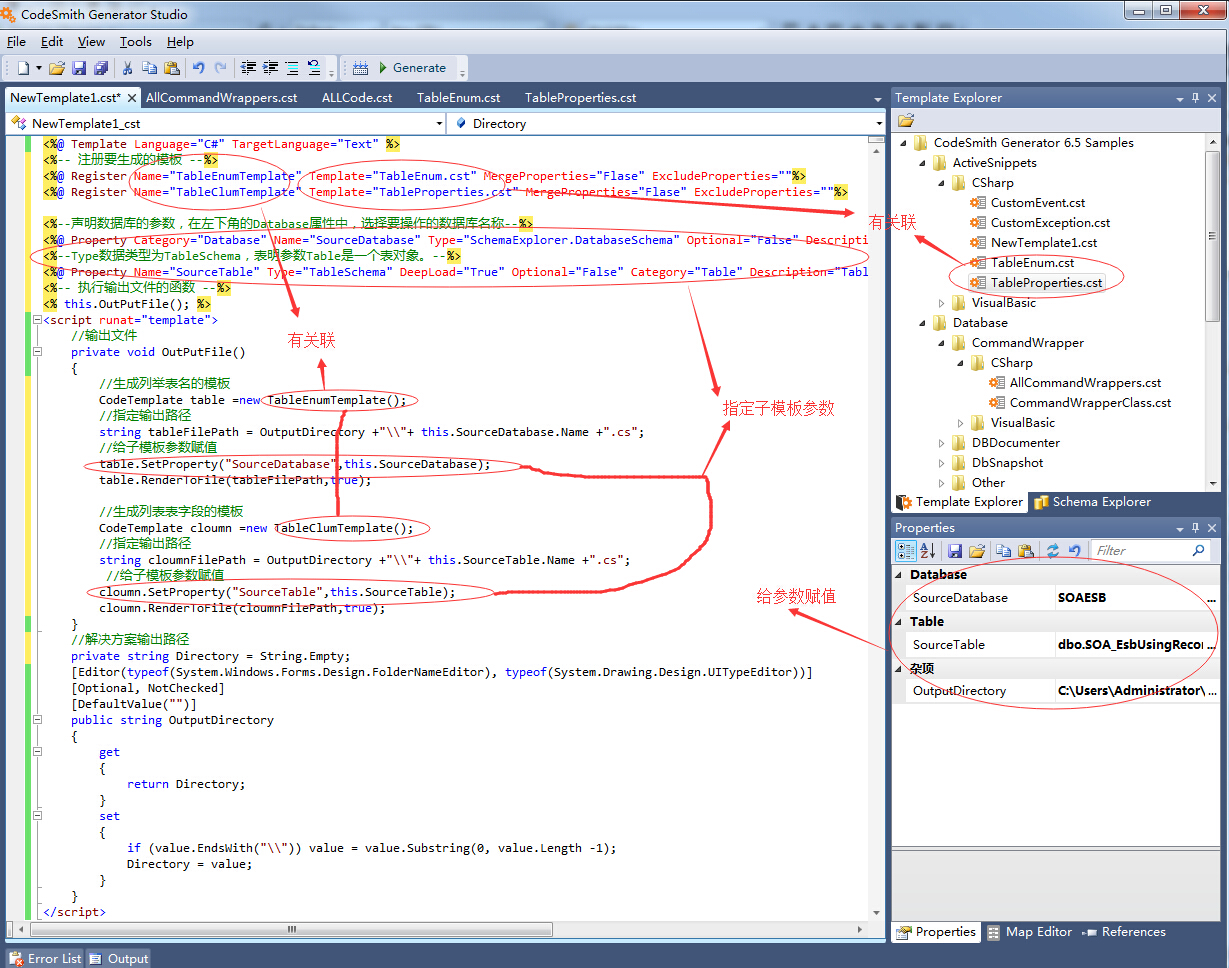
<%@ CodeTemplate Inherits="CodeTemplate" Language="C#" TargetLanguage="Text" Description="NetTiers main template." Debug="True" ResponseEncoding="UTF-8"%><%-- 注册实体层Entity模板 --%>
<%@ Register Name="EntityTemplate" Template="WinformTier\Entity.cst" MergeProperties="Flase" ExcludeProperties=""%><%-- 数据库 --%>
<%@ Property Name="SourceDatabase" Type="SchemaExplorer.DatabaseSchema" DeepLoad="True" Optional="False" Category="01. Getting Started - Required" Description="Database that the tables views, and stored procedures should be based on. IMPORTANT!!! If SourceTables and SourceViews are left blank, the Entire Database will then be generated."%><%
//创建实体层Entity类
this.GenerateEntityClasses();Debug.WriteLine("OK");
%><script runat="template">//生成实体Entity类
privatevoid GenerateEntityClasses(){CodeTemplate Template =new EntityTemplate();foreach(TableSchema table inthis.SourceDatabase.Tables){string FileDirectory = OutputDirectory +"\\"+ table.Name +".cs";//生成模板Template.SetProperty("Table",table);//文件输出Template.RenderToFile(FileDirectory,true);Debug.WriteLine(FileDirectory +" 创建成功.");}}
</script><script runat="template">//解决方案输出路径
privatestring Directory = String.Empty;[Editor(typeof(System.Windows.Forms.Design.FolderNameEditor), typeof(System.Drawing.Design.UITypeEditor))] [Optional, NotChecked][DefaultValue("")]publicstring OutputDirectory { get{return Directory;}set{if (value.EndsWith("\\")) value = value.Substring(0, value.Length -1);Directory = value;} }
</script>Entity.cst:
Entity.cst<%--
作者:黄聪
网址:http://www.cnblogs.com/huangcong
--%>
<%@ CodeTemplate Inherits="CodeTemplate" Language="C#" TargetLanguage="Text" Description="NetTiers main template." Debug="True" ResponseEncoding="UTF-8"%><%@ Assembly Name="SchemaExplorer"%>
<%@ Import Namespace="SchemaExplorer"%><%@ Property Name="Table" Type="TableSchema" DeepLoad="True" Optional="False" Category="01. Getting Started - Required" Description="Database that the tables views, and stored procedures should be based on. IMPORTANT!!! If SourceTables and SourceViews are left blank, the Entire Database will then be generated."%>
using System;
using System.Collections.Generic;
using System.Linq;
using System.Text;namespace Entity
{publicpartialclass<%= Table.Name%>{<%foreach(ColumnSchema col in Table.Columns){ %>public<%= col.DataType %><%= col.Name %>{ get;set; }<% } %>}
}
7. 好啦,现在只要设置我们要导出的数据库和输出目录就可以运行看结果啦,点击CodeSmith主窗体右下角Properities面板中SourceDatabase属性栏右侧的…按钮,弹出数据库设置对话框,我们要在此添加一个新的数据库连接:

8. 点击Add按钮,属性设置如图,我们选择的是在前一章用PowerDesigner创建好的PD_test数据库:

9. 点击OK,回到数据库选择对话框,选择刚刚创建好的数据库连接:

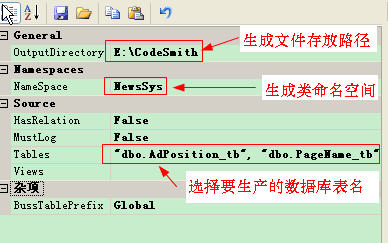
10. 接着是设置目标文件输出目录,我在这里设置为桌面的一个新建文件夹:

11. OK,万事俱备,可以点击运行按钮让CodeSmith为我们批量生成代码啦:

作者写的很详细,这里省略了一些步骤,很详细的,可以参考一下转载链接
转载自:https://www.cnblogs.com/huangcong/archive/2010/06/14/1758201.html