前端手写电子签名板实现
作者:@ 很菜的小白在分享
时间:2022年12月29日
介绍
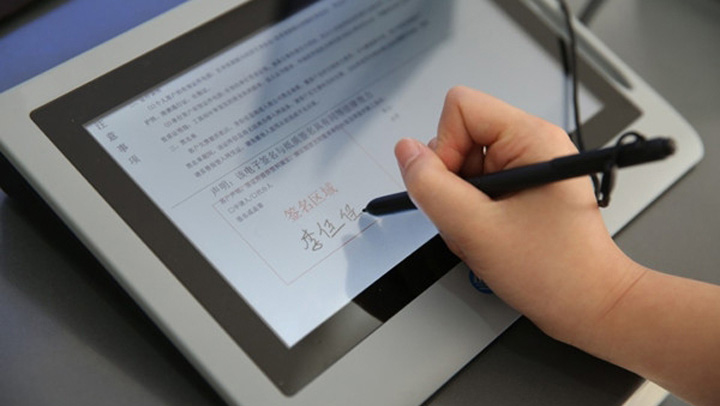
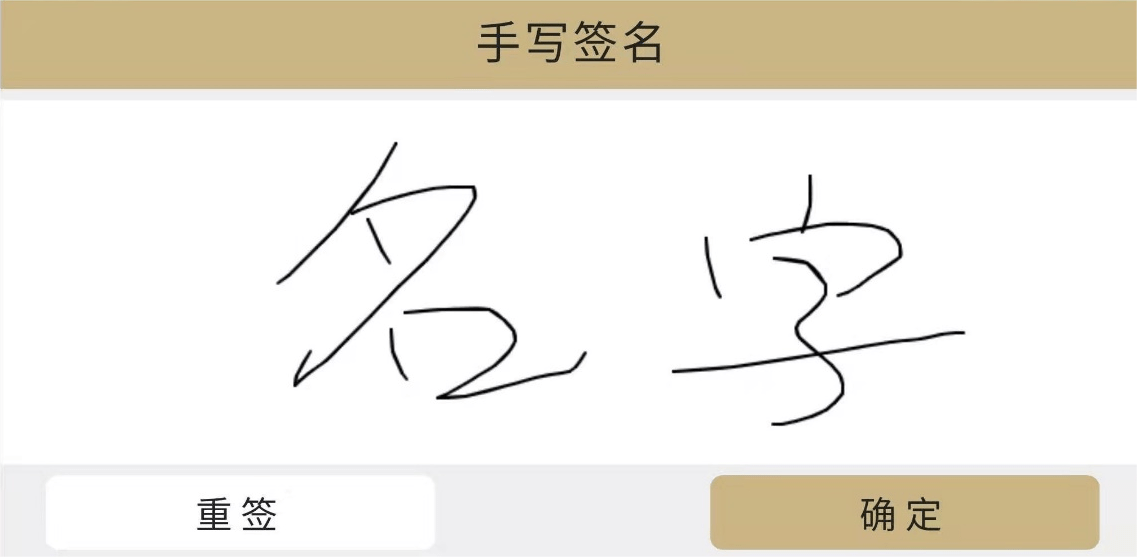
什么是电子签名
电子签名是指数据电文中以电子形式所含、所附用于识别签名人身份并表明签名人认可其中内容的数据。—— 百度百科
通俗点说其实就是通过在电子设备上进行类似纸面上签字的效果。在如今互联网快速发展的时代,可以实现云签名,在线签订合同等各种场景。
初衷
这个功能是我在日常开发项目时遇到的需求场景,背景是公司开发的在线教育客户端,允许学生在客户端进行学习和答题,题目类型中有一项“解答题”,需要学生通过手写答题的方式进行作答。因为是第一次接触在线教育类型项目和这样的需求,所以产生了一些思考。
由于项目是使用uniApp开发的Pad客户端,在实现上与原生js有所区别,所以本文将通过原生js的方式重新实现一遍,并且让组件更加灵活通用。
思考
在刚接触到这个需求时,有的同学表示懵逼3连,这怎么实现?其实你只要相信,只要产品能提出的需求,世面上存在这样的功能,不管是用什么语言实现的,排除一些特殊功能,js大部分都可以实现。<canvas> 标签会在页面上创建一块画布允许我们在上面绘制各种图形,下面介绍实现该功能的主要技术点,如果对 Canvas 技术了解的可以直接跳过介绍部分。
什么是 canvas
Canvas API 提供了一个通过JavaScript 和 HTML的
<canvas>元素来绘制图形的方式。它可以用于动画、游戏画面、数据可视化、图片编辑以及实时视频处理等方面。 —— MDN
举个例子:比如我们要实现一个长、宽各为50px的正方形。
正常操作:
<div style="width: 50px; height: 50px; background-color: #000;"></div>
Canvas方式:
<canvas id="myCanvas" width="200px" height="200px"></canvas><script>const canvas = document.getElementById('canvas')const ctx = canvas.getContext("2d")ctx.fillStyle = "#000"ctx.fillRect(0, 0, 50, 50)</script>
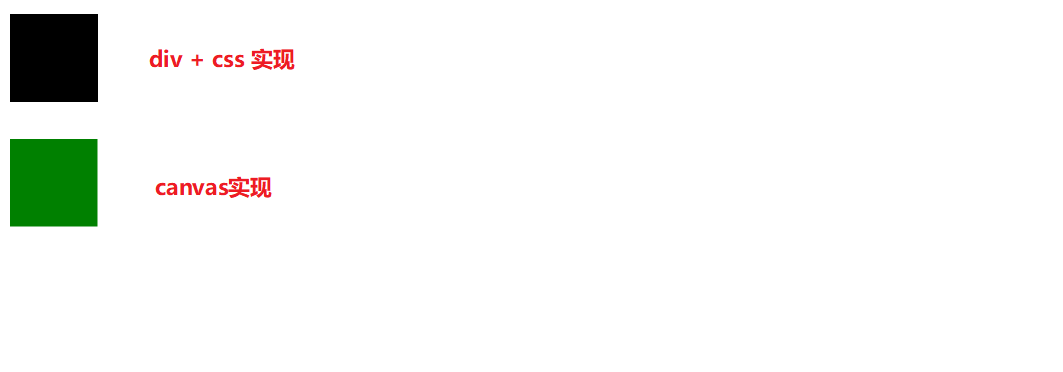
虽然这个例子中 Canvas 的实现方式更为复杂,那是因为 Canvas 在某些效果方面确实优于 html + css的方式,比如你需要绘制 sinx 的曲线,使用html+css方式就没有那么容易了,相反 Canvas可以轻松实现。
下面介绍一些常用到的 Canvas API。
Canvas 常用API
| 属性名 | 说明 | 返回值 |
|---|---|---|
| width | <canvas>元素的width属性,以CSS像素表示,未指定或者值为无效值(例如负数),则默认为300 | <canvas>元素的宽度 |
| height | <canvas>元素的height属性,以CSS像素表示,未指定或者值为无效值(例如负数),则默认为150 | <canvas>元素的高度 |
Canvas 常用方法
| 方法名 | 说明 | 参数 | 返回值 |
|---|---|---|---|
| captureStream() | 返回 CanvasCaptureMediaStream ,它是对画布表面的实时视频捕获。 | — | CanvasCaptureMediaStream |
| getContext() | 返回画布上的绘图上下文;如果不支持上下文 ID,则返回 null。 | 2d webgl webgl2 bitmaprenderer | CanvasContext |
| toDataURL() | 返回由类型参数指定的格式的图像数据URL。参考 | type encoderOptions | Data Url |
| toBlob() | 创建一个Blob 对象,表示 canvas 中包含的图像;该文件可以由用户代理决定是否缓存在磁盘上或存储在内存中。参考 | callback type type quality | — |
CanvasRenderingContext2D 常用API
| 属性名 | 说明 |
|---|---|
| canvas | 获取上下文关联的Canvas元素 |
| fillStyle | 描述颜色和样式的属性。默认值是 #000 (黑色)。 |
| font | 描述绘制文字时,当前字体样式的属性。 |
| lineCap | 指定如何绘制每一条线段末端的属性。有 3 个可能的值,分别是:butt, round and square。默认值是 butt。 |
| lineWidth | 设置线段厚度的属性(即线段的宽度)。 |
| strokeStyle | 描述画笔(绘制图形)颜色或者样式的属性。默认值是 #000 (black)。 |
| textAlign | 描述绘制文本时,文本的对齐方式的属性。 |
| textAlign | 描述绘制文本时,文本的对齐方式的属性。 |
CanvasRenderingContext2D 常用方法
参考
| 方法名 | 说明 |
|---|---|
| arc() | 绘制圆弧路径的方法。 |
| beginPath() | 通过清空子路径列表开始一个新路径的方法。当你想创建一个新的路径时,调用此方法。 |
| clearRect() | 通过把像素设置为透明以达到擦除一个矩形区域的目的。 |
| drawImage() | 提供了多种在画布(Canvas)上绘制图像的方式。 |
| getImageData() | 返回一个ImageData对象,用来描述 canvas 区域隐含的像素数据,这个区域通过矩形表示,起始点为(sx, sy)、宽为sw、高为sh。 |
| lineTo() | 使用直线连接子路径的终点到 x,y 坐标的方法(并不会真正地绘制)。 |
| moveTo() | 将一个新的子路径的起始点移动到 (x,y) 坐标的方法。 |
| measureText() | 返回一个关于被测量文本TextMetrics 对象包含的信息(例如它的宽度)。 |
| save() | 通过将当前状态放入栈中,保存 canvas 全部状态的方法。 |
| stroke() | 使用非零环绕规则,根据当前的画线样式,绘制当前或已经存在的路径的方法。 |
由于文章内容有限所以只列举常用 API 及 方法,想了解更多可以前往 MDN 了解更多 Canvas 相关知识。
实现
实现思路
实现思路大致就是,通过当前鼠标移动的位置在 Canvas 画布上绘制出鼠标的移动轨迹点,然后利用 Canvas 提供的 API 将点连成线来实现手写签名的过程。
具体实现
/*** @class* @classdesc 实现手写签名的构造函数* @param {Object} 手写签名画板的配置项*/function DrawingBoard(options) {if (!(this instanceof DrawingBoard)) {throw new TypeError("DrawingBoard constructor cannot be invoked without 'new'")}this.options = optionsthis.canvas = nullthis.ctx = nullthis.drawStatus = falseconst _this = this/*** @method* @param {Event} event 事件对象* @desc 鼠标按下事件*/DrawingBoard.prototype.touchStartPC = function (event) {_this.drawStatus = trueconst {offsetX, offsetY} = event_this.createBrush(offsetX, offsetY)}/*** @method* @param {Event} event 事件对象* @desc 鼠标移动事件*/DrawingBoard.prototype.touchMovePC = function (event) {if (!_this.drawStatus) return;const {offsetX, offsetY} = event_this.drawPixel({offsetX, offsetY})}/*** @method* @param {Event} event 事件对象* @desc 鼠标抬起事件*/DrawingBoard.prototype.touchEndPC = function (event) {_this.drawStatus = false}this.initSignatureCanvas()}/*** 初始化画板*/DrawingBoard.prototype.initSignatureCanvas = function () {let canvas = document.createElement('canvas')canvas.setAttribute('width', '200px')canvas.setAttribute('height', '200px')this.canvas = canvasthis.bindEvent(canvas)this.ctx = canvas.getContext('2d')this.options.el?.appendChild(canvas)}/*** @method* @param {Number} x 画笔的 x 坐标* @param {Number} y 画笔的 y 坐标* @desc 移动画笔创建连接点*/DrawingBoard.prototype.createBrush = function (x, y) {this.ctx.beginPath()this.ctx.moveTo(x, y)}/*** @method* @param {Object} options 绘制线条的 x,y 坐标* @desc 根据点坐标绘制连线*/DrawingBoard.prototype.drawPixel = function (options) {const {offsetX, offsetY} = optionsthis.ctx.lineTo(offsetX, offsetY)this.ctx.fill()this.ctx.stroke();this.createBrush(offsetX, offsetY)}/*** @method* @desc 事件绑定*/DrawingBoard.prototype.bindEvent = function () {this.canvas.addEventListener("mousedown", this.touchStartPC)this.canvas.addEventListener("mousemove", this.touchMovePC)this.canvas.addEventListener("mouseup", this.touchEndPC)}
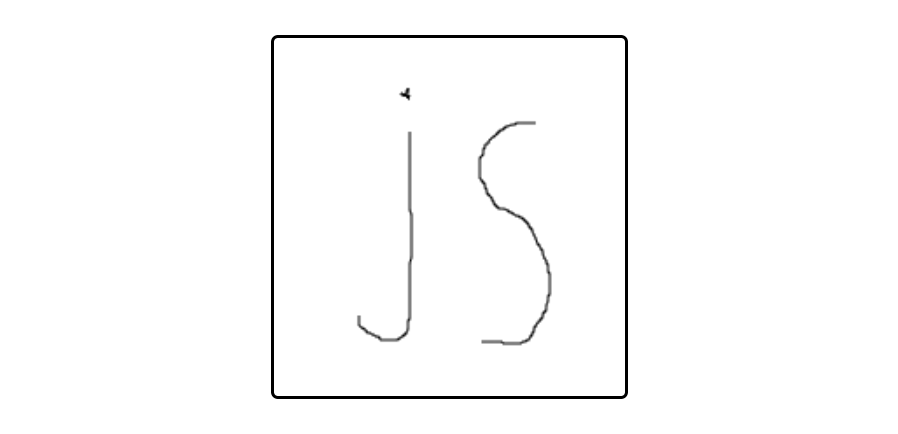
示例
<style>#drawingBoard {position: absolute;top: 200px;left: 200px;width: 200px;border: 2px solid #000;border-radius: 4px;overflow: hidden;}</style><div id="drawingBoard"></div>
var board = DrawingBoard({el: document.getElementById('drawingBoard'),})
效果
扩展
自定义画布尺寸
initSignatureCanvas方法调整,新增 addAttribute 为画布添加属性样式。
/*** 初始化画板*/DrawingBoard.prototype.initSignatureCanvas = function () {let canvas = document.createElement('canvas')this.canvas = canvas// 新增this.addAttribute(canvas)this.bindEvent(canvas)this.ctx = canvas.getContext('2d')this.options.el?.appendChild(canvas)}/*** @method* @desc 为容器和画布添加属性样式*/DrawingBoard.prototype.addAttribute = function () {let { width, height, style } = this.optionsconst container = this.getClientRect()let styleParse = ''if(!width) width = '200px'if(!height) height = '200px'for (const key in style) {if (Object.prototype.hasOwnProperty.call(style, key)) {styleParse += `${toSplitLine(key)}: ${style[key]};`}}this.canvas.setAttribute('width', width)this.canvas.setAttribute('height', height)this.canvas.setAttribute('style', styleParse)if (this.options.el) { if(container.width <= 0) this.options.el.style.width = widthif (container.height <= 0) this.options.el.style.height = heightif (this.options.brush && this.options.brush.pointer) {this.options.el.style.cursor = `url(${this.options.brush.pointer}) 0 16, default`}}}
options 配置项增加 width height 属性,允许传入画布尺寸信息,例:‘200px’。当未设置 #drawingBoard 容器宽高时,使用 options.width,默认:200px。
示例
var board = new DrawingBoard({el: document.getElementById('drawingBoard'),width: '200px',height: '200px'})
画板的禁用&启用
disable enable 用于切换画板是否启用。
/*** @method* @desc 禁用画布*/DrawingBoard.prototype.disable = function () {this.isDisable = truethis.unBindEvent()}/*** @method* @desc 启用画布*/DrawingBoard.prototype.enable = function () {this.isDisable = falsethis.bindEvent()}/*** @method* @desc 解除事件绑定*/DrawingBoard.prototype.unBindEvent = function () {this.canvas.removeEventListener("mousedown", this.touchStartPC)this.canvas.removeEventListener("mousemove", this.touchMovePC)this.canvas.removeEventListener("mouseup", this.touchEndPC)}
示例
<div id="drawingBoard"></div><button id="disableBtn">禁用</button><button id="enableBtn">启用</button>
var board = new DrawingBoard({el: document.getElementById('drawingBoard'),})disableBtn.onclick = disabledenableBtn.onclick = enabledfunction disabled() {board.disable()}function enabled() {board.enable()}
设置画笔样式&画板背景
/*** @method* @param {Event} event 事件对象* @desc 鼠标按下事件*/DrawingBoard.prototype.touchStartPC = function (event) {_this.drawStatus = trueconst { offsetX, offsetY } = event// 新增if (_this.isRubber) {_this.eraseBoard(offsetX, offsetY)return}_this.createBrush(offsetX, offsetY)}/*** @method* @param {Event} event 事件对象* @desc 鼠标移动事件*/DrawingBoard.prototype.touchMovePC = function (event) {if (!_this.drawStatus) return;const { offsetX, offsetY } = event// 新增if (_this.isRubber) {_this.eraseBoard(offsetX, offsetY)return}_this.drawPixel({offsetX, offsetY})}/*** 初始化画板*/DrawingBoard.prototype.initSignatureCanvas = function () {let canvas = document.createElement('canvas')this.canvas = canvasthis.addAttribute(canvas)this.bindEvent(canvas)this.ctx = canvas.getContext('2d')this.options.el?.appendChild(canvas)// 新增this.ctx.fillStyle = this.options.background || '#fff'this.ctx.fillRect(0, 0, canvas.width, canvas.height)}/*** @method* @param {Object} options 绘制线条的 x,y 坐标* @desc 根据点坐标绘制连线*/DrawingBoard.prototype.drawPixel = function (options) {const {offsetX, offsetY} = options// 新增this.ctx.strokeStyle = this.options.brush.color || '#000'this.ctx.lineWidth = this.options.brush.lineWidth || 2// 设置绘制线段末端结束的形式this.ctx.lineCap = 'round'this.ctx.lineJoin = 'round'this.ctx.lineTo(offsetX, offsetY)this.ctx.fill()this.ctx.stroke();this.createBrush(offsetX, offsetY)}/*** @method* @param {Number} x 画笔的 x 坐标* @param {Number} y 画笔的 y 坐标* @desc 擦除画布*/DrawingBoard.prototype.eraseBoard = function (x, y) {this.ctx.clearRect(x, y, this.options.brush.lineWidth, this.options.brush.lineWidth)}/*** @mehtod* @desc 切换画笔和橡皮模式*/DrawingBoard.prototype.switchBrush = function () {if (this.isRubber) {this.isRubber = falsethis.options.el.style.cursor = `url(${this.options.brush.pointer}) 0 16, default`} else {this.isRubber = truethis.options.el.style.cursor = `url('./assets/rubber.png') 0 16, default`}}/*** @mehtod* @param {Object} brush 画笔样式配置项* @desc 设置画笔样式*/DrawingBoard.prototype.setBrush = function (brush) {Object.assign(this.options.brush, brush)}
options 配置项增加 background brush 属性,允许传入画布背景与画笔配置信息。brush 属性包含 画笔颜色:color,画笔粗细:lineWidth,画笔icon:pointer(目前仅支持设置PC端鼠标指针)。
示例
<div id="drawingBoard"></div><div><label for="colorSelect">画笔颜色:</label><input type="color" id="colorSelect"></div><div><label for="numberSelect">画笔粗细:</label><input type="number" id="numberSelect"></div>
var board = new DrawingBoard({el: document.getElementById('drawingBoard'),background: '#000',brush: {color: '#fff',lineWidth: 10,pointer: './assets/brush.png'}})colorSelect.onchange = colorSelectChangenumberSelect.onchange = numberSelectChangefunction colorSelectChange (event) {board.setBrush({color: event.target.value})}function numberSelectChange(event) {board.setBrush({lineWidth: event.target.value})}
导出画布信息为图片资源
/*** @method* @param {Function} cb 通过回调函数返回画布信息* @desc 保存画布信息为图片资源*/DrawingBoard.prototype.save = function (cb) {if (this.options.exportType === 'blob') {this.canvas.toBlob(function (blob) {const blobUrl = URL.createObjectURL(blob)cb(blobUrl)}, this.options.mimeType)} else {const base64 = this.canvas.toDataURL(this.options.mimeType)cb(base64)}}
options 配置项增加 mimeType exportType 属性,mimeType 设置导出图片资源格式,默认 image/png,exportType 设置导出资源的数据形式,例如:base64 or blob,默认:base64,目前仅支持PC端,暂不支持移动端导出。
完整代码
文档
/*** @method* @param {String} str 需要转换的字符串* @returns 转换后的字符串* @desc 将驼峰命名转化为使用分隔符的字符串*/function toSplitLine(str) {var reg = /[A-Z]/g;var newStr = str.replace(reg, function ($0) {return '-' + $0.toLocaleLowerCase();});if (newStr.substring(0, 1) === '-') {newStr = newStr.substring(1);}return newStr;}/*** @class* @classdesc 实现手写签名的构造函数* @param {Object} 手写签名画板的配置项*/function DrawingBoard(options) {if (!(this instanceof DrawingBoard)) {throw new TypeError("DrawingBoard constructor cannot be invoked without 'new'")}this.options = optionsthis.canvas = nullthis.ctx = nullthis.drawStatus = falsethis.isDisable = truethis.isRubber = falseconst _this = this/*** @method* @param {Event} event 事件对象* @desc 鼠标按下事件*/DrawingBoard.prototype.touchStartPC = function (event) {_this.drawStatus = trueconst { offsetX, offsetY } = eventif (_this.isRubber) {_this.eraseBoard(offsetX, offsetY)return}_this.createBrush(offsetX, offsetY)}/*** @method* @param {Event} event 事件对象* @desc 鼠标移动事件*/DrawingBoard.prototype.touchMovePC = function (event) {if (!_this.drawStatus) return;const { offsetX, offsetY } = eventif (_this.isRubber) {_this.eraseBoard(offsetX, offsetY)return}_this.drawPixel({offsetX, offsetY})}/*** @method* @param {Event} event 事件对象* @desc 鼠标抬起事件*/DrawingBoard.prototype.touchEndPC = function (event) {_this.drawStatus = false}this.initSignatureCanvas()}/*** 初始化画板*/DrawingBoard.prototype.initSignatureCanvas = function () {this.isDisable = falselet canvas = document.createElement('canvas')this.canvas = canvasthis.addAttribute(canvas)this.bindEvent(canvas)this.ctx = canvas.getContext('2d')this.options.el?.appendChild(canvas)this.ctx.fillStyle = this.options.background || '#fff'this.ctx.fillRect(0, 0, canvas.width, canvas.height)}/*** @method* @param {Number} x 画笔的 x 坐标* @param {Number} y 画笔的 y 坐标* @desc 移动画笔创建连接点*/DrawingBoard.prototype.createBrush = function (x, y) {this.ctx.beginPath()this.ctx.moveTo(x, y)}/*** @method* @param {Object} options 绘制线条的 x,y 坐标* @desc 根据点坐标绘制连线*/DrawingBoard.prototype.drawPixel = function (options) {const {offsetX, offsetY} = optionsthis.ctx.strokeStyle = this.options.brush.color || '#000'this.ctx.lineWidth = this.options.brush.lineWidth || 2// 设置绘制线段末端结束的形式this.ctx.lineCap = 'round'this.ctx.lineJoin = 'round'this.ctx.lineTo(offsetX, offsetY)this.ctx.fill()this.ctx.stroke();this.createBrush(offsetX, offsetY)}/*** @method* @param {Number} x 画笔的 x 坐标* @param {Number} y 画笔的 y 坐标* @desc 擦除画布*/DrawingBoard.prototype.eraseBoard = function (x, y) {this.ctx.clearRect(x, y, this.options.brush.lineWidth, this.options.brush.lineWidth)}/*** @mehtod* @desc 切换画笔和橡皮模式*/DrawingBoard.prototype.switchBrush = function () {if (this.isRubber) {this.isRubber = falsethis.options.el.style.cursor = `url(${this.options.brush.pointer}) 0 16, default`} else {this.isRubber = truethis.options.el.style.cursor = `url('./assets/rubber.png') 0 16, default`}}/*** @mehtod* @param {Object} brush 画笔样式配置项* @desc 设置画笔样式*/DrawingBoard.prototype.setBrush = function (brush) {Object.assign(this.options.brush, brush)}/*** @method* @param {Function} cb 通过回调函数返回画布信息* @desc 保存画布信息为图片资源*/DrawingBoard.prototype.save = function (cb) {if (this.options.exportType === 'blob') {this.canvas.toBlob(function (blob) {const blobUrl = URL.createObjectURL(blob)cb(blobUrl)}, this.options.mimeType)} else {const base64 = this.canvas.toDataURL(this.options.mimeType)cb(base64)}}/*** @method* @desc 禁用画布*/DrawingBoard.prototype.disable = function () {this.isDisable = truethis.unBindEvent()}/*** @method* @desc 启用画布*/DrawingBoard.prototype.enable = function () {this.isDisable = falsethis.bindEvent()}/*** @method* @desc 获取父容器宽高*/DrawingBoard.prototype.getClientRect = function () {return {width: this.options.el.scrollWidth,height: this.options.el.scrollHeight}}/*** @method* @desc 为容器和画布添加属性样式*/DrawingBoard.prototype.addAttribute = function () {let { width, height, style } = this.optionsconst container = this.getClientRect()let styleParse = ''for (const key in style) {if (Object.prototype.hasOwnProperty.call(style, key)) {styleParse += `${toSplitLine(key)}: ${style[key]};`}}if(!width) width = '200px'if(!height) height = '200px'this.canvas.setAttribute('width', width)this.canvas.setAttribute('height', height)this.canvas.setAttribute('style', styleParse)if (this.options.el) { if(container.width <= 0) this.options.el.style.width = widthif (container.height <= 0) this.options.el.style.height = heightif (this.options.brush && this.options.brush.pointer) {this.options.el.style.cursor = `url(${this.options.brush.pointer}) 0 16, default`}}}/*** @method* @desc 事件绑定*/DrawingBoard.prototype.bindEvent = function () {this.canvas.addEventListener("mousedown", this.touchStartPC)this.canvas.addEventListener("mousemove", this.touchMovePC)this.canvas.addEventListener("mouseup", this.touchEndPC)}/*** @method* @desc 解除事件绑定*/DrawingBoard.prototype.unBindEvent = function () {this.canvas.removeEventListener("mousedown", this.touchStartPC)this.canvas.removeEventListener("mousemove", this.touchMovePC)this.canvas.removeEventListener("mouseup", this.touchEndPC)}
工具类函数
/*** @method* @param {String} str 需要转换的字符串* @returns 转换后的字符串* @desc 将驼峰命名转化为使用分隔符的字符串*/function toSplitLine(str) {var reg = /[A-Z]/g;var newStr = str.replace(reg, function ($0) {return '-' + $0.toLocaleLowerCase();});if (newStr.substring(0, 1) === '-') {newStr = newStr.substring(1);}return newStr;}
完结
以上就是整个功能的实现,如果存在缺陷请联系及时改正。
如果本文对你有帮助,记得留下点痕迹,让我知道你来过。
欢迎评论区讨论,共同进步,2022 即将结束,2023继续努力!!