最近做弱监督学习研究,进行相关分析。发现Detectron2是一个不错的框架,其中也有model zoo相当多种类的预训练模型可以拿来直接用。但是安装配置使用中碰到了许多坑。跟各位小伙伴们分享。
推荐使用Linux Ubuntu16.04以上版本安装,虚拟机不太好使
我的环境:
GPU:4 x RTX2080
Linux: Ubuntu 16.04 x64 预装doc
Nvidia驱动:440.82
CUDA:10.1
Usr: 无sudo权限
服务器安装指南:
1.强烈推荐先安装anaconda
- 找到合适的的anaconda安装包,推荐使用国内镜像
- Index of /anaconda/archive/ | 北京外国语大学开源软件镜像站 | BFSU Open Source Mirror
- 推荐使用2019以上的版本,ubutun的话选择linux_x64
- 为方便在服务器端,使用xshell操作下载,使用wget命令+复制对应的版本下载地址直接下载。
- 小提示:安装完后需要在是否init conda时输入yes。如果没有进行这一步,参考博文安装conda时没有执行conda init_weixin_43364556的博客-CSDN博客_conda init
/home/XXXXXX/anaconda3/bin/conda shell.bash hook >>~/.bashrc- 直接在终端执行,将XXXXX替换成自己的用户名
- 之后执行source .bashrc
- 显示(base)后完成安装
2.安装PyTorch
确保驱动和cuda已经安装好了,进入pytorch官网,选择对应版本,这里推荐使用conda安装方式,以便整个conda下的所有环境都可以使用pytorch不必重复安装
https://pytorch.org/get-started/locally/
如果cuda版本比较老,需要自己认证去寻找previous version
https://pytorch.org/get-started/previous-versions/
3.下载并配置Detectron2
Git链接:GitHub - shenyunhang/DRN-WSOD-pytorch: Enabling Deep Residual Networks for Weakly Supervised Object Detection创建合适的项目路径,通过以下执行clone
git clone https://github.com/shenyunhang/DRN-WSOD-pytorch.git以下是官方给出的安装指导和配置要求,供参考。
Installation
Our Colab Notebook has step-by-step instructions that install detectron2. The Dockerfile also installs detectron2 with a few simple commands.
Requirements
- Linux or macOS with Python ≥ 3.6
- PyTorch ≥ 1.4 and torchvision that matches the PyTorch installation. You can install them together at pytorch.org to make sure of this
- OpenCV is optional and needed by demo and visualization
Build Detectron2 from Source
gcc & g++ ≥ 5 are required. ninja is recommended for faster build. After having them, run:
python -m pip install 'git+https://github.com/facebookresearch/detectron2.git'
# (add --user if you don't have permission)# Or, to install it from a local clone:
git clone https://github.com/facebookresearch/detectron2.git
python -m pip install -e detectron2# Or if you are on macOS
CC=clang CXX=clang++ python -m pip install ......
To rebuild detectron2 that's built from a local clone, use
rm -rf build/ **/*.soto clean the old build first. You often need to rebuild detectron2 after reinstalling PyTorch.Install Pre-Built Detectron2 (Linux only)
Choose from this table:
CUDA torch 1.5 torch 1.4 10.2 install
10.1 install
install
10.0 install
9.2 install
install
cpu install
install
Note that:
- The pre-built package has to be used with corresponding version of CUDA and official PyTorch release. It will not work with a different version of PyTorch or a non-official build of PyTorch.
- Such installation is out-of-date w.r.t. master branch of detectron2. It may not be compatible with the master branch of a research project that uses detectron2 (e.g. those in projects or meshrcnn).
发现安装需要执行
python3 -m pip install -e .其实对应的就是根目录下执行
pip install setup.py如果在安装中有错误,请根据setup.py内要求的依赖包逐个安装
安装完后准备试一下他的功力,这里直接选用demo/中的demo.py做实验
以下是GETSTART.MD的部分内容
Getting Started with Detectron2
This document provides a brief intro of the usage of builtin command-line tools in detectron2.
For a tutorial that involves actual coding with the API, see our Colab Notebook which covers how to run inference with an existing model, and how to train a builtin model on a custom dataset.
For more advanced tutorials, refer to our documentation.
Inference Demo with Pre-trained Models
- Pick a model and its config file from model zoo, for example,
mask_rcnn_R_50_FPN_3x.yaml.- We provide
demo.pythat is able to run builtin standard models. Run it with:cd demo/ python demo.py --config-file ../configs/COCO-InstanceSegmentation/mask_rcnn_R_50_FPN_3x.yaml \--input input1.jpg input2.jpg \[--other-options]--opts MODEL.WEIGHTS detectron2://COCO-InstanceSegmentation/mask_rcnn_R_50_FPN_3x/137849600/model_final_f10217.pklThe configs are made for training, therefore we need to specify
MODEL.WEIGHTSto a model from model zoo for evaluation. This command will run the inference and show visualizations in an OpenCV window.For details of the command line arguments, see
demo.py -hor look at its source code to understand its behavior. Some common arguments are:
- To run on your webcam, replace
--input fileswith--webcam.- To run on a video, replace
--input fileswith--video-input video.mp4.- To run on cpu, add
MODEL.DEVICE cpuafter--opts.- To save outputs to a directory (for images) or a file (for webcam or video), use
--output.
在其他博客中detectron2 + ubuntu + cpu - 走看看有对其的一点点翻译大家可以参看。
注意:这里要说的是在线下载模型文件不太好用,无论是用代理还是不用,都下载不了
所以选择model zoo中直接下载pkl与训练模型,到demo/目录https://github.com/shenyunhang/DRN-WSOD-pytorch/blob/DRN-WSOD/MODEL_ZOO.md![]() https://github.com/shenyunhang/DRN-WSOD-pytorch/blob/DRN-WSOD/MODEL_ZOO.md注意,id要对应上,然后将你要识别的图片也放在demo/下,执行命令
https://github.com/shenyunhang/DRN-WSOD-pytorch/blob/DRN-WSOD/MODEL_ZOO.md注意,id要对应上,然后将你要识别的图片也放在demo/下,执行命令
python demo.py --config-file ../configs/COCO-InstanceSegmentation/mask_rcnn_R_50_FPN_3x.yaml --input ies.jpg --output 1.jpg --opts MODEL.WEIGHTS model_final_f10217.pkl[12/22 01:35:08 detectron2]: Arguments: Namespace(confidence_threshold=0.5, config_file='../configs/COCO-InstanceSegmentation/mask_rcnn_R_50_FPN_3x.yaml', input=['ies.jpg'], opts=['MODEL.WEIGHTS', 'model_final_f10217.pkl'], output='1.jpg', video_input=None, webcam=False)
[12/22 01:35:12 fvcore.common.checkpoint]: [Checkpointer] Loading from model_final_f10217.pkl ...
[12/22 01:35:12 fvcore.common.checkpoint]: Reading a file from 'Detectron2 Model Zoo'
0%| | 0/1 [00:00<?, ?it/s]/home/zhf/PJ/wsod/DRN-WSOD-pytorch/detectron2/layers/wrappers.py:226: UserWarning: This overload of nonzero is deprecated:
nonzero()
Consider using one of the following signatures instead:
nonzero(*, bool as_tuple) (Triggered internally at /opt/conda/conda-bld/pytorch_1607370141920/work/torch/csrc/utils/python_arg_parser.cpp:882.)
return x.nonzero().unbind(1)
[12/22 01:35:13 detectron2]: ies.jpg: detected 10 instances in 0.36s
100%|████████████████████████████████████████████████████████████████████████████████████████████████████████████████████████████| 1/1 [00:00<00:00, 2.49it/s]
完成后1.png即为输出文件,导出后查看,效果还可以,输入图片可以是任意尺寸的!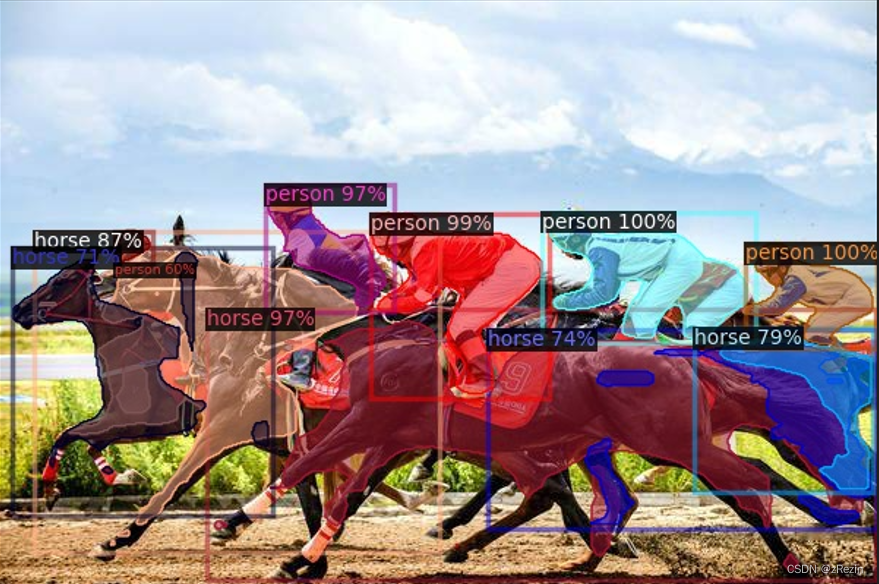
,后期会解析一下detectron2的代码结构


![关于CSRF攻击及mvc中的解决方案 [ValidateAntiForgeryToken]](https://img-my.csdn.net/uploads/201212/05/1354701750_7294.jpg)