文章目录
- 一、学会使用char/short/int关键字
- 二、学会使用 if & switch
- 三、学会使用 for & while
- 四、学会使用static关键字
- 五、学会使用define关键字
- 六、学会使用typedef关键字
- 七、学会使用enum关键字
- 八、学会使用struct类型
- 九、学会使用指针类型
- 十、学会使用回调函数
- 十一、综合项目
- 1. 可变参数的实现
- 2. Zlog日志框架
- 3. google测试框架
一、学会使用char/short/int关键字
-
不同数据类型存储的长度
#include <stdio.h>char a; //0x00~0xff short b; //0x00~0xffff int c; //0x00~0xffffffffvoid main() {printf("hello world!\n");printf("%d %d %d\n", sizeof(a), sizeof(b), sizeof(c)); } -
数据类型的转换
#include <stdio.h>unsigned char time_buffer[4] = { 0x5F, 0xCB, 0x0F, 0x4F };
unsigned int time;//数据转换函数
unsigned int u8tou32B(unsigned char *buffer)
{return (((((((unsigned int)buffer[0]) << 8) | buffer[1]) << 8) | buffer[2]) << 8) | buffer[3];
}void main()
{printf("hello world!\n");time = u8tou32B(time_buffer);printf("time = %ld s\n",time);
}
二、学会使用 if & switch
条件判断语句if和switch,当判断的类型较少的时候,使用if去判断;当判断的类型较多的时候,使用switch去判断。
#include <stdio.h>typedef enum{NET_INIT = 0,NET_CONNECTING,NET_CONNECT_SUCCESS,NET_CONNECT_FAIL,NET_ERROR,
}E_NET_STATUS;void main()
{printf("hello world\n");E_NET_STATUS net_status = NET_CONNECTING;//1. 第一种方式if (net_status == NET_INIT){}else if (net_status == NET_CONNECTING){}else if (net_status == NET_CONNECT_SUCCESS){}else if (net_status == NET_CONNECT_FAIL){}else if (net_status == NET_ERROR){}//2. 第二种方式switch (net_status){case NET_INIT:break;case NET_CONNECTING:break;case NET_CONNECT_SUCCESS:break;case NET_CONNECT_FAIL:break;case NET_ERROR:break;default:break;}
}
三、学会使用 for & while
-
while的用法# include <stdio.h>void main() {int wifi_array[5] = { 1, 2, 3, 4, 5 };int index = 0;while (index < sizeof(wifi_array)/sizeof(int)){printf("%d \n", wifi_array[index]);index++;} } -
for的用法# include <stdio.h>void main() {int wifi_array[5] = { 1, 2, 3, 4, 5 };int sum = 0;for (int index = 0; index < sizeof(wifi_array) / sizeof(int); index++){sum += wifi_array[index];}printf("%d \n", sum); }
四、学会使用static关键字
此处我们需要创建两个文件
主函数main.cpp
# include <stdio.h>
//这里使用 "" 符号加载自己创建的头文件
# include "test.h"void main()
{printf("hello world\n");test();test1();test1();test1();
}
test.cpp文件
# include <stdio.h>
# include "test.h"//创建静态函数,表明函数只能在本文件中使用,其他文件若是调用会报错
//若其他文件想要使用,可以创建外部函数,把此函数放到外部函数内部。
static void test_printf()
{printf("test_printf\n");
}void test(void)
{test_printf();
}void test1()
{//创建静态变量,编译器只会执行一次这个语句static int num = 0;num++;printf("%d\n", num);
}
test.h文件
//文件多的时候,多个文件调用同一个文件,会出现重复定义的情况
//我们使用 #ifndef---#endif 来确保头文件重复创建#ifndef _TEST_H_
#define _TEST_H_void test(void);
//此处使用会报错
static void test_printf(void);
void test1(void);#endif
运行结果:
hello world
test_printf
1
2
3
五、学会使用define关键字
# include <stdio.h>//算法运算需要加上括号
# define A (3+1)//使用define关键字声明一个值,程序中使用 ifdef 来判断,
//可以很方便的应用于程序调试中
//# define VERSION_PRE 0
# define VERSION_GLOD 1void main()
{printf("hello world\n");printf("sum = %d \n", 10 * A);#ifdef VERSION_PREprintf("THIS is a Pre version\n");
#elif VERSION_GLODprintf("THIS is Gold version\n");
#endif
}
六、学会使用typedef关键字
# include <stdio.h>//注意typedef和define的区别
typedef char* PCHAR1;
#define PCHAR2 char*//c1、c2都为char*,typedef为char* 引入了一个新的别名
PCHAR1 c1, c2;
//等价于
char *c1, *c2;//相当于char* c3,c4; c3是char*,而c4是char
PCHAR2 c3, c4;
//等价于
char* c3;
char c4;//在单片机开发中,定义变量时使用unsigned char会过于繁琐,通常把unsigned char重定义为uint8
//当程序中需要定义unsigned char时,直接使用uint8即可。
typedef unsigned char  uint8;
typedef unsigned short uint16;
typedef unsigned int   uint32;
七、学会使用enum关键字
# include <stdio.h>//使用enum定义枚举类型
typedef enum{NET_INIT = 1,NET_CONNECTING,NET_CONNECT_SUCCESS,NET_CONNECT_FAIL,NET_ERROR,
}E_NET_STATUS;void main()
{//定义枚举类型变量,可以限制数据的范围,方便检查程序E_NET_STATUS ble_status = NET_CONNECTING;//以下判断网络的连接状态if (ble_status == NET_INIT){printf("Initing\n");}else if (ble_status == NET_CONNECTING){printf("Connecting\n");}else if (ble_status == NET_CONNECT_SUCCESS){printf("Connect success\n");}else if (ble_status == NET_CONNECT_FAIL){printf("Connect fail\n");}else{printf("error");}
}
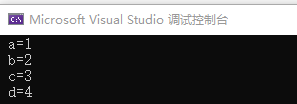
八、学会使用struct类型
使用struct把同一事物的所有属性包含在一起,使程序结构整洁,条理清晰。
# include <stdio.h>typedef enum{NET_INIT = 1,NET_CONNECTING,NET_CONNECT_SUCCESS,NET_CONNECT_FAIL,NET_ERROR,
}E_NET_STATUS;typedef struct{int num;
}T_Manager;typedef struct{int num;int time;int money;
}T_Pay;typedef struct{int system_status;int net_status;int motor_status[4];int pay_status;T_Pay m_pay;T_Manager m_manager;
}T_Device;//定义两个不同的网卡
T_Device g_Device;
T_Device g_Device1;void main()
{g_Device.net_status = NET_INIT;g_Device1.net_status = NET_CONNECTING;g_Device.m_pay.num = 1;g_Device.m_manager.num = 2;printf("Net status = %d\n", g_Device.net_status);printf("Net1 status = %d\n", g_Device1.net_status);printf("m_pay = %d\n", g_Device.m_pay.num);printf("m_Manager = %d\n", g_Device.m_manager.num);
}
执行结果:
Net status = 1
Net1 status = 2
m_pay = 1
m_Manager = 2
九、学会使用指针类型
-
指针操作的是地址
# include <stdio.h>void main()
{int val = 10;int *p;p = &val;printf("p = %d *p = %d\n", p,*p);
}
执行结果:
p = 2096592 *p = 10
此处p代表变量地址, *p才代表变量里面的数值
-
交换a,b
# include <stdio.h>//1. 不使用指针类(保存临时变量,交换不成功) void swap(int data1, int data2) {int temp = data2;data2 = data1;data1 = temp; }void main() {int a = 10, b = 20;swap(a, b);printf("a = %d, b = %d\n", a, b); }//2. 使用指针类型(直接交换变量的地址,交换成功) void swap(int *data1, int *data2) {int temp = *data2;*data2 = *data1;*data1 = temp; }void main() {int a = 10, b = 20;swap(&a, &b);printf("a = %d, b = %d\n", a, b); } -
100个钥匙使用指针操作
#include <stdio.h>void open(int *key, int num)
{printf("data = %d\n", key[num]);
}void main()
{int key[100] = { 0, 1, 2, 3, 4, 5, 6, 7, 8, 9 };open(key, 5);
}
十、学会使用回调函数
使用场景:
- 送餐机器人:底盘移动到目标位置后,如何通知应用程序?
- 智能音箱:网络状态更改后,如何通知应用程序?
传统方式:
- 开放变量,让别人直接获取
- 通过getStatus()类似的函数定时获取
建议方式:
使用回调函数
具体实现:
# include <stdio.h>//工具代码
typedef struct{int status;void(*statusChange)(int status);
}T_Device;T_Device g_Device;void addCallbackFunc(void (*pstatusChange)(int status)){g_Device.statusChange = pstatusChange;
}void run(){g_Device.status = 10;if (g_Device.status == 10){if (g_Device.statusChange != NULL){g_Device.statusChange(g_Device.status);}}
}//用户代码
void callBack(int status){printf("status = %d\n", status);
}void main()
{//当自己的状态等于10,并且有回调函数的时候,执行这个回调函数,//从而实现自己的状态到了某个值时主动执行回调函数addCallbackFunc(callBack);run();
}
十一、综合项目
1. 可变参数的实现
可变参数函数:可以在运行时取任意的实参个数并根据实参的个数自动处理不同实参的情形,或者至少可以在运行时指定任意个数的实参个数。
-
c语言中的
printf()函数就是典型的可变参数函数,它除了有一个固定的format参数外,后面的参数都是可变的。 -
printf()函数通过第一个参数确定形参的个数,通过占位符确定形参类型。 -
printf()函数源码#include <stdarg.h>int printf(const char *fmt, ...) {char printf_buf[1024];va_list args; int printed;va_start(args, fmt); printed = vsprintf(printf_buf, fmt, args);va_end(args); puts(printf_buf);return printed; } -
宏介绍:
va_list:用于定义va_list类型的变量va_start:用于初始化va_list类型的变量va_end:关闭变参扩展,进行内存回收
2. Zlog日志框架
-
第一种方式:整个
c文件#include <stdio.h> //可变参数使用的头文件 #include <stdarg.h> //声明是否打开日志输出 #define OPEN_LOG 1 //声明当前程序的日志等级状态,只输出等级等于或高于该值的内容 #define LOG_LEVEL LOG_DEBUG //日志等级,越往下越高 typedef enum{LOG_DEBUG = 0,LOG_INFO,LOG_WARN,LOG_ERROR, }E_LOGLEVEL;//判断当前输入的日志等级 char *EM_LOGLevelGet(const int level){if (level == LOG_DEBUG){return "LOG_DEBUG";}else if (level == LOG_INFO){return "LOG_INFO";}else if (level == LOG_WARN){return "LOG_WARN";}else if (level == LOG_ERROR){return "LOG_ERROR";}return "UNKNOW"; }//日志输出函数 void EM_LOG(const int level, const char* fun, const int line, char *fmt, ...){ #ifdef OPEN_LOGva_list arg;va_start(arg, fmt);char buf[vsnprintf(NULL, 0, fmt, arg) + 1];vsnprintf(buf, sizeof(buf), fmt, arg);va_end(arg);if (level >= LOG_LEVEL)printf("[%s] [%s %d] %s\n",EM_LOGLevelGet(level), fun, line, buf);//TODO 存储 #endif }//宏定义,隐藏形参,只需要日志等级和可变参数 #define EMlog(level, fmt, ...) EM_LOG(level, __FUNCTION__, __LINE__, fmt, ##__VA_ARGS__)void main(){int a = 10, b = 11;EMlog(LOG_DEBUG, "app start");EMlog(LOG_INFO, "a = %d, b=%d", a, b);EMlog(LOG_WARN, "app LOG_WARN");EMlog(LOG_ERROR, "app LOG_ERROR"); } -
独立多文件:
main.cpplog.cpplog.hmain.cpp#include <stdio.h> #include <stdarg.h> #include "log.h"void main(){int a = 10, b = 11;EMlog(LOG_DEBUG, "app start");EMlog(LOG_INFO, "A = %d", a);EMlog(LOG_WARN, "app LOG_WARN");EMlog(LOG_ERROR, "app LOG_ERROR"); }log.h#ifndef _EM_LOG_H_ #define _EM_LOG_H_//可变参数使用的头文件 #include <stdarg.h> //声明是否打开日志输出 #define OPEN_LOG 1 //声明当前程序的日志等级状态,只输出等级等于或高于该值的内容 #define LOG_LEVEL LOG_DEBUG //是否保存日志文件 #define LOG_SAVE 1//日志等级,越往下越高 typedef enum{LOG_DEBUG = 0,LOG_INFO,LOG_WARN,LOG_ERROR, }E_LOGLEVEL;//函数声明 void EM_LOG(const int level, const char* fun, const int line, char *fmt, ...);//宏定义,隐藏形参,只需要日志等级和可变参数 #define EMlog(level, fmt, ...) EM_LOG(level, __FUNCTION__, __LINE__, fmt, ##__VA_ARGS__)#endiflog.cpp#include <stdio.h> #include "log.h"//判断当前输入的日志等级 char *EM_LOGLevelGet(const int level){switch (level){case LOG_DEBUG: return "LOG_DEBUG"; break;case LOG_INFO: return "LOG_INFO"; break;case LOG_WARN: return "LOG_WARN"; break;case LOG_ERROR: return "LOG_ERROR"; break;default: return "UNKNOW"; break;} }//日志输出函数 void EM_LOG(const int level, const char* fun, const int line, char *fmt, ...){ #ifdef OPEN_LOGva_list arg;va_start(arg, fmt);char buf[1 + vsnprintf(NULL, 0, fmt, arg)];vsnprintf(buf, sizeof(buf), fmt, arg);va_end(arg);if (level >= LOG_LEVEL)printf("[%s] [%s %d] %s\n", EM_LOGLevelGet(level), fun, line, buf);//TODO 存储 #endif }
3. google测试框架
#include <stdio.h>
#include <stdlib.h>typedef struct
{int output;int a;int b;int(*TeseFunc)(int, int);  int line;
}T_Test;// 结构体作为函数返回值(新建结构体)
T_Test *addFunc(int(*TeseFunc)(int, int), int a, int b, int output, int line){T_Test *m_Test = (T_Test *)malloc(sizeof(T_Test));  m_Test->a = a;m_Test->b = b;m_Test->TeseFunc = TeseFunc;m_Test->output = output;m_Test->line = line;return m_Test;
}// 宏定义函数,缺省line
#define addFunc(TeseFunc, a, b, output) addFunc(TeseFunc, a, b, output, __LINE__)//测试函数
void runTest(T_Test *p_Test){if (p_Test != NULL){int count = p_Test->TeseFunc(p_Test->a, p_Test->b);if (count == p_Test->output){printf("success \n");}else{printf("[LINE: %d] fail %d != %d\n", p_Test->line, count, p_Test->output);}free(p_Test);   }
}int add(int a, int b){return a + b;
}int main(){printf("Test app start.\n");T_Test *m_Test = addFunc(add, 1, 2, 4);runTest(m_Test);return 0;
}