A r m o u r G e e T e s t ArmourGeeTest ArmourGeeTest
[TOS]
- 本项目仅供交流学习,有疑问请在issue中提出;
- 本项目不提供面向任何商业需求的版本迭代;
- 关于本项目源码的使用请遵循Apache-2.0 License;
- 禁止任何人使用本项目及其分支提供任何形式的收费代理服务。
🎠 项目简介
- ArmourGeeTest是一种针对GeeTest滑动验证的超高通过率解决方案。
- 引入
姿态收敛以及惯性牵引等初中物理概念解决二维空间中的像素对齐问题。 - 当这个难倒了大批爬虫玩家的问题被抽象成
缺口识别以及像素对齐两个指标时使用本方案进行百次实验:
a. 当缺口识别率为100%时,gt3通过率为92%。失败案例中超半数由收敛超时引发,剩下的被怪兽吃掉了;
b. 当缺口识别率为100%时,gt2通过率100%。仅在缺口被遮挡时失败,但此时更倾向认为缺口识别率<100%; gt3算子收敛过程小概率出现“震荡”现象,此时(为保证通过率)任务耗时将大幅增长,开发者可通过优(手)化(调)本项目的模型超参数,达成低耗时+高通过率的性能指标。
✈️快速上手
-
【方案一】用户
通过观看ArmourGeeTest滑动验证demo了解本项目的工作范围。
-
【方案二】开发者
Clone项目,根据技术文档合理配置
config.py后编译项目。
💁♂ 用法说明
更多详细信息请访问本项目Github仓库
1 环境复现
[注意] 本文档将以如下参考配置进行项目说明
-
开发工具:
Pycharm Community 2021.1、Anaconda(env Python3.7) -
操作系统:
Windows 10.0.19041 -
必要组件:
google-chrome v91.0.4472.124、chromedriver_win32 v92.0.4472.101
2 目录结构
2.1 演示模块
[注意] 在
Github项目中根目录路径名为armour-geetest-{branchName},如armour-geetest-main。
如下XML所示为本项目演示用例的工程结构,以./armour-geetest为root,则main.py是程序入口,其调用了来自./examples中的demo_geetest2和demo_geetest3的测试用例,通过编译main.py既可打开演示站点进行算法测试,而相关测试站点的链接存放在对应算法的“demo.py”文件中。
-
./examples/demo_base.py中存放了一个Selenium Chrome高性能运行实例,用以启动浏览器、提供继承接口等任务; -
./examples/demo_geetest2.py存放了继承自base的浏览器操作句柄,并作为GeeTest2的接口实现; -
./examples/demo_geetest3.py的作用同上; -
./src/database/cache下存放的则是截图缓存的输出,此目录将在程序初次运行后自动创建;相关路径定位可在./src/config.py中设置。
armour-geetest|———— examples| |———— __init__.py| |———— demo_base.py| |———— demo_geetest2.py| |———— demo_geetest3.py|———— src| |———— armour| | |———— common| | |———— support| | | |———— __init__.py| | | |———— core.py| | | |———— geetest_v2.py| | | |———— geetest_v3.py| | |———— __init__.py| |———— *database| | |———— cache| | | |———— full_img{timeStamp}.png| | | |———— notch_img{timeStamp}.png| |———— __init__.py | |———— config.py|———— main.py|———— requirements.txt
2.2 底层模块
如2.1 XML所示,在./src/armour中存放了本项目实例的解耦代码,是能完成基本需求的独立模块。
./src/armour/common中存放着exceptions.py异常警告模块;./src/armour/support中存放这实例核心功能代码;core:一种CrackBaseClass,存放着基于多种科学计算方法的轨迹生成器、像素对齐方法、混频震荡器、缺口边界识别以及包括模块拽动、验证唤醒、缓存拼图等应对针对性场景的方法。geetest_v2:继承core,实现方法接口,并根据具体业务场景重写了对应的模块。并在run方法中实现业务流程的串联。geetest_v3:继承core,实现方法接口,并根据具体业务场景重写了对应的模块。并在run方法中实现业务流程的串联。
3 启动项目
定义如下变量用于流程演示:
gt3:一类需要点击激活验证界面的版本;
gt2:一类无需点击伴随有丰富卡通背景图的版本;
full_img:原始背景图;
notch_img:带有“拼图缺口”的背景图;
3.1 快速上手
在Pycharm 中运行终端Terminal,以目录./sspanel-geetest为运行根按序执行以下指令。
(1)拉取依赖
# ./armour-geetest
pip install -r requirements.txt -i https://pypi.tuna.tsinghua.edu.cn/simple
(2)运行demo
# ./armour-geetest
python main.py
(3)查看输出
- 通过观看ArmourGeeTest滑动验证demo了解本项目的工作范围;
- 获取的
full_img以及notch_img将分别根据/src/config.py中的路径FULL_IMG_PATH以及NOTCH_IMG_PATH存放到指定路径下,默认在/src/databse/cache文件夹中(项目初始化后自动生成)。
3.2 打开冰箱门
本项目依赖
Selenium实现对Chrome浏览器的操作,需要运行环境中存在Chrome以及chromdriver.exe。
3.2.1 配置google-chrome开发环境
(1)安装Chrome
若您电脑中已存在Chrome浏览器请跳过此步骤
访问Google Chrome下载(最新版)Chrome应用程序。
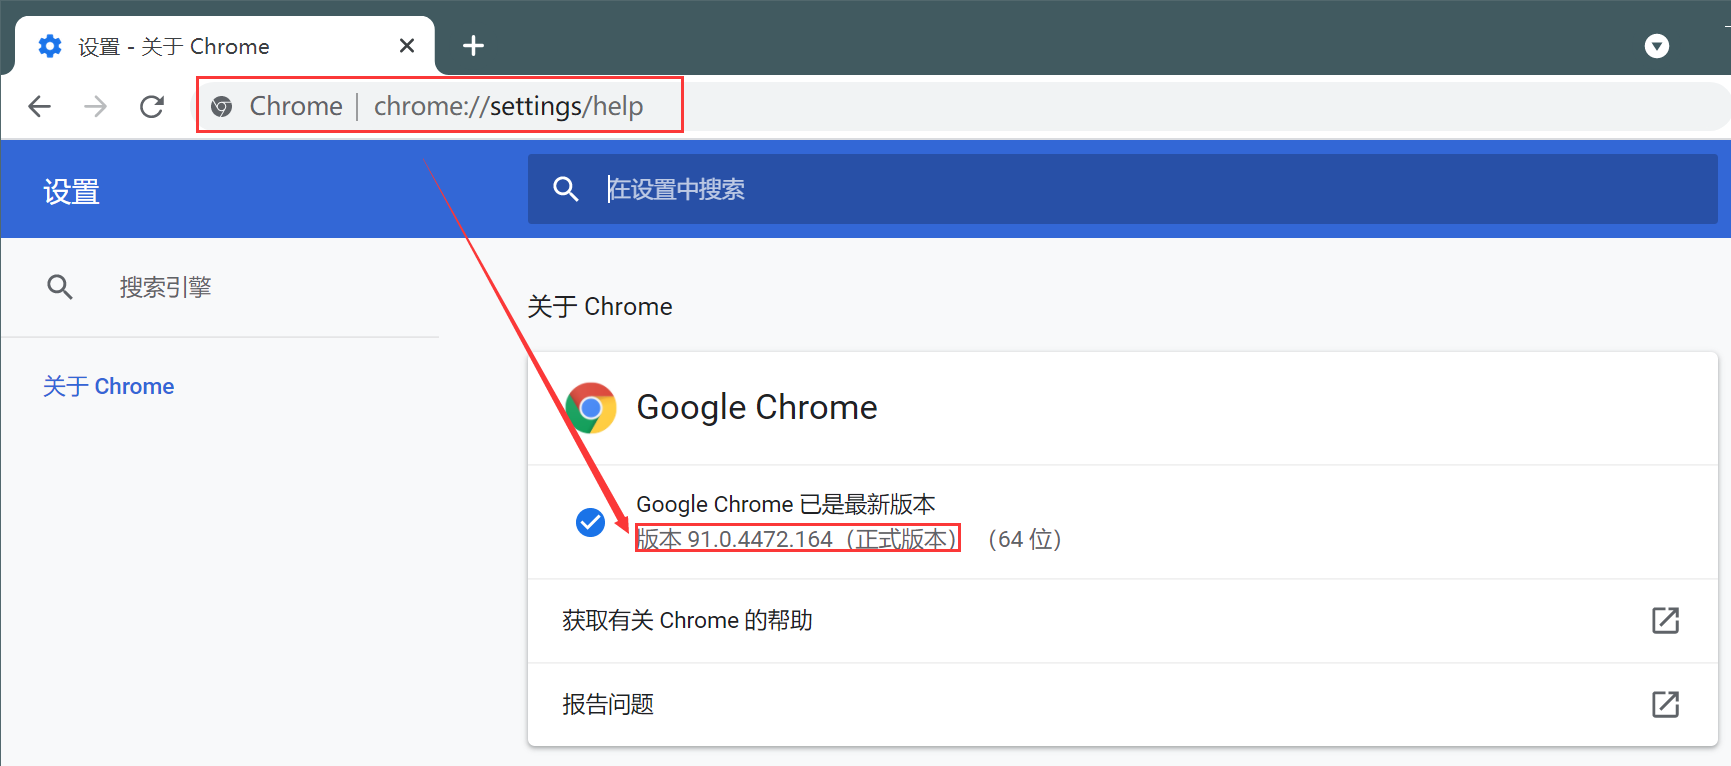
(2)查看Chrome version
如下图所示,在搜索栏中输入chrome://settings/help查看软件版本。
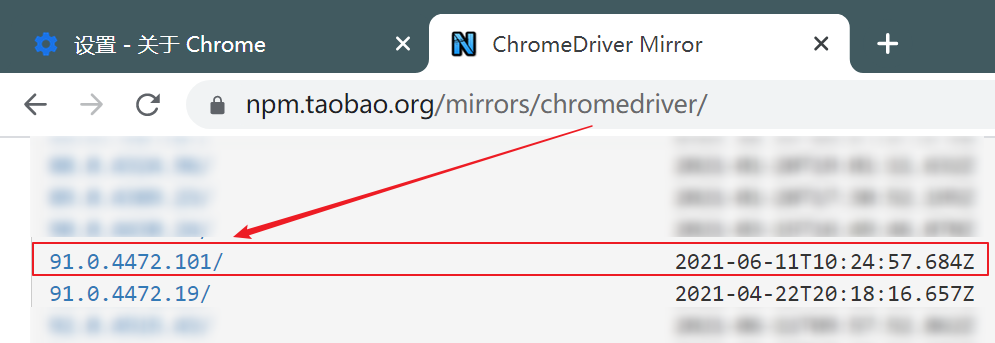
(3)安装chromedriver
访问驱动镜像网页选择对应版本、对应操作系统的应用程序下载并解压出chromedriver。
版本的选择建议:前3组十进制版本号需要和Chrome的一致,再根据发布时间选择最新的小版本,如下图所示。
3.2.2 配置config.py项目启动参数
本项目配置文件中,必须合理配置
CHROMEDRIVER_PATH参数才能启动GeeTest-Crack滑动验证破解模块
关于CHROMEDRIVER_PATH路径确定的源码如下:
# ./armour-geetest/src/config.py# 系统默认的chromedriver文件路径,既./armour-geetest/chromedriver.exe
CHROMEDRIVER_PATH = dirname(__file__) + "/chromedriver.exe"# 若chromedriver不在CHROMEDRIVER_PATH指定的路径下 尝试从环境变量中查找路径
if not exists(CHROMEDRIVER_PATH):CHROMEDRIVER_PATH = "chromedriver"
其中,建议开发者将下载好的文件移至./armour-geetest工程目录下,系统运行时既可自动读取chromedriver程序;否则需要经过一系列较为繁琐的环境变量配置过程,可参考此文章,此时CHROMEDRIVER_PATH将被置为None,系统运行时根据环境变量PATH读取chromedriver。
以上仅是推荐配置,若您对Python3开发足够熟练,可改动源码二次开发。
4 其他设置
4.1 关于Selenium常见报错
关于WebdriverException异常类型的中文解释可参考此文章。
4.2 注意事项
- 本项目所用演示站点可能需要流量过墙,若条件允许请开启系统代理;
- 请勿直接在
PyCharm中以./src/armour/support为根目录运行任何代码,该目录下代码的引用使用相对路径hook,运行必然抛出错误ImportError: attempted relative import with no known parent package; - 若需要移植到其他项目中使用,请实现
./examples中所展示的相关接口以及调用方法; Github项目拉取后会在根目录下携带一枚chromedriver_win32.exe 91.0.4472.101若版本不匹配请参照config.py中的引导替换相应版本文件,或将其移除(使用环境变量)。
5 源码附录
获取最新版本源码请访问本项目Github仓库,本篇博客仅起演示说明作用,可能并不携带最新版本特性。
直接复制粘贴可能会有格式错乱,请根据情况调整,如重新格式化代码CTRL+ALT+L;
请各位玩家具备最基础的项目debug能力(球球了)当然有问题也可在本篇博客中评论;
请阅读 [4.2 注意事项],以及[2.1 XML]目录结构;
./src/arrmour/support/core.py
# -*- coding: utf-8 -*-
# Time       : 2021/7/21 17:39
# Author     : QIN2DIM
# Github     : https://github.com/QIN2DIM
# Description:
import random
import timefrom PIL import Image, ImageDraw, ImageFont
from selenium.webdriver import Chrome
from selenium.webdriver.common.action_chains import ActionChains
from selenium.webdriver.common.by import By
from selenium.webdriver.support import expected_conditions as ec
from selenium.webdriver.support.ui import WebDriverWaitclass SliderValidator(object):def __init__(self, driver: Chrome, debug: bool = False, full_img_path: str = None, notch_img_path: str = None,business_name: str = "SliderValidator"):self.debug = debug# Selenium操作句柄self.api = driver# 设置默认的全局等待时长self.wait = WebDriverWait(self.api, 5)# 业务名 用于debug模式下标记控制台的信息输出self.business_name = business_name# 完整图形和缺口图形文件路径self.full_img_path = full_img_path if full_img_path else f"full_img_path_{time.time()}.png"self.notch_img_path = notch_img_path if notch_img_path else f"notch_img_path_{time.time()}.png"# 像素相似度阈值 用于粗糙地比对两张size一致的图形的相同像素坐标下的RGBA残差self.threshold: int = 60# 偏置起点 拼图在x轴上的像素体积self.offset: int = 35# 缓存物理算子的运动终点坐标(计算值而非真实值)self.boundary = self.offset# 滑块对象初始化self.slider = None# 滑块轨迹初始化self.track: list = []def activate_validator(self):"""唤醒验证 若无需唤醒则pass:return:"""passdef capture_slider(self, xpath: str = None, class_name: str = None):if xpath:self.slider = self.wait.until(ec.element_to_be_clickable((By.XPATH, xpath)))elif class_name:self.slider = self.wait.until(ec.element_to_be_clickable((By.CLASS_NAME, class_name)))def capture_full_img(self):"""# 获取完整的截图并存储:return:"""passdef capture_notch_img(self):"""# 获取缺口截图并存储:return:"""pass@staticmethoddef generate_track(solution, phys_params) -> list:if callable(solution):return solution(phys_params)def operator_sport_v1(self, phys_params) -> tuple:"""计算方案1:根据变速直线运动公式生成物理算子运动轨迹:return: 生成一维坐标的运动轨迹"""# 运动终点坐标boundary = phys_params['boundary']# 轨迹树track = []# 物理算子当前所在的一维空间位置current_coordinate = phys_params.get("current_coordinate") if phys_params.get("current_coordinate") else 0# 切割变加速度的边界距离mid = phys_params.get("mid") if phys_params.get("mid") else boundary * 3.2 / 4# 运动时间(采样间隔)越高则单步位移提升越大,任务耗时降低,但误差增大t = phys_params.get("t") if phys_params.get("t") else 1.# 运动初速度为0v = 0# 当算子还未抵达终点时,持续生成下一步坐标alpha_factor = phys_params.get("alpha_factor") if phys_params.get("alpha_factor") else 1.8712beta_factor = phys_params.get("beta_factor") if phys_params.get("beta_factor") else 1.912while current_coordinate < boundary:# 当算子处于“距离中点”前时加速,越过后减速if current_coordinate < mid:a = random.uniform(alpha_factor, beta_factor)else:a = -random.uniform(0.11, 0.13)v0 = vv = v0 + a * t# move 是每一步的位移move = v0 * t + 1 / 2 * a * t * tcurrent_coordinate += movetrack.append(int(move))if self.debug:print(f">>> displacement: {sum(track)}, boundary: {boundary}, position: {sum(track) - boundary}")# 返回算子运动轨迹return track, sum(track) - boundarydef operator_sport_v2(self):"""计算方案2:借鉴Momentum动量收敛思想,生成包含“混频震荡”“累积速度”等行为的物理算子运动轨迹:return:"""passdef operator_sport_v3(self):"""计算方案3:使用强化学习暴力破解,生成拟人化的物理算子运动轨迹:return:"""passdef identify_boundary(self, full_img_path, notch_img_path, offset: int = 35):"""获取缺口偏移量:param full_img_path: 不带缺口图片路径:param notch_img_path: 带缺口图片路径:param offset: 偏移量, 默认 35:return:"""# 1.读取完整背景图与残缺背景图# 完整背景图与残缺背景图的边长参数一致full_img, notch_img = Image.open(full_img_path), Image.open(notch_img_path)# 2.遍历ImageObject图片对象的每一个像素点# ImageObject.size[0] 图片长度for i in range(offset, full_img.size[0]):# ImageObject.size[1] 图片宽度for j in range(full_img.size[1]):# 2.1将遍历到的像素点坐标(x,y)传到像素比对方法 is_pixel_equal() 用于找出像素明度差距较大的像素坐标集合if not self.is_pixel_equal(full_img, notch_img, i, j):# 视此坐标点为第一个明度差值较大的像素点,既“缺口拼图”的像素临界(起)点# 因为“滑块移动”是橫向移动滑块,不考虑垂直方向(y轴)坐标的影响,故此时仅返回x轴坐标,既横向坐标# 将此时遍历到的坐标返回self.boundary = ireturn self.boundary# 2.2 此时返回的坐标点必然是错误的# 但为了程序高效运行,需要返回一个符合参数格式的变量return self.boundarydef is_pixel_equal(self, img1, img2, x, y):pix1 = img1.load()[x, y]pix2 = img2.load()[x, y]if (abs(pix1[0] - pix2[0] < self.threshold) and abs(pix1[1] - pix2[1] < self.threshold) and abs(pix1[2] - pix2[2] < self.threshold)):return Trueelse:return Falsedef check_boundary(self, boundary):"""测试缺口识别算法精确度,根据full-notch色域残差计算得出的边界坐标boundary,在notch图上做出一条垂直线段,用于对比“边界”真实值与计算值的差距:return:"""text_size = 14text_font = "arialbi.ttf"line_width = 1# 打开文件对象boundary_notch = Image.open(self.notch_img_path)# 打开作图句柄draw = ImageDraw.Draw(boundary_notch)# 标识边界线(计算值)draw.line((boundary, 0, boundary, boundary_notch.size[1]), fill=(30, 255, 12), width=line_width)# 标识边界线x轴坐标ft = ImageFont.truetype(text_font, size=text_size)draw.text((boundary + line_width, 10), f"x = ({boundary}, )", fill=(255, 0, 0), font=ft)# 显示图片boundary_notch.show()@staticmethoddef de_dark(x, halt):time.sleep(halt)return x, abs(round(x / halt, 2))@staticmethoddef shock(step_num: int = 9, alpha=0.3, beta=0.5):pending_step = []for _ in range(step_num):correct_step = random.choice([-1, 0, 0, 1])if correct_step == 0 and random.uniform(0, 1) > alpha:if random.uniform(0, 1) <= beta:correct_step = 1else:correct_step = -1pending_step.append(correct_step)return pending_stepdef drag_slider(self, track, slider, position: int, boundary: int,use_imitate=True,is_hold=False,momentum_convergence=False):""":param position: 滑块走完轨迹后与boundary预测值的相对位置,position > 0在右边,反之在左边:param is_hold: 是否已拖住滑块,用于兼容不同的验证触发方式:param boundary::param slider::param track::param use_imitate:仿生旋转。对抗geetest-v3务必开启。百次实验中,当识别率为100%时,对抗成功率92%。:param momentum_convergence: 动量收敛。对抗geetest-v2务必开启。百次实验中,当识别率为100%时,对抗成功率99%。仅当boundary ~= 48(拼图遮挡)时失效。:return:"""# ====================================# 参数转换与清洗# ====================================# float -> intif not isinstance(position, int):position = int(position)# 重定向滑块对象if is_hold:passelse:time.sleep(0.5)ActionChains(self.api).click_and_hold(slider).perform()# 震荡收敛步伐初始化catwalk = []# 参数表debugger_map = {'position': position, }# ====================================# 执行核心逻辑# ====================================# step1: 根据轨迹拖动滑块,使滑块逼近boundary附近for step in track:ActionChains(self.api).move_by_offset(xoffset=step, yoffset=0).perform()# step2.1: operator于一维空间中的位置回衡 基于仿生学if use_imitate:step_num = 9# 拼图与boundary重合 -> 震荡收敛if position == 0:catwalk = self.shock(step_num=step_num, alpha=0.3, beta=0.5)# 执行步态for step in catwalk:ActionChains(self.api).move_by_offset(xoffset=step, yoffset=0).perform()# 姿态回衡if abs(sum(catwalk)) >= int(step_num / 2):ActionChains(self.api).move_by_offset(xoffset=-sum(catwalk) + 1, yoffset=0).perform()else:if position > 0:# 拼图位于boundary右方 -> 回落# 修正后落于区间 ∈ [-2,1,2,3,4,5,6]emergency_braking = -int((position / 2)) if -int((position / 2)) != 0 else -2else:# 拼图位于boundary左方 -> 补偿# 修正后落于区间 ∈ [3, 4, 5, 6, 7...]emergency_braking = abs(position) + 2# 向左抖动pending_step = self.shock(step_num=step_num, alpha=0.3, beta=0.2)# 一级步态修正ActionChains(self.api).move_by_offset(xoffset=emergency_braking, yoffset=0).perform()catwalk.append(emergency_braking)for step in pending_step:if random.uniform(0, 1) < 0.2:time.sleep(0.5)ActionChains(self.api).move_by_offset(xoffset=step, yoffset=0).perform()catwalk.append(step)# 二级步态修正stance = sum(catwalk) + positionwhile abs(stance) > 3 and position != 0:# 踏出对抗步伐step = - (position / abs(position))ActionChains(self.api).move_by_offset(xoffset=step, yoffset=0).perform()# 更新参数catwalk.append(step)position += stepstance = sum(catwalk) + positiondebugger_map.update({'catwalk': catwalk})# step2.2: operator于一维空间中的位置回衡 基于极限收敛if momentum_convergence:# 通过强化学习拟合出的收敛区间convergence_region = list(range(-9, -2))low_confidence_region = list(range(47, 52))# 补偿算子初始化,作为momentum收敛后的单步步长回衡姿态inertial = 0# 当算子处于低置信度空间内,使用手工调平的方法回衡# 当boundary落在此区间内时,缺口识别有极大概率出现偏差,使用手工调平的方法回衡姿态# 若出现遮挡,回衡成功率较高# 若识别错误,回衡成功率必然为0if boundary in low_confidence_region:if abs(position) < 1.1:inertial = random.randint(-5, -2)elif abs(position) <= 5:inertial = random.randint(-8, -5)else:inertial = -8# 当算子处于收敛空间外时,使用运动补偿的方法回落姿态elif position not in convergence_region:if position < convergence_region[0]:inertial = random.randint(convergence_region[0] - position, convergence_region[-1] - position)else:inertial = -random.randint(position - convergence_region[-1], position - convergence_region[0])# 将补偿算子inertial作为单步像素距离移动ActionChains(self.api).move_by_offset(xoffset=inertial, yoffset=0).perform()debugger_map.update({'inertial': inertial})# 打印参数表if self.debug:print(f"{self.business_name}: {debugger_map}")# 松开滑块 统计通过率ActionChains(self.api).release(slider).perform()time.sleep(1.5)return debugger_mapdef is_try_again(self):""":return:"""# v3button_text = self.api.find_element_by_class_name('geetest_radar_tip_content')text = button_text.textif text == '尝试过多' or text == '网络不给力' or text == '请点击重试':button = self.api.find_element_by_class_name('geetest_reset_tip_content')button.click()def is_success(self):""":return:"""passdef run(self):"""The reference logic flow is as follows:return:"""# Change the execution order appropriately according to the specific situation.# 1. EC.Presence_of_all_elements_located.# 2. Get the slider object.# 3. Get a complete screenshot.# 4. Activate GeeTest.# 5. Get a screenshot of the gap.# It is recommended to execute in order.# 6. Identify the coordinates of the left boundary of the gap.# ~(Visual recognition results in debug mode.)# 7. Generate the trajectory of the physical operator.# 8. Drag the slider.# 9. Determine whether the execution is successful and return the relevant bool signal.
./src/arrmour/support/geetest_v2.py
# -*- coding: utf-8 -*-
# Time       : 2021/7/21 17:39
# Author     : QIN2DIM
# Github     : https://github.com/QIN2DIM
# Description: 识别GeeTest_v2滑动验证的示例
import timefrom selenium.common.exceptions import NoSuchElementExceptionfrom .core import SliderValidator, By, ec, ActionChainsclass GeeTest2(SliderValidator):def __init__(self, driver, debug=False, business_name="GeeTest_v2", full_img_path=None, notch_img_path=None):super(GeeTest2, self).__init__(driver=driver, debug=debug, business_name=business_name,full_img_path=full_img_path, notch_img_path=notch_img_path, )self.threshold = 60self.offset = 60def capture_full_img(self):gt_full_img = self.api.find_element_by_xpath("//a[contains(@class,'gt_fullbg')]")gt_full_img.screenshot(filename=self.full_img_path)def capture_notch_img(self):gt_notch_img = self.wait.until(ec.invisibility_of_element_located((By.XPATH, "//a[contains(@class,'gt_hide')]")))gt_notch_img.screenshot(filename=self.notch_img_path)def activate_validator(self):ActionChains(self.api).click_and_hold(self.slider).perform()def is_success(self):for x in range(2):try:label = self.api.find_element_by_class_name("gt_info_type")if self.debug:print(f"--->result: {label.text.strip()}\n")if "通过" in label.text.strip():return Trueelse:return Falseexcept NoSuchElementException:time.sleep(0.5)continuedef run(self) -> bool:# 加载元素self.wait.until(ec.presence_of_all_elements_located)# 获取滑块对象slider = self.capture_slider(xpath="//div[contains(@class,'slider_')]")# 获取完整的截图并存储self.capture_full_img()# 唤醒Geetest hold住self.activate_validator()# 获取缺口截图并存储self.capture_notch_img()# 识别缺口左边界坐标boundary = self.identify_boundary(self.full_img_path, self.notch_img_path, self.offset)if 60 <= boundary <= 63:boundary -= 12# debug模式下 可视化识别结果if self.debug:self.check_boundary(boundary)# 生成轨迹track, position = self.generate_track(# 轨迹生成器解决方案solution=self.operator_sport_v1,# 计算所需的物理量初始值字典phys_params={'boundary': boundary,'current_coordinate': 0,'mid': boundary * 3.3 / 4,'t': 1.2,'alpha_factor': 0.4011,'beta_factor': 0.5211,})# 拖动滑块self.drag_slider(track=track,slider=slider,position=position,boundary=boundary,use_imitate=False,is_hold=True,momentum_convergence=True)# 验证通过if self.is_success():return True# 验证失败 或 元素加载超时else:return False
./src/arrmour/support/geetest_v3.py
# -*- coding: utf-8 -*-
# Time       : 2021/7/21 17:39
# Author     : QIN2DIM
# Github     : https://github.com/QIN2DIM
# Description: 识别GeeTest_v3滑动验证的示例
import base64
import timefrom selenium.common.exceptions import NoSuchElementExceptionfrom .core import SliderValidator, By, ecclass GeeTest3(SliderValidator):def __init__(self, driver, debug=False, business_name="GeeTest_v3", full_img_path=None, notch_img_path=None):super(GeeTest3, self).__init__(driver=driver, debug=debug, full_img_path=full_img_path,notch_img_path=notch_img_path, business_name=business_name)self.threshold = 60self.offset = 35@staticmethoddef save_base64img(data, path_):"""将 base64 数据转化为图片保存到指定位置:param data: base64 数据,不包含类型:param path_: 保存的全路径"""with open(path_, "wb") as f:f.write(base64.b64decode(data))def get_base64_by_canvas(self, class_name, contain_type):"""将 canvas 标签内容转换为 base64 数据:param class_name: canvas 标签的类名:param contain_type: 返回的数据是否包含类型:return: base64 数据"""# 防止图片未加载完就下载一张空图bg_img = ''while len(bg_img) < 5000:get_img_js = 'return document.getElementsByClassName("' + class_name + '")[0].toDataURL("image/png");'bg_img = self.api.execute_script(get_img_js)time.sleep(0.5)if contain_type:return bg_imgelse:return bg_img[bg_img.find(',') + 1:]def capture_full_img(self):element_class_name = "geetest_canvas_fullbg geetest_fade geetest_absolute"data = self.get_base64_by_canvas(element_class_name, False)self.save_base64img(data, self.full_img_path)return self.full_img_pathdef capture_notch_img(self):element_class_name = "geetest_canvas_bg geetest_absolute"data = self.get_base64_by_canvas(element_class_name, False)self.save_base64img(data, self.notch_img_path)return self.notch_img_pathdef capture_slider(self, xpath: str = None, class_name: str = None):# 重试10次,每次失败冷却0.5s 最多耗时5s,否则主动抛出错误for _ in range(10):try:self.slider = self.api.find_element_by_class_name(class_name)return self.sliderexcept Exception as e:print("{}:{}".format(self.__class__, e))time.sleep(0.5)else:raise NoSuchElementExceptiondef activate_validator(self):self.api.find_element_by_class_name('geetest_radar_tip').click()time.sleep(0.5)def is_success(self):""":return:"""button_text2 = self.api.find_element_by_class_name('geetest_success_radar_tip_content')text2 = button_text2.textif text2 == '验证成功':return Truereturn Falsedef run(self) -> bool:# 唤醒Geetest 点击唤出self.activate_validator()# 加载元素self.wait.until(ec.presence_of_element_located((By.CLASS_NAME, 'geetest_canvas_slice')))self.wait.until(ec.presence_of_element_located((By.CLASS_NAME, 'geetest_canvas_fullbg')))# 获取完整&有缺口的截图并存储full_img_path = self.capture_full_img()notch_img_path = self.capture_notch_img()# 识别缺口左边界坐标boundary = self.identify_boundary(full_img_path, notch_img_path, self.offset)# debug模式下 可视化识别结果if self.debug:self.check_boundary(boundary)# 生成轨迹track, position = self.generate_track(# 轨迹生成器解决方案solution=self.operator_sport_v1,# 计算所需的物理量初始值字典phys_params={'boundary': boundary,'current_coordinate': 0,'mid': boundary * 3.3 / 4,'t': 0.5,'alpha_factor': 3.4011,'beta_factor': 3.5211,})# 获取滑块对象slider = self.capture_slider(class_name="geetest_slider_button")# 根据轨迹拖动滑块self.drag_slider(track=track,slider=slider,position=position,boundary=boundary,use_imitate=True,is_hold=False,momentum_convergence=False)# 执行成功,结束重试循环if self.is_success():if self.debug:print(f"--->{self.business_name}:验证成功")return True# 元素加载超时,捕获失败else:if self.debug:print(f"--->{self.business_name}:验证失败")return False