cGAN : Pix2Pix
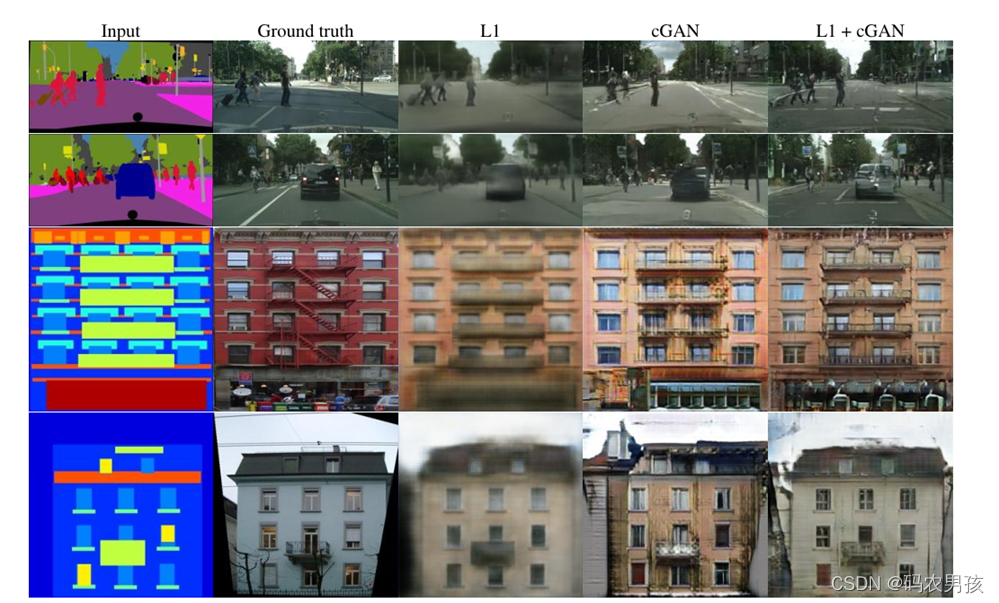
生成对抗网络还有一个有趣的应用就是,图像到图像的翻译。例如:草图到照片,黑白图像到RGB,谷歌地图到卫星视图,等等。Pix2Pix就是实现图像转换的生成对抗模型,但是Pix2Pix中的对抗网络又不同于普通的GAN,称之为cGAN,全称是:conditional GAN。
cGAN和GAN的区别:
- 传统的GAN从数据中学习从随机噪声向量 z z z到真是图像 y y y的映射: G ( z ) → y G(z)\to y G(z)→y
- 条件GAN学习的是学习从输入图像 x x x和随机噪声 z z z到目标图像 y y y的映射: G ( x , z ) → y G(x, z) \to y G(x,z)→y
- 传统的GAN中判别器只根据真实或生成图像辨别真伪: D ( y ) D(y) D(y) | D ( G ( x ) ) D(G(x)) D(G(x))
- 条件GAN中判别器还加入了,观察图像 x x x: D ( x , y ) D(x, y) D(x,y) | D ( x , G ( x , z ) ) D(x, G(x, z)) D(x,G(x,z))
- 在cGAN中,生成器损失中又增加了 L 1 \mathcal L_1 L1损失
cGAN的Loss
L c G A N ( G , D ) = E x , y [ l o g D ( x , y ) ] + E x , z [ l o g ( 1 − D ( x , G ( x , z ) ) ] \mathcal L_{cGAN}(G,D) = E_{x,y}[log D(x,y)] + E_{x,z}[log(1 - D(x, G(x, z))] LcGAN(G,D)=Ex,y[logD(x,y)]+Ex,z[log(1−D(x,G(x,z))]
L L 1 ( G ) = E x , y , z [ ∣ ∣ y − G ( x , z ) ∣ ∣ 1 ] \mathcal L_{L1}(G) = E_{x, y, z}[||y - G(x, z)||_1] LL1(G)=Ex,y,z[∣∣y−G(x,z)∣∣1]
G ∗ = a r g m i n G m a x D L c G A N ( G , D ) + λ L L 1 ( G ) G^* = {argmin}_{G}max_{D}\mathcal L_{cGAN}(G,D) + \lambda \mathcal L_{L1}(G) G∗=argminGmaxDLcGAN(G,D)+λLL1(G)
环境
tensorflow 2.6.0
GPU RTX2080ti
数据集
一个大规模数据集,其中包含来自50个不同城市的街景中记录的各种立体视频序列,除了更大的20,000个弱注释帧外,还具有5000帧的高质量像素级注释。因此,该数据集比以前的类似尝试大一个数量级。
城市景观数据集适用于:
- 评估视觉算法在语义城市场景理解主要任务中的性能:像素级、实例级和全景语义标注。
- 支持旨在利用大量(弱)注释数据的研究,例如用于训练深度神经网络。
import os
import pathlib
import numpy as np
from tqdm import tqdm
import matplotlib.pyplot as pltimport tensorflow as tf
from tensorflow.keras.layers import *
from tensorflow.keras.losses import BinaryCrossentropy
from tensorflow.keras.models import *
from tensorflow.keras.optimizers import Adam
数据集中的每一个样本都由一对图像组成:原始街景和像素级分割结果,下面的实验把左边作为输入,把分割的结果作为输出,训练一个实现街景分割的生成模型。

数据加载和预处理
IMAGE_HEIGHT = 256
IMAGE_WIDTH = 256
BUFFER_SIZE = 200
# produced better results for the U-Net in the original pix2pix
BATCH_SIZE = 1
NEAREST_NEIGHBOR = tf.image.ResizeMethod.NEAREST_NEIGHBOR
def load_split_image(image_path):image = tf.io.read_file(image_path)image = tf.image.decode_jpeg(image)width = tf.shape(image)[1]width = width // 2input_image = image[:, :width, :]real_image = image[:, width:, :]input_image = tf.cast(input_image, tf.float32)real_image = tf.cast(real_image, tf.float32)return input_image, real_image
def resize(input_image, real_image, height, width):input_image = tf.image.resize(input_image, size=(height,width), method=NEAREST_NEIGHBOR)real_image = tf.image.resize(real_image, size=(height, width), method=NEAREST_NEIGHBOR)return input_image, real_image
# 数据增强:随机剪裁
def random_crop(input_image, real_image):stacked_image = tf.stack([input_image, real_image],axis=0)size = (2, IMAGE_HEIGHT, IMAGE_WIDTH, 3)cropped_image = tf.image.random_crop(stacked_image, size=size)input_image = cropped_image[0]real_image = cropped_image[1]return input_image, real_image
def normalize(input_image, real_image):input_image = (input_image / 127.5) - 1real_image = (real_image / 127.5) - 1return input_image, real_image
@tf.function
def random_jitter(input_image, real_image):input_image, real_image = resize(input_image, real_image, width=286,height=286)# 随机剪裁 -> 256x256input_image, real_image = random_crop(input_image,real_image)# 随机反转if np.random.uniform() > 0.5:input_image = tf.image.flip_left_right(input_image)real_image = tf.image.flip_left_right(real_image)return input_image, real_image
加载训练/测试数据
def load_image_train(image_file):input_image, real_image = load_split_image(image_file)input_image, real_image = random_jitter(input_image, real_image)input_image, real_image = normalize(input_image, real_image)return input_image, real_image
def load_image_test(image_file):input_image, real_image = load_split_image(image_file)input_image, real_image = resize(input_image, real_image,IMAGE_HEIGHT, IMAGE_WIDTH)input_image, real_image = normalize(input_image, real_image)return input_image, real_image
数据流
train_dataset = tf.data.Dataset.list_files('./SeData/cityscapes/train/*.jpg')
train_dataset = train_dataset.map(load_image_train, num_parallel_calls=tf.data.AUTOTUNE)
train_dataset = train_dataset.shuffle(BUFFER_SIZE)
train_dataset = train_dataset.batch(BATCH_SIZE)
test_dataset = tf.data.Dataset.list_files('./SeData/cityscapes/val/*.jpg')
test_dataset = test_dataset.map(load_image_test)
test_dataset = test_dataset.batch(BATCH_SIZE)
构建生成器
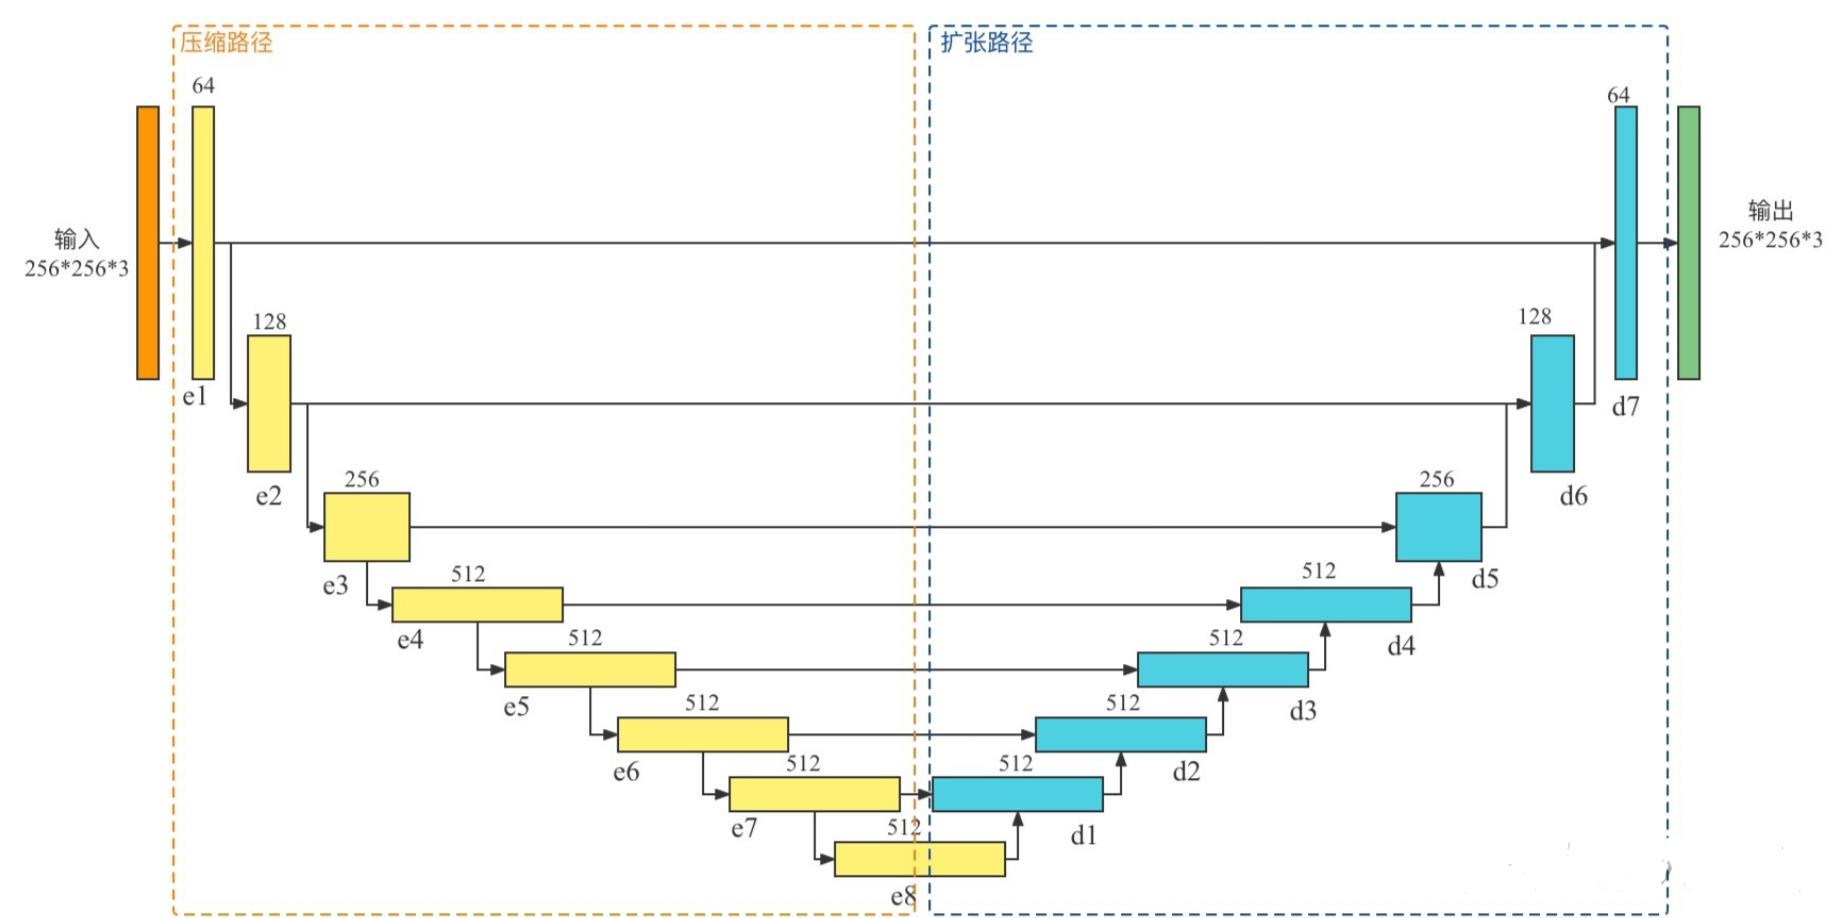
生成器的主干网络为:U-Net。U-Net 由编码器(下采样器)和解码器(上采样器)组成。

- 编码器中的每个块为:Convolution -> Batch normalization -> Leaky ReLU
- 解码器中的每个块为:Transposed convolution -> Batch normalization -> Dropout(应用于前三个块)-> ReLU
- 编码器和解码器之间存在跳跃连接(在 U-Net 中)
下采样
def downsample(filters, size, apply_batchnorm=True):initializer = tf.random_normal_initializer(0., 0.02)result = tf.keras.Sequential()result.add(Conv2D(filters, size, strides=2, padding='same',kernel_initializer=initializer, use_bias=False))if apply_batchnorm:result.add(BatchNormalization())result.add(LeakyReLU())return result
上采样
def upsample(filters, size, apply_dropout=False):initializer = tf.random_normal_initializer(0., 0.02)result = tf.keras.Sequential()result.add(Conv2DTranspose(filters, size, strides=2, padding='same',kernel_initializer=initializer, use_bias=False))result.add(BatchNormalization())if apply_dropout:result.add(Dropout(0.5))result.add(ReLU())return result
生成器网络
def Generator():inputs = Input(shape=[256, 256, 3])down_stack = [downsample(32, 4, apply_batchnorm=False), # (batch_size, 128, 128, 64)downsample(64, 4), # (batch_size, 64, 64, 128)downsample(128, 4), # (batch_size, 32, 32, 256)downsample(256, 4), # (batch_size, 16, 16, 512)downsample(256, 4), # (batch_size, 8, 8, 512)#downsample(512, 4), # (batch_size, 4, 4, 512)#downsample(512, 4), # (batch_size, 2, 2, 512)#downsample(512, 4), # (batch_size, 1, 1, 512)]up_stack = [#upsample(512, 4, apply_dropout=True), # (batch_size, 2, 2, 1024)#upsample(512, 4, apply_dropout=True), # (batch_size, 4, 4, 1024)#upsample(512, 4, apply_dropout=True), # (batch_size, 8, 8, 1024)upsample(256, 4), # (batch_size, 16, 16, 1024)upsample(128, 4), # (batch_size, 32, 32, 512)upsample(64, 4), # (batch_size, 64, 64, 256)upsample(32, 4), # (batch_size, 128, 128, 128)]initializer = tf.random_normal_initializer(0., 0.02)last = Conv2DTranspose(3, 4, strides=2, padding='same',kernel_initializer=initializer, activation='tanh') # (batch_size, 256, 256, 3)x = inputs# Downsampling through the modelskips = []for down in down_stack:x = down(x)skips.append(x)skips = reversed(skips[:-1])# Upsampling and establishing the skip connectionsfor up, skip in zip(up_stack, skips):x = up(x)x = Concatenate()([x, skip])x = last(x)return tf.keras.Model(inputs=inputs, outputs=x)
generator = Generator()
生成器损失
定义生成器损失,GA该损失会惩罚与网络输出和目标图像不同的可能结构。
- 生成器损失是生成图像和一数组的 sigmoid 交叉熵损失。
- L1 损失,它是生成图像与目标图像之间的 MAE(平均绝对误差),这样可使生成的图像在结构上与目标图像相似。
- 生成器损失的公式为:gan_loss + LAMBDA * l1_loss,其中 LAMBDA = 100。该值由论文作者决定。
G l o s s = E x , z [ l o g ( 1 − D ( x , G ( x , z ) ) ] + E x , y , z [ ∣ ∣ y − G ( x , z ) ∣ ∣ 1 ] G_{loss} = E_{x,z}[log(1 - D(x, G(x, z))] + E_{x, y, z}[||y - G(x, z)||_1] Gloss=Ex,z[log(1−D(x,G(x,z))]+Ex,y,z[∣∣y−G(x,z)∣∣1]
LAMBDA = 100
loss_object = tf.keras.losses.BinaryCrossentropy(from_logits=True)
def generator_loss(disc_generated_output, gen_output, target):gan_loss = loss_object(tf.ones_like(disc_generated_output), disc_generated_output)# Mean absolute errorl1_loss = tf.reduce_mean(tf.abs(target - gen_output))total_gen_loss = gan_loss + (LAMBDA * l1_loss)return total_gen_loss, gan_loss, l1_loss
构建判别器
cGAN 中的判别器是一个卷积“PatchGAN”分类器,它会尝试对每个图像分块的真实与否进行分类。
- 判别器中的每个块为:Convolution -> Batch normalization -> Leaky ReLU。
- 最后一层之后的输出形状为 (batch_size, 30, 30, 1)。
- 输出的每个 30 x 30 图像分块会对输入图像的 70 x 70 部分进行分类。
- 判别器接收 2 个输入:
- 输入图像和目标图像,应分类为真实图像。
- 输入图像和生成图像(生成器的输出),应分类为伪图像。
- 使用tf.concat([inp, tar], axis=-1) 将这 2 个输入连接在一起。
def Discriminator():initializer = tf.random_normal_initializer(0., 0.02)inp = Input(shape=[256, 256, 3], name='input_image')tar = Input(shape=[256, 256, 3], name='target_image')x = concatenate([inp, tar]) # (batch_size, 256, 256, channels*2)down1 = downsample(64, 4, False)(x) # (batch_size, 128, 128, 64)down2 = downsample(128, 4)(down1) # (batch_size, 64, 64, 128)down3 = downsample(256, 4)(down2) # (batch_size, 32, 32, 256)zero_pad1 = ZeroPadding2D()(down3) # (batch_size, 34, 34, 256)conv = Conv2D(512, 4, strides=1, kernel_initializer=initializer,use_bias=False)(zero_pad1) # (batch_size, 31, 31, 512)batchnorm1 = BatchNormalization()(conv)leaky_relu = LeakyReLU()(batchnorm1)zero_pad2 = ZeroPadding2D()(leaky_relu) # (batch_size, 33, 33, 512)last = Conv2D(1, 4, strides=1,kernel_initializer=initializer)(zero_pad2) # (batch_size, 30, 30, 1)return Model(inputs=[inp, tar], outputs=last)
discriminator = Discriminator()
判别器损失
discriminator_loss 函数接收 2 个输入:真实图像和生成图像输入判别器后的输出。
- real_loss 是真实图像和一组 1的 sigmoid 的交叉熵损失(因为这些是真实图像)
- generated_loss 是生成图像和一组 0 的 sigmoid 交叉熵损失(因为这些是伪图像)
- total_loss 是 real_loss 和 generated_loss 的和
def discriminator_loss(disc_real_output, disc_generated_output):real_loss = loss_object(tf.ones_like(disc_real_output), disc_real_output)generated_loss = loss_object(tf.zeros_like(disc_generated_output), disc_generated_output)total_disc_loss = real_loss + generated_lossreturn total_disc_loss
优化器和检查点
generator_opt = tf.keras.optimizers.Adam(2e-4, beta_1=0.5)
discriminator_opt = tf.keras.optimizers.Adam(2e-4, beta_1=0.5)
checkpoint_dir = './training_checkpoints'
checkpoint_prefix = os.path.join(checkpoint_dir, "ckpt")
checkpoint = tf.train.Checkpoint(generator_optimizer=generator_opt,discriminator_optimizer=discriminator_opt,generator=generator,discriminator=discriminator)
训练模型
- 生成器接收 input_image 输出 generate_image (gen_output)
- 判别器接收 input_image 和 target_image 输出判别结果 disc_real_ouput
- 判别器接收 input_image 和 gen_output 生成图像 输出判别结果 disc_generated_output
- 计算生成器和判别器损失
- 计算损失相对于生成器和判别器变量(输入)的梯度,并将其应用于优化器
- 记录损失到 TensorBoard
import time
import datetime
from IPython import display
log_dir="./logs/"summary_writer = tf.summary.create_file_writer(log_dir + "fit/" + datetime.datetime.now().strftime("%Y%m%d-%H%M%S"))
def generate_images(model, test_input, tar):prediction = model(test_input, training=True)plt.figure(figsize=(12, 12))display_list = [test_input[0], tar[0], prediction[0]]title = ['Input Image', 'Ground Truth', 'Predicted Image']for i in range(3):plt.subplot(1, 3, i+1)plt.title(title[i])# Getting the pixel values in the [0, 1] range to plot.plt.imshow(display_list[i] * 0.5 + 0.5)plt.axis('off')plt.show()
@tf.function
def train_step(input_image, target, step):with tf.GradientTape() as gen_tape, tf.GradientTape() as disc_tape:gen_output = generator(input_image, training=True)disc_real_output = discriminator([input_image, target], training=True)disc_generated_output = discriminator([input_image, gen_output], training=True)gen_total_loss, gen_gan_loss, gen_l1_loss = generator_loss(disc_generated_output, gen_output, target)disc_loss = discriminator_loss(disc_real_output, disc_generated_output)generator_gradients = gen_tape.gradient(gen_total_loss, generator.trainable_variables)discriminator_gradients = disc_tape.gradient(disc_loss, discriminator.trainable_variables)generator_opt.apply_gradients(zip(generator_gradients, generator.trainable_variables))discriminator_opt.apply_gradients(zip(discriminator_gradients, discriminator.trainable_variables))with summary_writer.as_default():tf.summary.scalar('gen_total_loss', gen_total_loss, step=step//1000)tf.summary.scalar('gen_gan_loss', gen_gan_loss, step=step//1000)tf.summary.scalar('gen_l1_loss', gen_l1_loss, step=step//1000)tf.summary.scalar('disc_loss', disc_loss, step=step//1000)
def fit(train_ds, test_ds, steps):example_input, example_target = next(iter(test_ds.take(1)))start = time.time()for step, (input_image, target) in train_ds.repeat().take(steps).enumerate():if (step) % 1000 == 0:display.clear_output(wait=True)if step != 0:print(f'Time taken for 1000 steps: {time.time()-start:.2f} sec\n')start = time.time()generate_images(generator, example_input, example_target) # 打印测试效果print(f"Step: {step//1000}k")train_step(input_image, target, step)# Training stepif (step+1) % 10 == 0:print('.', end='', flush=True)# Save (checkpoint) the model every 5k stepsif (step + 1) % 5000 == 0:checkpoint.save(file_prefix=checkpoint_prefix)
%load_ext tensorboard
%tensorboard --logdir {log_dir}
fit(train_dataset, test_dataset, steps=40000)
Time taken for 1000 steps: 21.16 sec

Step: 39k
....................................................................................................
检查训练结果
- 如果 gen_gan_loss 或 disc_loss 变得很低,则表明此模型正在支配另一个模型,并且您未能成功训练组合模型。
- 值 log(2) = 0.69 是这些损失的一个良好参考点,因为它表示困惑度为 2:判别器的平均不确定性是相等的。
- 对于 disc_loss,低于 0.69 的值意味着判别器在真实图像和生成图像的组合集上的表现要优于随机数。
- 对于 gen_gan_loss,如果值小于 0.69,则表示生成器在欺骗判别器方面的表现要优于随机数。
- 随着训练的进行,gen_l1_loss 应当下降
从最新检查点恢复并测试模型
ls {checkpoint_dir}
checkpoint                  ckpt-3.data-00000-of-00001
ckpt-1.data-00000-of-00001  ckpt-3.index
ckpt-1.index                ckpt-4.data-00000-of-00001
ckpt-2.data-00000-of-00001  ckpt-4.index
ckpt-2.index
# Restoring the latest checkpoint in checkpoint_dir
checkpoint.restore(tf.train.latest_checkpoint(checkpoint_dir))
<tensorflow.python.training.tracking.util.CheckpointLoadStatus at 0x7f956c1a23d0>
# Run the trained model on a few examples from the test set
for inp, tar in test_dataset.take(3):generate_images(generator, inp, tar)


测试网上的街景图片
def load_image(image_path):image = tf.io.read_file(image_path)image = tf.image.decode_jpeg(image)image = tf.image.resize(image, size=(256, 256), method=NEAREST_NEIGHBOR)image = tf.cast(image, tf.float32)return image
img1 = load_image('./test/city_test4.jpg')img1 = img1 / 127.5 - 1img1 = tf.expand_dims(img1, axis=0)
pred1 = generator(img1, training=False)
plt.figure(figsize=(8, 8))
plt.subplot(1, 2, 1)
plt.title("Input Image")
plt.imshow(img1[0] * 0.5 + 0.5)
plt.axis('off')
plt.subplot(1, 2, 2)
plt.title("Predicted Image")
plt.imshow(pred1[0] * 0.5 + 0.5)
plt.axis('off')


