小白都能看懂的实战教程 手把手教你Python Web全栈开发 Flask(Python Web)实战系列之在线论坛系统 第三讲
这是小白都能看懂的实战教程 手把手教你Python Web全栈开发 的第三讲,如果文中有基础知识不太熟悉的话,可以看博主前几期的博客:
本文原创为CSDN博主亓官劼,原文链接为:小白都能看懂的实战教程 手把手教你Python Web全栈开发 (DAY 3),请大家支持原创,拒绝抄袭!!!。
博主博客文章内容导航(实时更新)
更多优质文章推荐:
- 收藏!最详细的Python全栈开发指南 看完这篇你还不会Python全栈开发 你来打我!!!
- 一本教你如何在前端实现富文本编辑器
- 小白都能看得懂的教程 一本教你如何在前端实现markdown编辑器
- Flask学习(基本语法)
- 一文教会你Bootstrap,让你也可以快速建站
- 一文教你如何白嫖JetBrains全家桶(IDEA/PtChram/CLion)免费正版
- 小白都能看懂的实战教程 手把手教你Python Web全栈开发 (DAY 1)
- 小白都能看懂的实战教程 手把手教你Python Web全栈开发 (DAY 2)
- 小白都能看懂的实战教程 手把手教你Python Web全栈开发 (DAY 3)
- 小白都能看懂的实战教程 手把手教你Python Web全栈开发 (DAY 4)
- 小白都能看懂的实战教程 手把手教你Python Web全栈开发 (DAY 5)
- 小白都能看懂的实战教程 手把手教你Python Web全栈开发 (DAY 6)
- 小白都能看懂的实战教程 手把手教你Python Web全栈开发 (DAY 7)
本项目所有源码在GitHub开源,GitHub地址为:OnlineForumPlatform
有需要源码可以前去查看,喜欢的话可以star一下
下面就开始本讲的内容了,这讲将会带来代价实现论坛的主题功能,论坛的问题列表,帖子详情页面,发布帖子,回答问题等功能,让这个在线论坛系统成为一个“真正的论坛”,让他具有论坛的功能。
3.1 发布帖子的功能实现
在这里的haul,由于问题列表等页面,没问题的话无法具体的进行显示,所以这里我们先开发发布问题的功能,然后再开发问题列表页面。
3.1.1 发布帖子的实现-前端
前端的话我们先实现一个富文本编辑器来实现信息的编辑,使我们编辑的文章具有格式化,如果不知道如何在前端嵌入富文本编辑器的话,可以看我之前的博客:一本教你如何在前端实现富文本编辑器:一本教你如何在前端实现富文本编辑器。
在此基础上,我们来设计我们的前端页面。
这里我们直接上代码:
post_issue.css:
.post_issue_content{margin-left: 20%;margin-right: 20%;
}#page_header{text-align: center;
}#issue_titile_div{height: 35px;margin: 0;
}/*设置富文本编辑器默认的高度*/
#edui1_iframeholder{height: 200px;
}#inputEmail3{margin-left: 0;padding-left: 0;width: 100%;
}#post_issue_butt{margin-top: 60px;text-align: center;height: 35px;
}#post_issue_butt button{height: 35px;
}
post_issue.html:
{% extends 'base.html' %}{% block title %}
发布帖子
{% endblock %}{% block css %}<link rel="stylesheet" href="/static/css/post_issue.css"><!-- 引入配置文件 --><script src="/static/ueditor/ueditor.config.js"}></script><!-- 引入编辑器源码文件 --><script src="/static/ueditor/ueditor.all.min.js"}></script>
{% endblock %}{% block content %}
<div class="post_issue_content"><div class="page-header" id="page_header"><h1>发布帖子<small>Post issue</small></h1></div><form class="post_issue_form"><div class="form-group" id="issue_titile_div"><input type="text" class="form-control" name="title" id="inputEmail3" placeholder="请输入标题"></div><div class="ueditor_div"><script id="editor" type="text/plain">请输入发布的内容!</script></div><div id="post_issue_butt"><button type="submit" class="btn btn-default">发布帖子</button></div></form>
</div>
<!-- 实例化编辑器 -->
<script type="text/javascript">var editor = UE.getEditor('editor');
</script>
{% endblock %}{% block post_issue_class %}
active
{% endblock %}
同时我们也可以修改下导航栏的右端,使登录时,显示发布帖子的导航,如果不修改,则需要将post_issue.html的最后三行删除,否则会报错。
添加的内容为:添加在注销的标签之前即可.
<li class="{% block post_issue_class %}{% endblock %}"><a href="{{ url_for('post_issue') }}">发布帖子</a></li>
为了方便调试,我们这里在app.py中添加了发布帖子的路由:
# 发布帖子
@app.route('/post_issue')
def post_issue():return render_template('post_issue.html')
此时发布帖子的前端页面效果为:

至此,我们发布帖子的前端页面就完成了,页面还算不错,下面我们继续完成其他的功能。
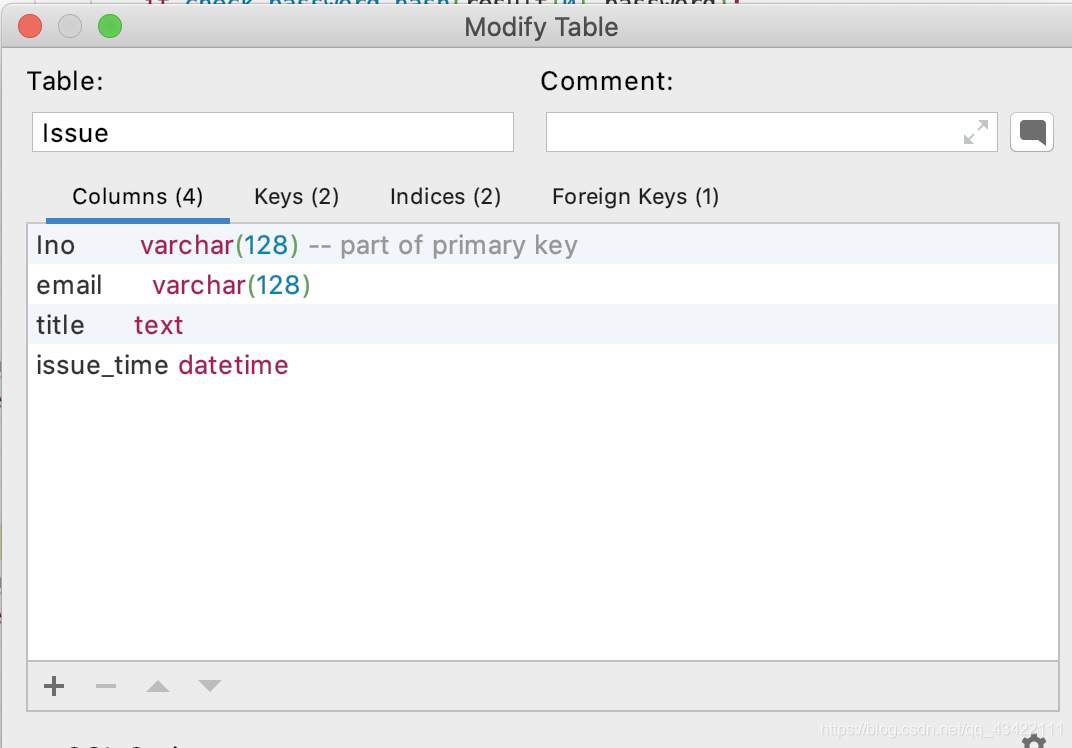
3.1.2 发布帖子的实现-数据库
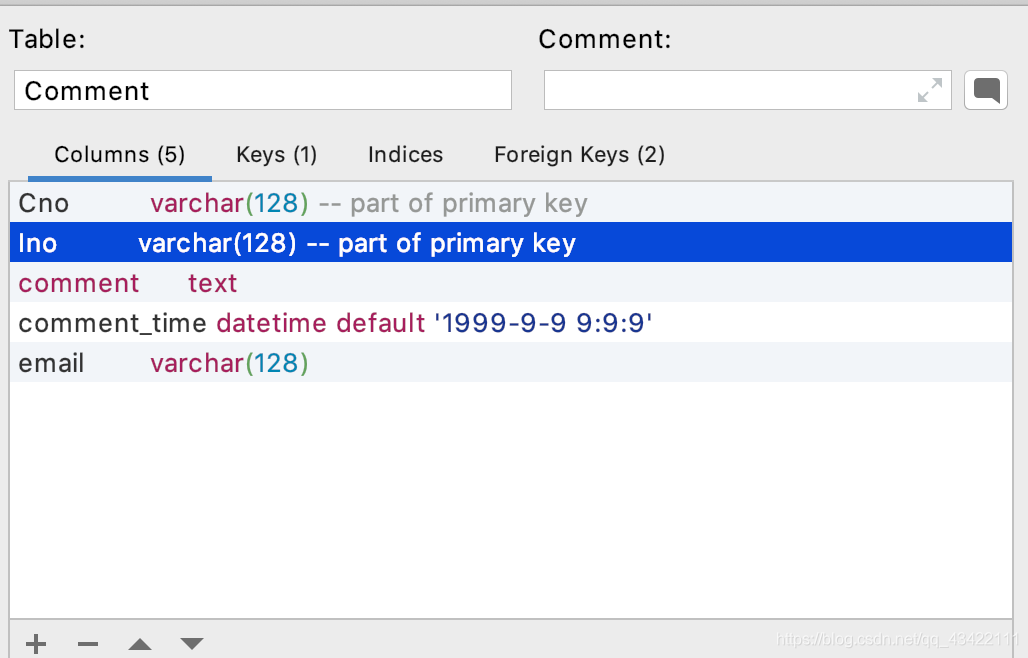
下面我们来设计帖子的数据库。首先我们需要明确我们需要存储哪些内容:标题、内容、发布人的Id(即email)、发布时间、帖子号(用来唯一标示一个帖子)。但是由于我们是一个论坛,里面的内容还需要很多人来回复,因此我们设计成2个表,分别为Issue和Comment,使用Issue表存储每个Issue的标题、发布人、发布时间、Issue号,使用Comment来存储每个评论(包括第一楼,发帖人的内容作为第一楼)的内容、发布人、发布时间和Connment号。
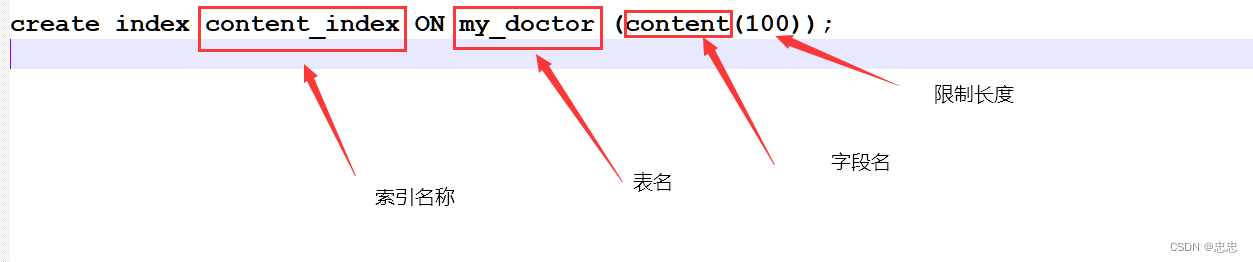
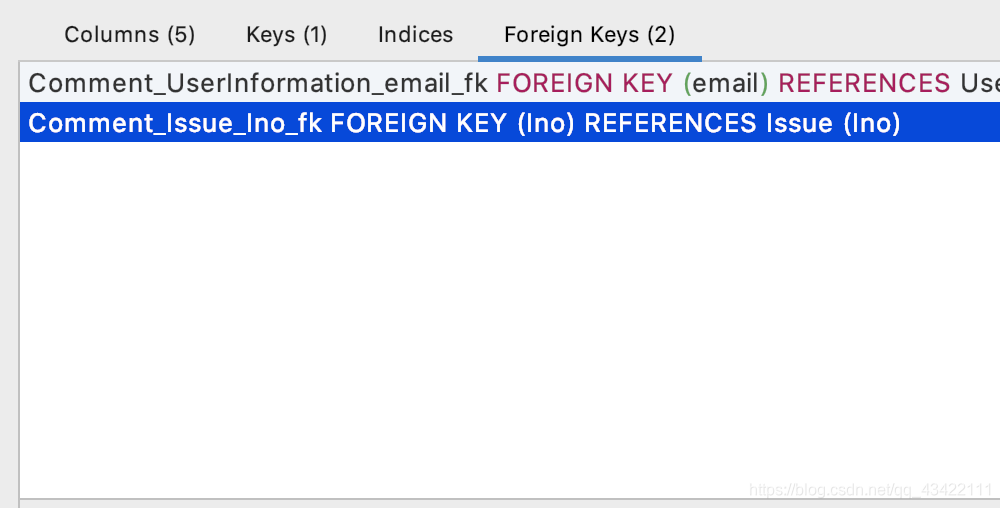
Issue表为:其中需要添加外键,email依赖UserInformation的email
SQL描述为:
create table Issue
(Ino varchar(128) null,email varchar(128) not null,title text default null,issue_time datetime null,constraint Issue_UserInformation_email_fkforeign key (email) references UserInformation (email)
);create unique index Issue_Ino_uindexon Issue (Ino);alter table Issueadd constraint Issue_pkprimary key (Ino);
Comment表为:
SQL语句为:
create table Comment
(Cno varchar(128) not null,Ino varchar(128) not null,comment text null,comment_time datetime default '1999-9-9 9:9:9' not null,email varchar(128) null,constraint Comment_pkprimary key (Cno, Ino),constraint Comment_Issue_Ino_fkforeign key (Ino) references Issue (Ino),constraint Comment_UserInformation_email_fkforeign key (email) references UserInformation (email)
);
这样我们发布帖子需要使用的数据库就完成啦。
都能看懂的实战教程 手把手教你Python Web全栈开发 (DAY 3)](https://blog.csdn.net/qq_43422111/article/details/105160371),请大家支持原创,拒绝抄袭!!!。
3.1.3 发布帖子的实现-后端
下面我们来完成发布帖子的后端实现。首先我们先这是允许的请求方式
@app.route('/post_issue',methods=['GET','POST'])
然后我们再去将post_issue.html中的form的method设置为post:
<form class="post_issue_form" method="post">
我们开始来后端获取前端发送的标题和内容:
title = request.form.get('title')
comment = request.form.get('editorValue')
然后我们来获取发布人(也就是当前登录账号),当前时间。
email = session.get('email')
issue_time = time.strftime("%Y-%m-%d %H:%M:%S")
下面我们开始获取Issue号,这里我们获取数据库中最大的Issue号,然后将它+1即可,如果没有,那么我们就设为1。
try:cur = db.cursor()sql = "select max(Ino) from Issue"db.ping(reconnect=True)cur.execute(sql)result = cur.fetchone()if result is None:Ino = int(1)else:Ino = int(request[0]) + 1
except Exception as e:raise e
所有需要获取的数据都获取好了,我们将数据存入数据库中,这样发布帖子的功能也就算是完成了。在Issue中,为了信息安全起见,我们使用128位随机数来作为ID,具体使用在代码中体现。
后端代码为;
# 生成128随机id
def gengenerateID():re = ""for i in range(128):re += chr(random.randint(65, 90))return re# 发布帖子
@app.route('/post_issue', methods=['GET', 'POST'])
def post_issue():if request.method == 'GET':return render_template('post_issue.html')if request.method == 'POST':title = request.form.get('title')comment = request.form.get('editorValue')email = session.get('email')issue_time = time.strftime("%Y-%m-%d %H:%M:%S")try:cur = db.cursor()Ino = gengenerateID()sql = "select * from Issue where Ino = '%s'" % Inodb.ping(reconnect=True)cur.execute(sql)result = cur.fetchone()# 如果result不为空,即存在该ID,就一直生成128位随机ID,直到不重复位置while result is not None:Ino = gengenerateID()sql = "select * from Issue where Ino = '%s'" % Inodb.ping(reconnect=True)cur.execute(sql)result = cur.fetchone()sql = "insert into Issue(Ino, email, title, issue_time) VALUES ('%s','%s','%s','%s')" % (Ino, email, title, issue_time)db.ping(reconnect=True)cur.execute(sql)db.commit()sql = "insert into Comment(Cno, Ino, comment, comment_time, email) VALUES ('%s','%s','%s','%s','%s')" % ('1', Ino, comment, issue_time, email)db.ping(reconnect=True)cur.execute(sql)db.commit()return render_template('post_issue.html')except Exception as e:raise e
这样我们发布帖子的整体功能就是完成了,下面我们再来完成显示帖子列表的功能,让我们发布的帖子显示出来。
3.2 论坛页面的实现
3.2.1 论坛页面的实现-前端
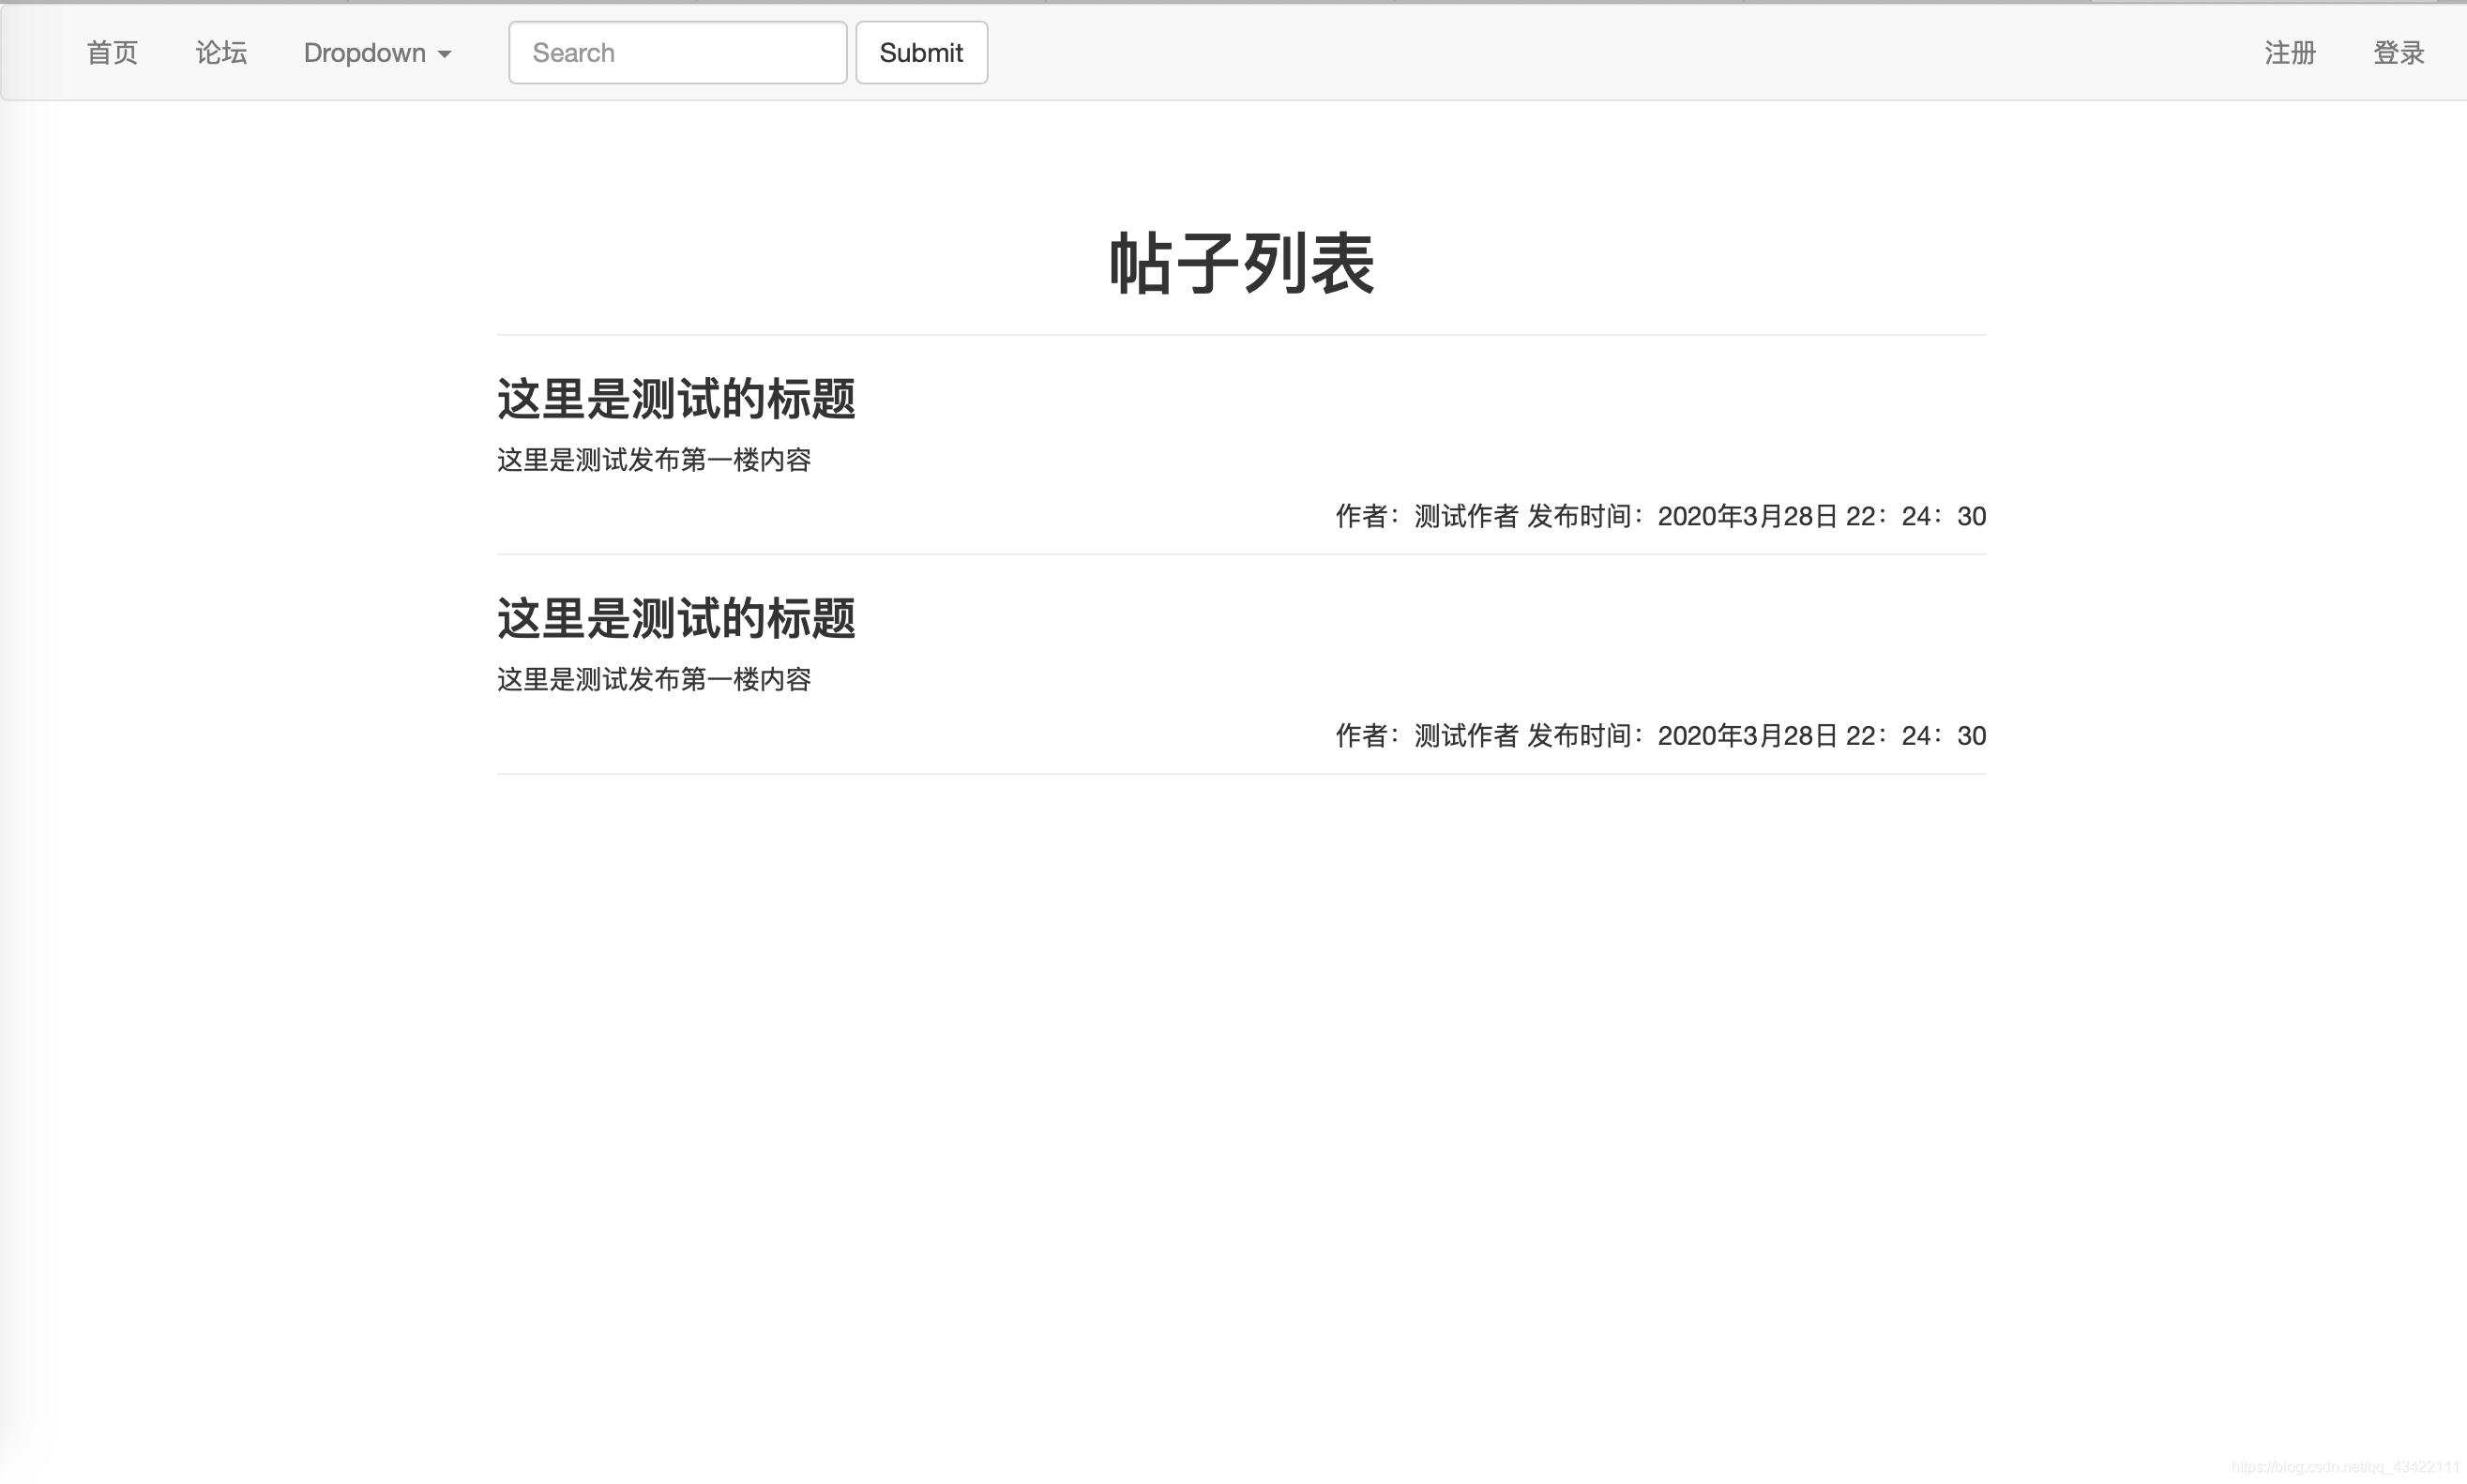
论坛页面我们先简单做一个帖子列表的显示,后续有新功能的话,我们再来添加。这里没有什么东西,这里先设置一个简洁的页面,具体的功能完后面再逐渐的去完善,手把手的带你完成这个项目的全部过程。下面我们直接上效果图和代码吧,都是上面细讲过的东西,一个简单的ul构成的页面。这里的页面是静态的,等我们完成后端功能之后,我们再来将这里修改为一个动态的更新。
效果图为:
formula.css代码:
.formula_content{margin: 5% 20%;
}#page_header{text-align: center;
}.issue_list_ul{list-style-type: none;margin-left: 0;padding-left: 0;
}
.author_info{text-align: right;
}.issue_div{border-bottom:1px solid #eee;
}.issue_content{max-height: 200px;
}
formula.html代码;
{% extends 'base.html' %}{% block title %}
论坛
{% endblock %}{% block css %}
<link rel="stylesheet" href="/static/css/formula.css">
{% endblock %}{% block content %}
<div class="formula_content"><div class="page-header" id="page_header"><h1>帖子列表</h1></div><div class="issue_list_div"><ul class="issue_list_ul"><li class="issue_list_li"><div class="issue_div"><div class="issue_content"><h3>这里是测试的标题</h3><p>这里是测试发布第一楼内容</p></div><div class="author_info"><p class="post-info"><span>作者:测试作者</span><span>发布时间:2020年3月28日 22:24:30</span></p></div></div></li><li class="issue_list_li"><div class="issue_div"><div class="issue_content"><h3>这里是测试的标题</h3><p>这里是测试发布第一楼内容</p></div><div class="author_info"><p class="post-info"><span>作者:测试作者</span><span>发布时间:2020年3月28日 22:24:30</span></p></div></div></li></ul></div>
</div>{% endblock %}
{% block formula_class %}
active
{% endblock %}
在这里设置了block,在base.html进行了添加,如果base.html不修改的话,把最后3行删掉,否则会报错。在base.html中添加了论坛的导航<li class="{% block formula_class %}{% endblock %}"><a href="{{ url_for('formula') }}">论坛</a></li>
修改完之后的base.html全部代码为:
<!DOCTYPE html>
<html lang="en">
<head><meta charset="UTF-8"><title>{% block title %}
{#        其他页面重写标题的地方#}{% endblock %}</title>{% block css %}
{#    其他页面引用样式或者js的地方#}{% endblock %}<link rel="stylesheet" href="/static/css/base.css"><script src="https://cdn.bootcss.com/jquery/3.4.1/jquery.js"></script><script src="https://cdn.bootcss.com/twitter-bootstrap/3.4.0/js/bootstrap.min.js"></script><link href="https://cdn.bootcss.com/twitter-bootstrap/3.4.0/css/bootstrap.min.css" rel="stylesheet">
</head>
<body><div class="navigation_bar"><nav class="navbar navbar-default"><div class="container-fluid">
{#              由于这里我们不需要使用商标,所以对Bran部分进行了删除#}<!-- Collect the nav links, forms, and other content for toggling --><div class="collapse navbar-collapse" id="bs-example-navbar-collapse-1"><ul class="nav navbar-nav"><li class="{% block homepage_class %}{% endblock %}"><a href="{{ url_for('index') }}">首页<span class="sr-only">(current)</span></a></li><li class="{% block formula_class %}{% endblock %}"><a href="{{ url_for('formula') }}">论坛</a></li><li class="dropdown"><a href="#" class="dropdown-toggle" data-toggle="dropdown" role="button" aria-haspopup="true" aria-expanded="false">Dropdown <span class="caret"></span></a><ul class="dropdown-menu"><li><a href="#">Action</a></li><li><a href="#">Another action</a></li><li><a href="#">Something else here</a></li><li role="separator" class="divider"></li><li><a href="#">Separated link</a></li><li role="separator" class="divider"></li><li><a href="#">One more separated link</a></li></ul></li></ul><form class="navbar-form navbar-left"><div class="form-group"><input type="text" class="form-control" placeholder="Search"></div><button type="submit" class="btn btn-default">Submit</button></form><ul class="nav navbar-nav navbar-right">{% if email %}<li class="{% block post_issue_class %}{% endblock %}"><a href="{{ url_for('post_issue') }}">发布帖子</a></li><li class=""><a href="{{ url_for('register') }}">注销</a></li><li class="dropdown"><a href="#" class="dropdown-toggle" data-toggle="dropdown" role="button" aria-haspopup="true" aria-expanded="false">{{ nickname }} <span class="caret"></span></a><ul class="dropdown-menu"><li><a href="#">Action</a></li><li><a href="#">Another action</a></li><li><a href="#">Something else here</a></li><li role="separator" class="divider"></li><li><a href="#">Separated link</a></li></ul></li>{% else %}<li class="{% block register_class %}{% endblock %}"><a href="{{ url_for('register') }}">注册</a></li><li class="{% block login_class %} {% endblock %}"><a href="{{ url_for('login') }}">登录</a></li>{% endif %}</ul></div><!-- /.navbar-collapse --></div><!-- /.container-fluid --></nav></div><div class="content" style="padding: 0;margin: 0;">{% block content %}
{#        其他页面重写页面内容的地方#}{% endblock %}</div>
</body>
</html>
在这里为了方便我们使用url_for,所以我们需要在app.py中为formula设置路由:
# 论坛页面
@app.route('/formula')
def formula():return render_template('formula.html')
这就是前端部分了,下面我们再来实现论坛的后端功能
3.2.2 论坛页面的实现-后端
论坛页面后端的需要也很明显,就是要从数据库中将所有Issue数据返回到前端,在前端中显示。这里我们直接使用一个3表连接,将数据查出来,然后返回到前端:
# 论坛页面
@app.route('/formula')
def formula():if request.method == 'GET':try:cur = db.cursor()sql = "select Issue.Ino, Issue.email,UserInformation.nickname,issue_time,Issue.title,Comment.comment from Issue,UserInformation,Comment where Issue.email = UserInformation.email and Issue.Ino = Comment.Ino and Cno = '1' order by issue_time DESC "db.ping(reconnect=True)cur.execute(sql)issue_information = cur.fetchall()cur.close()return render_template('formula.html',issue_information = issue_information)except Exception as e:raise e
然后我们在前端进行显示,这里我们在前端的部分将两个测试的li换成:
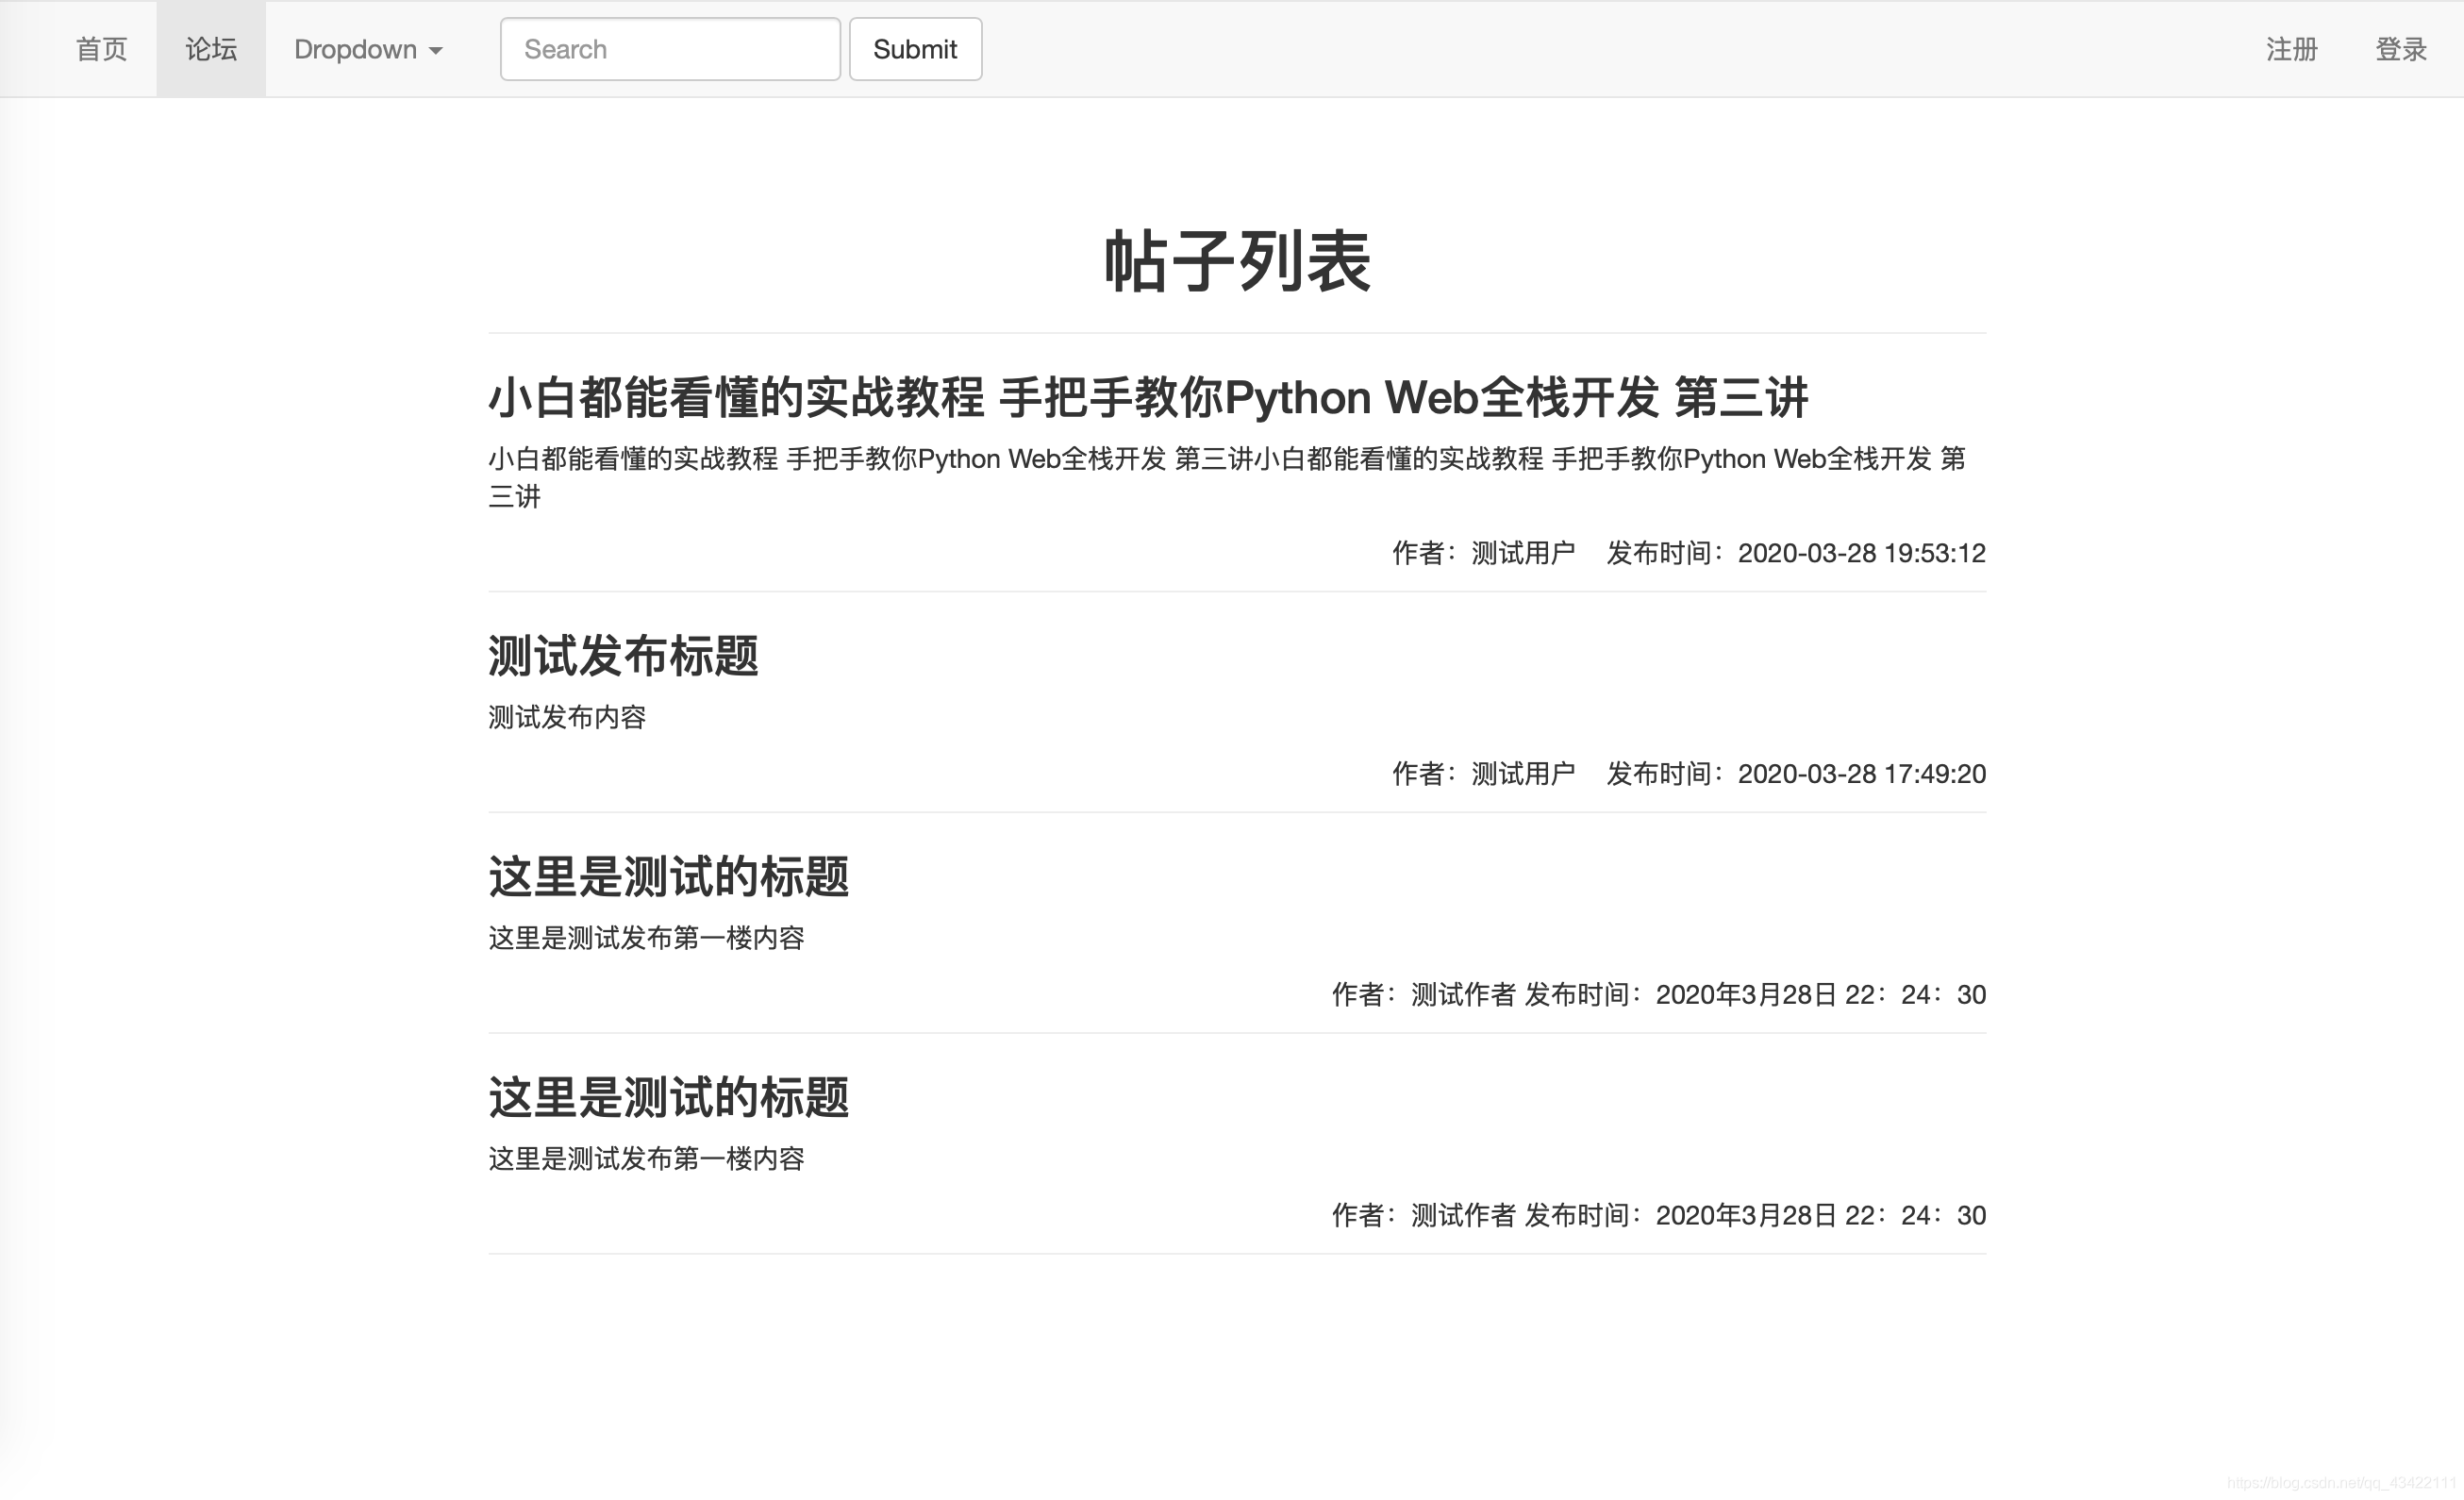
{% for issue in issue_information %}<li class="issue_list_li"><div class="issue_div"><div class="issue_content"><h3>{{ issue[4] }}</h3><article>{{ issue[5]|safe }}</article></div><div class="author_info"><p class="post-info"><span>作者:{{ issue[2] }}</span> <span>发布时间:{{ issue[3] }}</span></p></div></div></li>
{% endfor %}
这样就完成了,这里再贴一下完整的formula.html代码,防止有的同学不知道替换哪些内容:
{% extends 'base.html' %}{% block title %}
论坛
{% endblock %}{% block css %}
<link rel="stylesheet" href="/static/css/formula.css">
{% endblock %}{% block content %}
<div class="formula_content"><div class="page-header" id="page_header"><h1>帖子列表</h1></div><div class="issue_list_div"><ul class="issue_list_ul">{% for issue in issue_information %}<li class="issue_list_li"><div class="issue_div"><div class="issue_content"><h3>{{ issue[4] }}</h3><article>{{ issue[5]|safe }}</article></div><div class="author_info"><p class="post-info"><span>作者:{{ issue[2] }}</span> <span>发布时间:{{ issue[3] }}</span></p></div></div></li>{% endfor %}<li class="issue_list_li"><div class="issue_div"><div class="issue_content"><h3>这里是测试的标题</h3><p>这里是测试发布第一楼内容</p></div><div class="author_info"><p class="post-info"><span>作者:测试作者</span><span>发布时间:2020年3月28日 22:24:30</span></p></div></div></li><li class="issue_list_li"><div class="issue_div"><div class="issue_content"><h3>这里是测试的标题</h3><p>这里是测试发布第一楼内容</p></div><div class="author_info"><p class="post-info"><span>作者:测试作者</span><span>发布时间:2020年3月28日 22:24:30</span></p></div></div></li></ul></div>
</div>{% endblock %}
{% block formula_class %}
active
{% endblock %}
论坛现在的页面效果:现在已经可以将我们之前发布的帖子显示出来了,小伙伴们可以再发几个帖子测试下功能:
好了,现在论坛页面也完成了,那么我们在发布完帖子之后,我们可以将页面跳转到帖子列表。
在app.py中修改发布帖子的函数,直接将发布成功的return修改为:return redirect(url_for('formula'))
修改之后的发布帖子的完整功能代码为:
# 发布帖子
@app.route('/post_issue', methods=['GET', 'POST'])
def post_issue():if request.method == 'GET':return render_template('post_issue.html')if request.method == 'POST':title = request.form.get('title')comment = request.form.get('editorValue')email = session.get('email')issue_time = time.strftime("%Y-%m-%d %H:%M:%S")try:cur = db.cursor()Ino = gengenerateID()sql = "select * from Issue where Ino = '%s'" % Inodb.ping(reconnect=True)cur.execute(sql)result = cur.fetchone()# 如果result不为空,即存在该ID,就一直生成128位随机ID,直到不重复位置while result is not None:Ino = gengenerateID()sql = "select * from Issue where Ino = '%s'" % Inodb.ping(reconnect=True)cur.execute(sql)result = cur.fetchone()sql = "insert into Issue(Ino, email, title, issue_time) VALUES ('%s','%s','%s','%s')" % (Ino, email, title, issue_time)db.ping(reconnect=True)cur.execute(sql)db.commit()sql = "insert into Comment(Cno, Ino, comment, comment_time, email) VALUES ('%s','%s','%s','%s','%s')" % ('1', Ino, comment, issue_time, email)db.ping(reconnect=True)cur.execute(sql)db.commit()cur.close()return redirect(url_for('formula'))except Exception as e:raise e
好了,现在小伙伴们可以去测试自己的论坛系统啦!现在已经完成了一半了,我们可以发布问题并且显示出来了。今天的这次的博客就先到这里啦,剩下的内容我们将在第四讲中继续实现。如果喜欢这个系列的话,可以点赞、关注博主~
都能看懂的实战教程 手把手教你Python Web全栈开发 (DAY 3)](https://blog.csdn.net/qq_43422111/article/details/105160371),请大家支持原创,拒绝抄袭!!!。