前言
IPC 系列文章:
建议按顺序阅读。
Android IPC 之Service 还可以这么理解
Android IPC 之Binder基础
Android IPC 之Binder应用
Android IPC 之AIDL应用(上)
Android IPC 之AIDL应用(下)
Android IPC 之Messenger 原理及应用
Android IPC 之服务端回调
Android IPC 之获取服务(IBinder)
Android Binder 原理换个姿势就顿悟了(图文版)
通过前面的文章我们知道,要进行进程通信的核心是能拿到另一个进程暴露出来的IBiner引用。本篇将重点分析获取IBinder的方式及其原理。
通过本篇文章,你将了解到:
1、获取系统服务
2、获取自定义服务
3、两者区别与联系
本篇文章,系统服务、自定义服务里的服务并非单纯是指Service,而是提供某一类功能的"服务"。
1、获取系统服务
简单例子
以手机振动为例:
Vibrator vibrator = (Vibrator)getSystemService(Context.VIBRATOR_SERVICE);vibrator.vibrate(1000);
调用Context 方法getSystemService(xx),xx表示服务名字,最终返回Vibrator。
拿到Vibrator 引用后就可以调用相应的方法让手机振动。
继续沿着方法调用分析:
#ContextImpl.java@Overridepublic Object getSystemService(String name) {return SystemServiceRegistry.getSystemService(this, name);}#SystemServiceRegistrypublic static Object getSystemService(ContextImpl ctx, String name) {//从map 里获取键值ServiceFetcher<?> fetcher = SYSTEM_SERVICE_FETCHERS.get(name);return fetcher != null ? fetcher.getService(ctx) : null;}
这个map从哪里来呢?在SystemServiceRegistry 静态代码块里注册的:
#SystemServiceRegistry.javastatic {...registerService(Context.VIBRATOR_SERVICE, Vibrator.class,new CachedServiceFetcher<Vibrator>() {@Overridepublic Vibrator createService(ContextImpl ctx) {return new SystemVibrator(ctx);}});...}
可以看出返回了SystemVibrator,它是Vibrator(抽象类)的子类。
Vibrator.vibrate(xx)最终调用了如下方法:
#SystemVibrator.javaprivate final IVibratorService mService;public SystemVibrator(Context context) {super(context);//获取服务端提供的接口mService = IVibratorService.Stub.asInterface(ServiceManager.getService("vibrator"));}public void vibrate(int uid, String opPkg, VibrationEffect effect,String reason, AudioAttributes attributes) {if (mService == null) {Log.w(TAG, "Failed to vibrate; no vibrator service.");return;}try {//真正调用之处mService.vibrate(uid, opPkg, effect, usageForAttributes(attributes), reason, mToken);} catch (RemoteException e) {Log.w(TAG, "Failed to vibrate.", e);}}
了解过AIDL的同学都会知道,熟悉的套路:
- mService 为服务端提供的接口,客户端调用其提供的方法即可实现相应的功能。
- 客户端为当前待使用振动服务的App进程,服务端为提供振动服务的进程。

获取IBinder
振动服务的IBinder是通过:
ServiceManager.getService("vibrator")
获取的。
#ServiceManager.javapublic static IBinder getService(String name) {try {IBinder service = sCache.get(name);if (service != null) {return service;} else {//获取IBinderreturn Binder.allowBlocking(rawGetService(name));}} catch (RemoteException e) {Log.e(TAG, "error in getService", e);}return null;}private static IServiceManager getIServiceManager() {if (sServiceManager != null) {return sServiceManager;}//获取服务端的ServiceManagersServiceManager = ServiceManagerNative.asInterface(Binder.allowBlocking(BinderInternal.getContextObject()));return sServiceManager;}private static IBinder rawGetService(String name) throws RemoteException {...final IBinder binder = getIServiceManager().getService(name);...return binder;}
又是熟悉的套路,IServiceManager 为ServiceManager服务端提供的接口,通过该接口获取振动服务的IBinder引用。
其中BinderInternal.getContextObject()) 获取ServiceManager的IBinder。
此处需要说明一下:
Client 需要从ServiceManager获取震动服务的IBinder,而Client本身需要和ServiceManager通信,要通信那么得有IBinder吧。BinderInternal.getContextObject())就是为了获取ServiceManager的IBinder,该方法从Binder驱动获取了IBinder引用。
注册服务
ServiceManager是如何找到振动服务的呢?
Android 系统启动后,会开启system_server进程,该进程里开启了很多系统服务,包括AMS、WMS、振动服务等。
#SystemServer.javaprivate void startOtherServices() {...VibratorService vibrator = null;...vibrator = new VibratorService(context);//向ServiceManager注册振动服务ServiceManager.addService("vibrator", vibrator);...}
继续来看addService(xx):
#ServiceManager.javapublic static void addService(String name, IBinder service) {addService(name, service, false, IServiceManager.DUMP_FLAG_PRIORITY_DEFAULT);}public static void addService(String name, IBinder service, boolean allowIsolated,int dumpPriority) {try {//IPC 调用注册服务getIServiceManager().addService(name, service, allowIsolated, dumpPriority);} catch (RemoteException e) {Log.e(TAG, "error in addService", e);}}
调用ServiceManager接口添加服务到ServiceManager里。
小结
好了,现在从头到尾再捋一下。
1、ServiceManager 进程启动
2、system_server 进程启动,并将各个服务(包括振动服务)添加到ServiceManager里
3、客户端从ServiceManager里获取振动服务
用图表示:
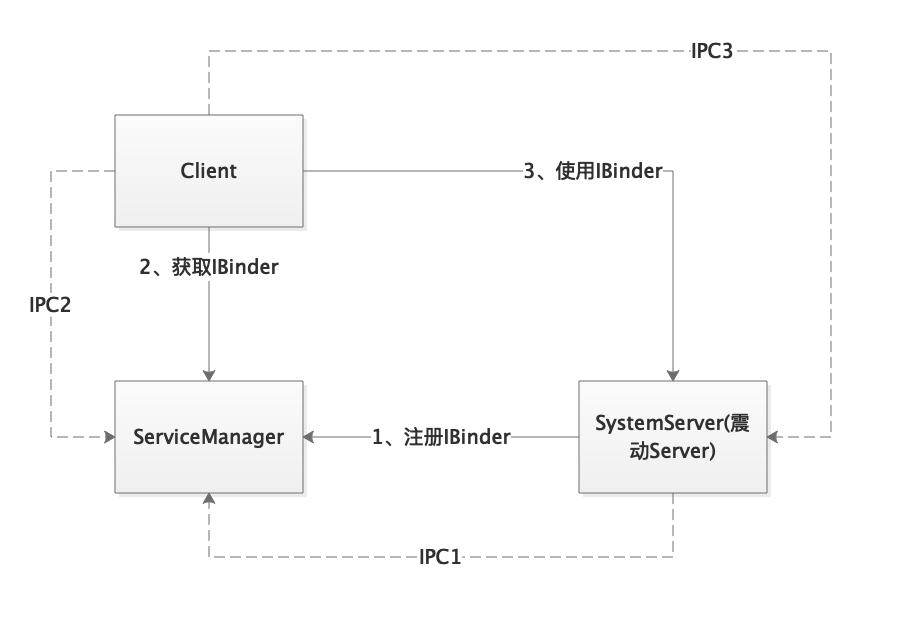
其中 Client、ServiceManager、SystemServer 分别运行于三个不同的进程,三者之间通过Binder进行IPC。实线为其调用目的,虚线为其调用手段。
1、SystemServer 通过IPC1 向ServiceManager注册服务的IBinder引用
2、Client想要使用服务(如振动服务),先通过IPC2 向ServiceManager获取
3、Client拿到服务IBinder后,调用服务接口(IPC3),使用服务提供的具体功能
为了减少多次无用IPC调用,因此Client会将拿到的各种服务缓存到数组里,当要查询的服务已经存在,则不用进行IPC2,直接使用IPC3。
系统提供的服务如AMS、WMS、PMS等都将IBinder封装在xxManager(如WindowManager等)里,通过xxManager就可以进行IPC使用具体的服务。
2、获取自定义服务
上面说了系统提供的服务需要注册到ServiceManager里,以便后来者查询使用之。那么我们自己定义的服务该如何使用呢?
Service 的绑定流程
先来看看典型的绑定流程:
服务端代码:
IStudentServer iStudentServer = IStudentServer.Stub() {@Overridepublic void say(String world) throws RemoteException {Log.d(TAG, "hello " + world);}};@Nullable@Overridepublic IBinder onBind(Intent intent) {return iStudentServer.asBinder();}
客户端代码:
ServiceConnection serviceConnection = new ServiceConnection() {@Overridepublic void onServiceConnected(ComponentName name, IBinder service) {//重点在service 类型IStudentServer iStudentServer = IStudentServer.Stub.asInterface(service);try {iStudentServer.say("hello"); } catch (Exception e) {}}@Overridepublic void onServiceDisconnected(ComponentName name) {}};private void bindService() {Intent intent = new Intent(MainActivity.this, MyService.class);bindService(intent, serviceConnection, Context.BIND_AUTO_CREATE);}
大致阐述上述流程:
1、Service 构造Binder对象,并将IBinder在onBind(xx)传递出去
2、客户端在绑定Service成功后会收到服务端传递过来的IBinder
3、通过该IBinder获取关联的接口操作服务端
可以看出,我们在Service里定义业务逻辑(Server端),并开放了接口,通过Service的绑定功能将接IBinder传递给客户端,这和获取系统服务的逻辑是一样的,核心都是IBinder的传递,接下来从源头入手查看IBinder的传递。
从Context.bindService(xx)开始
由于涉及到的代码较多,此处就不贴完整源码了,重点关注关键之处和IPC 流程,多用图示之。
绑定流程图:

大致解释上图元素构成:
最顶上方框为类名。
红色表示它们都运行在同一进程,暂且称之为客户端进程。
绿色表示它们都运行在同一进程,暂且称之为系统服务进程。
黄色表示它们都运行在同一进程,暂且称之为服务端进程。
红色箭头表示该调用为进程间调用,用IPC 表示之。其余为本进程内的对象调用。
分别来分析重点1、2、3。
重点1
客户端发起绑定操作,传入ServiceConnection 引用,该引用在ContextImpl.bindServiceCommon(xx)里被封装在ServiceDispatcher里,而ServiceDispatcher又持有InnerConnection引用,InnerConnection 继承自IServiceConnection.Stub 可以跨进程调用。
也就是说,客户端进程留下了一个"桩",等待别的进程调用。
重点2
AMS 收到客户端的绑定指令后,发起绑定操作,通过IPC 调用服务端接口。
最终调用到服务端的onBind(xx)方法,该方法里返回服务端的IBinder引用。
重点3
服务端返回IBinder引用后,委托AMS 发布这个IBinder,IBinder找到对应的客户端进程。而在重点1里客户端已经留下了"桩",此时AMS 顺势找到这个"桩"直接调用ServiceConnection的onServiceConnected(xx),就能将IBinder传递给客户端。
可能比较绕,我们从进程的角度再简化一下:

可以看出,以上发生了四次IPC 操作(当然里面还涉及到其它的IPC,此处忽略)。IBinder传递要经过两次IPC。
IBinder 传递
上面分析了通过绑定流程返回服务端的IBinder引用。
但是运行的过程中却发现问题:
服务端返回的IBinder是:IStudentServer
而客户端收到的IBinder是:BinderProxy
这个是怎么回事呢?
既然IBinder是通过进程间传递的,看看其是否是支持序列化。
public interface IBinder {...}public class Binder implements android.os.IBinder {...}
发现它们都没有实现Parcelable 接口。它是怎么支持序列化的呢?
那只能从Parcel本身分析了。
Parcel 除了支持
readInt()
writeInt()
...
等基本数据类型外,还支持
public final IBinder readStrongBinder() {return nativeReadStrongBinder(mNativePtr);}public final void writeStrongBinder(IBinder val) {nativeWriteStrongBinder(mNativePtr, val);}
顾名思义,应该是专门读写IBinder的方法,也就是说虽然没有实现Parcelable,但是Parcel 内置支持了IBinder。
接着继续查看其native方法,看看有何奥妙之处。
static jobject android_os_Parcel_readStrongBinder(JNIEnv* env, jclass clazz, jlong nativePtr)
{Parcel* parcel = reinterpret_cast<Parcel*>(nativePtr);if (parcel != NULL) {return javaObjectForIBinder(env, parcel->readStrongBinder());}return NULL;
}static void android_os_Parcel_writeStrongBinder(JNIEnv* env, jclass clazz, jlong nativePtr, jobject object)
{Parcel* parcel = reinterpret_cast<Parcel*>(nativePtr);if (parcel != NULL) {const status_t err = parcel->writeStrongBinder(ibinderForJavaObject(env, object));if (err != NO_ERROR) {signalExceptionForError(env, clazz, err);}}
}
注:方法在/frameworks/core/jni/android_os_Parcel.cpp
先分析写入IBinder的情况:
parcel->writeStrongBinder(xx) 调用了Parcel.cpp里的writeStrongBinder(xx)进而调用flatten_binder(xx)函数
status_t flatten_binder(const sp<ProcessState>& /*proc*/,const sp<IBinder>& binder, Parcel* out){flat_binder_object obj;...if (binder != NULL) {IBinder *local = binder->localBinder();if (!local) {//本地引用不存在BpBinder *proxy = binder->remoteBinder();if (proxy == NULL) {ALOGE("null proxy");}const int32_t handle = proxy ? proxy->handle() : 0;//type 标记为非本地Binderobj.hdr.type = BINDER_TYPE_HANDLE;obj.binder = 0; /* Don't pass uninitialized stack data to a remote process */obj.handle = handle;obj.cookie = 0;} else {//IBinder为本地的Binder引用,也就是和Server处在同一进程//type 标记为本地Binderobj.hdr.type = BINDER_TYPE_BINDER;obj.binder = reinterpret_cast<uintptr_t>(local->getWeakRefs());obj.cookie = reinterpret_cast<uintptr_t>(local);}} else {...}return finish_flatten_binder(binder, obj, out);}
可以看出,根据传入的IBinder是不是本地Binder然后打上type标记。
再来看看读取IBinder的情况
parcel->readStrongBinder()里最终调用了:
status_t unflatten_binder(const sp<ProcessState>& proc,const Parcel& in, sp<IBinder>* out){const flat_binder_object* flat = in.readObject(false);if (flat) {//根据Type 标记判断switch (flat->hdr.type) {case BINDER_TYPE_BINDER://本地引用*out = reinterpret_cast<IBinder*>(flat->cookie);return finish_unflatten_binder(NULL, *flat, in);case BINDER_TYPE_HANDLE://非本地引用,获取代理对象*out = proc->getStrongProxyForHandle(flat->handle);return finish_unflatten_binder(static_cast<BpBinder*>(out->get()), *flat, in);}}return BAD_TYPE;}
由此可见,如果是Server端的IBinder与Client端不在同一进程,则会转换为Proxy对象,最终体现在Java层的就是BinderProxy类型。
注:函数在/frameworks/native/libs/binder/Parcel.cpp
综上所述,IBinder跨进程传递时:
- 如果客户端、服务端同一进程,则服务端回传的IBinder为当前引用
- 如果客户端、服务端处在不同进程,则服务端回传的IBinder为BinderProxy
3、两者区别与联系
获取系统服务
系统服务会往ServiceManager注册,ServiceManager运行在单独的进程里,客户端进程需要先向ServiceManager里请求IBinder,再使用IBinder获取关联接口进而使用系统服务。
获取自己定义的服务
服务端进程开启后,暴露出IBinder。客户端通过绑定服务端进程里的Service,将IBinder跨进程传递至客户端,客户端再使用IBinder获取关联接口进而使用自定义服务。此过程没有借助于ServiceManager。
不论是哪种方式,核心都需要获得IBinder,IBinder的获取需要IPC。
至此,Android IPC 系列文章已经分析完毕
本文基于Android 10.0。