文章目录
- 1.登录页面
- 2.用户不存在
- 3.代码
- 3.1 login.wxml
- 3.2 login.css
- 3.3 login.js
- 4*斜体样式*.总结
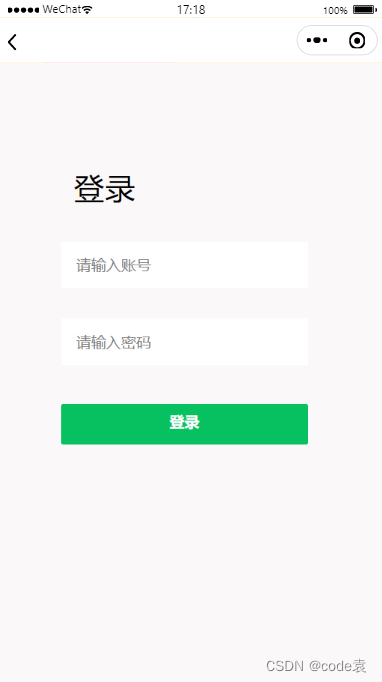
1.登录页面
登录的具体流程
1.当用户输入密码和账号后首先检验账号和密码是否为空
2.若不为空,则将输入的账号发送到后端,首先判断账号是否存在
3.若账号存在,则开始判断对应的密码是否正确。
4.若账号和密码都正确则显示登录成功。
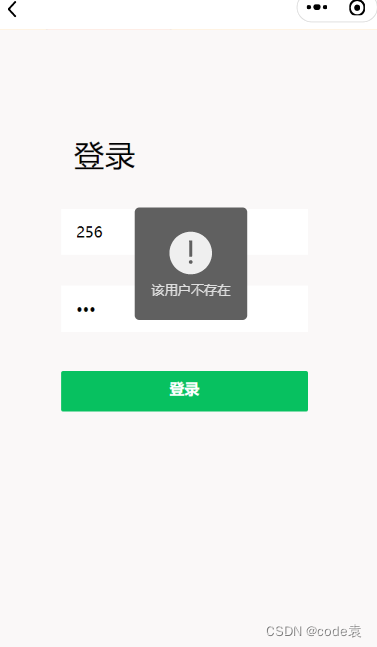
2.用户不存在
3.代码
3.1 login.wxml
<view class="v1" style="height:{{clientHeight?clientHeight+'px':'auto'}}"><!-- v2父容器 子view使用绝对布局 --><view class="v2"><view class="dltext" style="width: 232rpx; height: 92rpx; display: block; box-sizing: border-box; left: 0rpx; top: -2rpx">登录</view><!-- 手机号 --><view class="phoneCs"><!-- <image src="/images/zhang.png" class="ph"></image> --><input placeholder="请输入账号" type="number" bindinput="content" /></view><!-- 密码 --><view class=passwordCs"><!-- <image src="/images/mi.png" class="ps"></image> --><input placeholder="请输入密码" type="password" bindinput="password" /></view><!-- 登录按钮 --><view class="denglu"><button class="btn-dl" type="primary" bindtap="goadmin">登录</button></view></view></view>3.2 login.css
/* pages/login/login.wxss *//* 最大的父元素 */
.v1{display: block;position:absolute;width: 100%;background-color: rgb(250, 248, 248);
}
/* 白色区域 */
.v1 .v2{position: relative;margin-top: 150rpx;left: 100rpx; width: 545rpx;height: 600rpx;background-color: rgb(250, 248, 248);border-radius: 50rpx;
}
/* 白色区域内的登录文本 */
.v1 .v2 .dltext{margin-top: 50rpx;position: absolute;margin-left:50rpx;width: 150rpx;height: 100rpx;font-size: 60rpx;font-family: Helvetica;color: #000000;line-height: 100rpx;letter-spacing: 2rpx;
}
/* 手机图片+输入框+下划线的父容器view */
.v1 .v2 .phoneCs{margin-top: 200rpx;margin-left: 25rpx;position: absolute;display: flex;width:480rpx ;height: 90rpx ;background-color: white;}
/* 手机图标 */
.v1 .v2 .phoneCs .ph{margin-top: 5rpx;margin-left: 30rpx;width: 55rpx;height: 55rpx;
}
/* 手机号输入框 */
.v1 .v2 .phoneCs input{width: 400rpx;font-size: 30rpx ;margin-top: 25rpx;margin-left: 30rpx;
}
/* 密码图标+输入框+小眼睛图标+下划线父容器view */
.v1 .v2 .passwordCs{margin-top: 350rpx;margin-left: 25rpx;position: absolute;display: flex;width:480rpx ;height: 90rpx ;background-color: white;}
/* 密码图标 */
.v1 .v2 .passwordCs .ps{margin-top: 5rpx;margin-left: 30rpx;width: 55rpx;height: 55rpx;
}
/* 眼睛 图标*/
.v1 .v2 .passwordCs .eye{margin-top: 5rpx;margin-left: 65rpx;width: 55rpx;height: 55rpx;
}
/* 密码输入框 */
.v1 .v2 .passwordCs input{width: 400rpx;font-size: 30rpx ;margin-top: 25rpx;margin-left: 30rpx;
}
/* 登录按钮容器view */
.v1 .v2 .denglu{width: 480rpx;height: 80rpx;position: absolute;margin-top:515rpx;margin-left:25rpx;}
/* 登录按钮 */
.v1 .v2 .denglu button{padding: 0rpx;line-height: 70rpx;font-size: 30rpx;width: 100%;height: 100%;border-radius: 5rpx;
}
3.3 login.js
//index.js
//获取应用实例
const app = getApp()let username=''let password=''
Page({data: {username: '',password: '',clientHeight:''},onLoad(){var that=thiswx.getSystemInfo({ success: function (res) { console.log(res.windowHeight)that.setData({ clientHeight:res.windowHeight}); } }) },//协议goxieyi(){wx.navigateTo({url: '/pages/oppoint/oppoint',})},//获取输入款内容content(e){username=e.detail.value},password(e){password=e.detail.value},//登录事件goadmin(){let flag = false  //表示账户是否存在,false为初始值if(username==''){wx.showToast({icon:'none',title: '账号不能为空',})}else if(password==''){wx.showToast({icon:'none',title: '密码不能为空',})}else{wx.cloud.database().collection('adminShop').get({success:(res)=>{console.log(res.data)let admin=res.datafor (let i = 0; i < admin.length; i++) {  //遍历数据库对象集合if (username === admin[i].username) { //账户已存在flag=true;if (password !== admin[i].password) {  //判断密码正确与否wx.showToast({  //显示密码错误信息title: '密码错误!!',icon: 'error',duration: 2500});break;} else {wx.showToast({  //显示登录成功信息title: '登陆成功!!',icon: 'success',duration: 2500})flag=true;wx.setStorageSync('admin', password)wx.navigateTo({url: '/pages/admin/admin',})break;}}};if(flag==false)//遍历完数据后发现没有该账户{wx.showToast({title: '该用户不存在',icon: 'error',duration: 2500})}}})}},
})4斜体样式.总结
小程序的页面的简洁可以给用户带来很好的体验。
当用户在输入信息后逻辑层通过for循环来遍历数据库的中数据。
好了,今天的分享就到这里了。点个赞吧