神经网络学习小记录47——ShuffleNetV2模型的复现详解
- 学习前言
- 什么是ShuffleNetV2
- ShuffleNetV2
- 1、所用模块
- 2、网络整体结构
- 网络实现代码
学习前言
据说ShuffleNetV2比Mobilenet还要厉害,我决定好好学一下。

什么是ShuffleNetV2
这篇是ECCV2018关于轻量级模型的文章。
目前大部分的轻量级模型在对比模型速度时用的指标是FLOPs,这个指标主要衡量的就是卷积层的乘法操作。
但是实际运用中会发现,同一个FLOPS的网络运算速度却不同,只用FLOPS去进行衡量的话并不能完全代表模型速度。
通过如下图所示对比,作者发现Elemwise/Data IO等内存读写密集型操作也会极大的影响模型运算速度。
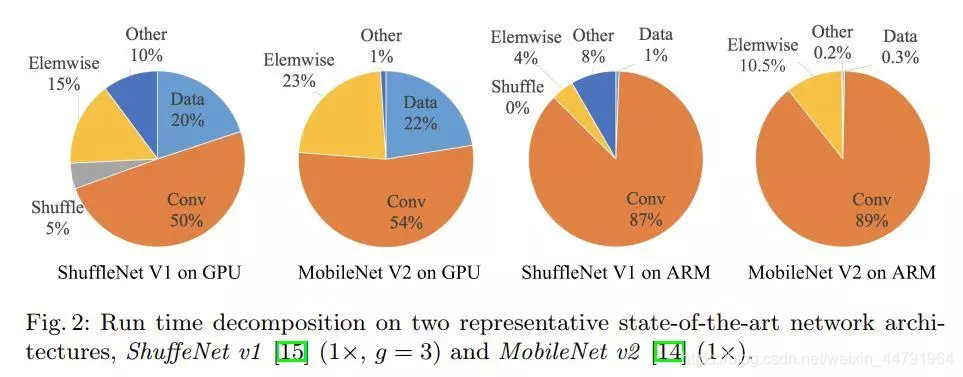
结合理论与实验作者提出了4条实用的指导原则:
1、卷积层的输入和输出特征通道数相等时MAC最小,此时模型速度最快。
2、过量使用组卷积会增加MAC。
3、网络碎片化会降低并行度。
4、不能忽略元素级操作,比如ReLU和Add,虽然它们的FLOPs较小,但是却需要较大的MAC。
ShuffleNetV2
1、所用模块

如图所示是ShuffleNetV2所常用的两个模块:
1、当Stride==1的时候,采用左边的模块,由于残差边没有卷积,因此宽高不变,主要用于加深网络层数。
2、当Stride==2的时候,采用右边的模块,由于残差边有卷积,因此宽高可变,主要用于压缩特征层的宽高,进行下采样。
模块实现代码如下:
def channel_split(x, name=''):# 输入进来的通道数in_channles = x.shape.as_list()[-1]ip = in_channles // 2# 对通道数进行分割c_hat = Lambda(lambda z: z[:, :, :, 0:ip], name='%s/sp%d_slice' % (name, 0))(x)c = Lambda(lambda z: z[:, :, :, ip:], name='%s/sp%d_slice' % (name, 1))(x)return c_hat, cdef channel_shuffle(x):height, width, channels = x.shape.as_list()[1:]channels_per_split = channels // 2# 通道交换x = K.reshape(x, [-1, height, width, 2, channels_per_split])x = K.permute_dimensions(x, (0,1,2,4,3))x = K.reshape(x, [-1, height, width, channels])return xdef shuffle_unit(inputs, out_channels, bottleneck_ratio, strides=2, stage=1, block=1):bn_axis = -1prefix = 'stage{}/block{}'.format(stage, block)# [116, 232, 464]bottleneck_channels = int(out_channels * bottleneck_ratio/2)if strides < 2:c_hat, c = channel_split(inputs, '{}/spl'.format(prefix))inputs = c# [116, 232, 464]x = Conv2D(bottleneck_channels, kernel_size=(1,1), strides=1, padding='same', name='{}/1x1conv_1'.format(prefix))(inputs)x = BatchNormalization(axis=bn_axis, name='{}/bn_1x1conv_1'.format(prefix))(x)x = Activation('relu', name='{}/relu_1x1conv_1'.format(prefix))(x)# 深度可分离卷积x = DepthwiseConv2D(kernel_size=3, strides=strides, padding='same', name='{}/3x3dwconv'.format(prefix))(x)x = BatchNormalization(axis=bn_axis, name='{}/bn_3x3dwconv'.format(prefix))(x)# [116, 232, 464]x = Conv2D(bottleneck_channels, kernel_size=1,strides=1,padding='same', name='{}/1x1conv_2'.format(prefix))(x)x = BatchNormalization(axis=bn_axis, name='{}/bn_1x1conv_2'.format(prefix))(x)x = Activation('relu', name='{}/relu_1x1conv_2'.format(prefix))(x)# 当strides等于2的时候,残差边需要添加卷积if strides < 2:ret = Concatenate(axis=bn_axis, name='{}/concat_1'.format(prefix))([x, c_hat])else:s2 = DepthwiseConv2D(kernel_size=3, strides=2, padding='same', name='{}/3x3dwconv_2'.format(prefix))(inputs)s2 = BatchNormalization(axis=bn_axis, name='{}/bn_3x3dwconv_2'.format(prefix))(s2)s2 = Conv2D(bottleneck_channels, kernel_size=1,strides=1,padding='same', name='{}/1x1_conv_3'.format(prefix))(s2)s2 = BatchNormalization(axis=bn_axis, name='{}/bn_1x1conv_3'.format(prefix))(s2)s2 = Activation('relu', name='{}/relu_1x1conv_3'.format(prefix))(s2)ret = Concatenate(axis=bn_axis, name='{}/concat_2'.format(prefix))([x, s2])ret = Lambda(channel_shuffle, name='{}/channel_shuffle'.format(prefix))(ret)return retdef block(x, channel_map, bottleneck_ratio, repeat=1, stage=1):x = shuffle_unit(x, out_channels=channel_map[stage-1],strides=2,bottleneck_ratio=bottleneck_ratio,stage=stage,block=1)for i in range(1, repeat+1):x = shuffle_unit(x, out_channels=channel_map[stage-1],strides=1,bottleneck_ratio=bottleneck_ratio,stage=stage, block=(1+i))return x
2、网络整体结构
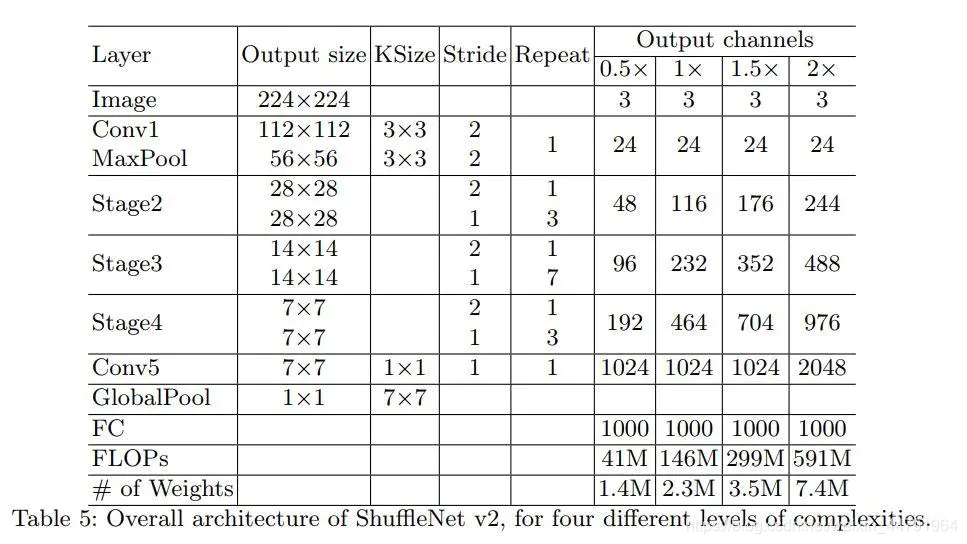
网络整体结构如图所示:
1、当输入进来的图片为224,224,3的时候,会经过一次卷积压缩+一次最大池化,此时网络的shape由224,224,3->112,112,24->56,56,24。
2、经过一次右边的ShuffleNet模块后进行三次左边的ShuffleNet模块。此时网络的shape由56,56,24->28,28,116。
3、经过一次右边的ShuffleNet模块后进行七次左边的ShuffleNet模块。此时网络的shape由28,28,116->14,14,232。
4、经过一次右边的ShuffleNet模块后进行三次左边的ShuffleNet模块。此时网络的shape由14,14,232->7,7,464。
5、卷积到1024,此时网络的shape由7,7,464->7,7,1024。
6、全局池化后,进行全连接,用于预测。
网络实现代码
ShuffleNetV2一共有4个scale,分别对应不同大小的ShuffleNetV2。
import numpy as np
from keras.utils import plot_model
from keras.layers import Input, Conv2D, MaxPool2D
from keras.layers import Activation, Add, Concatenate, Conv2D
from keras.layers import GlobalAveragePooling2D, Dense
from keras.layers import MaxPool2D,AveragePooling2D, BatchNormalization, Lambda, DepthwiseConv2D
from keras.models import Model
import keras.backend as Kimport numpy as npdef channel_split(x, name=''):# 输入进来的通道数in_channles = x.shape.as_list()[-1]ip = in_channles // 2# 对通道数进行分割c_hat = Lambda(lambda z: z[:, :, :, 0:ip], name='%s/sp%d_slice' % (name, 0))(x)c = Lambda(lambda z: z[:, :, :, ip:], name='%s/sp%d_slice' % (name, 1))(x)return c_hat, cdef channel_shuffle(x):height, width, channels = x.shape.as_list()[1:]channels_per_split = channels // 2# 通道交换x = K.reshape(x, [-1, height, width, 2, channels_per_split])x = K.permute_dimensions(x, (0,1,2,4,3))x = K.reshape(x, [-1, height, width, channels])return xdef shuffle_unit(inputs, out_channels, bottleneck_ratio, strides=2, stage=1, block=1):bn_axis = -1prefix = 'stage{}/block{}'.format(stage, block)# [116, 232, 464]bottleneck_channels = int(out_channels * bottleneck_ratio/2)if strides < 2:c_hat, c = channel_split(inputs, '{}/spl'.format(prefix))inputs = c# [116, 232, 464]x = Conv2D(bottleneck_channels, kernel_size=(1,1), strides=1, padding='same', name='{}/1x1conv_1'.format(prefix))(inputs)x = BatchNormalization(axis=bn_axis, name='{}/bn_1x1conv_1'.format(prefix))(x)x = Activation('relu', name='{}/relu_1x1conv_1'.format(prefix))(x)# 深度可分离卷积x = DepthwiseConv2D(kernel_size=3, strides=strides, padding='same', name='{}/3x3dwconv'.format(prefix))(x)x = BatchNormalization(axis=bn_axis, name='{}/bn_3x3dwconv'.format(prefix))(x)# [116, 232, 464]x = Conv2D(bottleneck_channels, kernel_size=1,strides=1,padding='same', name='{}/1x1conv_2'.format(prefix))(x)x = BatchNormalization(axis=bn_axis, name='{}/bn_1x1conv_2'.format(prefix))(x)x = Activation('relu', name='{}/relu_1x1conv_2'.format(prefix))(x)# 当strides等于2的时候,残差边需要添加卷积if strides < 2:ret = Concatenate(axis=bn_axis, name='{}/concat_1'.format(prefix))([x, c_hat])else:s2 = DepthwiseConv2D(kernel_size=3, strides=2, padding='same', name='{}/3x3dwconv_2'.format(prefix))(inputs)s2 = BatchNormalization(axis=bn_axis, name='{}/bn_3x3dwconv_2'.format(prefix))(s2)s2 = Conv2D(bottleneck_channels, kernel_size=1,strides=1,padding='same', name='{}/1x1_conv_3'.format(prefix))(s2)s2 = BatchNormalization(axis=bn_axis, name='{}/bn_1x1conv_3'.format(prefix))(s2)s2 = Activation('relu', name='{}/relu_1x1conv_3'.format(prefix))(s2)ret = Concatenate(axis=bn_axis, name='{}/concat_2'.format(prefix))([x, s2])ret = Lambda(channel_shuffle, name='{}/channel_shuffle'.format(prefix))(ret)return retdef block(x, channel_map, bottleneck_ratio, repeat=1, stage=1):x = shuffle_unit(x, out_channels=channel_map[stage-1],strides=2,bottleneck_ratio=bottleneck_ratio,stage=stage,block=1)for i in range(1, repeat+1):x = shuffle_unit(x, out_channels=channel_map[stage-1],strides=1,bottleneck_ratio=bottleneck_ratio,stage=stage, block=(1+i))return xdef ShuffleNetV2(input_tensor=None,pooling='max',input_shape=(224,224,3),num_shuffle_units=[3,7,3],scale_factor=1,bottleneck_ratio=1,classes=1000):name = 'ShuffleNetV2_{}_{}_{}'.format(scale_factor, bottleneck_ratio, "".join([str(x) for x in num_shuffle_units]))out_dim_stage_two = {0.5:48, 1:116, 1.5:176, 2:244}out_channels_in_stage = np.array([1,1,2,4])out_channels_in_stage *= out_dim_stage_two[scale_factor]  #  calculate output channels for each stageout_channels_in_stage[0] = 24  # first stage has always 24 output channelsout_channels_in_stage = out_channels_in_stage.astype(int)img_input = Input(shape=input_shape)x = Conv2D(filters=out_channels_in_stage[0], kernel_size=(3, 3), padding='same', use_bias=False, strides=(2, 2),activation='relu', name='conv1')(img_input)x = MaxPool2D(pool_size=(3, 3), strides=(2, 2), padding='same', name='maxpool1')(x)for stage in range(len(num_shuffle_units)):repeat = num_shuffle_units[stage]x = block(x, out_channels_in_stage,repeat=repeat,bottleneck_ratio=bottleneck_ratio,stage=stage + 2)if scale_factor!=2:x = Conv2D(1024, kernel_size=1, padding='same', strides=1, name='1x1conv5_out', activation='relu')(x)else:x = Conv2D(2048, kernel_size=1, padding='same', strides=1, name='1x1conv5_out', activation='relu')(x)x = GlobalAveragePooling2D(name='global_avg_pool')(x)x = Dense(classes, name='fc')(x)x = Activation('softmax', name='softmax')(x)inputs = img_inputmodel = Model(inputs, x, name=name)return modelif __name__ == '__main__':import osos.environ['CUDA_VISIBLE_DEVICES'] = ''model = ShuffleNetV2(input_shape=(224, 224, 3),scale_factor=1)model.summary()