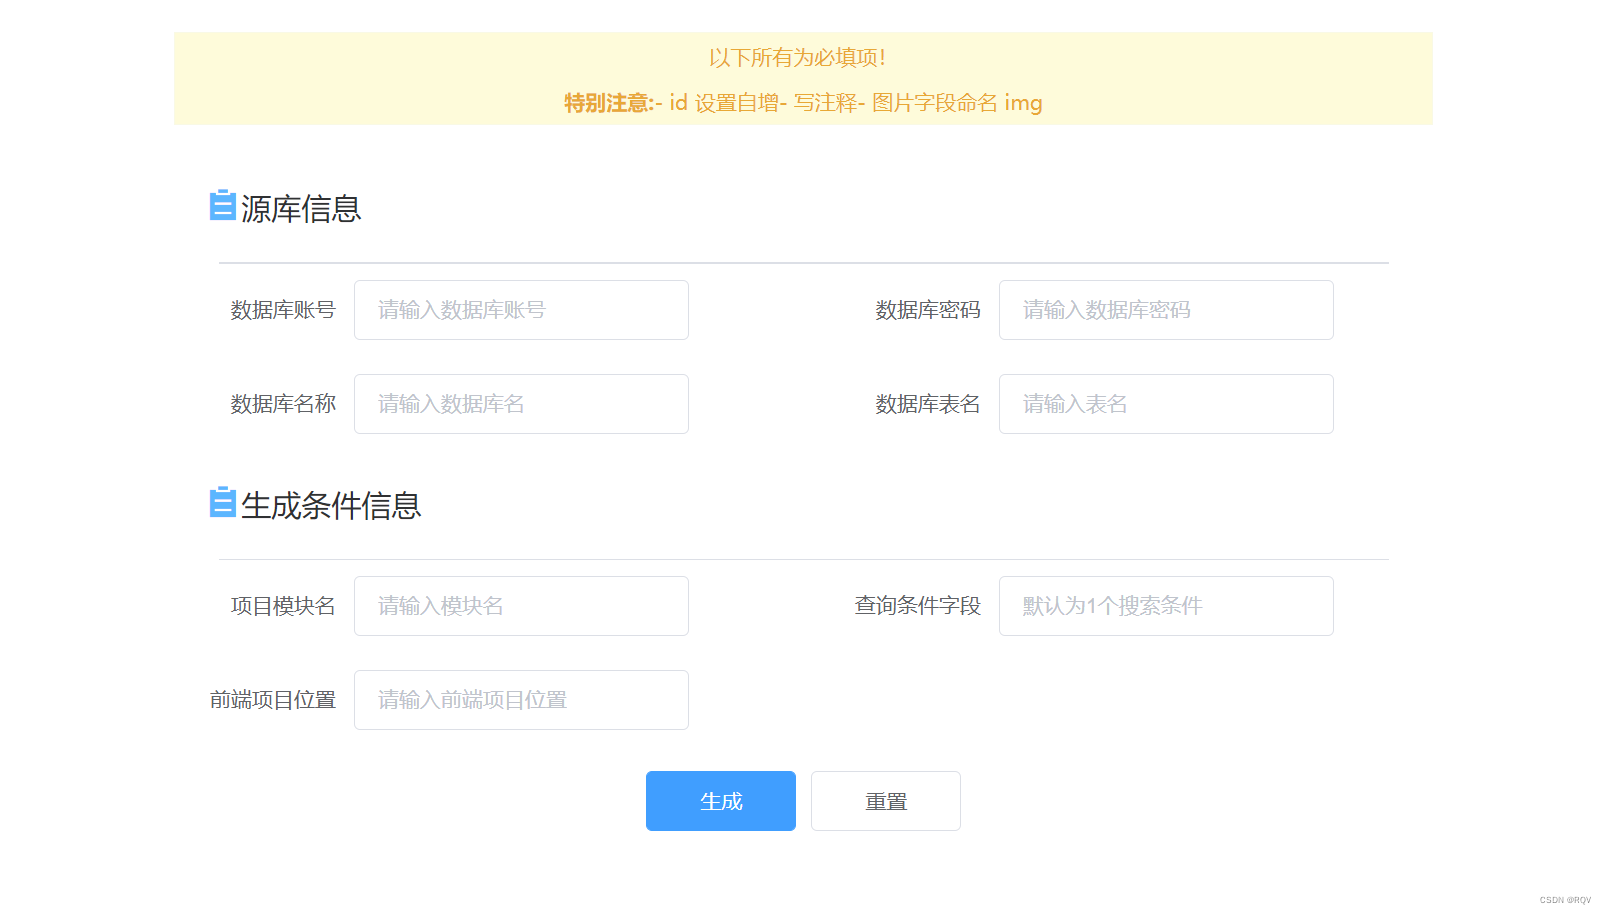
hello 大家好,最近搞了一个前后端代码生成器。只需设计好数据库,就可以自动生成前端页面包括图片上传和后端代码。下面给大家介绍一下。
项目环境:jdk8、node12、maven、mysql、vue2
技术介绍:SpringSecurity、SpringBoot、swagger、elementUi、vue.js
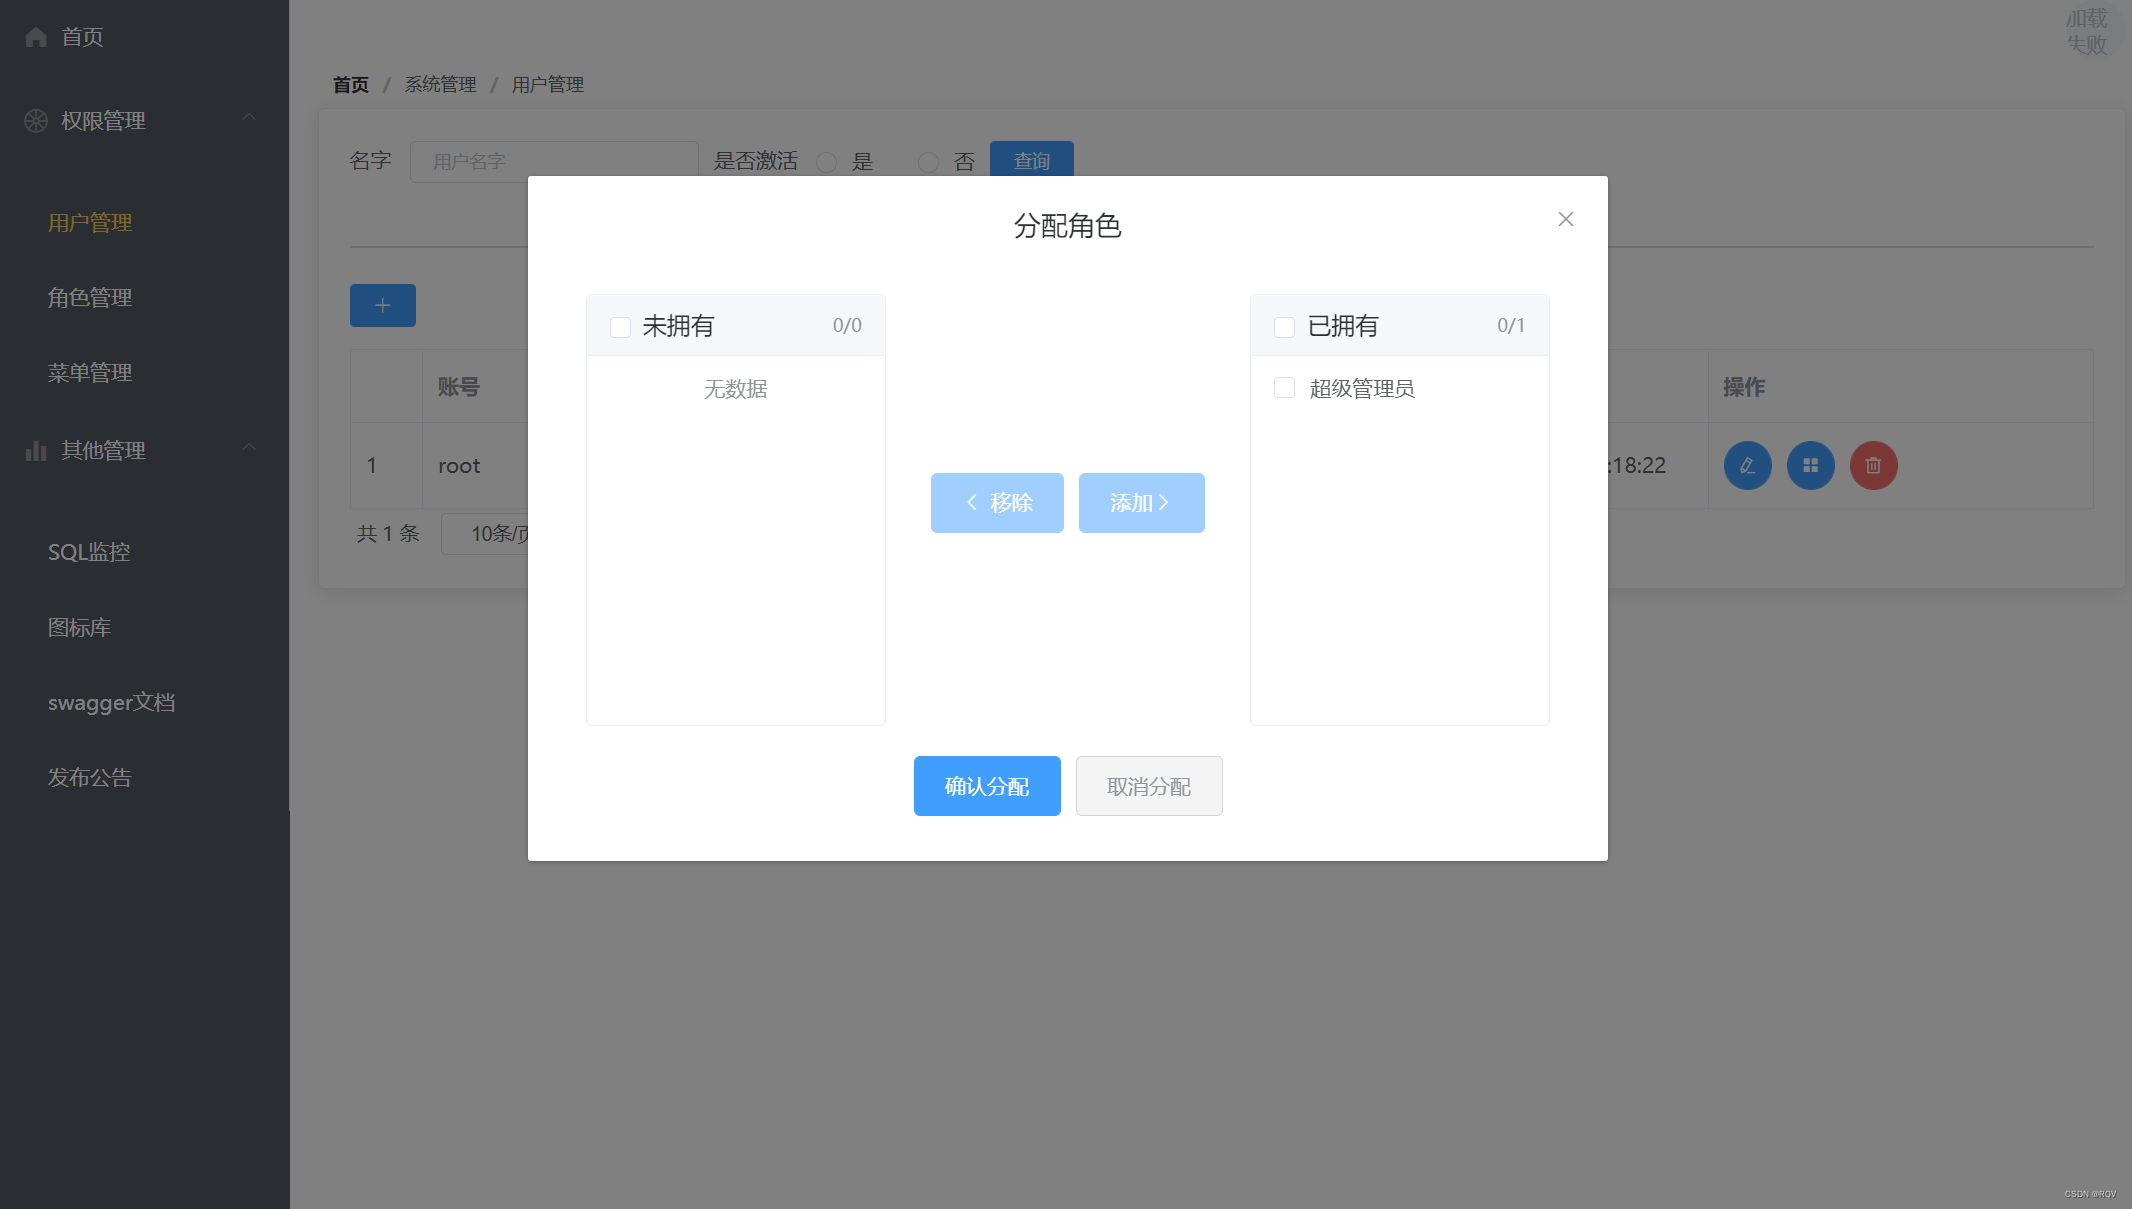
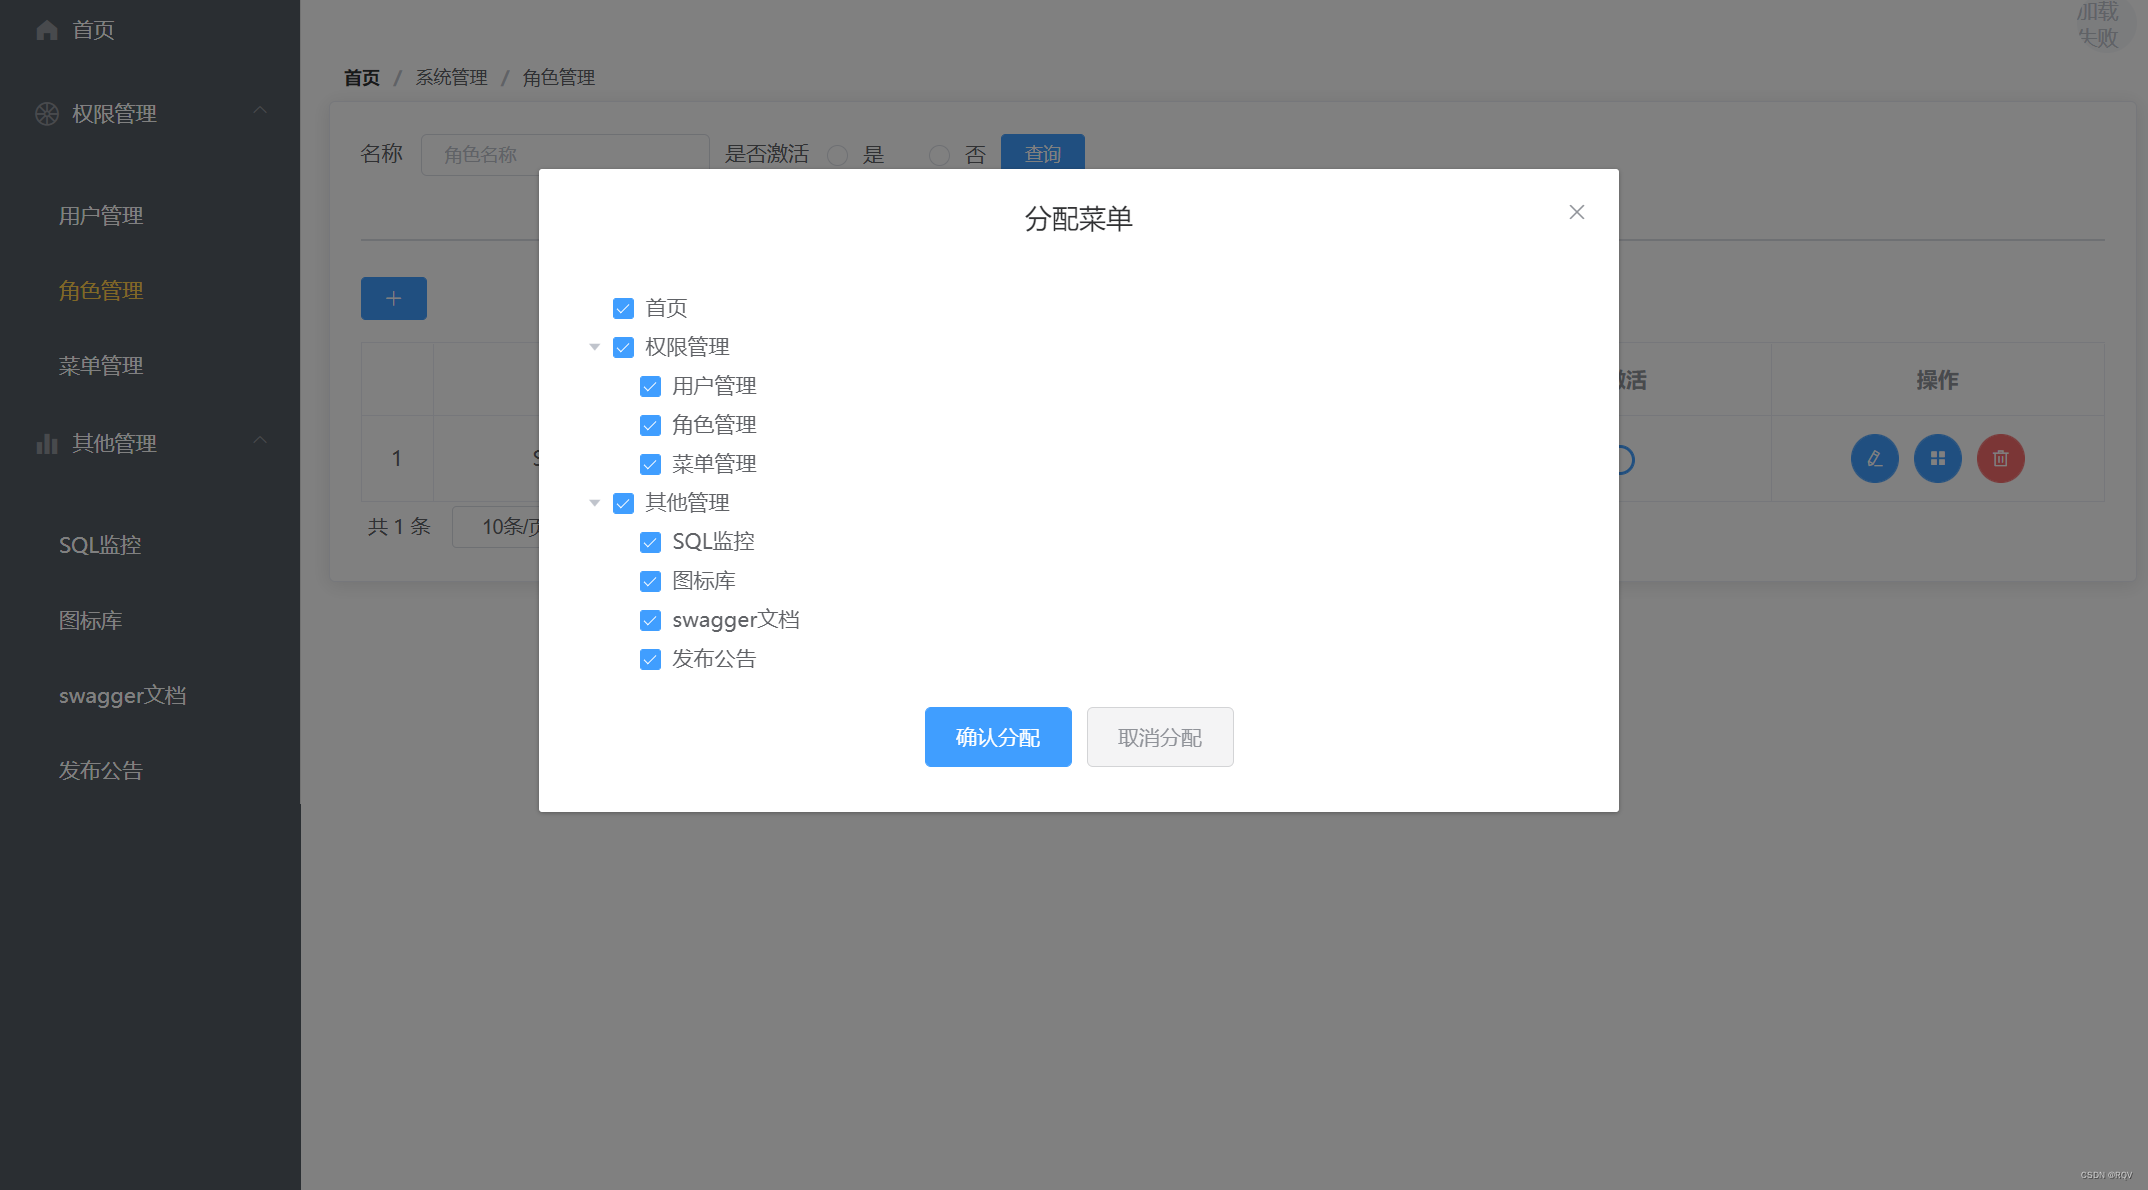
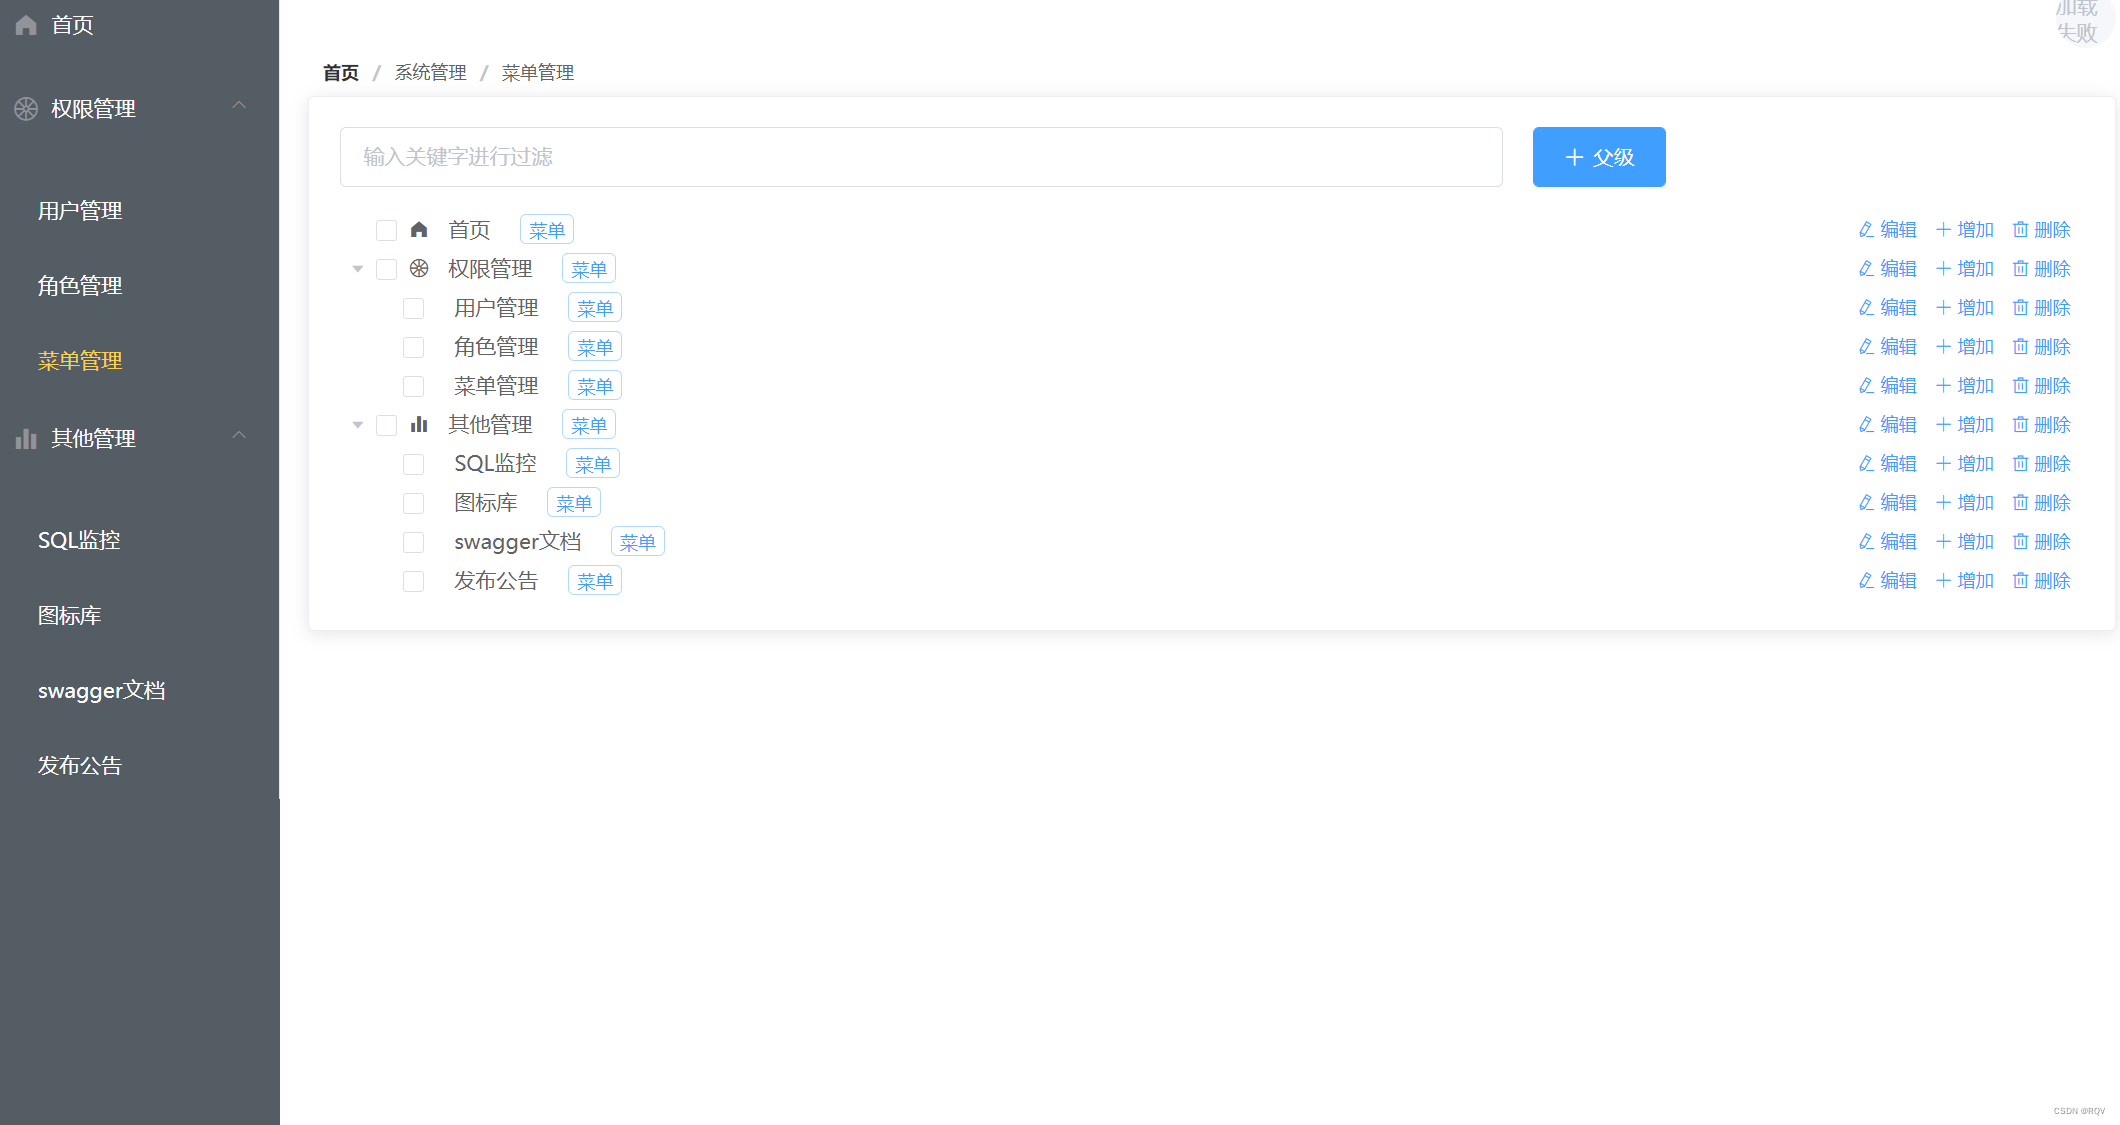
功能介绍:权限管理,动态生成菜单,图标库,swagger文档,可视化,系统sql执行监控
效果演示
密码:123456
权限和菜单管理代码:
package com.admin.security.config;import com.admin.security.evaluator.UserPermissionEvaluator;
import com.admin.security.filter.JWTAuthenticationTokenFilter;
import com.admin.security.handler.*;
import com.admin.security.provider.UserAuthenticationProvider;
import org.springframework.beans.factory.annotation.Autowired;
import org.springframework.context.annotation.Bean;
import org.springframework.context.annotation.Configuration;
import org.springframework.security.config.annotation.authentication.builders.AuthenticationManagerBuilder;
import org.springframework.security.config.annotation.method.configuration.EnableGlobalMethodSecurity;
import org.springframework.security.config.annotation.web.builders.HttpSecurity;
import org.springframework.security.config.annotation.web.configuration.EnableWebSecurity;
import org.springframework.security.config.annotation.web.configuration.WebSecurityConfigurerAdapter;
import org.springframework.security.config.http.SessionCreationPolicy;
import org.springframework.security.crypto.bcrypt.BCryptPasswordEncoder;
import org.springframework.security.web.access.expression.DefaultWebSecurityExpressionHandler;/*** @Author 染柒* @Date 2020/12/6 14:51* @Version 1.0*/
@Configuration
@EnableWebSecurity
@EnableGlobalMethodSecurity(prePostEnabled = true) //开启权限注解,默认是关闭的
public class SecurityConfig extends WebSecurityConfigurerAdapter {/*** 自定义登录成功处理器*/@Autowiredprivate UserLoginSuccessHandler userLoginSuccessHandler;/*** 自定义登录失败处理器*/@Autowiredprivate UserLoginFailureHandler userLoginFailureHandler;/*** 自定义注销成功处理器*/@Autowiredprivate UserLogoutSuccessHandler userLogoutSuccessHandler;/*** 自定义暂无权限处理器*/@Autowiredprivate UserAuthAccessDeniedHandler userAuthAccessDeniedHandler;/*** 自定义未登录的处理器*/@Autowiredprivate UserAuthenticationEntryPointHandler userAuthenticationEntryPointHandler;/*** 自定义登录逻辑验证器*/@Autowiredprivate UserAuthenticationProvider userAuthenticationProvider;/*** 加密方式* @Author 染柒* @CreateTime 2019/10/1 14:00*/@Beanpublic BCryptPasswordEncoder bCryptPasswordEncoder(){return new BCryptPasswordEncoder();}/*** 注入自定义PermissionEvaluator*/@Beanpublic DefaultWebSecurityExpressionHandler userSecurityExpressionHandler(){DefaultWebSecurityExpressionHandler handler = new DefaultWebSecurityExpressionHandler();handler.setPermissionEvaluator(new UserPermissionEvaluator());return handler;}/*** 配置登录验证逻辑*/@Overrideprotected void configure(AuthenticationManagerBuilder auth){//这里可启用我们自己的登陆验证逻辑auth.authenticationProvider(userAuthenticationProvider);}/*** 配置security的控制逻辑* @Author 染柒* @CreateTime 2019/10/1 16:56* @Param  http 请求*/@Overrideprotected void configure(HttpSecurity http) throws Exception {http.authorizeRequests()// 不进行权限验证的请求或资源(从配置文件中读取).antMatchers(JWTConfig.antMatchers.split(",")).permitAll()// 其他的需要登陆后才能访问.anyRequest().authenticated().and().headers().frameOptions().disable().and()// 配置未登录自定义处理类.httpBasic().authenticationEntryPoint(userAuthenticationEntryPointHandler).and()// 配置登录地址.formLogin().loginProcessingUrl("/login/userLogin")// 配置登录成功自定义处理类.successHandler(userLoginSuccessHandler)// 配置登录失败自定义处理类.failureHandler(userLoginFailureHandler).and()// 配置登出地址.logout().logoutUrl("/login/userLogout")// 配置用户登出自定义处理类.logoutSuccessHandler(userLogoutSuccessHandler).and()// 配置没有权限自定义处理类.exceptionHandling().accessDeniedHandler(userAuthAccessDeniedHandler).and()// 开启跨域.cors().and()// 取消跨站请求伪造防护.csrf().disable();// 基于Token不需要sessionhttp.sessionManagement().sessionCreationPolicy(SessionCreationPolicy.STATELESS);// 禁用缓存http.headers().cacheControl();// 添加JWT过滤器http.addFilter(new JWTAuthenticationTokenFilter(authenticationManager()));}}
package com.admin.system.controller;import com.admin.common.response.Result;
import com.admin.common.utils.Page;
import com.admin.system.mapper.MenuMapper;
import com.admin.system.pojo.Menu;
import com.admin.system.service.MenuService;
import com.admin.system.vo.MenuVo;
import io.swagger.annotations.Api;
import io.swagger.annotations.ApiOperation;
import org.springframework.security.access.prepost.PreAuthorize;
import org.springframework.web.bind.annotation.*;import javax.annotation.Resource;
import java.util.HashMap;
import java.util.List;
import java.util.Map;import static com.admin.system.utils.Convert.convertToMenuVo;
import static com.admin.system.utils.FindChild.findMenuChild;
import static com.admin.system.utils.FindRoot.findMenuRoot;/*** <p>* 前端控制器* </p>** @author 染柒* @since 2022-04-04*/
@RestController
@RequestMapping("/menu")
@Api(value = "系统菜单模块",tags = "系统菜单接口")
public class MenuController {@Resourceprivate MenuService menuService;@Resourceprivate MenuMapper menuMapper;@PreAuthorize("hasRole('SUPERADMIN')")@RequestMapping(value = "/menuList",method = RequestMethod.POST)@ApiOperation(value = "分页查询菜单信息",notes = "分页查询菜单信息")public Result getByPage(@RequestBody Page<Menu> page){page = menuService.getAllByPage(page);return Result.ok().data("data",page);}@PreAuthorize("hasRole('SUPERADMIN')")@RequestMapping(value = "/getAllMenu",method = RequestMethod.GET)@ApiOperation(value = "查询所有菜单信息",notes = "查询所有菜单信息")public Result getAllMenu(){List<Menu> menuList = menuMapper.selectAll();/*将menuList转换成menuVoList*/List<MenuVo> menuVoList = convertToMenuVo(menuList);/*找根节点*/List<MenuVo> rootMenu = findMenuRoot(menuVoList);/*为根节点设置子菜单*/for(MenuVo menuVo : rootMenu){/*获取某个根节点的子菜单*/List<MenuVo> childList = findMenuChild(menuVo.getId(),menuVoList);menuVo.setChildren(childList);}List<Integer> ids = menuService.findOpenIds();Map<String, Object> map = new HashMap<>();map.put("tree", rootMenu);map.put("open", ids);return Result.ok().data("data",map);}@PreAuthorize("hasRole('SUPERADMIN')")@RequestMapping(value = "/addMenu",method = RequestMethod.POST)@ApiOperation(value = "添加菜单",notes = "添加菜单")public Result addMenu(@RequestBody Menu menu){boolean check =menuService.save(menu);return Result.ok().message("添加成功!");}@PreAuthorize("hasRole('SUPERADMIN')")@RequestMapping(value = "/deleteMenu/{id}",method = RequestMethod.DELETE)@ApiOperation(value = "根据ID删除菜单",notes = "根据ID删除菜单")public Result deleteMenu(@PathVariable Integer id){boolean check = menuService.removeById(id);if (check == true){return Result.ok().message("删除成功!");}else{return Result.error().message("删除失败!");}}@PreAuthorize("hasRole('SUPERADMIN')")@RequestMapping(value = "/viewMenu/{id}",method = RequestMethod.GET)@ApiOperation(value = "根据ID查看用户菜单",notes = "根据ID查看用户菜单")public Result viewMenu(@PathVariable Integer id){Menu menu = menuService.getById(id);return Result.ok().data("data",menu);}@PreAuthorize("hasRole('SUPERADMIN')")@RequestMapping(value = "/update",method = RequestMethod.PUT)@ApiOperation(value = "根据ID更新用户菜单",notes = "根据ID更新用户菜单")public Result update(@RequestBody Menu menu){boolean check = menuService.updateById(menu);if (check == true){return Result.ok().message("更新成功!");}else{return Result.error().message("更新失败!");}}}前端角色列表:
<template><div v-loading="loading"><!-- 面包导航 --><el-breadcrumb separator="/" style="padding-left:10px;padding-bottom:10px;font-size:12px;"><el-breadcrumb-item :to="{ path: '/' }">首页</el-breadcrumb-item><el-breadcrumb-item>系统管理</el-breadcrumb-item><el-breadcrumb-item>角色管理</el-breadcrumb-item></el-breadcrumb><!-- 卡片主体 --><el-card class="box-card"><div class="block"><!-- 搜索 --><el-form :inline="true" :model="page" class="demo-form-inline" size="mini"><el-form-item label="名称"><el-input v-model="page.params.nickname" placeholder="角色名称" clearable /></el-form-item><el-form-item label="是否激活"><el-radio-group v-model="page.params.status"><el-radio label="1">是</el-radio><el-radio label="0">否</el-radio></el-radio-group></el-form-item><el-form-item><el-button type="primary" @click="getRoleList" size="mini">查询</el-button></el-form-item></el-form><el-divider/><div style="margin:15px 0px 15px 0"><el-button type="primary" @click="handleView" size="mini" icon="el-icon-plus"></el-button></div><el-table :data="page.list" border style="width: 100%"><el-table-columnfixedtype="index":index="indexMethod"></el-table-column><el-table-column  prop="id" label="ID" width="80" v-if="show"/><el-table-column  prop="roleName" label="角色名称" /><el-table-column prop="remark" label="角色描述" /><el-table-column prop="modifiedTime" label="修改时间"><template slot-scope="scope"><i class="el-icon-time"></i><span style="margin-left: 10px">{{ scope.row.modifiedTime }}</span></template></el-table-column><el-table-column prop="status" label="是否激活"><template slot-scope="scope"><el-switch v-model="scope.row.status" :inactive-value="0" :active-value="1"  @change="changRoleStatus(scope.row)"></el-switch></template></el-table-column><el-table-column  label="操作"  fixed="right"><template slot-scope="scope"><el-button @click="handleEdit(scope.row.id)" type="primary" icon="el-icon-edit" size="small" circle></el-button><el-button @click="handleAddMenu(scope.row.id)" type="primary"  size="small" icon="el-icon-menu" circle></el-button><el-button @click="handleDelete(scope.row.id)" type="danger" icon="el-icon-delete" size="small" circle></el-button></template></el-table-column></el-table><!-- 分页 --><el-paginationclass="pagination"@size-change="handleSizeChange"@current-change="handleCurrentChange":current-page="page.currentPage":page-sizes="[10, 20, 50, 100]":page-size="page.pageSize"layout="total, sizes, prev, pager, next, jumper":total="page.totalCount"></el-pagination></div></el-card><el-dialog title="分配菜单" :visible.sync="dialogFormVisible" :center="true"><!-- @closeDialog = "closeDialog" 传方法--><addMenu :id="id" @closeDialog = "closeDialog"></addMenu></el-dialog><el-dialog title="添加角色信息" :visible.sync="viewVisible" :center="true"><views  @closeDialog = "closeView" @getRoleList = "getRoleList"></views></el-dialog><el-dialog title="编辑角色信息" :visible.sync="editVisible" :center="true"><update :editForm="editForm" @closeDialog = "closeEdit" @getRoleList = "getRoleList"></update></el-dialog></div>
</template>
<style>
.el-table th,td{ text-align: center !important; }</style>><script>
import roleApi from "@/api/role"
import addMenu from "./doAddMenu"
import { Message } from 'element-ui'
import views from "./view"
import update from "./update"export default {components: {addMenu,update,views},data(){return {page: {currentPage: 1,pageSize:10,totalPage: 0,totalCount:0,params: {},list: []},loading: true,show: false,dialogFormVisible: false,editVisible: false,viewVisible: false,editForm: {},id: ""}},created(){this.getRoleList()setTimeout(() => {this.loading = false;}, 500);},methods:{indexMethod(index) {return (index * 1)+1;},handleSizeChange(val) {this.page.pageSize = valthis.getRoleList()},handleCurrentChange(val) {this.page.currentPage = valthis.getRoleList()},getRoleList(){roleApi.getRoleList(this.page).then(res =>{this.page = res.data.data})},handleEdit(id){roleApi.viewRole(id).then(res => {this.editForm = res.data.data})this.editVisible = true},handleView(){this.viewVisible = true},handleDelete(id){this.$confirm('是否刪除?', '提示', {confirmButtonText: '确定',cancelButtonText: '取消',type: 'error'}).then(() => {roleApi.deleteRole(id).then(res => {Message.success(res.message)this.getRoleList()})})},handleAddMenu(id){this.id = idthis.dialogFormVisible = true},closeDialog(){this.dialogFormVisible = false},//改变用户禁用状态async changRoleStatus(row) {roleApi.update(row).then(res => {if(row.status == 0){Message.success("已禁用!")}else{Message.success("已激活!")}this.getRoleList()})},closeView(){this.viewVisible = false},closeEdit(){this.editVisible = false},}}
</script>
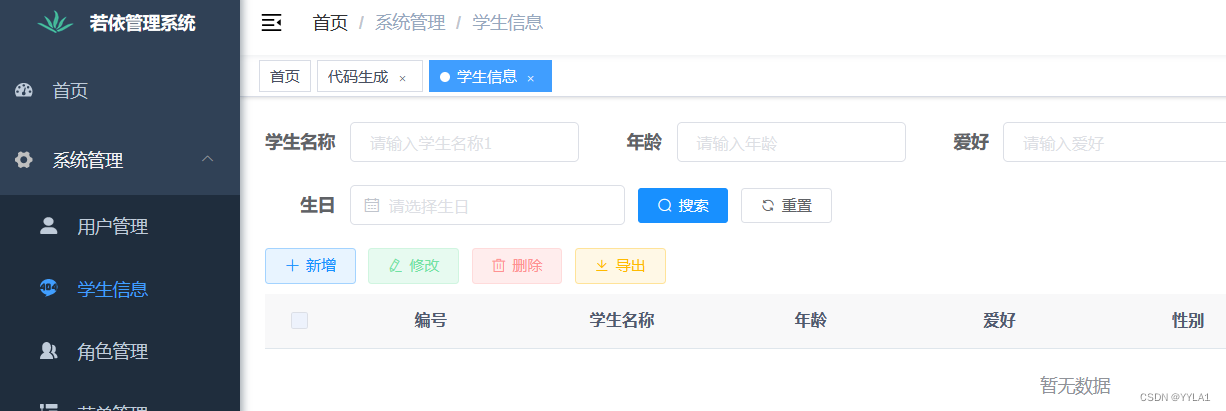
项目截图:
欢迎大家来学习交流!