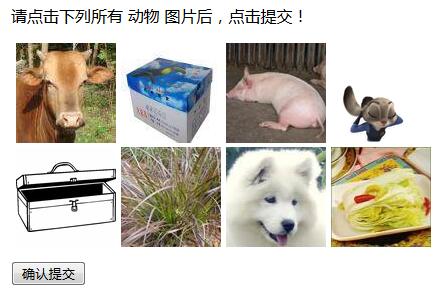
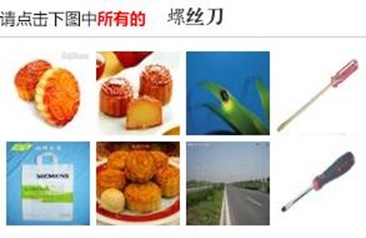
模型训练好之后,就可以应用于新图片的预测了。比如现在有下面这么一张12306的验证码,预测工作也分为两部分:上半部分的文字预测、下半部分的图片预测,将两部分划分开之后分别加载各自的模型进行预测。

文字预测:需要把文字部分从整个验证码图片中截取下来,截取函数在前面的文章中已介绍过,可以把截取函数保存为一个python文件,在这里直接导入即可。
图片预测:先把8个小图片分别截取保存下来,这些数据可以用作新模型训练的数据来源噢。用当前的模型对新数据预测并分类存储,然后利用新数据去改善旧数据的质量和数量,这样也可以提高模型的精度。
代码如下
import os, io
import json
import hashlib
import numpy as np
from PIL import Image
import tensorflow as tf
from collections import defaultdict
from tensorflow.keras import models
from collections import defaultdict
from split_text import judge_image_bk, split_image_text	#文本截取#在训练的时候对数据做了一些处理工作,所以在测试的时候也需要做相应的处理
def transform_test(feature, flag):feature = np.array(feature)[:, :, 0:3]	#图片格式转换feature = tf.image.resize(feature, [64, 64])feature = tf.divide(feature, 255.)mean = tf.convert_to_tensor([0.485, 0.456, 0.406])std = tf.convert_to_tensor([0.229, 0.224, 0.225])feature = tf.divide(tf.subtract(feature, mean), std)if flag == 1:   #训练时,只对文字部分做了标准化处理feature = tf.image.per_image_standardization(feature)return tf.image.convert_image_dtype(feature, tf.float32)#划分下面8张小验证码图片
def split_image(raw_image, image_shape):crop_area = [(5, 41, 71, 107), (77, 41, 143, 107), (149, 41, 215, 107), (221, 41, 287, 107),(5, 113, 71, 179), (77, 113, 143, 179), (149, 113, 215, 179), (221, 113, 287, 179)]if isinstance(raw_image, str):try:raw_image = Image.open(raw_image)lst = [raw_image.crop(region).resize(image_shape) for region in crop_area]except Exception as e:print('图片文件错误:', e.args)return Falsereturn lst#加载模型
def model_load(model_path):return models.load_model(model_path)#文本预测,返回预测结果以及图片数据
def text_predict(captcha_path):mode = judge_image_bk(captcha_path)# 把split_image_text函数的最后两行注释掉,然后添加return text;同时去掉name、save_dir两个参数imgs = split_image_text(captcha_path, (64, 64), mode)if not imgs:return text_predict(captcha_path)res_text = []for img in imgs:index = np.argmax(text_model.predict(np.expand_dims(transform_test(img, 1), 0))[0])res_text.append(dic[labels[index]])print('文字识别结果:', ' '.join(res_text))return res_text, imgs#图片预测,返回预测结果以及图片数据
def pic_predict(captcha_path):imgs = split_image(captcha_path, (64, 64))pred_res = []if imgs:res_dic = defaultdict(list)for j in range(1, 9):index = np.argmax(model_pic.predict(np.expand_dims(transform_test(imgs[j-1], 2), 0))[0])tmp = dic[labels[index]]res_dic[tmp].append(j)pred_res.append(tmp)res_dic = dict(res_dic)print('图片识别结果:', res_dic)return res_dic, pred_res, imgsreturn#匹配确定验证码的位置
def captcha_pos(res_text, res_pic):res = []for each in res_text:#挂钟和钟表这两个验证码事实上没啥区别,我试了很多次,只要出现表,全选完事if each == '挂钟' or each == '钟表':if res_pic.get('挂钟'):res.extend(res_pic.get('挂钟'))if res_pic.get('钟表'):res.extend(res_pic.get('钟表'))else:try:res.extend(res_pic.get(each))except:print(each + '无匹配图片!')res = list(set(res))	#去重print('验证码位置:', res)return res#创建文件夹
def mk_dir(path):try:os.mkdir(path)except FileExistsError:pass#保存文本图片和图像图片,如有需要
def save(save_dir, prediction, imgs):byter = io.BytesIO()  #创建字节流对象length = len(imgs)for i in range(length):save_path = os.path.join(os.getcwd(), save_dir, prediction[i])mk_dir(save_path)imgs[i].save(byter, format='JPEG')  #将JPEG格式转换成字节流格式#python提供的hashlib只接受字节流输入,获取图片的哈希值,方便对其命名imgs[i].save(os.path.join(save_path, hashlib.md5(byter.getvalue()).hexdigest() + '.jpg'))if length < 8:print('%d张文本图片保存成功!' % length)else:print('%d张图像图片保存成功!' % length)
以上是预测时的函数定义部分。
下面就可以定义相关参数,然后识别验证码。
if __name__ == '__main__':text_save_dir = 'text_prediction'pic_save_dir = 'pic_prediction'#第一次运行时,将创建两个文件夹mk_dir(text_save_dir)mk_dir(pic_save_dir)#加载两个模型text_model = model_load('text_model.h5')model_pic = model_load('pic_model.h5')#标签labels = ['Ants', 'Bandaid', 'Banner', 'Basketball', 'Beer', 'Boots', 'Bottleopener', 'Buscard', 'Candlestick', 'Cherry', 'Chineseknot', 'Coral', 'Cottonswab', 'Dashboard', 'DragonBoat', 'Earplugs', 'Electronicscale', 'Embroidery', 'Exhaustfan', 'Filebag', 'Flyswatter', 'Frenchfries', 'Gong', 'Jujube', 'MemorialGateway', 'Mop', 'Mungbean', 'Palmprint', 'Pyramid', 'Redbean', 'Refrigerator', 'Seagull', 'Seaweed', 'Spatula', 'Tapemeasure', 'Teacup', 'Tennisracket', 'Treadmill', 'Wallclock', 'Windchime', 'Wool', 'Wristband', 'aircraftcarrier', 'apill', 'blackboard', 'calendar', 'candle', 'chilipatse', 'clocksandwatches', 'doublefacedadhesivetape', 'firecrackers', 'funnel', 'honeybee', 'hot-waterbag', 'lion', 'lizard', 'notebook', 'palette', 'paper-cut', 'pencil-box', 'pineapple', 'plate', 'poster', 'preservedplum', 'pressurecooker', 'redwine', 'ricecooker', 'safetyhat', 'salad', 'sandbag', 'seal', 'smallbell', 'stapler', 'steamer', 'streetlamp', 'teatable', 'tiger', 'typewriter', 'whistling', 'wire']with open('en2ch.json', 'r') as f: #加载英译中文件dic = json.load(f)captcha_path = 'D:/captcha/15689.jpg' #原始验证码图片保存的路径#文字识别res_text, imgs_text = text_predict(captcha_path)#图像识别res_pic, pred_res, imgs_pic = pic_predict(captcha_path)res = captcha_pos(res_text, res_pic)#保存图片save(text_save_dir, res_text, imgs_text)save(pic_save_dir, pred_res, imgs_pic)
通过两部分的预测结果输出验证码的正确位置。第一排4张图片标号:1、2、3、4;第二排4张图片标号:5、6、7、8。
最终结果如下

以上是联合使用两个模型进行验证码预测的过程,接下来利用12306的验证机制,来实战测试两个模型联合使用的准确率。
import time
import base64
import requests
from urllib.parse import urlencodedef verify(count):#count用于计数正确识别的次数#验证码获取的基本链接,返回数据为base64编码的序列cap_base_url = "https://kyfw.12306.cn/passport/captcha/captcha-image64?login_site=E&module=login&rand=sjrand&"#验证码验证的基本链接,返回数据格式为json,其中包含状态码verify_base_url = 'https://kyfw.12306.cn/passport/captcha/captcha-check?'#用session来完成验证过程,保证请求过程的会话一致性session = requests.session()#为验证码获取链接加上时间戳,然后发起请求res = session.get(cap_base_url + str(int(time.time() * 1000)))img = base64.b64decode(res.json()['image'])  #解码之后的数据格式为io流img = Image.open(io.BytesIO(img))#原本输入text_predict、pic_predict两个函数的参数是图片的存储路径,#我这里直接输入的是图片本身,所以对judge_image_bk、split_image_text以及split_image这三个函数作了一点修改,也就是省去了函数中打开图片的这行代码#如果不想修改以上函数,也可以在这里加一行代码,先把得到的img保存到本地也行,具体存储路径自行定义res_text, imgs_text= text_predict(img)res_pic, pred_res, imgs_pic = pic_predict(img)res = captcha_pos(res_text, res_pic)if res:answers = []for i in res:  #计算得到验证码的像素坐标if i <= 4:answers.extend([str(40 + 72 * (i - 1)), str(73)])else:answers.extend([str(40 + 72 * (i - 5)), str(145)])data = {'answer': '', 'rand': 'sjrand', 'login_site': 'E'}data['answer'] = ','.join(answers)response = session.get(verify_base_url + urlencode(data))#状态码4表示成功if response.json()['result_code'] == '4':count += 1return True, count, imgreturn False, count, imgtext_model = model_load('text_model.h5')
model_pic = model_load('pic_model.h5')#标签
labels = ['Ants', 'Bandaid', 'Banner', 'Basketball', 'Beer', 'Boots', 'Bottleopener', 'Buscard', 'Candlestick', 'Cherry', 'Chineseknot', 'Coral', 'Cottonswab', 'Dashboard', 'DragonBoat', 'Earplugs', 'Electronicscale', 'Embroidery', 'Exhaustfan', 'Filebag', 'Flyswatter', 'Frenchfries', 'Gong', 'Jujube', 'MemorialGateway', 'Mop', 'Mungbean', 'Palmprint', 'Pyramid', 'Redbean', 'Refrigerator', 'Seagull', 'Seaweed', 'Spatula', 'Tapemeasure', 'Teacup', 'Tennisracket', 'Treadmill', 'Wallclock', 'Windchime', 'Wool', 'Wristband', 'aircraftcarrier', 'apill', 'blackboard', 'calendar', 'candle', 'chilipatse', 'clocksandwatches', 'doublefacedadhesivetape', 'firecrackers', 'funnel', 'honeybee', 'hot-waterbag', 'lion', 'lizard', 'notebook', 'palette', 'paper-cut', 'pencil-box', 'pineapple', 'plate', 'poster', 'preservedplum', 'pressurecooker', 'redwine', 'ricecooker', 'safetyhat', 'salad', 'sandbag', 'seal', 'smallbell', 'stapler', 'steamer', 'streetlamp', 'teatable', 'tiger', 'typewriter', 'whistling', 'wire']with open('en2ch.json', 'r') as f:	#加载英译中文件dic = json.load(f)count = 0
for i in range(100):  #一次性请求次数建议不要太多,如果你ip多也没问题status, count, img = verify(count)time.sleep(random.choice([0.1,0.2,0.3,0.4,0.5,0.8]))if status:print('第%d次验证码校验结果:成功!' % (i + 1))else:print('第%d次验证码校验结果:失败!' % (i + 1))#把识别错误的验证码保存下来,目录自定义,我这里的目录是'12306错误预测图'img.save(os.path.join(os.getcwd(), '12306错误预测图', str(i+101)+'.jpg'))
print('验证码校验成功率:%d' % count + '%')
经过多次测试,两个模型联合使用的实际准确率在90%左右。根据对识别错误的验证码分析,联合使用准确率有所下降的主要原因在于数据集中小部分的图片归类错误,因为是人工归类,有些两个种类的相似图片归类出错,还有些图片根本不知道是啥,主要是这个问题导致实际的准确率有小幅度的下降。不过,可以根据错误预测的验证码,来对之前的数据集进行修正,将实际的准确率提上来。
部分测试结果如下

在后续经过对训练集和验证集中部分错误图片的正确归类后,重新训练模型,经过实战测试,准确率就提升上来了,和模型训练过程中的准确率基本上是吻合的。
附上实战测试结果图,经过修正后,两个模型联合使用的整体准确率可稳定在97%,文本模型准确率基本上是100%。