目录
创建EJB服务器项目
配置服务器依赖项(WildFly 18和更新版本)
部署EJB服务器项目
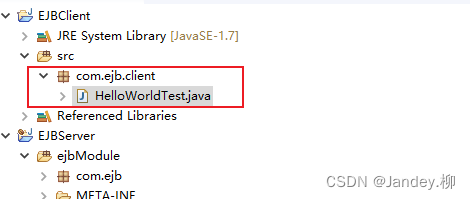
创建EJB客户端项目
配置客户端依赖项(WildFly 18及更新版本)
在EJB客户端项目中配置安全性
运行EJB客户端项目
使用纯HTTP传输
EJB客户端:如何检索EJB客户机的远程IP地址
WildFly 8,9,10和JBoss AS 7 EJB远程客户端
编写服务器端
编写客户端
来自远程主机的EJB 3客户机
JBoss AS 7和EAP 6项目
EJB 3远程客户端故障排除
本教程的目的是演示如何从远程独立Java客户机查找和调用部署在WildFly服务器实例上的ejb。
这是我们的场景:

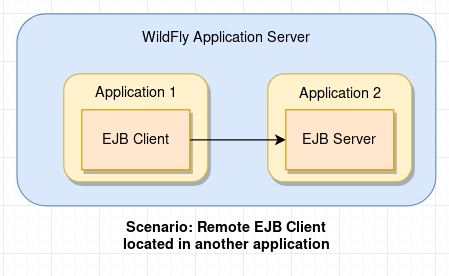
如果您的EJB客户端运行在WildFly应用服务器(例如另一个EJB应用程序)中,那么我们建议查看本教程:WildFly:如何从位于另一个应用程序中的EJB调用EJB 。
为了演示如何从远程EJB客户端调用EJB,我们需要完成以下步骤:
- 创建包含EJB接口和实现的EJB服务器项目
- 创建查找远程EJB的EJB客户端项目
- 在客户端项目中配置安全性,以便它被授权调用远程ejb
创建EJB服务器项目
假设你有一个简单的服务器项目,包括以下有状态和无状态EJB:
package com.itbuzzpress.chapter4.ejb;import javax.ejb.Remote;
import javax.ejb.Stateful;
import com.itbuzzpress.chapter4.exception.InsufficientFundsException;@Stateful
@Remote(Account.class)
public class AccountEJB implements Account {long money;@Overridepublic long getMoney() {return money;}public void createAccount(long amount)  {this.money= amount;}@Overridepublic void deposit(long amount)  {this.money+= amount;System.out.println("Money deposit. total is "+money);}@Overridepublic void withdraw(long amount) throws InsufficientFundsException {long newAmount = money - amount;if (newAmount < 0) {throw new InsufficientFundsException("Unsufficient funds for account! ");}money = newAmount;     System.out.println("Money withdrawal. total is "+money);}
}package com.itbuzzpress.chapter4.ejb;import javax.ejb.Remote;
import javax.ejb.Stateless;@Stateless
@Remote(Calculator.class)
public class CalculatorEJB implements Calculator {float interest=5;@Overridepublic float calculateInterest(long money) {return money * (1+ (interest/100));}}
这两个类的接口是:
package com.itbuzzpress.chapter4.ejb;import com.itbuzzpress.chapter4.exception.InsufficientFundsException;public interface Account {public void deposit(long amount);public void withdraw(long amount) throws InsufficientFundsException;public long getMoney();public void createAccount(long amount);
}package com.itbuzzpress.chapter4.ejb;public interface Calculator {public float calculateInterest(long money);}
配置服务器依赖项(WildFly 18和更新版本)
服务器项目需要以下依赖项:
<dependencyManagement><dependencies><dependency><groupId>org.wildfly.bom</groupId><artifactId>wildfly-jakartaee8-with-tools</artifactId><version>${version.server.bom}</version><type>pom</type><scope>import</scope></dependency></dependencies>
</dependencyManagement>
<dependencies><dependency><groupId>org.jboss.spec.javax.annotation</groupId><artifactId>jboss-annotations-api_1.3_spec</artifactId><scope>provided</scope></dependency><dependency><groupId>org.jboss.spec.javax.ejb</groupId><artifactId>jboss-ejb-api_3.2_spec</artifactId><scope>provided</scope></dependency>
</dependencies>属性version.server.bom包含应用服务器版本,例如:
<properties><version.server.bom>18.0.0.Final</version.server.bom>
</properties>
配置服务器依赖(WildFly 11、12、13、14、15、16、17):
如果您的WildFly版本仍然没有获得Jakarta EE认证,那么您需要应用的唯一更改是您的BOM,对于服务器和客户机应用程序,它将是WildFly -javaee8-with-tools。不需要其他更改:
<dependencyManagement><dependencies><dependency><groupId>org.wildfly.bom</groupId><artifactId>wildfly-javaee8-with-tools</artifactId><version>${version.server.bom}</version><type>pom</type><scope>import</scope></dependency></dependencies>
</dependencyManagement>
部署EJB服务器项目
由于我们的pom.xml包含了WildFly的maven插件,你可以简单地构建和部署EJB服务器项目如下:
mvn install wildfly:deploy从服务器日志中检查EJB项目是否已经部署,JNDI绑定是否可用:
17:54:04,147 INFO [org.jboss.as.ejb3.deployment] (MSC service thread 1-8) WFLYEJB0473: JNDI bindings for session bean named 'AccountEJB' in deployment unit 'deployment "ejb-server-basic.jar"' are as follows:java:global/ejb-server-basic/AccountEJB!com.itbuzzpress.chapter4.ejb.Accountjava:app/ejb-server-basic/AccountEJB!com.itbuzzpress.chapter4.ejb.Accountjava:module/AccountEJB!com.itbuzzpress.chapter4.ejb.Accountjava:jboss/exported/ejb-server-basic/AccountEJB!com.itbuzzpress.chapter4.ejb.Accountejb:/ejb-server-basic/AccountEJB!com.itbuzzpress.chapter4.ejb.Account?statefuljava:global/ejb-server-basic/AccountEJBjava:app/ejb-server-basic/AccountEJBjava:module/AccountEJB创建EJB客户端项目
现在让我们为它写一个EJB客户端代码:
package com.itbuzzpress.chapter4.client;import java.util.Hashtable;import javax.naming.Context;
import javax.naming.InitialContext;
import javax.naming.NamingException;import com.itbuzzpress.chapter4.ejb.Account;
import com.itbuzzpress.chapter4.ejb.Calculator;
import com.itbuzzpress.chapter4.exception.InsufficientFundsException;import javax.naming.spi.NamingManager;
public class RemoteEJBClient {public static void main(String[] args) throws Exception {Calculator calculator = lookupCalculatorEJB();Account account = lookupAccountEJB();System.out.println("Create Account with 1000$ ");account.createAccount(1000l);System.out.println("Deposit 250$ ");account.deposit(250);try {System.out.println("Withdraw 500$ ");account.withdraw(500);} catch (InsufficientFundsException e) {e.printStackTrace();}long money = account.getMoney();System.out.println("Money left " + money);float totalMoney = calculator.calculateInterest(money);System.out.println("Money plus interests " + totalMoney);}private static Account lookupAccountEJB() throws NamingException {final Hashtable jndiProperties = new Hashtable();jndiProperties.put(Context.INITIAL_CONTEXT_FACTORY,  "org.wildfly.naming.client.WildFlyInitialContextFactory");jndiProperties.put(Context.PROVIDER_URL,"http-remoting://localhost:8080");final Context ctx = new InitialContext(jndiProperties);return (Account) ctx.lookup("ejb:/ejb-server-basic/AccountEJB!com.itbuzzpress.chapter4.ejb.Account?stateful");}private static Calculator lookupCalculatorEJB() throws NamingException {final Hashtable jndiProperties = new Hashtable();jndiProperties.put(Context.INITIAL_CONTEXT_FACTORY,  "org.wildfly.naming.client.WildFlyInitialContextFactory");jndiProperties.put(Context.PROVIDER_URL,"http-remoting://localhost:8080");final Context context = new InitialContext(jndiProperties);return (Calculator) context.lookup("ejb:/ejb-server-basic/CalculatorEJB!com.itbuzzpress.chapter4.ejb.Calculator");}
}
正如你所看到的,以前的WildFly ejb客户端最明显的变化是新的初始化上下文,它需要“org.wildfly.naming.client.WildFlyInitialContextFactory”。如果将系统属性 java.naming.factory.initial设置为org.wildfly.naming.client.WildFlyInitialContextFactory,然后你的Java代码访问初始上下文是:
InitialContext ctx = new InitialContext();
Account account = (Account) ctx.lookup("ejb:/javaee7-ejb-server-basic/CalculatorEJB!com.itbuzzpress.chapter4.ejb.Calculator");
配置客户端依赖项(WildFly 18及更新版本)
项目需要以下依赖项:
<dependencyManagement><dependencies><dependency><groupId>org.wildfly.bom</groupId><artifactId>wildfly-jakartaee8-with-tools</artifactId><version>${version.server.bom}</version><type>pom</type><scope>import</scope></dependency></dependencies>
</dependencyManagement>
<dependencies>
<!-- We depend on the EJB remote business interfaces of this application --><dependency><groupId>com.itbuzzpress.chapter4</groupId><artifactId>ejb-server-basic</artifactId><type>ejb-client</type><version>${project.version}</version></dependency>
<!-- Include the ejb client jars --><dependency><groupId>org.wildfly</groupId><artifactId>wildfly-ejb-client-bom</artifactId><type>pom</type><scope>compile</scope></dependency>
</dependencies>与此类似,version.server.bom包含Application Server版本,例如:
<properties><version.server.bom>18.0.0.Final</version.server.bom>
</properties>
对于EJB服务器项目,如果您运行的是WildFly 11和WildFly 17之间的WildFly版本,请使用dependencyManagement部分中的artifactId WildFly -javaee8-with-tools。
在EJB客户端项目中配置安全性
影响客户端的另一个变化是以前的jboss-ejb-client.properties文件已被废弃,因此鼓励您迁移到Elytron wildfly-config.xml文件,该文件将所有客户端配置统一在一个地方。出于本例的目的,我们将添加一个默认的wildfly-config.xml文件,该文件使用任何可用的SASL机制选择器进行身份验证。
<configuration><authentication-client xmlns="urn:elytron:1.0"><authentication-rules><rule use-configuration="default" /></authentication-rules><authentication-configurations><configuration name="default"><sasl-mechanism-selector selector="#ALL" /><set-mechanism-properties><property key="wildfly.sasl.local-user.quiet-auth" value="true" /></set-mechanism-properties><providers><use-service-loader/></providers></configuration></authentication-configurations></authentication-client>
</configuration>
另一方面,如果你需要提供凭证,那么你可以将它们添加到wildfly-config.xml文件中,如下所示:
<configuration><authentication-client xmlns="urn:elytron:1.0"><authentication-rules><rule use-configuration="default"/></authentication-rules><authentication-configurations><configuration name="default"><sasl-mechanism-selector selector="DIGEST-MD5"/><set-user-name name="ejbuser"/><credentials><clear-password password="password1!"/></credentials></configuration></authentication-configurations></authentication-client>
</configuration>
要在服务器上创建用户,只需执行add-user.sh脚本,如下所示:
$ ./add-user.sh -a -u ejbuser -p password1!运行EJB客户端项目
为了运行客户端应用程序,我们在客户端项目的pom.xml中包含了exec-maven-plugin,它包含了要执行的类名作为参数:
<plugin><groupId>org.codehaus.mojo</groupId><artifactId>exec-maven-plugin</artifactId><version>${version.exec.plugin}</version><executions><execution><goals><goal>exec</goal></goals></execution></executions><configuration><executable>java</executable><workingDirectory>${project.build.directory}/exec-working-directory</workingDirectory><arguments><argument>-classpath</argument><classpath />                 <argument>com.itbuzzpress.chapter4.client.RemoteEJBClient</argument></arguments></configuration>
</plugin>
你可以运行它的应用程序:
mvn exec:exec您可以在https://github.com/fmarchioni/mastertheboss/tree/master/ejb/remote-ejb-latest查看本教程的源代码
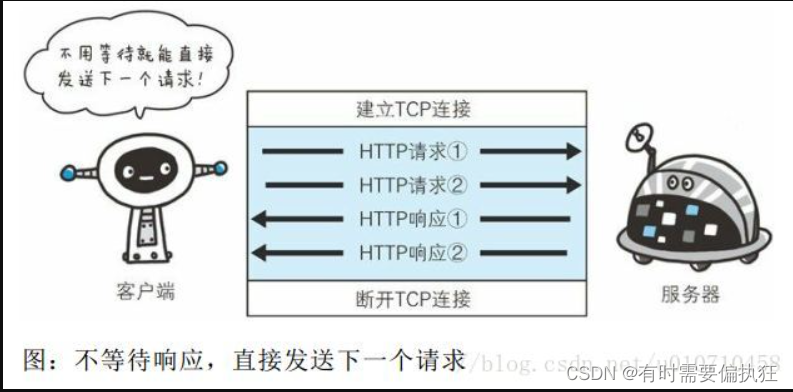
使用纯HTTP传输
为了在单个调用级别上实现平衡,自WildFly 11以来引入了一个新的“纯”HTTP协议。客户端可以使用“http://”url而不是“remoting+http://”来利用此特性。它的优点是,该协议利用了标准的HTTP行为,它可以被任何负载均衡器有效地平衡,而不仅仅是EAP内建的负载均衡器。
为了使用纯HTTP传输,你必须在你的项目中包含以下依赖项:
<dependency><groupId>org.wildfly.wildfly-http-client</groupId><artifactId>wildfly-http-client-common</artifactId>
</dependency>
<dependency><groupId>org.wildfly.wildfly-http-client</groupId><artifactId>wildfly-http-naming-client</artifactId>                 </dependency>
然后在你的代码中,你需要替换Context.PROVIDER_URL从下面:
jndiProperties.put(Context.PROVIDER_URL,"http-remoting://localhost:8080");替换 为:
jndiProperties.put(Context.PROVIDER_URL,"http://localhost:8080/wildfly-services");EJB客户端:如何检索EJB客户机的远程IP地址
依赖项jboss-ejb-client包含EJBClient类,该类包含一个名为SOURCE_ADDRESS_KEY的有用属性,该属性可用于检索远程EJB客户端IP地址。下面是一个例子:
import java.net.InetSocketAddress;
import javax.annotation.Resource;
import javax.ejb.SessionContext;
import javax.ejb.Stateless;
import org.jboss.ejb.client.EJBClient;@Stateless
public class CalculatorEJB implements Calculator {@Resourceprivate SessionContext ctx;@Overridepublic String getClientAddress() {InetSocketAddress clientAddress = (InetSocketAddress) ctx.getContextData().get(EJBClient.SOURCE_ADDRESS_KEY);if(clientAddress != null) return clientAddress.getHostString();return null;}
}
WildFly 8,9,10和JBoss AS 7 EJB远程客户端
以前版本的JBoss AS(版本< 7.x)使用JNP项目作为JNDI命名实现,因此开发人员熟悉jnp:// PROVIDER_URL URL,以便与应用服务器通信。从AS7开始,不使用JNP项目。JNP项目的客户端现在已经被 jboss-remote-naming项目(https://github.com/jbossas/jboss-remote-naming)所取代。JNP客户端被 jboss-remote-naming项目取代的原因有很多。其中之一是JNP项目在与JNDI服务器通信时不允许细粒度的安全配置。jboss-remote-naming项目是由jboss-remoting项目(https://github.com/jboss-remoting/jboss-remoting)支持的,该项目允许对安全性进行更多更好的控制。
编写服务器端
我们将创建一个名为ejb-remote-server 的Maven项目,其原型如下:
$ mvn -DarchetypeGroupId=org.codehaus.mojo.archetypes -DarchetypeArtifactId=ejb-javaee7 -DarchetypeRepository=https://nexus.codehaus.org/content/repositories/snapshots -DgroupId=com.sample.ejb -DartifactId=ejb-remote-server -Dversion=1.0 -Dpackage=com.sample.ejb -Darchetype.interactive=false --batch-mode --update-snapshots archetype:generate让我们添加一些类到我们的项目:
package com.sample.ejb;public interface SampleBeanRemote {public String echo(String s);}下面是实现:
package com.sample.ejb;import javax.ejb.Remote;
import javax.ejb.Stateless;@Stateless
@Remote(SampleBeanRemote.class)
public class  SampleBeanRemoteImpl implements SampleBeanRemote  {@Overridepublic String echo(String s) {return "Hello "+s;}}
以下依赖关系需要添加到项目:
<properties><version.wildfly.maven.plugin>1.0.2.Final</version.wildfly.maven.plugin><version.jboss.spec.javaee.7.0>1.0.3.Final</version.jboss.spec.javaee.7.0><version.ejb.plugin>2.3</version.ejb.plugin><maven.compiler.target>1.8</maven.compiler.target><maven.compiler.source>1.8</maven.compiler.source></properties><dependencyManagement><dependencies><dependency><groupId>org.jboss.spec</groupId><artifactId>jboss-javaee-7.0</artifactId><version>${version.jboss.spec.javaee.7.0}</version><type>pom</type><scope>import</scope></dependency></dependencies></dependencyManagement><dependencies><!-- Import the Common Annotations API (JSR-250), we use provided scopeas the API is included in WildFly --><dependency><groupId>org.jboss.spec.javax.annotation</groupId><artifactId>jboss-annotations-api_1.2_spec</artifactId><scope>provided</scope></dependency><!-- Import the EJB API, we use provided scope as the API is included in WildFly --><dependency><groupId>org.jboss.spec.javax.ejb</groupId><artifactId>jboss-ejb-api_3.2_spec</artifactId><scope>provided</scope></dependency></dependencies><build><finalName>${project.artifactId}</finalName><plugins><!-- WildFly plug-in to deploy the application --><plugin><groupId>org.wildfly.plugins</groupId><artifactId>wildfly-maven-plugin</artifactId><version>${version.wildfly.maven.plugin}</version><configuration><filename>${project.build.finalName}.jar</filename></configuration></plugin><plugin><groupId>org.apache.maven.plugins</groupId><artifactId>maven-ejb-plugin</artifactId><version>${version.ejb.plugin}</version><configuration><ejbVersion>3.1</ejbVersion><generateClient>true</generateClient></configuration></plugin></plugins></build>编写客户端
我们的远程EJB客户端将是一个普通的Java类。为此,我们将创建一个新项目,该项目在其pom .xml中包含对EJB接口的依赖项。因此,首先创建一个几乎不包含src/java文件夹的新Maven项目。执行如下命令:
mvn archetype:generate -DarchetypeArtifactId=maven-archetype-quickstart -DinteractiveMode=false -DgroupId=com.sample.client -DartifactId=javaee7-ejb-
client-basic
我们将只向项目中添加一个类,它将远程调用我们的ejb:
package com.sample.client;import javax.naming.*;import com.sample.ejb.SampleBeanRemote;
import com.sample.ejb.SampleBeanRemoteImpl;import java.util.*;public class RemoteEJBClient {public static void main(String[] args) throws Exception {testRemoteEJB();}private static void testRemoteEJB() throws NamingException {final SampleBeanRemote ejb = lookupRemoteEJB();String s = ejb.echo("Frank");System.out.println(s);}private static SampleBeanRemote lookupRemoteEJB() throws NamingException {final Hashtable jndiProperties = new Hashtable();jndiProperties.put(Context.URL_PKG_PREFIXES, "org.jboss.ejb.client.naming");final Context context = new InitialContext(jndiProperties);final String appName = "";final String moduleName = "ejb-remote-server";final String distinctName = "";final String beanName = SampleBeanRemoteImpl.class.getSimpleName();final String viewClassName = SampleBeanRemote.class.getName();System.out.println("Looking EJB via JNDI ");System.out.println("ejb:" + appName + "/" + moduleName + "/" + distinctName + "/" + beanName + "!" + viewClassName);return (SampleBeanRemote) context.lookup("ejb:" + appName + "/" + moduleName + "/" + distinctName + "/" + beanName + "!" + viewClassName);}}如您所见,其中最棘手的部分是查找EJB的新JNDI绑定。实际的JNDI名称取决于传递EJB的包名称。在我们的例子中,服务器应用程序被命名为ejb-remote-server.jar,因此模块名称是“ ejb-remote-server.jar”。如果我们将web模块打包到ear文件中,我们应该定义带有ear名称的变量appName。
为了运行这个应用程序,您需要放置一个名为jjboss-ejb-client.properties的文件。客户端类路径中的属性:
remote.connectionprovider.create.options.org.xnio.Options.SSL_ENABLED=falseremote.connections=defaultremote.connection.default.host=localhost
remote.connection.default.port = 8080
remote.connection.default.connect.options.org.xnio.Options.SASL_POLICY_NOANONYMOUS=false
基本上,该文件包含将在其中查找EJB的主机和端口(在我们的示例中是本地主机和将请求传输到EJB容器的Undertow端口,在本例中为8080)。
为了编译和运行Client项目,你需要以下Maven依赖项:
<properties><project.build.sourceEncoding>UTF-8</project.build.sourceEncoding><version.jboss.spec.javaee.7.0>1.0.3.Final</version.jboss.spec.javaee.7.0><version.wildfly.maven.plugin>1.0.2.Final</version.wildfly.maven.plugin><version.exec.plugin>1.2.1</version.exec.plugin><version.war.plugin>3.0.0</version.war.plugin><!-- maven-compiler-plugin --><maven.compiler.target>1.8</maven.compiler.target><maven.compiler.source>1.8</maven.compiler.source></properties><dependencyManagement><dependencies><dependency><groupId>org.jboss.spec</groupId><artifactId>jboss-javaee-7.0</artifactId><version>${version.jboss.spec.javaee.7.0}</version><type>pom</type><scope>import</scope></dependency><dependency><groupId>org.wildfly</groupId><artifactId>wildfly-ejb-client-bom</artifactId><version>${version.wildfly}</version><type>pom</type><scope>import</scope></dependency></dependencies></dependencyManagement><dependencies><dependency><groupId>org.jboss.spec.javax.transaction</groupId><artifactId>jboss-transaction-api_1.2_spec</artifactId><scope>runtime</scope></dependency><dependency><groupId>org.jboss.spec.javax.ejb</groupId><artifactId>jboss-ejb-api_3.2_spec</artifactId><scope>runtime</scope></dependency><dependency><groupId>org.wildfly.quickstarts</groupId><artifactId>wildfly-ejb-remote-server-side</artifactId><type>ejb-client</type><version>${project.version}</version></dependency><dependency><groupId>org.wildfly</groupId><artifactId>wildfly-ejb-client-bom</artifactId><type>pom</type><scope>runtime</scope></dependency></dependencies><build><finalName>${project.artifactId}</finalName><plugins><!-- Add the maven exec plug-in to allow us to run a java programvia maven --><plugin><groupId>org.codehaus.mojo</groupId><artifactId>exec-maven-plugin</artifactId><version>${version.exec.plugin}</version><executions><execution><goals><goal>exec</goal></goals></execution></executions><configuration><executable>java</executable><workingDirectory>${project.build.directory}/exec-working-directory</workingDirectory><arguments><!-- automatically creates the classpath using allproject dependencies, also adding the project build directory --><argument>-classpath</argument><classpath></classpath><argument>org.jboss.as.quickstarts.ejb.remote.client.RemoteEJBClient</argument></arguments></configuration></plugin><plugin><artifactId>maven-assembly-plugin</artifactId><configuration><descriptorRefs><descriptorRef>jar-with-dependencies</descriptorRef></descriptorRefs><archive><manifest><mainClass>org.jboss.as.quickstarts.ejb.remote.client.RemoteEJBClient</mainClass></manifest></archive></configuration></plugin><plugin><groupId>org.wildfly.plugins</groupId><artifactId>wildfly-maven-plugin</artifactId><version>${version.wildfly.maven.plugin}</version><inherited>true</inherited><configuration><skip>true</skip></configuration></plugin></plugins></build>正如您所看到的,除了EJB和事务API之外,为了使用EJB的接口,我们必须引用Server项目(ejb.remote.server)。
这个项目的源代码可以在https://github.com/fmarchioni/mastertheboss/tree/master/ejb/remote-ejb上找到
来自远程主机的EJB 3客户机
如果您的EJB 3客户机来自远程主机,您将需要通过应用程序用户进行身份验证,以获得远程协议的允许。
首先使用add-user.sh脚本添加一个用户:
[francesco@localhost bin]$ ./add-user.sh What type of user do you wish to add? a) Management User (mgmt-users.properties) b) Application User (application-users.properties)
(a): bEnter the details of the new user to add.
Using realm 'ApplicationRealm' as discovered from the existing property files.
Username : ejbuser
Password :
Re-enter Password :
What groups do you want this user to belong to? (Please enter a comma separated list, or leave blank for none)[  ]:
About to add user 'ejbuser' for realm 'ApplicationRealm'
Is this correct yes/no? yes
Added user 'ejbuser' to file '/home/francesco/jboss/wildfly-10.0.0.Final/standalone/configuration/application-users.properties'
Added user 'ejbuser' to file '/home/francesco/jboss/wildfly-10.0.0.Final/domain/configuration/application-users.properties'
Added user 'ejbuser' with groups  to file '/home/francesco/jboss/wildfly-10.0.0.Final/standalone/configuration/application-roles.properties'
Added user 'ejbuser' with groups to file '/home/francesco/jboss/wildfly-10.0.0.Final/domain/configuration/application-roles.properties'接下来,将用户信息添加到jboss-ejb-client.properties中
remote.connection.default.username=ejbuser
remote.connection.default.password=ejbuser123
JBoss AS 7和EAP 6项目
如果您运行的是较旧版本的应用服务器,那么最相关的更改(除了依赖项之外)就是jboss-ejb-client.properties使用旧的Remoting Port来允许EJB请求的属性,输入:
endpoint.name=client-endpoint
remote.connectionprovider.create.options.org.xnio.Options.SSL_ENABLED=false
remote.connections=defaultremote.connection.default.host=localhost
remote.connection.default.port = 4447
remote.connection.default.connect.options.org.xnio.Options.SASL_POLICY_NOANONYMOUS=false
EJB 3远程客户端故障排除
预期的结果是运行客户机时控制台上的一个虚拟回显打印。然而,需要检出的东西很多,因此可能出现的错误的数量也很多。开发者论坛中一个常见的错误是:
Exception in thread “main” javax.naming.NoInitialContextException: Need to specify class name in environment or system property, or as an applet parameter, or in an application resource file: java.naming.factory.initial
此错误的检查包括:
- 您是否将JBoss的客户端库添加到您的项目中?
- 也许您使用了错误的JNDI根上下文。例如,代替正确的
ejb:/as7project//SampleBeanRemoteImpl!com.sample.ejb.SampleBeanRemote
你可能使用了:
java:/as7project//SampleBeanRemoteImpl!com.sample.ejb.SampleBeanRemote
另一个常见的问题是:
No EJB receiver available for handling [appName:,modulename:,distinctname:as7project] combination for invocation context org.jboss.ejb.client.EJBClientInvocationContext@10f6d3
在这种情况下,模块名和不同的名称之间不匹配。(请看划线部分)。检查JNDI构建字符串。
另一方面,这里的错误看起来是一样的,但模块名称是正确的:
No EJB receiver available for handling [appName:,modulename:as7project,distinctname:] combination for invocation context org.jboss.ejb.client.EJBClientInvocationContext@7b7072
在这里,您应该再次检查JNDI,可能您没有正确地声明远程EJB名称或远程EJB实现类。例如,代替正确的
ejb:/as7project//SampleBeanRemoteImpl!com.sample.ejb.SampleBeanRemote
你使用了:
java:/as7project//SampleBeanRemoteImpl!com.sample.ejb.SampleBeanRemoteTypo
还有一个问题:
WARN: Could not register a EJB receiver for connection to remote://192.168.1.1:4447
java.lang.RuntimeException: Operation failed with status WAITING
这通常是由jboss-ejb-client.properties文件中的IP或端口错误组合造成的。
- 您可能无法到达该主机地址
- 也许您正在该服务器上使用端口偏移量,所以应该使用4447 +偏移量而不是端口4447
Exception in thread “main” javax.naming.NamingException: No provider URL configured for connection
很可能您正在尝试初始化旧的JBoss InitialContextFactory。
例如,你可能有:
jndiProperties.put(Context.INITIAL_CONTEXT_FACTORY, "org.jboss.naming.remote.client.InitialContextFactory");
如果是这样,从代码中删除这一行!