文章目录
- 一、简介
- 1、是什么
- 2、为什么
- 二、准备工作
- 1、环境准备
- 1.1、注册账号
- 1.2、获取APPID
- 1.3、开发工具
- 2、创建微信小程序
- 三、组件
- 1、目录及其作用介绍
- 2、页面操作
- 3、view 块级元素
- 4、`<navigator>`导航跳转
- 5、`scroll-view`滚动
- 6、text 行标签
- 7、swiper 轮播
- 8、常用表单组件
- 8.1、button
- 8.2、input
- 9、基础内容
- 9.1、icon 图标
- 9.2、progress 进度条
- 四、框架
- 1、小程序配置
- 1.1、`app.json`全局配置
- 1、pages
- 2、window
- 3、tabBar
- 1.2、页面配置【局部】
- 2、WXML
- 2.1、WXML数据绑定
- 2.2、列表渲染
- 2.3、条件渲染
- 2.4、模板
- 3、框架接口_Page内的生命周期及各项函数
- 4、框架接口_事件函数及setData用法
- 5、API_基础用法
- 5.1、获取设备相关信息
- 5.2、加载中
- 5.3、提交成功
- 6、API_路由用法
- 6.1、wx.navigateTo
- 6.2、wx.switchTab
- 6.3、wx.reLaunch
- 6.4、wx.navigateTo
- 7、API_request发送网络请求
- 7.1、请求数据源:[http://edu.newsight.cn/wxList.php](http://edu.newsight.cn/wxList.php)
- 7.2、请求的数据在调试器中的AppData中进行查看
- 7.3、效果展示
- 7.4、wxml
- 7.5、wxss
- 7.6、js
- 五、ES6实用的技术
- 1、变量与常量
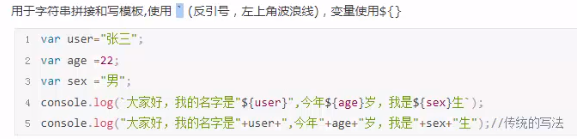
- 2、模板
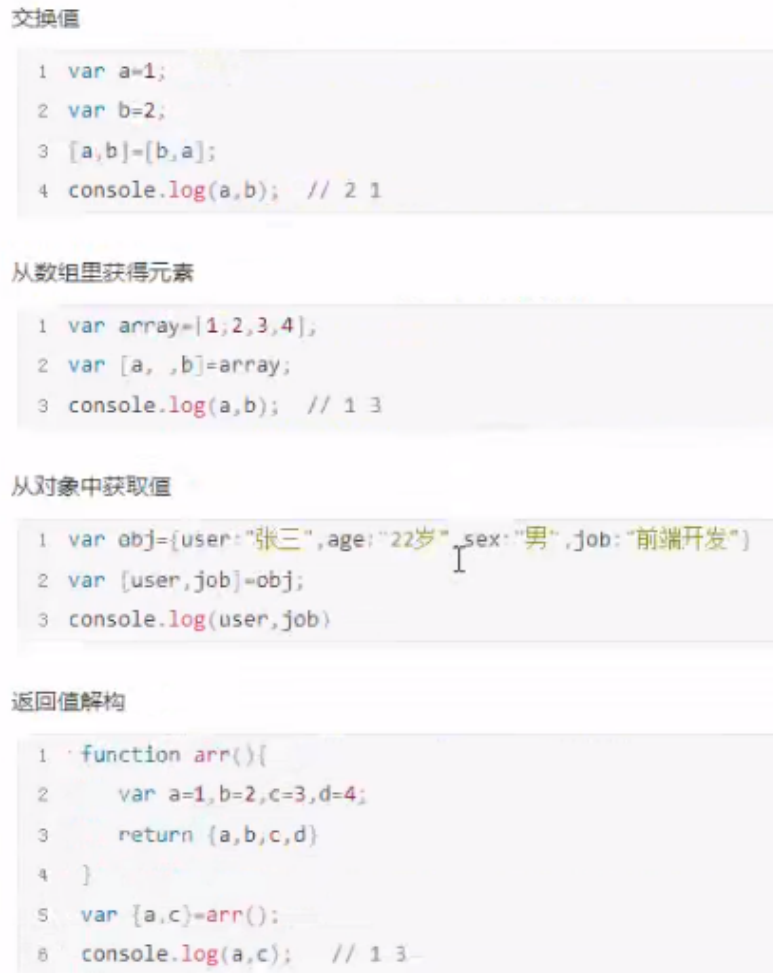
- 3、解构赋值
- 4、箭头函数
- 5、for循环遍历
- 6、对象中函数的声明
- 7、默认参数
- 8、展开运算符 ...
- 六、案例
- 1、标题+客服
- 1.1、布局 html
- 1.2、公共样式 + 动画定义
- 1.3、布局样式 css
- 2、轮播图
- 2.1、布局 html
- 2.2、布局样式 css
- 3、滚动显示
- 3.1、布局 html
- 3.2、布局样式 css
- 4、作品展示
- 4.1、布局 html
- 4.2、布局样式 css
- 5、行业动态
- 5.1、布局 html
- 5.2、布局样式 css
- 6、底部logo
- 6.1、布局 html
- 6.2、布局样式 css
如果缺少创意素材,墨刀是个不错的选择
一、简介
1、是什么
微信小程序,简称小程序,缩写XCX,是一种把不需要下载安装计科使用的应用,实现了”触手可及“的梦想。无处不在,随时可用,无需安装卸载。其他例如支付宝小程序、百度小程序、QQ小程序、今日头条抖音小程序
2、为什么
小程序和APP的对比
- 开发成本低
- 开发门槛低
- 开发周期更短,节省开发成本
- APP已经趋于饱和
- 案例:拼多多、小红书等案例
-
用户:减轻内容,用完即可关闭,不占用空间。
-
商户:线上线下结合,实现互联网的转型。
-
创业者:应用广泛,创业更加简单,尤其是公众号的创业者,可以直接公众号+小程序,打造微信生态圈,前途不可限量。
小程序与普通网页开发的区别
-
小程序的主要开发语言是JavaScript
-
从网页开发迁移到小程序的开发成本并不高
流量入口
微信搜索、发现入口、线下小程序、小程序码、公众号内链、转发小程序、公众号关联小程序、商家公众号自定义菜单、绑定关联通知、附近小程序
二、准备工作
百度搜索“微信小程序API”。 文档中会有安装的软件包以及API 的各种解析
1、环境准备
1.1、注册账号
建议使用全新的邮箱,没有注册过其他小程序和公众号的
访问注册页面,耐心完成注册即可
1.2、获取APPID
由于后期调用微信小程序的接口等功能,需要索取开发者的小程序中的APPID,所以在注册成后,可登录,然后获取APPID。
登录成功之后,可看到如下界面,然后复制你的 APPID ,不要给别人看到

1.3、开发工具
下载地址:https://developers.weixin.qq.com/miniprogram/dev/devtools/devtools.html
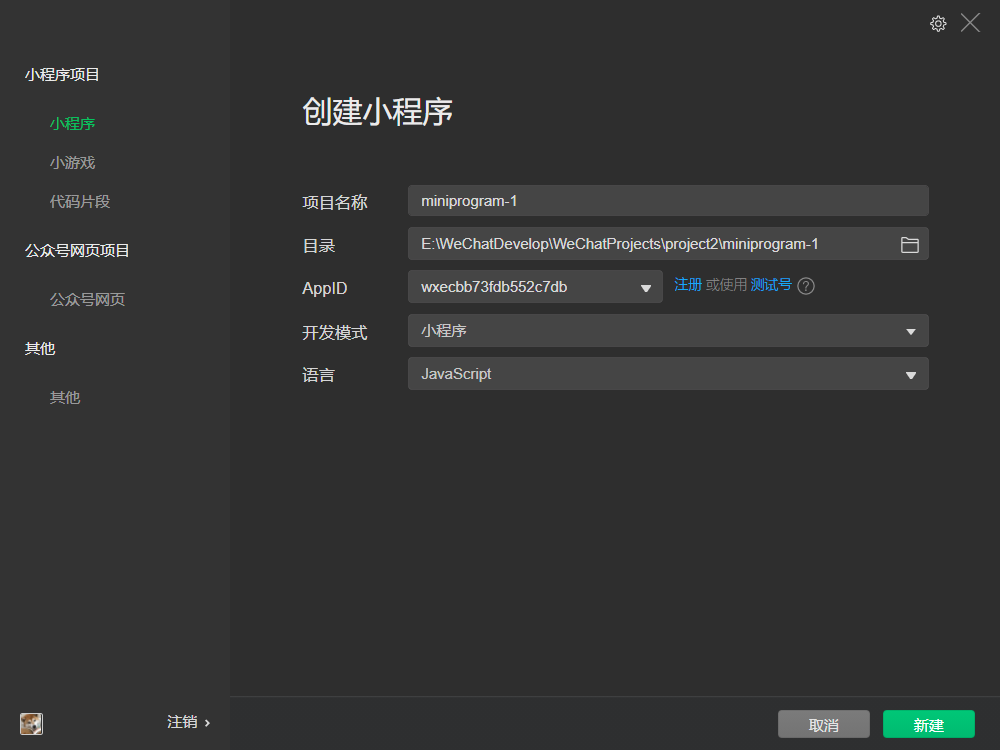
2、创建微信小程序
打开微信开发者工具—— 新建小程序项目——填写项目信息——成功
设置外观及其字号

三、组件
1、目录及其作用介绍
pages包含一个个具体的页面utils包含公共文件app.js小程序的逻辑,相当于一个入口文件app.json当前小程序的全局配置,包括页面显示顺序app.wxss页面全局样式文件project.config.json项目配置文件,做一些个性化配置,例如界面颜色、编译配置等等sitemap.json配置小程序及其页面是否允许被微信索引wxss页面样式,app.wxss作为全局样式,会作用于当前小程序的所有页面,局部页面样式page.wxss仅对当前页面生效。js实现页面逻辑json实现页面配置wxml实现页面结构
2、页面操作
- 页面创建【建议使用第二种方法】
- 第一种:先新建文件夹news——右击该文件夹——新建Page(输入news,需与文件夹名字相同)
- 第二种:在
app.json全局文件中在pages配置项下配置路径"pages/news/news"保存即可生成
- 页面删除:只能右击该文件夹进行删除
3、view 块级元素
冒泡事件
现有父级元素和子级元素如下,现要对黄块点击并不影响父级红块的事件

<view class="box"   hover-class="boxHover"  hover-start-time="50"  hover-stay-time="50"><view class="item" hover-class="itemHover" hover-stop-propagation></view>
</view>
- hover-class:指定按下去的样式类。
boxHover表示类名,可在wxss中进行设置 - hover-start-time: 按住后多久出现点击态,单位毫秒
- hover-stay-time: 手指松开后点击态保留时间,单位毫秒
- hover-stop-propagation:阻止冒泡事件,一般作用与子级
4、<navigator>导航跳转
<navigator>是一个块级元素
<navigator class="link" url="/pages/logs/logs" open-type="reLaunch">跳转到logs页面</navigator>
- url:跳转的链接地址,不能采用小程序以外的其他地址,比如网页链接
- open-type:表示跳转到应用内的某个页面但不可返回
5、scroll-view滚动
在横向设置块级元素的滚动时,会用到如下属性
flex-wrap: nowrap;/*不挤压*/,display:flex;作用与父级元素flex:0 0 100px;/* 扩展 缩放 保持本身大小*/,作用与子级元素
<scroll-view scroll-x scroll-left="150"><view class="scroOut"><view class="scroBox">111</view><view class="scroBox">222</view><view class="scroBox">333</view><view class="scroBox">444</view><view class="scroBox">555</view><view class="scroBox">666</view></view>
</scroll-view>
- scroll-x:开启横向滚动
- scroll-y:开启竖向滚动
- scroll-left=“150”:设置开始滚动位置,同理可设置scroll-top
6、text 行标签
<view class="on"><text user-select>可复制可复制可复制可复制可复制可复制可复制可复制可复制可复制可复制可复制</text><text user-select space="nbsp">空格 显示</text><text decode="{{true}}">\n解 码<显示</text></view><view class="up"><text>不可复制不可复制不可复制不可复制不可复制不可复制不可复制不可复制不可复制</text>
</view>
- user-select:作用与可复制的
text标签上,即该文本可复制,默认为不可复制 - space=“string”:表示该文本中的空格显示方式,对
text中的空格进行显示,有如下几个属性:nbsp、ensp、emsp - decode:解码,对
text中的 、<;等编码进行解码
7、swiper 轮播
<!--pages/swiper/swiper.wxml-->
<swiper class="banner" indicator-dots="{{true}}" indicator-color="rgba(255,255,255,0.5)" indicator-active-color="#fff"autoplay="{{true}}"interval="3000"circular="{{true}}"previous-margin="20"next-margin="20"><swiper-item><image src="./bg.jpg" mode="widthFi"  style="width: 100%; padding:0 5px"></image></swiper-item><swiper-item><image src="./bg.jpg" mode="widthFi"  style="width: 100%; padding:0 5px"></swiper-item><swiper-item><image src="./bg.jpg" mode="widthFi"  style="width: 100%; padding:0 5px"></swiper-item>
</swiper>
-
swiperindicator-dots="true":是否显示面板指示点indicator-color="rgba(255,255,255,0.5)":指示点颜色indicator-active-color="#fff":当前选中的指示点颜色autoplay="true":是否自动切换interval="3000":切换间隔circular="true":是否采用衔接滑动previous-margin="20":前边距,可用于露出前一项的一小部分,接受 px 和 rpx 值next-margin="20":后边距,可用于露出后一项的一小部分,接受 px 和 rpx 值
-
swiper-item中各image- widthFix :缩放模式,宽度不变,高度自动变化,保持原图宽高比不变
- heightFix : 缩放模式,高度不变,宽度自动变化,保持原图宽高比不变
8、常用表单组件
8.1、button
<view class="out"><button type="primary" size="mini">登录</button><button type="warn" size="mini">退出登录</button><button type="default" size="mini" plain="{{false}}" disabled="{{true}}">镂空+禁用</button><button type="default" size="mini" loading="{{true}}">加载中</button><button type="default" size="mini" open-type="contact">微信开放能力</button><form action="" bindsubmit="onSubmit"><input type="text"></input><button form-type="submit">提交</button></form>
</view>
- type
type="primary":绿色type="warn":红色type="default':白色
plain="{{false}}":按钮是否镂空,背景色透明disabled="{{true}}":禁用按钮loading="{{true}}":加载中- size
size="default": 默认大小size="mini": 小尺寸
open-type="contact":打开客服会话模式- form-type
form-type="submit":提交表单form-type="reset":重置表单
8.2、input
<form action="" bindsubmit="onSubmit"><input type="text" class="ipt"placeholder="请输入用户名"placeholder-style="color:pink;font-size:30rpx"auto-focus="{{true}}"cursor-spacing="300"type="safe-password"></input><button form-type="submit">提交</button></form>
placeholder="请输入用户名":设置提示信息placeholder-style="color:pink;font-size:30rpx":对提示信息进行样式设置focus="{{true}}":进入页面之后输入框自动获取焦点cursor-spacing="300":指定光标与键盘的距离,取 input 距离底部的距离和 cursor-spacing 指定的距离的最小值作为光标与键盘的距离type="safe-password":input 的类型text:文本输入框number:数字输入键盘idcard:身份证输入键盘digit:带小数点的数字键盘safe-password:密码安全输入键盘 指引nickname:昵称输入键盘
confirm-type="send":设置键盘右下角按钮的文字,仅在type='text’时生效send: 右下角按钮为“发送”search:右下角按钮为“搜索”next: 右下角按钮为“下一个”go: 右下角按钮为“前往”done: 右下角按钮为“完成”
9、基础内容
9.1、icon 图标
<view style="padding:50px; text-align:center;"><icon type="success" size="100"></icon><view>提交成功,感谢你的配合!</view>
</view>
type="success":成功图标size="100":图标大小
9.2、progress 进度条
<view style="padding:50px"><progress percent="60"show-info="{{true}}"font-size="15"border-radius="10"activeColor="pink"backgroundColor="#ccc"active="{{true}}"></progress>
</view>
percent="60":百分比0~100show-info="{{true}}":在进度条右侧显示百分比font-size="15":右侧百分比字体大小border-radius="10":进度条圆角边框activeColor="pink":已选择的进度条的颜色backgroundColor="#ccc":未选择的进度条的颜色active="{{true}}":动画播放
四、框架
1、小程序配置
1.1、app.json全局配置
1、pages
所有的页面均在pages数组中,如果想要切换当前显示的页面,需把路径提到开头位置,因此快捷键尤为重要:ALT+向上箭
2、window
用于设置小程序的状态栏、导航条、标题、窗口背景色。
-
"navigationBarBackgroundColor": "#fff",:导航栏背景颜色,如 #000000 -
"navigationBarTextStyle": "black",:导航栏标题颜色,仅支持 black / white -
"navigationBarTitleText": "Weixin",: 导航栏标题文字内容 -
navigationStyle:default: 导航栏样式,仅支持以下值:- default 默认样式
- custom 自定义导航栏,只保留右上角胶囊按钮。
-
backgroundColor:#ffffff:窗口的背景色,需要结合开启下拉刷新一起使用 -
"backgroundTextStyle": "light",: 下拉 loading 的样式,仅支持 dark / light -
backgroundColorTop:#ffffff: 顶部窗口的背景色, -
backgroundColorBottom:#ffffff底部窗口的背景色, -
enablePullDownRefresh:true: 是否开启全局的下拉刷新。
3、tabBar
"tabBar": {"color": "#c30","selectedColor": "#0ff","backgroundColor": "#ccc","borderStyle": "white","position": "top","custom": true,"list": [{"pagePath": "pages/swiper/swiper","text": "首页","iconPath": "iconPath","selectedIconPath": "selectedIconPath"},{"pagePath": "pages/index/index","text": "案例"},{"pagePath": "pages/logs/logs","text": "日志"}]},
"color": "#c30",:默认颜色"selectedColor": "#0ff",:选中之后的颜色"backagegroundColor": "#ccc",:背景颜色"borderStyle": "white",:tabbar 上边框的颜色, 仅支持 black / white
"position": "top",:tabBar 的位置,仅支持 bottom / top"custom": true,:自定义 tabBar的显示与否"list": [{}]:配置路由"pagePath": "pages/swiper/swiper",:路由路径"text": "首页":路由名字"iconPath": "iconPath",:图片路径,icon 大小限制为 40kb,建议尺寸为 81px * 81px,不支持网络图片。当 position 为 top 时,不显示 icon。"selectedIconPath": "selectedIconPath":选中时的图片路径,icon 大小限制为 40kb,建议尺寸为 81px * 81px,不支持网络图片。当 position 为 top 时,不显示 icon。
1.2、页面配置【局部】
同全局配置,但需要在demo.json文件中进行修改
{"navigationBarBackgroundColor": "#ffffff","navigationBarTextStyle": "black","navigationBarTitleText": "微信接口功能演示","backgroundColor": "#eeeeee","backgroundTextStyle": "light"
}
2、WXML
2.1、WXML数据绑定
<!--pages/WXML/WXML.wxml-->
<view><text>{{message}}</text>
</view>
<view><text>{{listArr}}</text>
</view>
<view>{{obj.name}}-{{obj.age}}-{{obj.address}}
</view>
// pages/WXML/WXML.js
Page({/*** 页面的初始数据*/data: {message:'Hello WXML!',listArr:['Java,Python,Web'],obj:{name:'Mark',age:15,address:'China'}},
})
2.2、列表渲染
<!--wxml-->
<view wx:for="{{array}}" wx:key="index"> {{index}}-{{item}}</view>
// page.js
Page({data: {array: [1, 2, 3, 4, 5]}
})
使用 wx:for-item 可以指定数组当前元素的变量名,
使用 wx:for-index 可以指定数组当前下标的变量名:
<view wx:for="{{array}}" wx:for-index="idx" wx:for-item="itemName">{{idx}}: {{itemName.message}}
</view>
wx:for 也可以嵌套,下边是一个九九乘法表
<view wx:for="{{[1, 2, 3, 4, 5, 6, 7, 8, 9]}}" wx:for-item="i"><view wx:for="{{[1, 2, 3, 4, 5, 6, 7, 8, 9]}}" wx:for-item="j"><view wx:if="{{i <= j}}">{{i}} * {{j}} = {{i * j}}</view></view>
</view>
2.3、条件渲染
<!--wxml-->
<view wx:if="{{view == 'WEBVIEW'}}"> WEBVIEW </view>
<view wx:elif="{{view == 'APP'}}"> APP </view>
<view wx:else="{{view == 'MINA'}}"> MINA </view>
// page.js
Page({data: {view: 'MINA'}
})
一般采用
block对条件进行判断包裹,block在页面中显示时会去掉block这一层及
<block wx:if="{{3>2}}"><navigator url="/pages/index">index</navigator><view>这是标题</view>
</block>
<block wx:else><navigator url="/pages/logs">logs</navigator>
</block>
2.4、模板
<!--wxml-->
<template name="staffName"><view>FirstName: {{firstName}}, LastName: {{lastName}}</view>
</template><template is="staffName" data="{{...staffA}}"></template>
<template is="staffName" data="{{...staffB}}"></template>
<template is="staffName" data="{{...staffC}}"></template>
// page.js
Page({data: {staffA: {firstName: 'Hulk', lastName: 'Hu'},staffB: {firstName: 'Shang', lastName: 'You'},staffC: {firstName: 'Gideon', lastName: 'Lin'}}
})
3、框架接口_Page内的生命周期及各项函数
//index.js
Page({data: {text: "This is page data."},onLoad: function(options) {// Do some initialize when page load.},onShow: function() {// Do something when page show.},onReady: function() {// Do something when page ready.},onHide: function() {// Do something when page hide.},onUnload: function() {// Do something when page close.},onPullDownRefresh: function() {// Do something when pull down.},onReachBottom: function() {// Do something when page reach bottom.},onShareAppMessage: function () {// return custom share data when user share.},onPageScroll: function() {// Do something when page scroll},onResize: function() {// Do something when page resize},onTabItemTap(item) {console.log(item.index)console.log(item.pagePath)console.log(item.text)},// Event handler.viewTap: function() {this.setData({text: 'Set some data for updating view.'}, function() {// this is setData callback})},customData: {hi: 'MINA'}
})
onLoad生命周期回调—监听页面加载onShow生命周期回调—监听页面显示onReady生命周期回调—监听页面初次渲染完成onHide生命周期回调—监听页面隐藏onUnload生命周期回调—监听页面卸载onPullDownRefresh监听用户下拉动作onReachBottom页面上拉触底事件的处理函数onShareAppMessage用户点击右上角转发onShareTimeline用户点击右上角转发到朋友圈onAddToFavorites用户点击右上角收藏onPageScroll页面滚动触发事件的处理函数onResize页面尺寸改变时触发,详见 响应显示区域变化onTabItemTap当前是 tab 页时,点击 tab 时触发onSaveExitState页面销毁前保留状态回调
4、框架接口_事件函数及setData用法
<!--pages/WXML/WXML.wxml-->
<view style="transition:0.55s; width:{{w}}rpx;height:{{h}}rpx;background:{{bgColor}}"></view>
<view bindtap="myTap" data-title="小程序" data-id="101">weixin-{{title}}</view>
// pages/WXML/WXML.js
Page({/*** 页面的初始数据*/data: {title:"张三",w:300,h:200,bgColor:"red"},// 自定义事件myTap:function(res){console.log(res.currentTarget.dataset)console.log(this.data.title)var newTitle = res.currentTarget.dataset.titlethis.setData({title:newTitle,w:500,h:500,bgColor:"blue"})console.log(this.data.title)},})
wxml中绑定数据data-title="小程序" data-id="101"wxml中绑定方法bindtap="myTap"- js文件中即可通过
res.currentTarget.dataset拿到绑定的数据 title和id - 自定义事件中可以使用
this.setData({})更改数据
5、API_基础用法
5.1、获取设备相关信息
wx.getSystemInfoSync():获取设备相关信息
- brand设备品牌
- .model获取设备型号
- system操作系统及版本
5.2、加载中
onLoad: function (options) {// console.log(wx.getSystemInfoSync().model)wx.showLoading({title: '加载中。。。',}),
5.3、提交成功
onLoad: function (options) {// console.log(wx.getSystemInfoSync().model)wx.showToast({title: '提交成功',})},
6、API_路由用法
// 绑定事件完成跳转功能
<button type="primary" bindtap="clickBtn">点击跳转到logs页面</button>
clickBtn:function(){wx.switchTab({url:"/pages/logs/logs"})
}
6.1、wx.navigateTo
要求:跳转到非tab页面
wx.navigateTo({url: 'test?id=1',events: {// 为指定事件添加一个监听器,获取被打开页面传送到当前页面的数据acceptDataFromOpenedPage: function(data) {console.log(data)},someEvent: function(data) {console.log(data)}...},success: function(res) {// 通过 eventChannel 向被打开页面传送数据res.eventChannel.emit('acceptDataFromOpenerPage', { data: 'test' })}
})
6.2、wx.switchTab
可以跳转到tab页面
wx.navigateTo({url: 'pages/logs/logs?id=1',
})
6.3、wx.reLaunch
要求:路由跳转时携带参数
wx.reLaunch({url: 'test?id=1',success:res=>{console.log(res)}
})
6.4、wx.navigateTo
保留当前页面,跳转到应用内的某个页面。但是不能跳到 tabbar 页面。
wx.navigateTo({url: 'test?id=1',events: {// 为指定事件添加一个监听器,获取被打开页面传送到当前页面的数据acceptDataFromOpenedPage: function(data) {console.log(data)},someEvent: function(data) {console.log(data)}...},success: function(res) {// 通过 eventChannel 向被打开页面传送数据res.eventChannel.emit('acceptDataFromOpenerPage', { data: 'test' })}
})
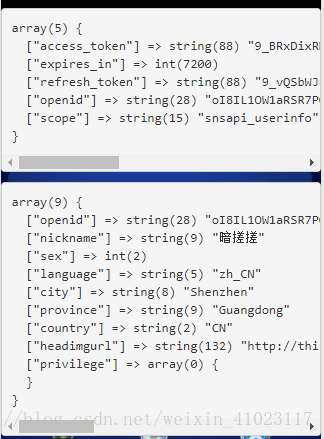
7、API_request发送网络请求
7.1、请求数据源:http://edu.newsight.cn/wxList.php
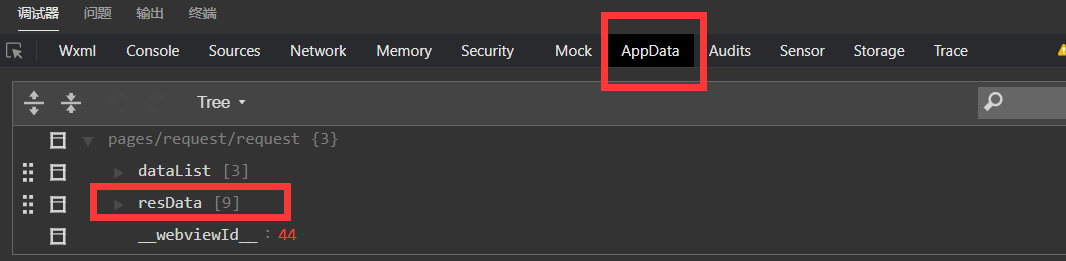
7.2、请求的数据在调试器中的AppData中进行查看
7.3、效果展示
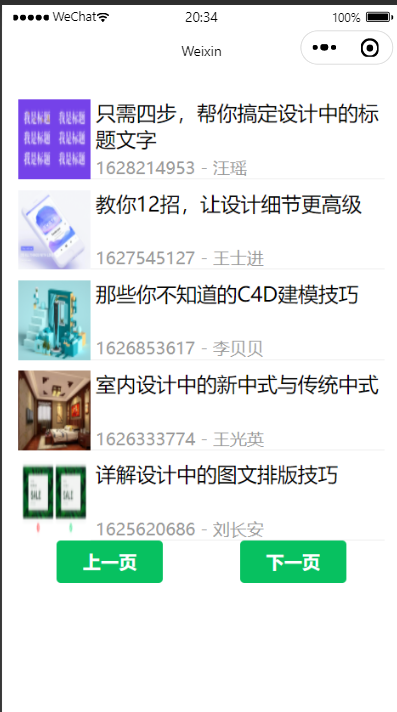
7.4、wxml
<!--pages/request/request.wxml-->
<view class="out"><view class="row" wx:for="{{resData}}" wx:key="index"><view class="pic"><image src="{{item.picurl}}"></image></view><view class="text"><view class="title">{{item.title}}</view><view class="time">{{item.posttime}} - {{item.author}}</view></view></view><view class="btn"><button bindtap="upPage" type="primary">上一页</button><button bindtap="nextPage" type="primary">下一页</button></view>
</view>
- 循环遍历js中请求到的数据
resData,使用item.字段名在页面中进行渲染 - 对各级块元素进行样式设置如下:
7.5、wxss
/* pages/request/request.wxss */
.out{  padding:30rpx;  box-sizing: border-box;}
.row{  display: flex;  height: 150rpx;  margin-top: 20rpx;}
.pic{  flex: 2;}
.pic image{  width: 100%;  height: 100%;}
.text{  flex: 8;  border-bottom:1px solid #eee;  padding-left: 10rpx;  display: flex;  flex-direction: column;  justify-content: space-between;}
.text .title{  font-size: 38rpx;}
.text .time{  color:#999}
.btn{  display: flex;}
.btn button{  width: 200rpx;  justify-content: space-between;}
7.6、js
// pages/request/request.js
Page({/*** 页面的初始数据*/data: {// dataList:[//   {title:"美团优选",time:"2022-6-18",url:"./image/bg.jpg"},//   {title:"多多优选",time:"2022-6-19",url:"./image/bg.jpg"},//   {title:"橙心优选",time:"2022-6-20",url:"./image/bg.jpg"},// ],resData:[],num:1},upPage:function(){this.data.num--;this.getList(this.data.num)},nextPage:function(){this.data.num++;this.getList(this.data.num)},getList:function(p=1){wx.request({url: 'http://edu.newsight.cn/wxList.php',data:{num:5,page:p},success:res=>{// console.log(res.data),this.setData({resData:res.data})}})},/*** 生命周期函数--监听页面加载*/onLoad: function (options) {this.getList();},
- 定义一个方法叫
getList(),负责发送request请求 - 在页面加载函数
onload中直接调用
五、ES6实用的技术
1、变量与常量
常量const不允许被覆盖块级变量let只能在块级中起作用,例如只在if、for、函数中起作用,在外无权访问该变量全局变量var
2、模板
3、解构赋值
4、箭头函数
箭头函数相当于匿名函数,并且简化了函数定义,()中放参数,没有参数就可以省略,箭头后面是函数体
var fun = (x,y)=>{console.log(x+y);
}
fun(2,3)
ES6之前访问函数外面的this比较麻烦,箭头函数可直接访问到最外面的this,不需要进行转换
5、for循环遍历
var arr =[1111,2222,3333,4444];// 1、第一种遍历并追加
for(var i =0;i<arr.length;i++){arr[i]=arr[i]+'遍历追加1'
}// 2、第二种遍历并追加
var newArr=[]
arr.forEach((item,idx)=>{item = item + '遍历追加2'newArr.push(item)
})// 3、第三种遍历并追加
var newArr = arr.map((item)=>{return item + "遍历追加3"
})console.log(newArr)
6、对象中函数的声明
var obj = {user:"张三",job(){return 'web前端开发'}
}
console.log(obj.job())
7、默认参数
function fun(x=0,y=2,z=true){console.log(x,y,z);
}
fun(); // 0,2,true
fun(4,0,false) // 4,0,false
8、展开运算符 …
arr1 = [1,2,3,4,5];
arr2 = ["a","b","c","d"];
arr3 = arr1.concat(arr2);
arr4 = [...arr1,...arr2]; // ...表示展开数组console.log(arr3); // [1,2,3,4,5,"a","b","c","d"]
console.log(arr4); // [1,2,3,4,5,"a","b","c","d"]
六、案例
1、标题+客服
1.1、布局 html
<!--index.wxml-->
<view class="header"><view class="container hdCon"><navigator open-type="switchTab" url="/pages/index/index" class="logo"><image src="../../images/logo.png"></image></navigator></view><view class="kefu"><button open-type="contact" class="btn"></button><image mode="heightFix" src="../../images/xiaoxi.png"></image></view>
</view>
1.2、公共样式 + 动画定义
/**app.wxss**/
.container{padding:0 26rpx;box-sizing: border-box;
}
/* 设置kefu动画效果 */
@keyframes dh{0%,50%,100%{opacity: 1;}25%{opacity: 0;}
}
1.3、布局样式 css
/**index.wxss**/
.header{width: 750rpx;height: 90rpx;margin-top: 5px;display: flex;
}
.hdCon{width: 85%;height: 100%;display:flex;justify-content: space-between;align-items: center;
}
.logo,
.hdCon image{width: 200rpx;height: 50rpx;
}
.kefu{width: 15%;text-align: center;padding: 15rpx;position: relative;/* 添加动画 animation:名称 匀速播放 时间 重复执行 跳跳 */animation: dh linear 1s infinite alternate;
}
.kefu image{width: 60rpx;height: 60rpx;
}
.btn{width: 100%;height: 100%;opacity: 0;/*设置透明度*/top: 0;left: 0;position: absolute;
}
opacity: 0;设置透明度animation: dh linear 1s infinite alternate;设置动画
2、轮播图
2.1、布局 html
<view class="banner"><swiper indicator-dots indicator-color="rgba(255,255,255,0.5)" indicator-active-color="#fff" autoplay circular interval="3000"><swiper-item><image src="../../images/banner1.jpg"></image></swiper-item><swiper-item><image src="../../images/banner2.jpg"></image></swiper-item>    <swiper-item><image src="../../images/banner3.jpg"></image></swiper-item></swiper>
</view>
2.2、布局样式 css
/* 轮播图 */.banner{width: 100%;height: 295rpx;
}
.banner swiper{width: 100%;height: 100%;
}
.banner image{width: 100%;height: 295rpx;
}
3、滚动显示
3.1、布局 html
<!-- 滚动显示 -->
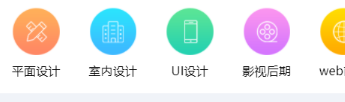
<scroll-view class="major" scroll-x><navigator class="box" url=""><image class="pic" src="/images/kecheng1.png"></image><view class="txt">平面设计</view></navigator><navigator class="box" url=""><image class="pic" src="/images/kecheng2.png"></image><view class="txt">室内设计</view></navigator><navigator class="box" url=""><image class="pic" src="../../images/kecheng3.png"></image><view class="txt">UI设计</view></navigator><navigator class="box" url=""><image class="pic" src="/images/kecheng4.png"></image><view class="txt">影视后期</view></navigator><navigator class="box" url=""><image class="pic" src="/images/kecheng5.png"></image><view class="txt">web前端</view></navigator>
</scroll-view>
3.2、布局样式 css
/* 滚动显示 */
.major{white-space: nowrap;/*不换行显示*/padding:30rpx 0;
}
.major .box{text-align: center;width: 165rpx;display:inline-block}
.major .pic{width: 100rpx;height: 100rpx;
}
.major .txt{font-size: 26rpx;margin-top: 8rpx;
}
4、作品展示
4.1、布局 html

<!-- 作品展示 -->
<view class="works"><view class="container"><view class="pubTitle"><view class="txt">学员作品</view><navigator class="more">更多 ></navigator></view><view class="wxMain"><navigator class="box" wx:for="{{worksList}}" wx:key="index"><image class="pic" src="{{item.src}}"></image><view class="ceng"><view class="tit">{{item.title}}</view><view class="line"></view><view class="des">{{item.desc}}</view></view></navigator></view></view>
</view>
4.2、布局样式 css
/* 学员作品展示 */
.pubTitle{display: flex;justify-content: space-between;height: 60rpx;align-items: center;margin-bottom: 40rpx;
}
.pubTitle .txt{font-size: 40rpx;height: 100%;position: relative;padding-left: 20rpx;
}
.pubTitle .txt::before{display: block;width: 8rpx;height: 34rpx;background: #c8020b;content:'';position: absolute;left: 0;top: 20%;
}
.pubTitle .more{font-size: 34rpx;color:#666;
}
.works{background-color: #f0f3f8;padding: 90rpx 0 70rpx;
}
.wxMain{display: flex;flex-wrap: wrap;justify-content: space-between;
}
.wxMain .box{width: 344rpx;height: 214rpx;margin-bottom: 10rpx;position: relative;
}
.wxMain .pic{width: 100%;height: 100%;
}
.wxMain .ceng{width: 100%;height: 100%;background: rgba(0,0,0,0.5);position: absolute;top:0;left: 0;color:#fff;display: flex;flex-direction: column;justify-content: center;align-items: center;text-align: center;padding: 0 20rpx;box-sizing: border-box;/*添加内边距padding时需要添加内填充属性*/
}
.wxMain .ceng .tit{font-size: 34rpx;
}
.wxMain .ceng .line{width: 50rpx;
}
.wxMain .ceng .des{font-size: 24rpx;opacity: 0.6;/*透明度*/text-transform: uppercase;/*转换成大写*/letter-spacing: 5rpx;/*字符间距*/
}
5、行业动态
5.1、布局 html
<!-- 行业动态 -->
<view class="dynamic"><view class="container"><view class="pubTitle"><view class="txt">行业动态</view><navigator class="more">更多 ></navigator></view><view class="dyMain"><navigator class="dyItem" wx:for="{{5}}" wx:key="index"><view class="pic"><image src="/images/xszp1.jpg"></image></view><view class="txt"><view class="title">这里是标题部分</view><view class="info">作者:王静<text space="ensp"> - </text>时间:2022-05-01</view></view></navigator></view></view>
</view>
5.2、布局样式 css
/* 行业动态 */
.dynamic{padding:90rpx 0 70rpx;
}
.dyItem{display: flex;padding:15rpx 0;border: 1rpx dashed #f4f4f4;justify-content: space-between;
}
.dyItem .pic{width: 230rpx;height: 150rpx;
}
.dyItem .pic image{width: 100%;height: 100%;
}
.dyItem .txt{width: 440rpx;display: flex;flex-direction: column;justify-content: space-between;
}
.dyItem .title{font-size: 34rpx;
}
.dyItem .info{font-size: 26rpx;color:#888;
}
.dyItem .info text{font-size: 22rpx;
}
6、底部logo
6.1、布局 html
<!-- 底部logo -->
<view class="footer"><image src="/images/logo.png" mode="widthFix" class="pic"></image><view class="text">- 高端实训平台 -</view>
</view>
6.2、布局样式 css
/* 底部 */
.footer{padding: 30rpx;background:#f2f2f2;text-align: center;
}
.footer .pic{width: 180rpx;
}
.footer .text{font-size: 25rpx;color: #666;
}


![解决微信登录出现{errcode:40163,errmsg:code been used, hints: [ req_id: jEFDVY4ce-jz9NSA ]} (前提是使用友盟分享)](https://img-blog.csdnimg.cn/20190815093303930.png?x-oss-process=image/watermark,type_ZmFuZ3poZW5naGVpdGk,shadow_10,text_aHR0cHM6Ly9ibG9nLmNzZG4ubmV0L3FxXzM3NDkyODA2,size_16,color_FFFFFF,t_70)