上一篇介绍了入门基础篇SpringDataJPA访问数据库。本篇介绍SpringDataJPA进一步的定制化查询,使用JPQL或者SQL进行查询、部分字段映射、分页等。本文尽量以简单的建模与代码进行展示操作,文章比较长,包含查询的方方面面。如果能耐心看完这篇文章,你应该能使用SpringDataJPA应对大部分的持久层开发需求。如果你需要使用到动态条件查询,请查看下一篇博客,专题介绍SpringDataJPA的动态查询。
一、入门引导与准备
JPQL(JavaPersistence Query Language)是一种面向对象的查询语言,它在框架中最终会翻译成为sql进行查询,如果不知JPQL请大家自行谷歌了解一下,如果你会SQL,了解这个应该不废吹灰之力。
1.核心注解@Query介绍
使用SpringDataJPA进行JPQL/SQL一般查询的核心是@Query注解,我们先来看看该注解
@Retention(RetentionPolicy.RUNTIME)
@Target({ ElementType.METHOD, ElementType.ANNOTATION_TYPE })
@QueryAnnotation
@Documented
public @interface Query {String value() default "";String countQuery() default "";String countProjection() default "";boolean nativeQuery() default false;String name() default "";String countName() default "";
}@Query注解中有6个参数,value参数是我们需要填入的JPQL/SQL查询语句;nativeQuery参数是标识该查询是否为原生SQL查询,默认为false;countQuery参数为当你需要使用到分页查询时,可以自己定义(count查询)计数查询的语句,如果该项为空但是如果要用到分页,那么就使用默认的主sql条件来进行计数查询;name参数为命名查询需要使用到的参数,一般配配合@NamedQuery一起使用,这个在后面会说到;countName参数作用与countQuery相似,但是使用的是命名查询的(count查询)计数查询语句;countProjection为涉及到投影部分字段查询时的计数查询(count查询);关于投影查询,待会会说到。
有了@Query基础后,我们就可以小试牛刀一把了,对于jar包依赖,我们用的依旧是上一节的依赖,代码如下:
2.准备实验环境
<parent>  <groupId>org.springframework.boot</groupId>  <artifactId>spring-boot-starter-parent</artifactId>  <version>1.4.1.RELEASE</version>
</parent>  <properties>  <project.build.sourceEncoding>UTF-8</project.build.sourceEncoding>  <java.version>1.8</java.version>  <springBoot.groupId>org.springframework.boot</springBoot.groupId>
</properties>  <dependencies>  <!-- SpringBoot Start -->  <dependency>  <groupId>${springBoot.groupId}</groupId>  <artifactId>spring-boot-starter-web</artifactId>  </dependency>  <!-- jpa -->  <dependency>  <groupId>${springBoot.groupId}</groupId>  <artifactId>spring-boot-starter-data-jpa</artifactId>  </dependency>  <dependency>  <groupId>${springBoot.groupId}</groupId>  <artifactId>spring-boot-starter-test</artifactId>  </dependency>  <!-- mysql -->  <dependency>  <groupId>mysql</groupId>  <artifactId>mysql-connector-java</artifactId>  </dependency>  <dependency>  <groupId>junit</groupId>  <artifactId>junit</artifactId>  <version>4.12</version>  </dependency>
</dependencies>
项目结构如下:

JpaConfiguration配置类与上篇的相同:
@Order(Ordered.HIGHEST_PRECEDENCE)
@Configuration
@EnableTransactionManagement(proxyTargetClass=true)
@EnableJpaRepositories(basePackages={"org.fage.**.repository"})
@EntityScan(basePackages={"org.fage.**.entity"})
public class JpaConfiguration {@BeanPersistenceExceptionTranslationPostProcessor persistenceExceptionTranslationPostProcessor(){return new  PersistenceExceptionTranslationPostProcessor();}
}@SpringBootApplication
@ComponentScan("org.fage.**")
public class App {public static void main(String[] args) throws Exception {SpringApplication.run(App.class, args);}
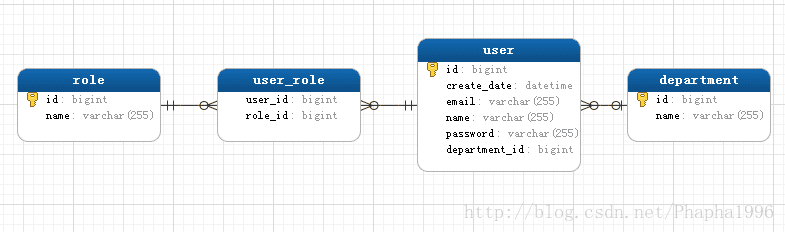
}对于实体建模依旧用到上一篇所用的模型Department、User、Role,Department与User为一对多,User与Role为多对多,为了方便后面介绍投影,user多增加几个字段,代码如下:
@Entity
@Table(name = "user")
public class User implements Serializable {private static final long serialVersionUID = -7237729978037472653L;@Id@GeneratedValue(strategy = GenerationType.IDENTITY)private Long id;private String name;private String password;@Column(name = "create_date")@DateTimeFormat(pattern = "yyyy-MM-dd HH:mm:ss")@Temporal(TemporalType.TIMESTAMP)private Date createDate;private String email;// 一对多映射@ManyToOne@JoinColumn(name = "department_id")private Department department;// 多对多映射@ManyToMany @JsonBackReference@JoinTable(name = "user_role", joinColumns = { @JoinColumn(name = "user_id") }, inverseJoinColumns = {@JoinColumn(name = "role_id") })private List<Role> roles;
//getter and setter .....
}
@Entity
@Table(name = "department")
public class Department implements Serializable {/*** */private static final long serialVersionUID = 3743774627141615707L;@Id@GeneratedValue(strategy=GenerationType.IDENTITY)private Long id;private String name;@OneToMany(mappedBy = "department")@JsonBackReference@JsonBackReferenceprivate List<User> users;//getter and setter
}
@Entity
@Table(name="role")
public class Role implements Serializable{/*** */private static final long serialVersionUID = 1366815546093762449L;@Id@GeneratedValue(strategy=GenerationType.IDENTITY)private Long id;private String name;//getter and setter
}
建模成功时,生成的表结构如下:
对于Repository:
@Repository
public interface DepartmentRepository extends JpaRepository<Department, Long>{}
@Repository
public interface RoleRepository extends JpaRepository<Role, Long>{}
@Repository
public interface UserRepository extends JpaRepository<User, Long>{
}如果以上代码有看不懂的地方,请移步到上一篇一览基础篇。至此,我们已经将环境整理好了,至于表中的数据插入,希望各位参考上一篇文章进行基础的crud操作将表中数据进行填充,接下来介绍@Query查询
二、使用JPQL查询
1 .核心查询与测试样例
在UserRepository中增加以下方法:
//--------------JPQL查询展示-------------////展示位置参数绑定@Query(value = "from User u where u.name=?1 and u.password=?2")User findByNameAndPassword(String name, String password);//展示名字参数绑定@Query(value = "from User u where u.name=:name and u.email=:email")User findByNameAndEmail(@Param("name")String name, @Param("email")String email);//展示like模糊查询@Query(value = "from User u where u.name like %:nameLike%")List<User> findByNameLike(@Param("nameLike")String nameLike);//展示时间间隔查询@Query(value = "from User u where u.createDate between :start and :end")List<User> findByCreateDateBetween(@Param("start")Date start, @Param("end")Date end);//展示传入集合参数查询@Query(value = "from User u where u.name in :nameList")List<User> findByNameIn(@Param("nameList")Collection<String> nameList);//展示传入Bean进行查询(SPEL表达式查询)@Query(value = "from User u where u.name=:#{#usr.name} and u.password=:#{#usr.password}")User findByNameAndPassword(@Param("usr")User usr);//展示使用Spring自带分页查询@Query("from User u")Page<User> findAllPage(Pageable pageable);//展示带有条件的分页查询@Query(value = "from User u where u.email like %:emailLike%")Page<User> findByEmailLike(Pageable pageable, @Param("emailLike")String emailLike);@RunWith(SpringRunner.class)
@SpringBootTest
public class TestClass {final Logger logger = LoggerFactory.getLogger(TestClass.class);@AutowiredUserRepository userRepository;@Testpublic void testfindByNameAndPassword(){userRepository.findByNameAndPassword("王大帅", "123");}@Testpublic void testFindByNameAndEmail(){userRepository.findByNameAndEmail("张大仙", "2@qq.com");}@Testpublic void testFindByNameLike(){List<User> users = userRepository.findByNameLike("马");logger.info(users.size() + "----");}@Testpublic void testFindByCreateDateBetween() throws ParseException{List<User> users = userRepository.findByCreateDateBetween(new SimpleDateFormat("yyyy-MM-dd HH:mm:ss").parse("2018-01-01 00:00:00"), new Date(System.currentTimeMillis()));logger.info(users.size() + "----");}@Testpublic void testFindByNameIn(){List<String> list = new ArrayList<String>();list.add("王大帅");list.add("李小三");userRepository.findByNameIn(list);}@Testpublic void testfindByNameAndPasswordEntity(){User u = new User();u.setName("李小三");u.setPassword("444");userRepository.findByNameAndPassword(u);}@Testpublic void testFindAllPage(){Pageable pageable = new PageRequest(0,5);Page<User> page = userRepository.findAllPage(pageable);ObjectMapper mapper = new ObjectMapper();String json = mapper.writeValueAsString(page); logger.info(json);}@Testpublic void findByEmailLike(){Pageable pageable = new PageRequest(0,5,new Sort(Direction.ASC,"id"));userRepository.findByEmailLike(pageable, "@qq.com");}
}对于UserRepository中的第一与第二个方法,目的是为了比较与展示位置绑定与名字绑定的区别,相信根据名称大家就能判别是什么意思与区别了,位置绑定即是方法参数从左到右第123456...所在位置的参数与查询语句中的第123456...进行对应。名字绑定即是查询语句中的参数名称与方法参数名称一一对应;对于第三个与第四个查询例子就不多说了;第五条查询语句展示的是传入集合进行in查询;第六条查询例子展示的是传入bean进行查询,该查询使用的表达式是Spring的SPEL表达式;
2. 分页与排序
最后两条查询语句展示的是进行分页查询、分页并排序查询,使用的计数查询默认使用主查询语句中的条件进行count, 当Repository接口的方法中含有Pageable参数时,那么SpringData认为该查询是需要分页的;org.springframework.data.domain.Pageable是一个接口,接口中定义了分页逻辑操作,它具有一个间接实现类为PageRequest,我们最需要关注的是PageRequest这个实现类的三个构造方法:
public class PageRequest extends AbstractPageRequest {
....
....public PageRequest(int page, int size) {this(page, size, null);}public PageRequest(int page, int size, Direction direction, String... properties) {this(page, size, new Sort(direction, properties));}public PageRequest(int page, int size, Sort sort) {super(page, size);this.sort = sort;}
....
....
}Direction则是一个枚举,如果该参数被传入则进行排序,常用的有Direction.ASC/Direction.DESC,即正序排与逆序排,如果排序,需要根据哪个字段排序呢?properties是一个可变长参数,传入相应字段名称即可根据该字段排序。还有最后一个参数Sort,Sort这个类中有一个构造方法:public Sort(Direction direction, String... properties),没错,我不用说相信大家都已经懂了是干什么用的了。
Pageable与PageRequest的关系解释完了,那么就该介绍一下最后两条查询语句的返回值Page<T>是干什么用的了,让我们看看倒数第二个测试方法返回的json串结果:
{ "content": [
{ "id": 1,"name": "王大帅","password": "123", "createDate": 1515312688000, "email": "1@qq.com","department": { "id": 1, "name": "开发部"}},
{ "id": 2, "name": "张大仙", "password": "456", "createDate": 1515139947000, "email": "2@qq.com", "department": {"id": 1, "name": "开发部" }},
{"id": 3, "name": "李小三","password": "789","createDate": 1514794375000, "email": "3@qq.com","department": {"id": 1, "name": "开发部" }},
{"id": 4, "name": "马上来","password": "444", "createDate": 1512116003000, "email": "4@qq.com", "department": { "id": 1,"name": "开发部" } },
{ "id": 5, "name": "马德华", "password": "555","createDate": 1515312825000,"email": "5@qq.com","department": { "id": 1, "name": "开发部"} }],"last": true,"totalPages": 1,"totalElements": 5,"size": 5,"number": 0,"sort": null,"first": true,"numberOfElements": 5
}到这里,Page与Pageable都了解了。
3. 关联查询与部分字段映射投影
接下来介绍使用JPQL进行关联查询与部分字段映射。现在的查询需求是,查出所有用户的名字、用户所属部门、用户的email、统计用户所拥有的角色有多少个,然后将列表结果进行给前端显示。有的朋友说,那我把关联到的对象都拿出来不就完了。可是,实际开发中一个表下有几十个字段会很常见,如果全部都拿出来是没有必要的,所以我们可以把需要的字段拿出来就可以了,下面介绍两种方法实现这种需求。
3.1 使用VO(view object)做映射与投影
我们在src/main/java中增加一个org.fage.vo包,该包下存放VO对象,我们在该包下创建一个UserOutputVO:
public class UserOutputVO {private String name;		//用户的名字private String email;		//用户的emailprivate String departmentName;	//用户所属的部门private Long roleNum;		//该用户拥有的角色数量public UserOutputVO(String name, String email, String departmentName, Long roleNum) {super();this.name = name;this.email = email;this.departmentName = departmentName;this.roleNum = roleNum;}public UserOutputVO() {super();}//getter and setter and toString...
}
@Query(value = "select new org.fage.vo.UserOutputVO(u.name, u.email, d.name as departmentName, count(r.id) as roleNum) from User u "+ "left join u.department d left join u.roles r group by u.id")Page<UserOutputVO> findUserOutputVOAllPage(Pageable pageable);这里注意一下,VO中的构造方法参数一定要与查询语句中的查询字段类型相匹配(包括数量),如果不匹配就会报错。以下是测试代码:
@Testpublic void testFindUserOutputVOAllPage(){Pageable pageable = new PageRequest(0,5);Page<UserOutputVO> page = userRepository.findUserOutputVOAllPage(pageable);List<UserOutputVO> list = page.getContent();for(UserOutputVO vo : list)logger.info(vo.toString());}
对于连接查询,有join、left join 、right join,与sql的类似,但是唯一需要注意的地方就是建模的关系要能连接起来,因为只有这样才能使用“.”进行连接;就像你想的那样,它是类似对象导航的,与sql的表连接有些使用上的不同,但是最终的连接结果是相同的。
3.2 使用projection接口做映射与投影
public interface UserProjection {String getName();@Value("#{target.emailColumn}")//当别名与该getXXX名称不一致时,可以使用该注解调整String getEmail();String getDepartmentName();Integer getRoleNum();
}//故意将email别名为emailColumn,以便讲解@Value的用法@Query(value = "select u.name as name, u.email as emailColumn, d.name as departmentName, count(r.id) as roleNum from User u "+ "left join u.department d left join u.roles r group by u.id")Page<UserProjection> findUserProjectionAllPage(Pageable pageable);@Testpublic void testFindUserProjectionAllPage(){Page<UserProjection> page = userRepository.findUserProjectionAllPage(new PageRequest(0,5));Collection<UserProjection> list = page.getContent();for(UserProjection up : list){logger.info(up.getName());logger.info(up.getEmail());logger.info(up.getDepartmentName());logger.info(up.getRoleNum()+"");}}两种方式都可以,对于到底哪种方式好,这取决于你的需求。
4.命名查询
@Entity
@Table(name="role")
@NamedQueries({@NamedQuery(name = "Role.findById", query = "from Role r where r.id=?1"),@NamedQuery(name = "Role.findAllPage", query = "from Role r")//...更多的@NamedQuery})
public class Role implements Serializable{private static final long serialVersionUID = 1366815546093762449L;@Id@GeneratedValue(strategy=GenerationType.IDENTITY)private Long id;private String name;public Role(){super();}public Role(String name){this.name = name;}//getter and setter}@Repository
public interface RoleRepository extends JpaRepository<Role, Long>{Role findById(Long id);Page<Role> findAllPage(Pageable pageable);
}@Testpublic void testFindRoleById(){roleRepository.findById(1l);}@Testpublic void testFindRoleAllPage(){roleRepository.findAll(new PageRequest(0,5));}5. JPQL方式总结
还是比较建议使用JPQL方式,因为SpringDataJPA各方面(比如分页排序)、动态查询等等都支持得比较好,Spring的SPEL表达式还可以扩展到SpringSecurity与SpringDataJPA高级的session用户查询方式,后续博客会有对SpringSecurity的介绍,等到那时候在一起讲解。三、使用原生SQL查询
有些时候,JPQL使用不当会导致转化成的sql并不如理想的简洁与优化,所以在特定场合还是得用到原生SQL查询的,比如当你想优化sql时等等。
1 .一般查询
使用原生查询时用的也是@Query注解,此时nativeQuery参数应该设置为true。我们先来看一些简单的查询
@Query(value = "select * from user u where u.id=:id", nativeQuery = true)User findByIdNative(@Param("id")Long id);@Query(value = "select * from user", nativeQuery = true)List<User> findAllNative();
@Test@Transactionalpublic void testFindByIdNative(){User u = userRepository.findByIdNative(1l);logger.info(u.toString());logger.info(u.getRoles().toString());}@Testpublic void testFindAllNative(){List<User> list = userRepository.findAllNative();for(User u : list){logger.info(u.toString());}}结果发现当查所有字段的时候,确实能映射成功,并且fetch快加载、懒加载自动关联也能正常使用。接下来我们换刚才使用JPQL时的查询需求,看看用SQL时该怎么做。
2.投影与映射分页查询
查询列表的需求依旧是刚才介绍使用JPQL时使用的需求(分页查出所有用户的名字、用户所属部门、用户的email、统计用户所拥有的角色有多少个),在UserRepository中创建代码片段:
//展示原生查询@Query(value = "select u.name as name, u.email as emailColumn, d.name as departmentName, count(ur.role_id) as roleNum from user u "+ "left join department d on d.id=u.department_id left join user_role ur on u.id=ur.user_id group by u.id limit :start,:size",nativeQuery = true)List<Object[]> findUserProjectionAllPageNative(@Param("start")int start, @Param("size")int size);//count语句@Query(value = "select count(u.id) from user u", nativeQuery = true)long countById();在TestClass中创建测试代码:
@Testpublic void testFindUserProjectionAllPageNative(){Pageable pageable = new PageRequest(0,5);List<Object []> content = userRepository.findUserProjectionAllPageNative(pageable.getOffset(), pageable.getPageSize());long total = userRepository.countById();//查看一下查询结果logger.info(content.size() + "");for(Object[] o : content){logger.info("名字:" + o[0].toString());logger.info("email:" + o[1].toString());logger.info("所属部门" + o[2].toString());logger.info("角色数量" + o[3].toString());}//如果需要的话,自行封装分页信息Page<Object[]> page = new PageImpl<Object[]>(content, pageable, total);System.out.println(page);}解释一下上面代码,由于是原生查询不支持动态分页,Page分页我们只能自己做了,但是依旧使用的是Spring的Page;pageable.getOffset()与pageable.getPageSize()分别对应limit ?, ?的第一与第二个问号。原生查询得出来的List是包函一堆被封装成Object的对象数组,每个object数组可以通过数组索引拿出值,也就与需要查的字段一一对应。如果你需要存入VO再带回给前端,那么你可以自行封装。对于PageImpl,我们使用了public PageImpl(List<T> content, Pageable pageable, long total) 这个构造方法,第一个参数是查询到的结果,第二个就不用说了,第三个参数是对主sql的count查询。当前端需要显示分页时,可以这样进行手动分页。
3.SQL方式总结
当你需要进行sql优化时,可能用原生sql方式会更好。但是一般需求时候用JPQL还是比较方便的,毕竟这样比较省事,拿数据总是需要分页的,有时候只需要拿几个字段也是这样。
四、总结
当你在接到一般需求时,使用JPQL的方式其实已经足够用了。但是如果对sql需要优化的时候,你也可以使用SQL的方式。总而言之,需要根据需求来应变使用的策略。
如果文中有不当的地方欢迎同学们提出建议与修改方案,但是请不要谩骂与辱骂。
下一篇将讲解SpringDataJPA根据动态条件进行查询的方方面面。