整理了一下新版的变化以及遇到的坑的解决办法,最后也会分享将网站及接口部署的方式。
千锋前端-React全家桶_React项目全球新闻发布管理系统
https://www.bilibili.com/video/BV1fw411d7R5
文章目录
- P4
- P5
- P6
- P11
- P15
- P17
- P18
- P22
- P29
- P30
- P34
- P38
- P41
- P43
- P45
- P50
- P67
- 进阶: 多语系网站
- 接口数据
- 部署网站及接口
P4
反向代理 setupProxy.js 改为:
// setupProxy.js
const { createProxyMiddleware } = require('http-proxy-middleware');module.exports = function(app) {app.use('/api',createProxyMiddleware({target: 'https://i.maoyan.com',changeOrigin: true,}));
};
App.js 中 axios 请求地址改为:
// App.js
useEffect(() => {axios.get("/api/mmdb/movie/v3/list/hot.json?ct=%E7%B9%81%E6%98%8C%E5%8C%BA&ci=774&channelId=4").then((res) => console.log(res.data));}, []);
因为我没有看到视频中用的 m.maoyan.com/ajax 那个地址,所以我自己抓了一个,反正是练习用的就不必那么讲究了,测试一下 middleware 能不能使就行。
P5
15 分处
HashRouter里面包Switch会出错,请改为包Routes(Routes 和 Switch 的功用是一样的,都能做到精准匹配)Route的 component 属性改为element,并且 element 中请使用<>包裹组件名称
// IndexRouter.js
import React from "react";
import { HashRouter, Routes, Route } from "react-router-dom";
import Login from "../views/login/Login";
import NewsSandBox from "../views/newssandbox/NewsSandBox";export default function IndexRouter () {return (<HashRouter><Routes><Route path="/login" element={<Login/>} /><Route path="/" element={<NewsSandBox/>} /></Routes></HashRouter>);
};
20 分处重定向部分
For react-router-dom v6, simply replace Redirect with Navigate
所以我们需要将 Redirect 改为 Navigate,并且一样使用的是 element 而不是 render
<Route path="/*" element={localStorage.getItem("token") ? <NewsSandBox/> : <Navigate to="/login"/>} />
P6
14 分处,一样将所有 Switch 改为 Routes, component 改为 element,Redirect 改为 Navigate:
//NewsSandBox.js
<Routes><Route path="home" element={<Home />} /><Route path="user-manage/list" element={<UserList />} /><Route path="right-manage/role/list" element={<RoleList />} /><Route path="right-manage/right/list" element={<RightList />} /><Route path="/" element={<Navigate replace from="/" to="home"/>} /><Route path="/*" element={<NoPermission/>} />
</Routes>
并且要记住的是 Navigate 只能包裹在 Route 中,Routes 中只能有 Route 或者 Fragment。
P11
使用 withRouter 会报错:
‘withRouter’ is not exported from ‘react-router-dom’.
因为 V6 之后没有 withRouter 了,所以直接改用 useNavigate 会更方便,完整的 Code 我直接放出来吧:
import React from "react";
import { Layout, Menu } from "antd";
import { UserOutlined, HomeOutlined, CrownOutlined } from "@ant-design/icons";
import SubMenu from "antd/lib/menu/SubMenu";
import { useNavigate } from "react-router";const { Sider } = Layout;const menuList = [{key: "/home",title: "首页",icon: <HomeOutlined />,},{key: "/user-manage",title: "用户管理",icon: <UserOutlined />,children: [{key: "/user-manage/list",title: "用户列表",icon: <UserOutlined />,},],},{key: "/right-manage",title: "权限管理",icon: <CrownOutlined />,children: [{key: "/right-manage/role/list",title: "角色列表",icon: <CrownOutlined />,},{key: "/right-manage/right/list",title: "权限列表",icon: <CrownOutlined />,},],},
];export default function SideMenu({ collapsed }) {let navigate = useNavigate();// Menuconst renderMenu = (menuList) => {return menuList.map((item) => {if (item.children) {return (<SubMenu key={item.key} icon={item.icon} title={item.title}>{renderMenu(item.children)}</SubMenu>);}return (<Menu.Itemkey={item.key}icon={item.icon}onClick={() => navigate(item.key)}>{item.title}</Menu.Item>);});};return (<Sider trigger={null} collapsible collapsed={collapsed}><div className="logo" /><Menu theme="dark" mode="inline" defaultSelectedKeys={["1"]}>{renderMenu(menuList)}</Menu></Sider>);
}
P15
props.location.pathname 可以用 useLocation 钩子取代,与 props.location 是一样的用法:
import { useNavigate, useLocation } from "react-router";
// ...
let location = useLocation();
const selectKeys = [location.pathname]; // ex: ['/home']
const openKeys = ["/" + location.pathname.split("/")[1]];
// ...
<Menu theme="dark" mode="inline" selectedKeys={selectKeys} defaultOpenKeys={openKeys}>{renderMenu(menu)}
</Menu>
P17
直接写 res.data[0].children = "" 的话一旦 array 内容顺序有所变更就会错误,因此建议透过遍历的方式寻找 children 长度为 0 的元素,将它改为空字串。
useEffect(() => {axios.get("http://localhost:8000/rights?_embed=children").then((res) => {res.data.forEach((item) => item.children?.length === 0 ? item.children = "" : item.children);setDataSource(res.data);})
}, []);
P18
个人认为删除后页面要会 auto refresh,所以我改写了一下,这样只要删除权限时就会修改 refresh 的状态,而 refresh 状态一变更就会重新 call API 获取数据。
// RightList.js
const [dataSource, setDataSource] = useState([]);
const [refresh, setRefresh] = useState(false);useEffect(() => {axios.get("http://localhost:8000/rights?_embed=children").then((res) => {res.data.forEach((item) =>item.children?.length === 0 ? (item.children = "") : item.children);setDataSource(res.data);});
}, [refresh]);const columns = [{title: "ID",dataIndex: "id",},{title: "权限名称",dataIndex: "title",},{title: "权限路径",dataIndex: "key",render: (key) => {return <Tag color="volcano">{key}</Tag>;},},{title: "操作",render: (item) => {return (<div><Buttondangershape="circle"icon={<DeleteOutlined />}style={{ marginRight: 10 }}onClick={() => confirmMethod(item)}/><Button type="primary" shape="circle" icon={<EditOutlined />} /></div>);},},];const confirmMethod = (item) => {confirm({title: "你确定要删除?",icon: <ExclamationCircleOutlined />,// content: "Some descriptions",onOk() {deleteMethod(item);},onCancel() {console.log("Cancel");},});};const deleteMethod = (item) => {if (item.grade === 1) {axios.delete(`http://localhost:8000/rights/${item.id}`).then(setRefresh).catch((e) => console.log(e))} else {axios.delete(`http://localhost:8000/children/${item.id}`).then(setRefresh).catch((e) => console.log(e))}
}
P22
分配权限的写法一样是改成 auto refresh,而不是改变状态。之后同样的处理我都不会再提了。
const [refresh, setRefresh] = useState(false);
// ...
useEffect(() => {axios.get("http://localhost:8000/roles").then((res) => setDataSource(res.data)).catch((e) => console.log(e));axios.get("http://localhost:8000/rights?_embed=children").then((res) => setRightList(res.data)).catch((e) => console.log(e));}, [refresh]);const handleOk = () => {setIsModalVisible(false);axios.patch(`http://localhost:8000/roles/${currentId}`, {rights: currentRights}).then(setRefresh).catch((e) => console.log(e))};
P29
一样将 Redirect 重定向改为使用 useNavigate
// components/sandbox/TopHeader.js
import { useNavigate } from "react-router";
// ...
let navigate = useNavigate();
// ...
<Menu.Item danger onClick={() => {localStorage.removeItem("token")navigate("/login");
}}>退出
</Menu.Item>
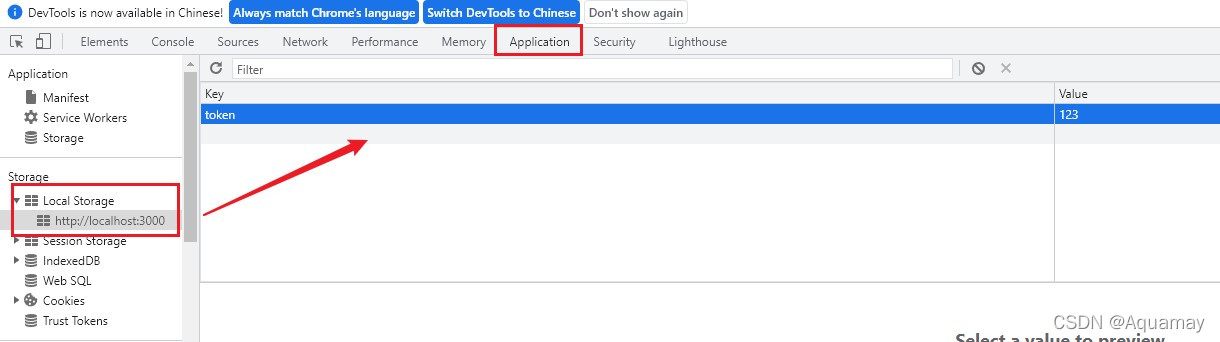
顺便分享一个干货,浏览器的devTools (chrome预设为 F12) - Application - Local Storage 可以看到你存在本地的所有东西,也就是你使用 localStorage.setItem 所记录下来的内容,你可以直接在这里设置或清除 token,也可以在 console 写代码修改,都是可以的。
P30
这个粒子库安装指令:
npm i tsparticles --save
如果按照官方文档使用 npm i react-particles-js 会报 Can't resolve 'tsparticles' in 'D:\...\...\node_modules\react-particles-js\cjs' 的错误。
P34
动态路由这部分因为 Switch 改为 Routes 且 Route 里面的 component 变为 element,组件带入的方式也不一样,因此 LocalRouterMap array 的 value 要用<>包裹组件:
import React, { useState, useEffect } from "react";
import Home from "../../views/sandbox/home/Home";
import RightList from "../../views/sandbox/right-manage/RightList";
import RoleList from "../../views/sandbox/right-manage/RoleList";
import UserList from "../../views/sandbox/user-manage/UserList";
import NewsCategory from "../../views/sandbox/news-manage/NewsCategory";
import NewsAdd from "../../views/sandbox/news-manage/NewsAdd";
import NewsDraft from "../../views/sandbox/news-manage/NewsDraft";
import NoPermission from "../../views/sandbox/nopermission/NoPermission";
import Audit from "../../views/sandbox/audit-manage/Audit";
import AuditList from "../../views/sandbox/audit-manage/AuditList";
import Unpublished from "../../views/sandbox/publish-manage/Unpublished";
import Published from "../../views/sandbox/publish-manage/Published";
import Sunset from "../../views/sandbox/publish-manage/Sunset";
import { Routes, Route, Navigate } from "react-router-dom";
import axios from "axios";
const LocalRouterMap = {"/home": <Home/>,"/user-manage/list": <UserList/>,"/right-manage/role/list": <RoleList/>,"/right-manage/right/list": <RightList/>,"/news-manage/add": <NewsAdd/>,"/news-manage/draft": <NewsDraft/>,"/news-manage/category": <NewsCategory/>,"/audit-manage/audit": <Audit/>,"/audit-manage/list": <AuditList/>,"/publish-manage/unpublished": <Unpublished/>,"/publish-manage/published": <Published/>,"/publish-manage/sunset": <Sunset/>,
};export default function NewsRouter() {const [backRouteList, setbackRouteList] = useState([]);useEffect(() => {Promise.all([axios.get("http://localhost:8000/rights"),axios.get("http://localhost:8000/children"),]).then((res) => {setbackRouteList([...res[0].data, ...res[1].data]);});}, []);return (<Routes>{backRouteList.map((item) => (<Routepath={item.key}key={item.key}element={LocalRouterMap[item.key]}/>))}<Route path="/" element={<Navigate replace from="/" to="/home" />} /><Route path="*" element={<NoPermission />} /></Routes>);
}
另外视频中说要在 Route 加上 exact 精准匹配,但如果你是安装最新版 React router dom (V6↑) 就不需要加,本身就会精准匹配。
P38
我用 className 的方式不成功,如果有跟我一样用 className 没办法隐藏其他步骤内容的可以改成使用 style 直接设内联样式:
<div style={{ display: current === 0 ? "" : "none" }}>111
</div><div style={{ display: current === 1 ? "" : "none" }}>222
</div><div style={{ display: current === 2 ? "" : "none" }}>333
</div>
P41
可以把 props.history.push 改成使用 useNavigate
import { useNavigate } from "react-router";
const navigate = useNavigate();
// ...
navigate(auditState === 0 ? "/news-manage/draft" : "/audit-manage/list");
P43
如果你和我一样无法使用 props.match.params.id 可以改为使用 useParams 这个 hook:
import React, { useEffect } from "react";
import { useParams } from "react-router";
import { PageHeader, Descriptions } from "antd";export default function NewsPreview(props) {const params = useParams();useEffect(() => {console.log(params.id); // 3}, []);//...
}
P45
props.history.goBack() 可以改为 navigate(-1):
import { useNavigate } from "react-router";
const navigate = useNavigate();<PageHeaderclassName="site-page-header"title={I18n.t("AddNew")}onBack={() => navigate(-1)}
/>
</PageHeader>
P50
之前 userlist 的筛选部分好像有漏掉,...list.filter((item) => item.username === username) 是加上自己的 user data, ...list.filter((item) => item.region === region && roleObj[item.roleId] === "editor" ) 又包括自己的 user data,所以需要加一个判断 && item.username !== username 避免重复把自己的 user data 放进去。
// views/sandbox/audit-manage/Audit.js
setdataSource(roleObj[roleId] === "superadmin"? list: [...list.filter((item) => item.username === username),...list.filter((item) =>item.region === region &&roleObj[item.roleId] === "editor" &&item.username !== username // add this line),]
);
P67
不能重复点赞的部分我是用 localStorage 简单实现的,会有很多弊端,不过暂时能用就行。
// Detail.js
import { useParams } from "react-router";
// ...
const params = useParams();
const [newsInfo, setNewsInfo] = useState([]);
let star = localStorage.getItem("star") || [];
// ...
const handleStar = () => {if (!star.includes(params.id.toString())) {updateNews(params.id, {star: newsInfo.star + 1,}).then(() => {setRefresh();const arr = [...star];localStorage.setItem("star", arr.concat(params.id));}).catch((e) => console.log(e));} else {notification.info({message: I18n.t("error"),description: I18n.t("starError"),placement: "bottomRight",});}
};
进阶: 多语系网站
多语系的部分我个人是习惯用 I18n,安装指令如下:
npm install i18n-js
在 src 底下新增一个 i18n 资料夹,里面包括:i18n.js、en.js、zh-cn.js、zh-tw.js
// i18n.js
import I18n from "i18n-js";
import zhTW from "./zh-tw";
import zhCN from "./zh-cn";
import en from "./en";I18n.missingTranslation = (scope) => {return scope;
};
I18n.translations = {"zh-tw": zhTW,"zh-cn": zhCN,en,
};export default I18n;
// zh-cn.js
export default {// LoginTitle: "全球新闻发布管理系统",Login: "登入",Username: "帐号",Password: "密码",Remember: "记住帐号",Forgot: "忘记密码",Or: "或者",Register: "注册"
}
然后把网站中所有会使用到的文字翻译成对应的语言存放在语系档案中,接着在需要使用到翻译的地方引入 I18n 就能够转换语系:
import I18n from "../../i18n/i18n";
// for example
<h2>{I18n.t("Title")}</h2>
我的习惯是写一个切换语系的menu在使用者操作处,点击语系之后就会调用下面这个方法:
const setLanguage = (locale) => {localStorage.setItem("locale", locale);window.location.reload();};

如此一来本地的 locale 就会更改,然后在 App.js 中我会写一个 useEffect 用于判别目前本地有没有储存语系,如果没有就使用浏览器语系navigator.language:
import React, { useEffect } from "react";
import "./App.css";
import IndexRouter from "./router/IndexRouter";
import I18n from "i18n-js";function App() {useEffect(() => {if (localStorage.getItem("locale")) {I18n.locale = localStorage.getItem("locale");} else {I18n.locale = window.navigator.language.toLowerCase();}}, []);return (<IndexRouter></IndexRouter>);
}export default App;
接口数据
接口数据部分为个人看视频手打的,不保证完全一致。
{"news": [{"id": 1,"title": "11111","author": "admin","categoryId": 1,"region": "","roleId": 1,"auditState": 2,"publishState": 1,"content": "<p></p>測試\n","createTime": 1615780184222,"star": 0,"view": 0},{"id": 2,"title": "22222","author": "admin","categoryId": 3,"region": "","roleId": 1,"auditState": 2,"publishState": 1,"content": "<p></p>測試\n","createTime": 1615780132422,"star": 0,"view": 0}],"categories": [{"id": 1,"title": "时事新闻","value": "时事新闻"},{"id": 2,"title": "环球经济","value": "环球经济"},{"id": 3,"title": "科学技术","value": "科学技术"},{"id": 4,"title": "军事世界","value": "军事世界"},{"id": 5,"title": "世界体育","value": "世界体育"},{"id": 6,"title": "生活理财","value": "生活理财"}],"regions": [{"id": 1,"title": "亚洲","value": "亚洲"},{"id": 2,"title": "欧洲","value": "欧洲"},{"id": 3,"title": "北美洲","value": "北美洲"},{"id": 4,"title": "南美洲","value": "南美洲"},{"id": 5,"title": "非洲","value": "非洲"},{"id": 6,"title": "大洋洲","value": "大洋洲"},{"id": 7,"title": "南极洲","value": "南极洲"}],"roles": [{"id": 1,"roleName": "超级管理员","roleType": 1,"rights": ["/user-manage","/right-manage","/right-manage/role/list","/right-manage/right/list","/right-manage/role/update","/right-manage/role/delete","/right-manage/right/update","/right-manage/right/delete","/news-manage","/news-manage/list","/news-manage/add","/news-manage/update/:id","/news-manage/preview/:id","/news-manage/draft","/news-manage/category","/audit-manage","/audit-manage/audit","/audit-manage/list","/publish-manage","/publish-manage/unpublished","/publish-manage/published","/publish-manage/sunset","/home","/user-manage/delete","/user-manage/add","/user-manage/update","/user-manage/list"]},{"id": 2,"roleName": "区域管理员","roleType": 2,"rights": ["/user-manage","/user-manage/add","/user-manage/delete","/user-manage/update","/user-manage/list","/news-manage","/news-manage/list","/news-manage/add","/news-manage/update/:id","/news-manage/preview/:id","/news-manage/draft","/news-manage/category","/audit-manage","/audit-manage/audit","/audit-manage/list","/publish-manage","/publish-manage/unpublished","/publish-manage/published","/publish-manage/sunset","/home"]},{"id": 3,"roleName": "区域编辑","roleType": 3,"rights": ["/news-manage","/news-manage/list","/news-manage/add","/news-manage/update/:id","/news-manage/preview/:id","/news-manage/draft","/audit-manage","/audit-manage/list","/publish-manage","/publish-manage/unpublished","/publish-manage/published","/publish-manage/sunset","/home"]}],"users": [{"id": 1,"username": "admin","password": 123456,"roleState": true,"default": true,"region": "","roleId": 1},{"id": 2,"username": "铁锤","password": 123,"roleState": true,"default": false,"region": "亚洲","roleId": 2},{"id": 3,"username": "钢弹","password": 123,"roleState": true,"default": false,"region": "南极洲","roleId": 2},{"id": 4,"username": "诸葛山珍","password": 123,"roleState": true,"default": false,"region": "","roleId": 2},{"id": 5,"username": "西门吹灯","password": 123,"roleState": true,"default": false,"region": "南极洲","roleId": 2}],"rights": [{"id": 1,"title": "首页","key": "/home","pagepermission": 1,"grade": 1},{"id": 2,"title": "用户管理","key": "/user-manage","pagepermission": 1,"grade": 1},{"id": 7,"title": "权限管理","key": "/right-manage","pagepermission": 1,"grade": 1},{"id": 14,"title": "新闻管理","key": "/news-manage","pagepermission": 1,"grade": 1},{"id": 21,"title": "审核管理","key": "/audit-manage","pagepermission": 1,"grade": 1},{"id": 24,"title": "发布管理","key": "/publish-manage","pagepermission": 1,"grade": 1}],"children": [{"id": 3,"title": "添加用户","rightId": 2,"key": "/user-manage/add","grade": 2},{"id": 4,"title": "删除用户","rightId": 2,"key": "/user-manage/delete","grade": 2},{"id": 5,"title": "修改用户","rightId": 2,"key": "/user-manage/update","grade": 2},{"id": 6,"title": "用户列表","rightId": 2,"key": "/user-manage/list","pagepermission": 1,"grade": 2},{"id": 8,"title": "角色列表","rightId": 7,"key": "/right-manage/role/list","pagepermission": 1,"grade": 2},{"id": 9,"title": "权限列表","rightId": 7,"key": "/right-manage/right/list","pagepermission": 1,"grade": 2},{"id": 10,"title": "修改角色","rightId": 7,"key": "/right-manage/role/update","grade": 2},{"id": 11,"title": "删除角色","rightId": 7,"key": "/right-manage/role/delete","grade": 2},{"id": 12,"title": "修改权限","rightId": 7,"key": "/right-manage/right/update","grade": 2},{"id": 13,"title": "删除权限","rightId": 7,"key": "/right-manage/right/delete","grade": 2},{"id": 15,"title": "新闻列表","rightId": 14,"key": "/news-manage/list","grade": 2},{"id": 16,"title": "撰写新闻","rightId": 14,"key": "/news-manage/add","pagepermission": 1,"grade": 2},{"id": 17,"title": "新闻更新","rightId": 14,"key": "/news-manage/update/:id","routepermission": 1,"grade": 2},{"id": 18,"title": "新闻预览","rightId": 14,"key": "/news-manage/preview/:id","routepermission": 1,"grade": 2},{"id": 19,"title": "草稿箱","rightId": 14,"key": "/news-manage/draft","pagepermission": 1,"grade": 2},{"id": 20,"title": "新闻分类","rightId": 14,"key": "/news-manage/category","pagepermission": 1,"grade": 2},{"id": 22,"title": "审核新闻","rightId": 21,"key": "/audit-manage/audit","pagepermission": 1,"grade": 2},{"id": 23,"title": "审核列表","rightId": 21,"key": "/audit-manage/list","pagepermission": 1,"grade": 2},{"id": 25,"title": "待发布","rightId": 24,"key": "/publish-manage/unpublished","pagepermission": 1,"grade": 2},{"id": 26,"title": "已发布","rightId": 24,"key": "/publish-manage/published","pagepermission": 1,"grade": 2},{"id": 27,"title": "已下线","rightId": 24,"key": "/publish-manage/sunset","pagepermission": 1,"grade": 2}]
}
部署网站及接口
前置:需先注册 netlify(布署网站) 及 heroku (布署接口) 帐号及新增一个 Github repo。
-
首先确保 package.json 中的 dependencies 有 json-server,如果没有请记得安装:
npm i --save json-server并且将专案中所有使用 axios 请求的网址后面加上
/api比如http://localhost:5000/news改为http://localhost:5000/api/news。 -
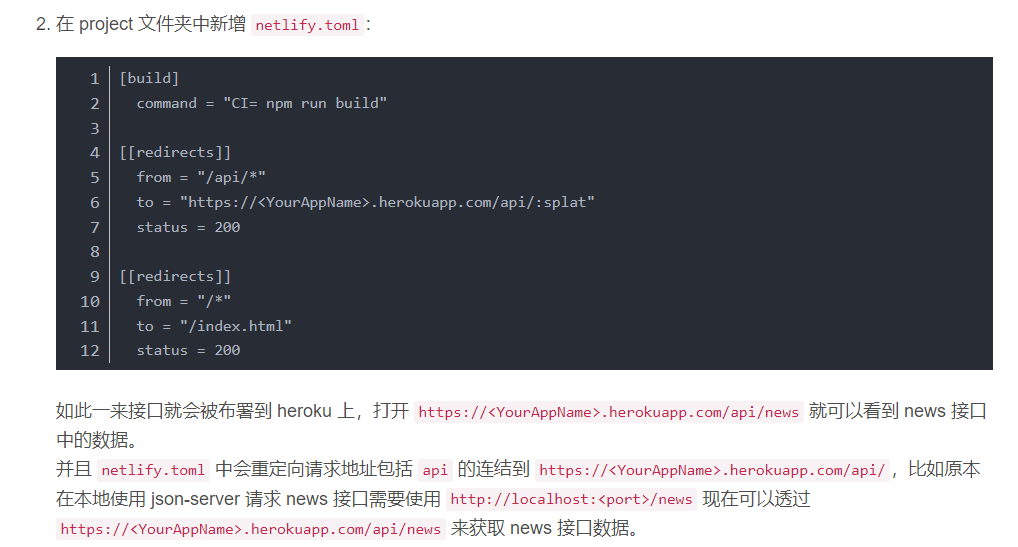
在 project 文件夹中新增
netlify.toml:[build]command = "CI= npm run build"[[redirects]]from = "/api/*"to = "https://<YourAppName>.herokuapp.com/api/:splat"status = 200[[redirects]]from = "/*"to = "/index.html"status = 200如此一来接口就会被布署到 heroku 上,打开
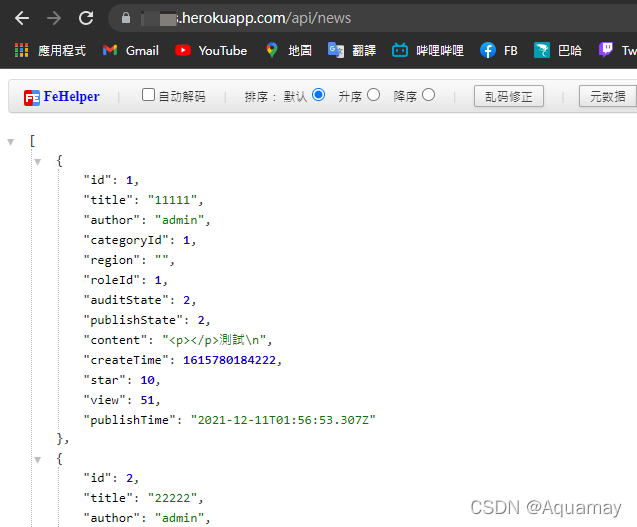
https://<YourAppName>.herokuapp.com/api/news就可以看到 news 接口中的数据。
并且netlify.toml中会重定向请求地址包括api的连结到https://<YourAppName>.herokuapp.com/api/,比如原本在本地使用 json-server 请求 news 接口需要使用http://localhost:<port>/news现在可以透过https://<YourAppName>.herokuapp.com/api/news来获取 news 接口数据。 -
在project根目录底下的
package.json里面 scripts 处加上json-server-dev及json-server-prod:"scripts": {"start": "react-scripts start","build": "react-scripts build","test": "react-scripts test","eject": "react-scripts eject","json-server-dev": "nodemon mock-api/server.js","json-server-prod": "node mock-api/server.js"}, -
在根目录底下新增
Procfile(注意没有任何副档名):web: npm run json-server-prod -
在根目录底下新增
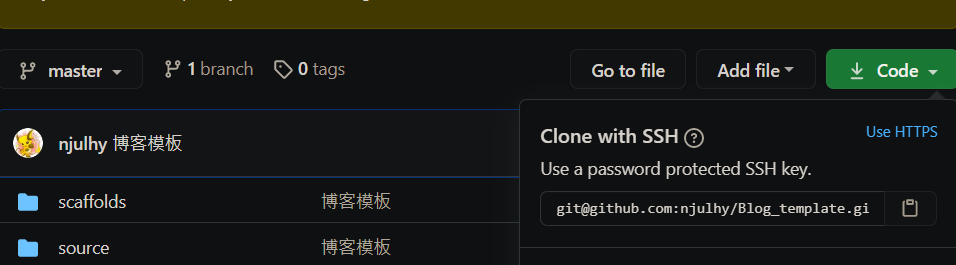
mock-api文件夹,并把 json-server 用到的db.json放入,再新增一个server.js:const jsonServer = require("json-server"); const server = jsonServer.create(); const router = jsonServer.router("mock-api/db.json"); const middlewares = jsonServer.defaults(); const port = process.env.PORT || 8000; // 自行改为你的接口 portserver.use(middlewares); server.use("/api", router);server.listen(port);最后将整个 project push 到 Github 上 (ex:
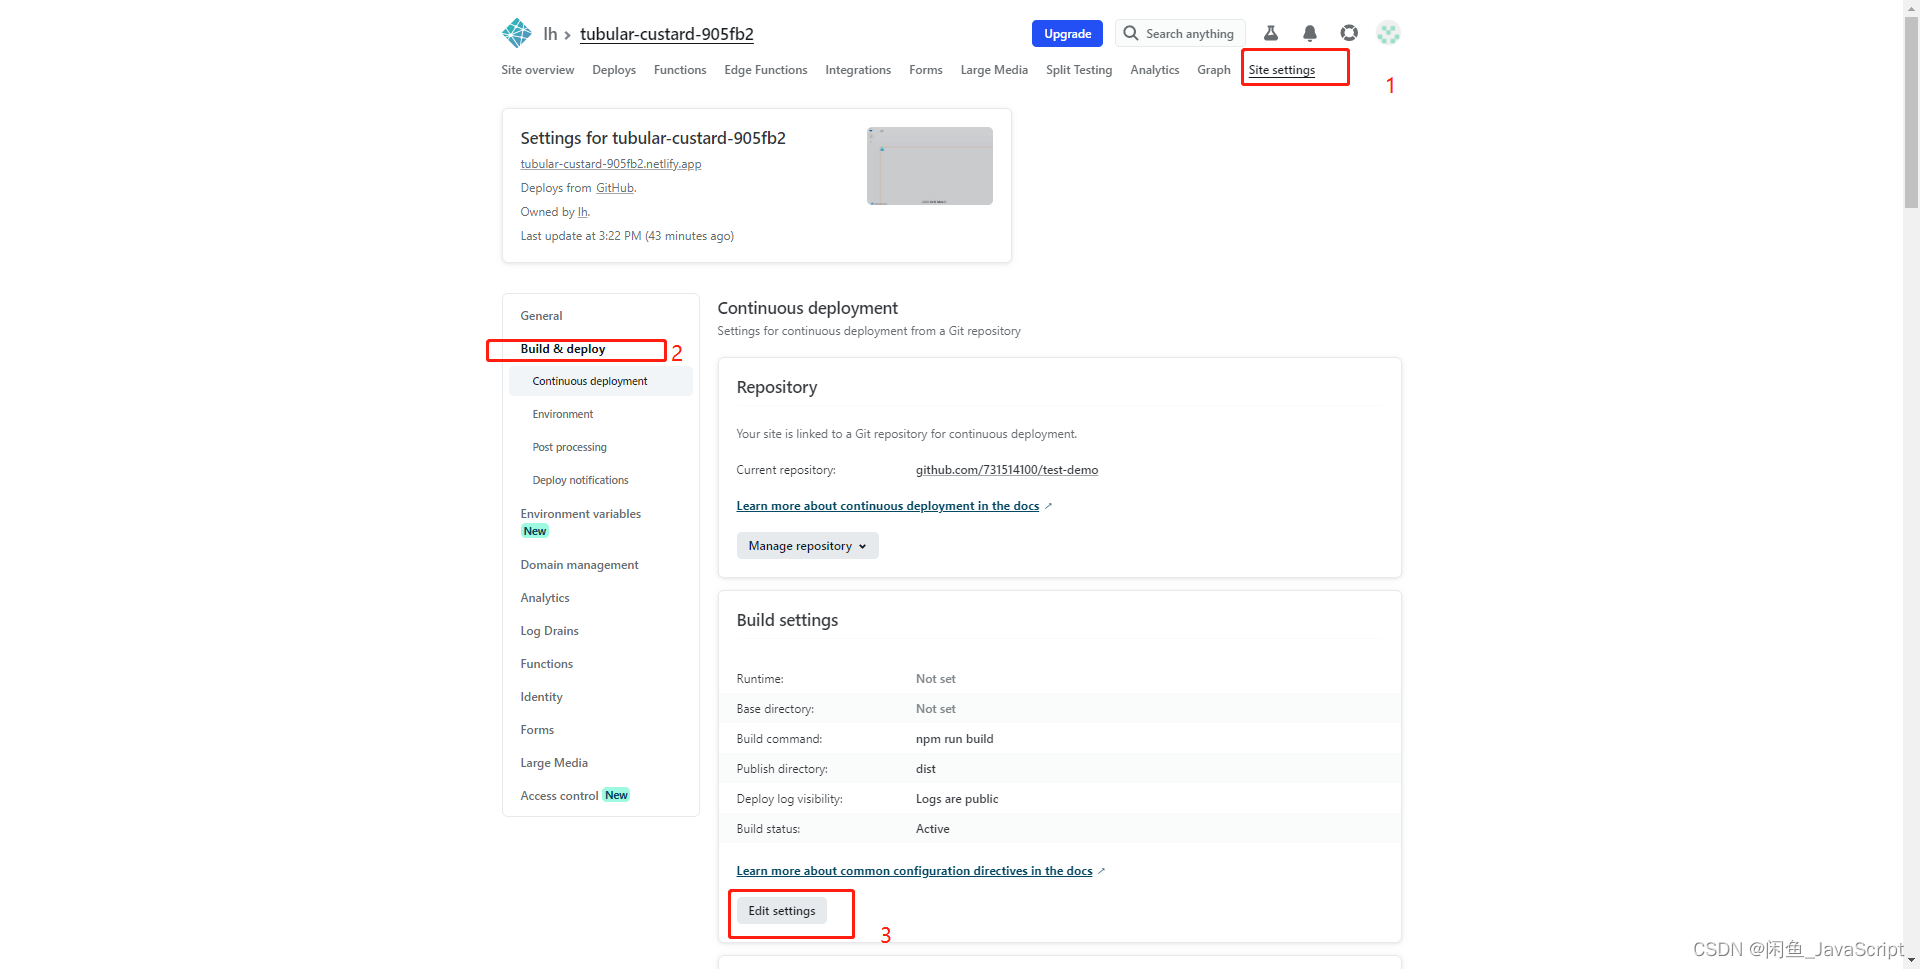
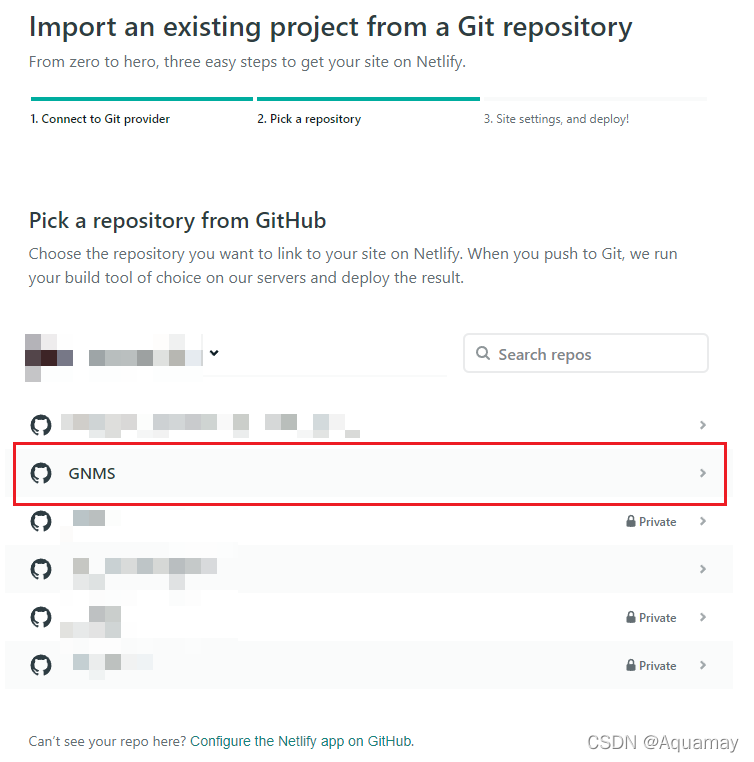
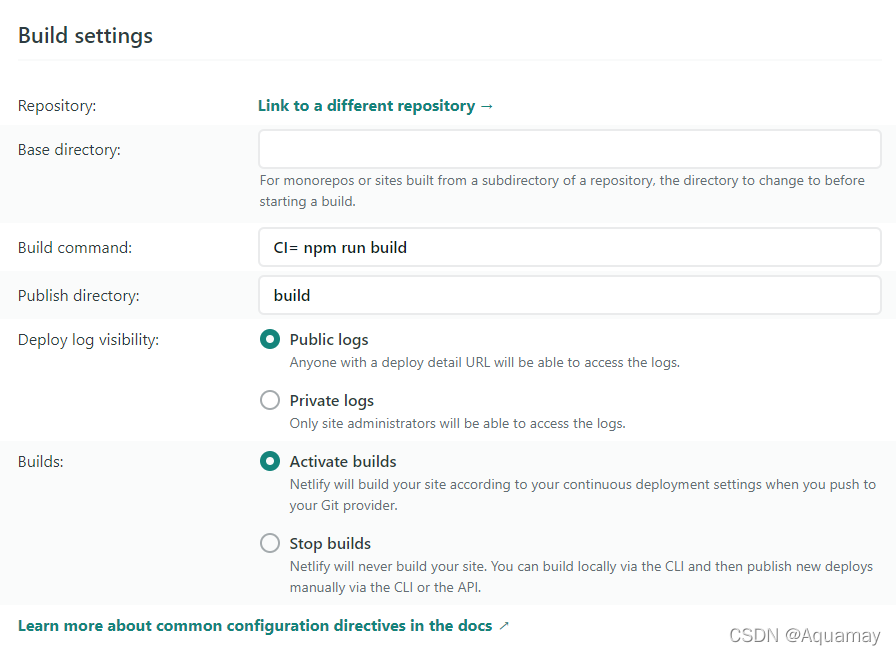
yourUserName/NewsSystem),然后到 netlify 新增一个 site,选择连接 Github 的 NewsSystem repo,并且选择你使用的 branch,Build Command 输入CI= npm run build,publish directory 写上build,然后等待 netlify 布署完你的网站就能正常浏览了。
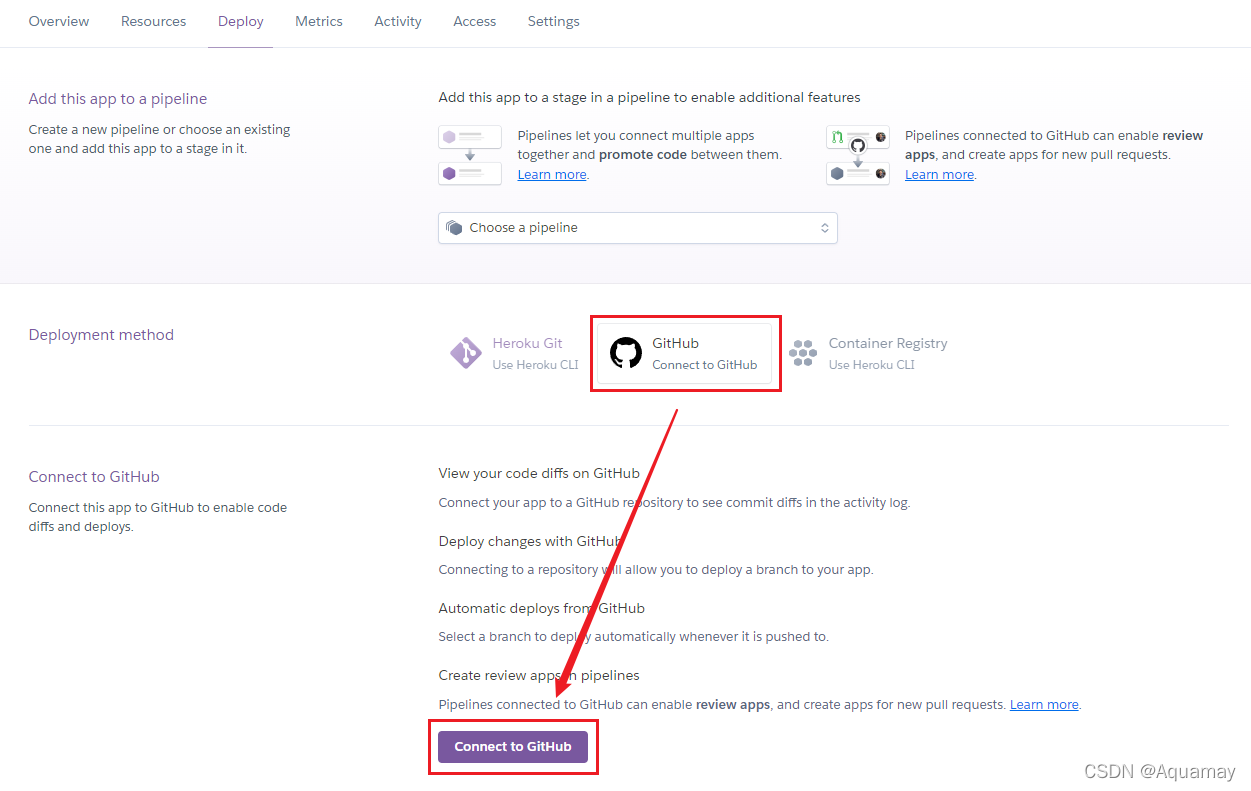
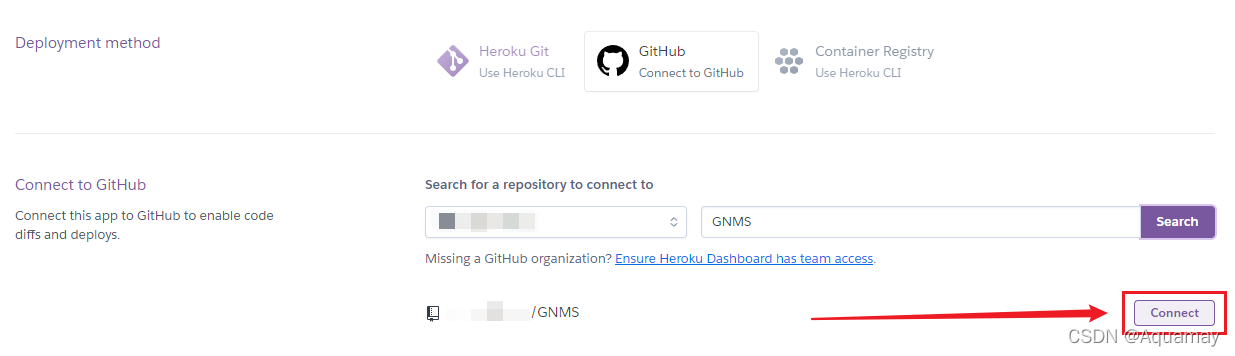
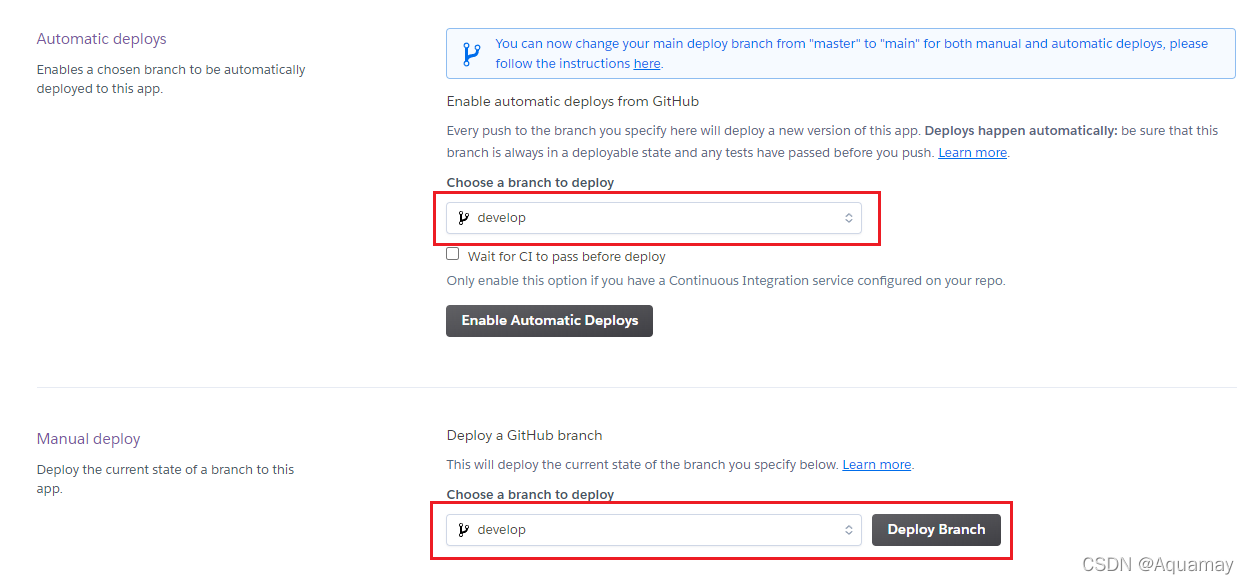
但此时你的接口还没有布署上去,所以网站也只是个空壳,所以我们需要到 heroku Create New App,新增完之后到 Deploy - Github 连接你的 Github NewsSystem repo 并且记得修改 branch,选择完 branch 之后启用自动布署Enable Automatic Deploys,最后按下Deploy Branch将接口布署到 Heroku。
/
/
部署成功之后就能透过 heroku app 网址后面加上/app来访问接口:

待 heroku 和 netlify 两个都布署完毕之后,你就可以透过 netlify 提供的网址浏览器的网站啦!因为你开启了自动布署,所以往后你只需要将修改的内容 push 到 Github 就会自动布署到 netlify 和 heroku,就不需要再两边都重新布署,省时省力!