IAR中的参数变量表
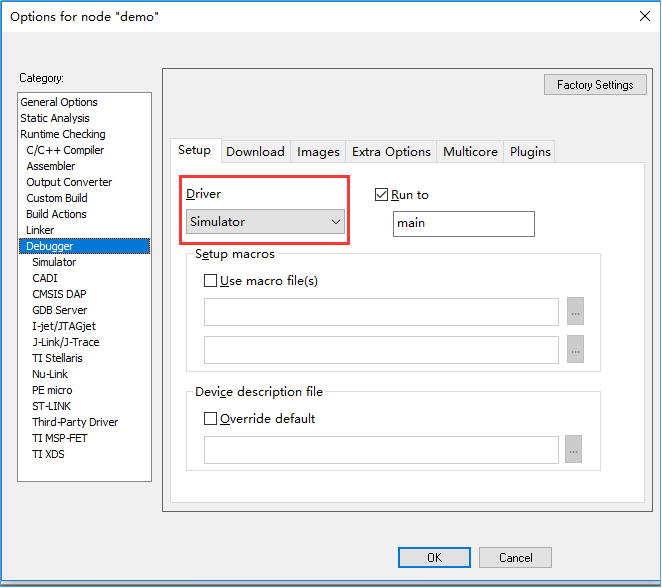
__iar_program_start在哪里定义/main之前做了什么
在main()之前,IAR都做了啥
cortex-m3启动代码详解
在IAR中利用AStyle插件格式化代码
IAR配色方案
--style=allman --pad-oper --max-code-length=150 --add-braces --align-pointer=name --max-continuation-indent=40 --delete-empty-lines --break-blocks --indent=spaces=2 --indent-switches --add-one-line-braces --unpad-paren --pad-comma --pad-header --attach-return-type --attach-return-type-decl $FILE_PATH$
0 分散加载
https://blog.csdn.net/weixin_42378319/article/details/106481132
变量定位
在IAR的集成开发环境中实现数据变量定位方法如下三种
Segger 调试
https://wiki.segger.com/J-Link_Commander
调试神器SEGGER_RTT移植使用
嵌入式开发笔记——调试组件SEGGER_RTT
Segger RTT使用注意事项
RTT控制块的位置
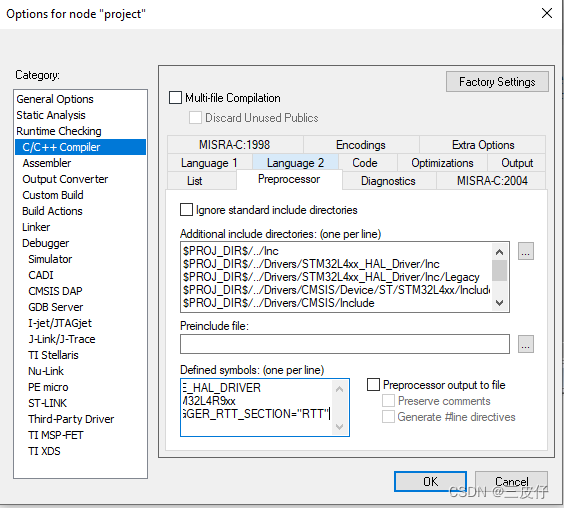
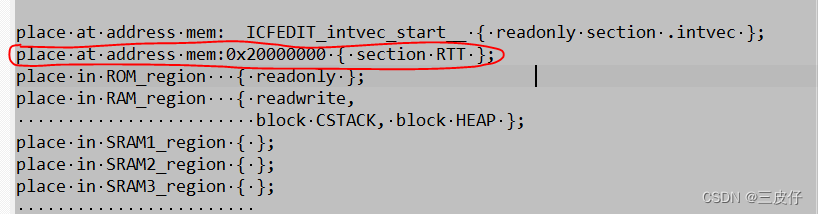
因为RTTViewer在内存中扫描控制块时,其默认扫描的地址范围可能与芯片的实际内存空间不一致,所以最好定义SEGGER_RTT_SECTION,并且修改连接脚本,
将_SEGGER_RTT变量放置到默认的扫描空间内,这样可有效避免打开RTTViewer,却没有任何打印信息的问题
IAR下的配置如下截图, gcc工具链下操作类似,MDK的连接脚本的语法没研究过~~~
1 IAR在线调试时用DEBUG打印调试信息
#include "stdafx.h"
#include<stdio.h>
#include<stdlib.h>
#include<string.h>//是否开启DEBUG模式
//#define _DEBUG_ 0    //不开启
#define _DEBUG_ 1    //开启
#if _DEBUG_
#define PRINTF(...) printf(__VA_ARGS__)
#else
#define PRINTF(...)
#endifint main()
{int a, b, c;b = 1;c = 2;a = b + c;PRINTF("a = %d\n", a);getchar();return 0;
}
同时在调试界面打开 terminal I/O

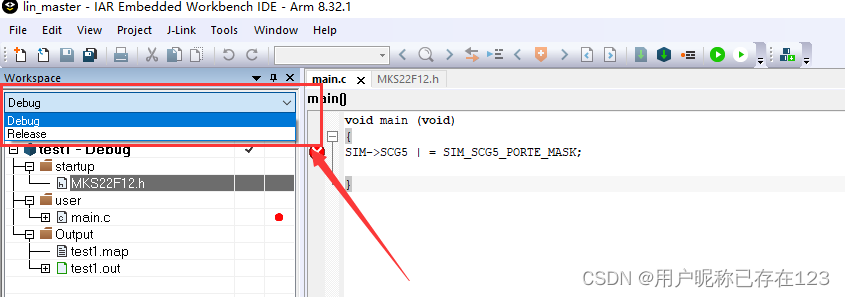
2 IAR添加debug和release选项
在IAR的Workspace窗口顶部的下拉菜单中有两个选项,Debug和Release。
名字和数量可以在菜单栏的Project–>Edit Configuration中增删修改
每个选项都对应着一种配置(也就是项目名称右击Options里的内容),互相是独立的。
所以用起来很方便,直接在不同的配置间切换。
3 Pragma directives

3.1 location


3.2 _Pragma 之location字段——(IAR使用基础篇)
今天我们就来学习编译指示指令:location
代码如下:
#define USB_GLOBAL _Pragma("location = \"m_usb_global\"")
#define USB_BDT _Pragma("location = \"m_usb_bdt\"")
这段代码的作用是,定义一个宏,用该宏定义的变量位于“m_usb_global”节中
/*s_UsbDevice is located in section m_usb_global*/
USB_GLOBAL static usb_device_struct_t s_UsbDevice[USB_DEVICE_CONFIG_NUM];
其实还有等效的代码:
#pragma location = "m_usb_global"
/*s_UsbDevice is located in section m_usb_global*/
usb_device_struct_t s_UsbDevice[USB_DEVICE_CONFIG_NUM];
前一种方法一劳永逸,下次再定义变量位于指定的section时,直接用宏定义就可以了,而第二种每次都需要用伪指令指定某一个section。
这些section都是在.icf文件中定义。
注意: 由static修饰的变量,_Pragma必须放在static之前,否则_Pragma不生效
3.3 data_alignment
data_alignment用于设置变量的起始地址对齐字节数,1表示起始地址是1字节的整数倍,2表示起始地址是2字节的整数倍,4表示起始地址是4字节的整数倍
Data alignment(数据、内存对齐)漫谈

/* Macro to get variable aligned on 32-bytes,needed for cache maintenance purpose */
#if defined   (__GNUC__)        /* GNU Compiler */#define ALIGN_32BYTES(buf)  buf __attribute__ ((aligned (32)))
#elif defined (__ICCARM__)    /* IAR Compiler */#define ALIGN_32BYTES(buf) _Pragma("data_alignment=32") buf
#elif defined   (__CC_ARM)      /* ARM Compiler */#define ALIGN_32BYTES(buf) __align(32) buf
#endif
3.4 pack
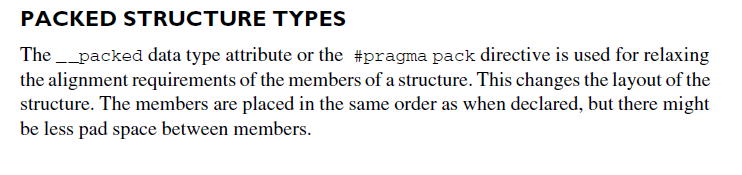
pack 用来设置结构体和联合体的最小对齐单元,pack指令只有使用在声明部分才起作用,在定义处不起作用。
如果结构体定义中包含另一个结构体,则pack指令只对当前结构体有效,对内部的结构体无效,如果内部的结构体也要对齐,则需要在内部结构体的声明处再次使用pack指令
IAR中使用struct强制对齐时的一个问题及解决
#pragma pack(1)
struct ADE9000_new_event_s
{RTC_date_time_t reset_date_time;  /* 复位事件计数的时间 */uint16_t count;                   /* 新产生事件个数 */uint16_t start_index;             /* 新事件的起始编号 */uint16_t end_index;               /* 新事件的结束编号 */
};
typedef struct ADE9000_new_event_s ADE9000_new_event_t;struct ADE9000_event_queue_s
{uint8_t current_index;ADE9000_event_value_t event_value[EVENT_QUEUE_ITEMS];
};
typedef struct ADE9000_event_queue_s ADE9000_event_queue_t;
#pragma pack()


4 switch 语句中省略号与 case 范围
这个是gcc对c语言中switch case的扩展,所以只能用gcc编译通过.
在标准 C 中,switch 语句中的 case 标签只能有一个关联值。Sun C 允许使用某些编译器中使用的扩展(称为 case 范围)。
case 范围指定要与单个 case 标签关联的值范围。case 范围语法为:
case low … high :
case 范围的行为就好像为从 low 到 high(含)的给定范围内的每个值指定了 case 标签。(如果 low 和 high 相等,则 case 范围仅指定一个值。)较低值和较高值必须符合 C 标准的要求。也就是说,它们必须是有效的整数常量表达式(C 标准 6.8.4.2)。case 范围和 case 标签可以随意混合,一个 switch 语句中可以指定多个 case 范围。
编程示例:
enum kind { alpha, number, white, other };
enum kind char_class(char c);
{     enum kind result;switch(c) {case 'a' ... 'z':case 'A' ... 'Z':result = alpha;break;case '0' ... '9':result = number;break;case ' ':case '\n':case '\t':case '\r':case '\v':result = white;break;default:result = other;break;}return result; }
除了 case 标签的现有要求以外的错误情形:
-如果 low 的值大于 high 的值,则编译器会拒绝代码并显示错误消息。(其他编译器的行为不一致,因此,只有通过错误消息才能确保程序在由其他编译器编译时不会表现出不同的行为。)
-如果 case 标签的值在已在 switch 语句中使用的 case 范围内,则编译器会拒绝代码并显示错误消息。
-如果 case 范围重叠,则编译器会拒绝代码并显示错误消息。
请注意,如果 case 范围的一个端点是数值,则在省略号 (…) 两侧留空格以避免其中一个点被视为小数点。
示例:
case 0...4; // errorcase 5 ... 9; // ok
5 IARproject中创建和使用模板
怎样在IARproject中创建和使用模板
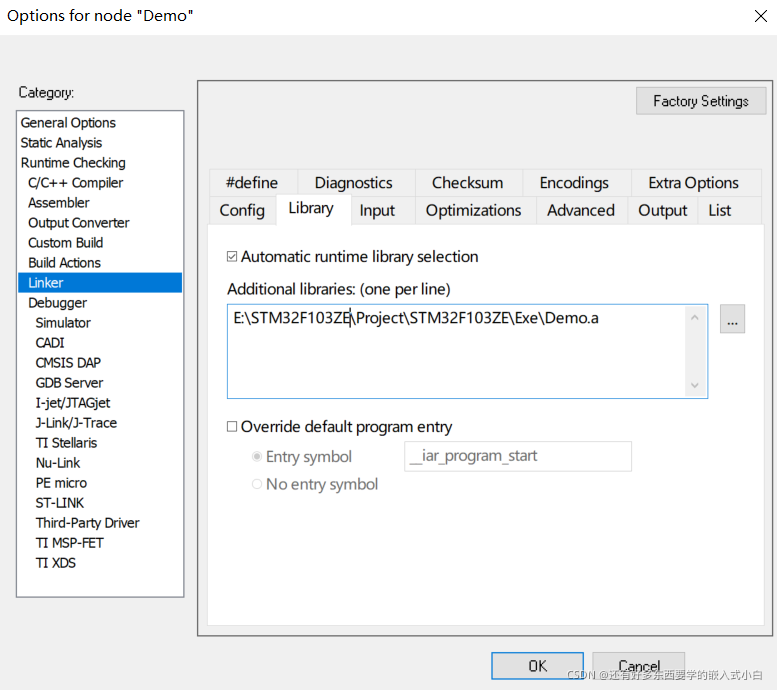
6 IAR 生成库文件
IAR中将部分文件编译成库函数.a及如何调用库函数
https://shareappscrack.com/iar-embedded-workbench-for-arm/?token=51188903
http://clickdown.org/category/how-to-download-crack/
7 VScode
使用VSCode编译调试IAR的stm32工程
Using Visual Studio Code with IAR Embedded Workbench
8 source insight
source insight的使用方法逆天整理
SourceInsight 快速、精确导入 IAR/MDK 工程脚步–附:源码
'''
si4project_filelist.py
This tool will generate source insight 4 project file list
from build output file (*.dep),then we can import the
file list in the source insight 4 project.
'''
import os
import sys
import xml.etree.ElementTree as ET
from datetime import datetime
import re# 1、Find .dep file
projectfilename = ''
sourcefile = ''
outputfile = ''
TOOLKIT_PATH = ''for entry in os.scandir():if entry.is_file():if entry.name.endswith('.eww'):projectfilename = entry.name# check IAR install path and get TOOLKIT_DIRif os.path.exists(r'C:\Program Files (x86)\IAR Systems') == False:print(r'Please input the TOOLKIT path(e.g. C:\Program Files (x86)\IAR Systems\Embedded Workbench 8.0\arm) or press ENTER to ignor')TOOLKIT_PATH = input()if os.path.exists(TOOLKIT_PATH) == False:print('Path not exist, ignor this part of file')TOOLKIT_PATH = ''elif os.path.exists(os.path.join(TOOLKIT_PATH, 'inc')) == False:print('Path error, ignor this part of file')TOOLKIT_PATH = ''else:for DIR in os.scandir(r'C:\Program Files (x86)\IAR Systems'):if DIR.name.startswith('Embedded Workbench'):TOOLKIT_PATH = r'C:\Program Files (x86)\IAR Systems\Embedded Workbench 8.0\arm'.replace('Embedded Workbench 8.0', DIR.name)# find current targetwsdtfile = os.path.join(os.getcwd(), 'settings')wsdtfile = os.path.join(wsdtfile, entry.name.replace('.eww', '.wsdt'))if os.path.exists(wsdtfile):tree = ET.ElementTree(file=wsdtfile)ConfigDictionary = tree.find('ConfigDictionary')CurrentConfigs = ConfigDictionary.find('CurrentConfigs')TargetName = CurrentConfigs.find('Project').text.split('/')[1]depfilename = CurrentConfigs.find('Project').text.split('/')[0] + '.dep'if os.path.exists(depfilename):sourcefile = depfilenameoutputfile = os.path.splitext(projectfilename)[0]breakprint('Please build the project once')input()sys.exit(0)elif entry.name.endswith('.uvproj') or entry.name.endswith('.uvprojx'):projectfilename = entry.nameif entry.name.endswith('.uvproj'):uvoptfile = entry.name.replace('.uvproj', '.uvopt')elif entry.name.endswith('.uvprojx'):uvoptfile = entry.name.replace('.uvprojx', '.uvoptx')tree = ET.ElementTree(file=uvoptfile)# find current targetfor tag in tree.findall('Target'):TargetOption = tag.find('TargetOption')OPTFL = TargetOption.find('OPTFL')IsCurrentTarget = int(OPTFL.find('IsCurrentTarget').text)if IsCurrentTarget:TargetName = tag.find('TargetName').textbreak# find dep file of current targetExtensions = tree.find('Extensions')if None == Extensions.findtext('nMigrate'):# ide is keil4depfilename = os.path.splitext(projectfilename)[0] + '_' + TargetName + '.dep'if os.path.exists(depfilename):sourcefile = depfilenameoutputfile = os.path.splitext(projectfilename)[0]else:# ide is keil5tree = ET.ElementTree(file=entry.name)for tag in tree.find('Targets').findall('Target'):if tag.find('TargetName').text == TargetName:TargetOption = tag.find('TargetOption')TargetCommonOption = TargetOption.find('TargetCommonOption')OutputDirectory = TargetCommonOption.find('OutputDirectory').textOutputDirectory = os.path.normpath(os.path.join(os.getcwd(), OutputDirectory))depfilename = os.path.splitext(projectfilename)[0] + '_' + TargetName + '.dep'depfilename = os.path.join(OutputDirectory, depfilename)if os.path.exists(depfilename):sourcefile = depfilenameoutputfile = os.path.splitext(projectfilename)[0]breakif '' == sourcefile:print('Please build the project once')input()sys.exit(0)breakif '' == projectfilename:print('Can not find project file, enter any key to exit')input()sys.exit(0)# 2、parse the seleted dep file
parsefile = open(sourcefile, 'r',encoding="utf-8")
si4filelist = []
if projectfilename.endswith('.eww'):tree = ET.ElementTree(file=parsefile)for tag in tree.findall('configuration'):if TargetName == tag.find('name').text:output_tag = tag.find('outputs')for elem in output_tag.findall('file'):if elem.text.startswith('$PROJ_DIR$'):if elem.text.endswith('.c') or elem.text.endswith('.s') or elem.text.endswith('.h'):si4filelist.append(os.path.abspath(elem.text.replace('$PROJ_DIR$', os.getcwd()))+'\n')elif TOOLKIT_PATH != '' and elem.text.startswith('$TOOLKIT_DIR$'):if elem.text.endswith('.c') or elem.text.endswith('.s') or elem.text.endswith('.h'):si4filelist.append(elem.text.replace('$TOOLKIT_DIR$', TOOLKIT_PATH)+'\n')breakelif projectfilename.endswith('.uvproj') or projectfilename.endswith('.uvprojx'):for line in parsefile.readlines():m = re.search(r"^F \(.*?\)(?=\([\dxa-fA-F]{10}\))|^I \(.*?\)(?=\([\dxa-fA-F]{10}\))", line)if None != m:relpath = m.group(0)[3:-1]si4filelist.append(os.path.abspath(relpath)+'\n')si4filelist = set(si4filelist)# 3、save the lists
outputfile = open(outputfile + '.si4project_filelist.txt', 'w')
outputfile.write('; Source Insight Project File List\n')
outputfile.write('; Project Name: '+os.path.splitext(sourcefile)[0]+'\n')
outputfile.write('; Generated by si4project_filelist.py at ' +datetime.now().strftime('%Y/%m/%d %H:%M:%S')+'\n')
outputfile.write('; Version=4.00.xxxx\n')
outputfile.write(';\n')
outputfile.write('; Each line should contain either a file name, a wildcard, or a sub-directory name.\n')
outputfile.write('; File paths are relative to the project source root directory.\n')
outputfile.write(';\n')
outputfile.writelines(si4filelist)
outputfile.close()
9 报警信息
解决 IAR中 Warning[Pa082] 的警告问题