🎈 1 参考文档
springboot 文件MultipartFile上传路径问题 | 橙熟^ _ ^-CSDN(原本采用绝对路径,参考该文章改成相对路径)
组件 | Element
🚀2 导入依赖和配置application.yml文件
2.1 在pom.xml中导入依赖
采用了mybatis-plus,需要导入依赖。
<!-- mybatis-plus-boot-starter -->
<dependency><groupId>com.baomidou</groupId><artifactId>mybatis-plus-boot-starter</artifactId><version>3.5.1</version>
</dependency>
2.2 导入依赖配置application.yml文件
server:port: 8800
spring:datasource:driver-class-name: com.mysql.cj.jdbc.Driverurl: jdbc:mysql://localhost:3306/数据库名?serverTimezone=GMT%2B8username: rootpassword: 123456
mybatis-plus:# mapper扫描mapper-locations: classpath*:mapper/**/*.xmlconfiguration:# 打印sqllog-impl: org.apache.ibatis.logging.stdout.StdOutImplfiles:upload:# 文件相对路径path: ./src/main/resources/images/
🚀3 创建数据库表和创建实体类
3.1 创建数据库files表
DROP TABLE IF EXISTS `files`;
CREATE TABLE `files`  (`id` int NOT NULL AUTO_INCREMENT COMMENT '文件id',`files_name` varchar(255) CHARACTER SET utf8mb4 COLLATE utf8mb4_0900_ai_ci NULL DEFAULT NULL COMMENT '文件名称',`type` varchar(255) CHARACTER SET utf8mb4 COLLATE utf8mb4_0900_ai_ci NULL DEFAULT NULL COMMENT '文件类型',`size` double(32, 2) NULL DEFAULT NULL COMMENT '文件大小(KB)',`url` varchar(255) CHARACTER SET utf8mb4 COLLATE utf8mb4_0900_ai_ci NULL DEFAULT NULL COMMENT '下载链接',`md5` varchar(255) CHARACTER SET utf8mb4 COLLATE utf8mb4_0900_ai_ci NULL DEFAULT NULL COMMENT '文件md5',`enable` tinyint NULL DEFAULT 1 COMMENT '链接是否可用(1:是 0:否)',`is_delete` tinyint NOT NULL DEFAULT 0 COMMENT '是否删除(1:是 0:否)',`create_time` timestamp(0) NOT NULL DEFAULT CURRENT_TIMESTAMP(0) COMMENT '创建时间',`update_time` timestamp(0) NOT NULL DEFAULT CURRENT_TIMESTAMP(0) ON UPDATE CURRENT_TIMESTAMP(0) COMMENT '更新时间',PRIMARY KEY (`id`) USING BTREE,INDEX `name`(`files_name`) USING BTREE
) ENGINE = InnoDB AUTO_INCREMENT = 9 CHARACTER SET = utf8mb4 COLLATE = utf8mb4_0900_ai_ci COMMENT = '文件表' ROW_FORMAT = Dynamic;
3.2 创建实体类Files
@Data
@TableName("files")
public class Files implements Serializable {@TableId(type = IdType.AUTO)private Integer id;//编号private String filesName;//文件名称private String type;//文件类型private Double size;//文件大小private String url;//下载链接private String md5;//文件MD5private Boolean enable;//链接是否可用(1:是 0:否)@TableField(fill = FieldFill.INSERT)@JsonFormat(pattern = "yyyy-MM-dd HH:mm:ss")private Date createTime;//创建时间@TableField(fill = FieldFill.INSERT_UPDATE)@JsonFormat(pattern = "yyyy-MM-dd HH:mm:ss")private Date updateTime;//更新时间@TableLogic()private Integer isDelete;//是否删除(1:是 0:否)
}
🚀4 创建Mapper层
4.1 创建FilesMapper。
@Mapper
public interface FilesMapper extends BaseMapper<Files> {}
4.2 创建FilesMapper.xml。
<?xml version="1.0" encoding="UTF-8"?>
<!DOCTYPE mapper PUBLIC "-//mybatis.org//DTD Mapper 3.0//EN" "http://mybatis.org/dtd/mybatis-3-mapper.dtd">
<mapper namespace="com.hyc.nsms.mapper.FilesMapper"></mapper>
🚀5 创建业务层
5.1 创建FilesService
public interface FilesService extends IService<Files> {//上传文件String upload(MultipartFile file);//下载文件void download(String filesUUID, HttpServletResponse response);
}
5.2 创建FilesServiceImpl
@Service
public class FilesServiceImpl extends ServiceImpl<FilesMapper, Files> implements FilesService {@Value("${files.upload.path}")private String filesUploadPath;//获取文件路径@Overridepublic String upload(MultipartFile file) {//将相对路径转化为绝对路径String destPath = new File(filesUploadPath).getAbsolutePath();//文件夹路径名称String originalFilename = file.getOriginalFilename();//文件大小double size = file.getSize();//文件类型String type = originalFilename.substring(originalFilename.lastIndexOf(".") + 1).toLowerCase();//使用uuid生成随机唯一值String uuid = UUID.randomUUID().toString().replaceAll("-", "");//新的文件名称,uuid+文件类型String fileUuid = uuid + "." + type;//新的文件地址,绝对路径+新的文件名称File uploadFile = new File(destPath + "/" + fileUuid);//判断配置的文件目录是否存在,若不存在则创建一个新的文件目录File parentFile = uploadFile.getParentFile();if (!parentFile.exists()) {parentFile.mkdirs();}try {String url;//获取文件的md5,通过对比文件md5,防止上传相同内容的文件String md5 = DigestUtils.md5DigestAsHex(file.getInputStream());//通过MD5来查询文件Files dbFiles = this.getFileByMD5(md5);if (dbFiles != null) {//如果数据库存在相同文件,直接获取urlurl = dbFiles.getUrl();} else {//如果数据库不存在相同文件,先存储到本地磁盘,再设置文件urlfile.transferTo(uploadFile);//把获取到的文件存储带磁盘目录url = "http://localhost:8800/files/" + fileUuid;//设置文件url}//将文件存储到数据库Files saveFile = new Files();saveFile.setFilesName(originalFilename);saveFile.setType(type);saveFile.setSize(size / 1024);//(单位:KB)saveFile.setUrl(url);saveFile.setMd5(md5);//保存操作save(saveFile);//返回文件下载路径urlreturn url;} catch (IOException e) {e.printStackTrace();return null;}}//将文件以流的形式一次性读取到内存,通过响应输出流输出到前端@Overridepublic void download(String filesUUID, HttpServletResponse response) {try {//根据文件的唯一标识码获取文件File uploadFile = new File(filesUploadPath + filesUUID);//读取文件的字节流FileInputStream fileInputStream = new FileInputStream(uploadFile);//将文件写入输入流InputStream inputStream = new BufferedInputStream(fileInputStream);byte[] buffer = new byte[inputStream.available()];inputStream.read(buffer);inputStream.close();//attachment表示以附件方式下载 inline表示在线打开 "Content-Disposition: inline; filename=文件名.png"//filename表示文件的默认名称,因为网络传输只支持URL编码的相关支付,因此需要将文件名URL编码后进行传输,前端收到后需要反编码才能获取到真正的名称response.addHeader("Content-Disposition", "attachment;filename=" + URLEncoder.encode(filesUUID, "UTF-8"));response.setContentType("application/octet-stream");//设置输出流的格式ServletOutputStream os = response.getOutputStream();os.write(buffer);//关闭fileInputStream.close();os.flush();os.close();} catch (IOException e) {e.printStackTrace();}}//通过文件MD5查询文件private Files getFileByMD5(String md5) {//查找数据库是否已经存在一样的图片QueryWrapper<Files> queryWrapper = new QueryWrapper<>();queryWrapper.eq("md5", md5);List<Files> filesList = list(queryWrapper);return filesList.size() == 0 ? null : filesList.get(0);}
}
🚀6 创建控制层和全局统一返回结果类
6.1 创建控制层FilesController
@RestController
@RequestMapping("/files")
public class FilesController {@Autowiredprivate FilesService filesService;@PostMapping("upload")public Result upload(@RequestParam MultipartFile file) {//获取上传文件String url = filesService.upload(file);return Result.ok(url);}@GetMapping("/{filesUUID}")public void download(@PathVariable String filesUUID, HttpServletResponse response) {//下载文件filesService.download(filesUUID, response);}
🚀7 创建全局统一返回结果类
7.1 创建自定义返回类Result
//全局统一返回结果类
@Data
public class Result<T> {//返回码private Integer code;//返回消息private String message;//返回数据private T data;public Result() {}protected static <T> Result<T> build(T data) {Result<T> result = new Result<T>();if (data != null)result.setData(data);return result;}public static <T> Result<T> build(T body, ResultCodeEnum resultCodeEnum) {Result<T> result = build(body);result.setCode(resultCodeEnum.getCode());result.setMessage(resultCodeEnum.getMessage());return result;}public static <T> Result<T> build(Integer code, String message) {Result<T> result = build(null);result.setCode(code);result.setMessage(message);return result;}public static <T> Result<T> ok() {return Result.ok(null);}//操作成功public static <T> Result<T> ok(T data) {Result<T> result = build(data);return build(data, ResultCodeEnum.SUCCESS);}public static <T> Result<T> fail() {return Result.fail(null);}//操作失败public static <T> Result<T> fail(T data) {Result<T> result = build(data);return build(data, ResultCodeEnum.FAIL);}public Result<T> message(String msg) {this.setMessage(msg);return this;}public Result<T> code(Integer code) {this.setCode(code);return this;}public boolean isOk() {if (this.getCode().intValue() == ResultCodeEnum.SUCCESS.getCode().intValue()) {return true;}return false;}
}
7.2 创建自定义返回信息枚举类ResultCodeEnum
@Getter
public enum ResultCodeEnum {SUCCESS(200, "成功"),FAIL(201, "失败"),TOKEN_ERROR(400, "HTTP请求失败"),TOKEN_PARSING_FAILED(401, "用户认证失败"),USER_CHECK_ERROR(403, "用户权限不足");private final Integer code;private final String message;ResultCodeEnum(Integer code, String message) {this.code = code;this.message = message;}
}
📋 8 使用Postman测试
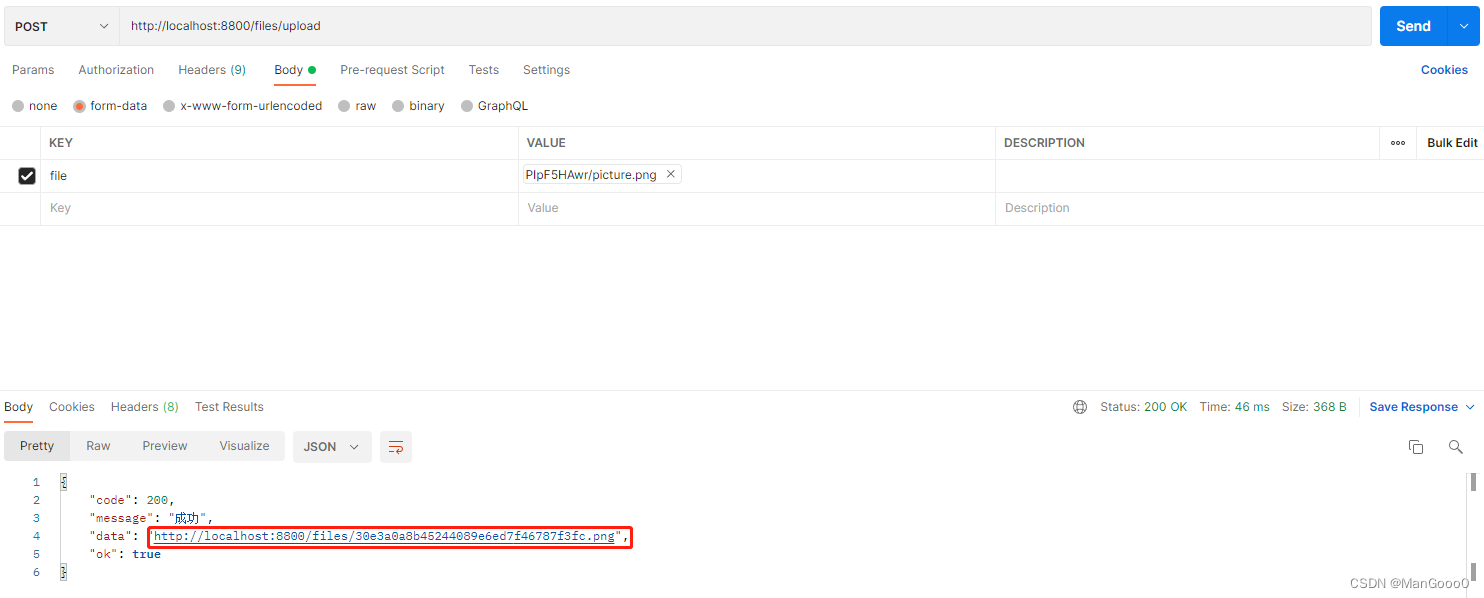
8.1 测试上传文件。
- 上传成功并返回url。
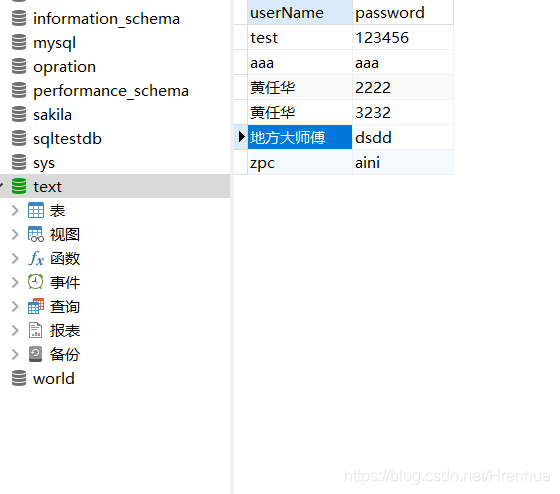
 2. 查看数据库。
8.2 测试下载文件。
- 直接将返回的url复制到搜索引擎。

- 文件下载成功。

🦢9 前端Vue+ElementUI
1 上传
-
使用el-upload标签。
<el-upload action="http://localhost:8800/files/upload":show-file-list="false":on-success="handleUploadSuccess"style="display: inline-block"><el-button type="primary" icon="el-icon-upload" style="margin-right: 10px">上传</el-button> </el-upload> -
文件上传成功时的钩子handleUploadSuccess。
methods: {//上传文件按钮handleUploadSuccess(res) {if (res.code === 200) {this.$message.success("上传成功")//this.getList()//刷新页面} else {this.$message.error("上传失败")}},
}
2 下载
-
写个按钮el-button。
<template slot-scope="scope"><el-button type="primary" icon="el-icon-download" @click="download(scope.row.url)">下载</el-button> </template> -
定义方法download。
methods: {//下载文件download(row) {file.downloadFiles(row).then(res => {console.log(res)})},
}
📫10 代码仓库
该方法运用到项目中,有问题可以直接查看完整项目。
NSMS | Gitee


![[记录六]Vue+node+koa2+mysql+nginx+redis,全栈开发小程序和管理员管理系统项目——服务端图片上传与下载](https://img-blog.csdnimg.cn/20200930155207423.png#pic_center)