spring概述
spring容器启动
springIoc控制反转
spring依赖注入
spring事务
spring事件监听
springaop面向切面编程
–AOP用例搭建
–注解配置 Spring AOP详解
–@Transactional注解
spring注解大全
spring概述
spring是一个轻量级的容器,用于管理业务相关对象的。其两大内核:Ioc(控制反转)、aop(面向切面编程)。容器功能包括依赖注入(Dependency,简称DI)和依赖查找(Dependency Lookup)。
耦合与解耦
耦合是程序间的依赖关系包括:类间的依赖、方法间的依赖
解耦是降低程序间的依赖关系,实际开发中应该做到,编译器不依赖,运行时才依赖。
解耦的思路有两种:
1.使用反射来创建对象,而避免使用new关键字
2.通过读取配置文件来获取要创建的对象全限定类名
spring容器启动
在web项目中,启动spring容器的方式有三种,ContextLoaderListener、ContextLoadServlet、ContextLoaderPlugin
-
监听方式(web.xml)
<context-param><param-name>contextConfigLocation</param-name><param-value>/WEB-INF/classes/applicationContext-*.xml</param-value>
</context-param>
<listener> <listener-class>org.springframework.web.context.ContextLoaderListener</listener-class>
</listener>
[注]还可以通过
<import resource="classpath:/spring/spring-xxx.xml"/>的方式把其他的配置引进来 -
servlet方式(web.xml)
<servlet> <servlet-name>context</servlet-name> <servlet-class>org.springframework.web.context.ContextLoaderServlet</servlet-class><load-on-startup>1</load-on-startup>
</servlet>
[注]这种方式在spring3.0以后不再支持,建议使用监听方式
-
通过plugin配置方式(web.xml)
<plug-in className="org.springframework.web.struts.ContextLoaderPlugIn">  <set-property property="contextConfigLocation" value="/WEB-INF/applicationContext.xml,/WEB-INF/action-servlet.xml" />
</plug-in>
[注]该方式适用于spring与strust等整合,在struts-config.xml里面配置一个ContextLoaderPlugIn,用于spring的初始化工作
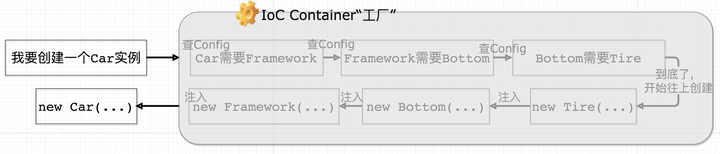
springIoc控制反转
Ioc(控制反转)将对象的创建过程交给容器,让容器管理对象的生命周期,如创建,初始化,销毁等。目的是削减计算机程序的耦合(接触我们代码中的依赖关系)。
SpringIoc核心容器接口:ApplicationContext
常用实现类
a.ClassPathXmlApplicationContext 它可以加载类路径下的配置文件
b.FileSystemXmlApplicationContext 它可以加载磁盘任意路径下的配置文件(必须有访问权限)
c.AnnotationConfigApplicationContext 它是用于读取注解创建容器的
使用Ioc只需要实现即可:
ApplicationContext ac = new ClassPathXmlApplicationContext("Spring/bean.xml");
现在把对象的创建交给Spring来管理就要知道Spring对bean的管理细节(创建bean的方式、bean的作用域)
-
Ioc容器创建bean的方式
1)默认构造器创建
在spring的配置文件中使用bean标签,配置以id 和class 属性后,且没有其他属性和标签时,采用的就是默认构造函数创建bean对象,此时如果类中没有默认构造函数,则对象无法创建
<bean id = "userService" class="com.ferao.Service.UserService"></bean>2)普通工厂中的方法
使用普通工厂中的方法创建对象(使用某个类中的方法创建对象,并存入spring 容器)
<bean id= "instanceFactory" class="com.ferao.InstanceFactory"></bean><bean id= "userService" factory-bean="instanceFactory" factory-method="getUserService"></bean>3)工厂中的静态方法
创建对象(使用某个类中的静态方法创建对象,并存入Spring容器)
<bean id= "userService" factory-bean="com.ferao.Factory.InstanceFactory" factory-method="getUserService"></bean> -
Ioc容器内bean的作用域
当通过Spring容器创建一个Bean实例时,不仅可以完成Bean实例的实例化,还可以为Bean指定特定的作用域(scope)。Spring支持如下5种作用域
1)singleton 单例模式
单例模式,在整个Spring IoC容器中,使用singleton定义的Bean将只有一个实例
2)protorype 原型模式
原型模式,每次通过容器的getBean方法获取prototype定义的Bean时,都将产生一个新的Bean实例
3)request 模式
对于每次HTTP请求,使用request定义的Bean都将产生一个新实例,即每次HTTP请求将会产生不同的Bean实例。只有在Web应用中使用Spring时,该作用域才有效
4)session 模式
对于每次HTTP Session,使用session定义的Bean豆浆产生一个新实例。同样只有在Web应用中使用Spring时,该作用域才有效
5)global-session 模式
每个全局的HTTP Session,使用session定义的Bean都将产生一个新实例。典型情况下,仅在使用portlet context的时候有效。同样只有在Web应用中使用Spring时,该作用域才有效
其中比较常用的是singleton和prototype两种作用域。对于singleton作用域的Bean,每次请求该Bean都将获得相同的实例。容器负责跟踪Bean实例的状态,负责维护Bean实例的生命周期行为;如果一个Bean被设置成prototype作用域,程序每次请求该id的Bean,Spring都会新建一个Bean实例,然后返回给程序。在这种情况下,Spring容器仅仅使用new 关键字创建Bean实例,一旦创建成功,容器不在跟踪实例,也不会维护Bean实例的状态。
如果不指定Bean的作用域,Spring默认使用singleton作用域。
Java在创建Java实例时,需要进行内存申请;销毁实例时,需要完成垃圾回收,这些工作都会导致系统开销的增加。因此,prototype作用域Bean的创建、销毁代价比较大。而singleton作用域的Bean实例一旦创建成功,可以重复使用。因此,除非必要,否则尽量避免将Bean被设置成prototype作用域。设置Bean的基本行为,通过scope属性指定,该属性可以接受singleton、prototype、request、session、globlesession5个值,分别代表以上5种作用域。
<!-- 默认的作用域:singleton -->
<bean id="p1" class="com.abc.Person" />
<!-- 指定的作用域:prototype -->
<bean id="p2" class="com.abc.Person" scope="prototype" />
//加载类路径下的beans.xml文件以初始化Spring容器 ApplicationContext context = new ClassPathXmlApplicationContext(); //分两次分别取同一个Bean,比较二者是否是同一个对象 System.out.println(context.getBean("p1") == context.getBean("p1")); System.out.println(context.getBean("p2") == context.getBean("p2"));控制台结果:
true
false
-
Ioc容器内bean的属性
id属性: id是bean的唯一标识符,在spring容器中不可能同时存在两个相同的id;
class属性: 类的全限定名(包名+类名),用“.”号连接;
name属性: 别名(alias),用法:getBean(“name”),支持设置多个别名,之间用英文逗号分割;
abstract属性: 设置bean是否为抽象类,默认abstract=“false”,如果设为true,将不能被实例化;
autowire-candidate属性: 默认为true,如果为false,那么该bean不能作为其他bean自动装配的候选者。
init-method属性: 它的作用是在创建一个bean之后调用该方法,初始化方法必须是一个无参方法。
destroy-method属性: 它的作用是在销毁bean之前可以执行指定的方法。注意:必须满足scope=“singleton”,并且destroy方法参数个数不能超过1,并且参数类型只能为boolean。
factory-bean属性: 设置了factory-bean属性后,将指定创建bean的工厂类对象,class属性将失效;
factory-method属性: 设置了factory-method属性后,将指定创建bean的工厂方法;
scope属性: bean的作用范围,它包括singleton、prototype、request、session
depends-on属性: 它的作用是一个bean实例化的过程需要依赖于另一个bean的初始化,也就是说被依赖的bean将会在需要依赖的bean初始化之前加载。多个依赖bean之间用","号分割;
-
Ioc容器内bean的生命周期
-
单例对象:
出生:当容器创建时对象出生
活着:只要容器还在,对象一直活着
死亡:容器销毁,对象消亡
总结:单例对象的生命周期和容器相同
-
多例对象:
出生:当我们使用对象时spring框架为我们创建
活着:对象只要是在使用过程中就一直活着
死亡:当对象长时间不用,且没有别的对象引用时,由java的垃圾回收机制回收
-
spring依赖注入
在当前类需要用到其他类的对象时,现在变成了由spring为我们提供,我们只需要在配置文件中说明需要引入类的相关信息即可,依赖关系的维护称之为依赖注入。
可注入的数据有如下三类:
1)基本类型和String
2)其他bean类型(在配置文件中或者注解配置过的bean)
3)复杂类型/集合类型
注入的方式有如下三类:
1)构造函数方法
2)set方法
3)注解方法
现在对注入方式进行详细解释:
-
构造函数方法
构造函方法注入使用constructor-arg标签并放置在bean标签的内部
constructor-arg标签的属性有:
a. type:用于指定要注入的数据的类型,该类型也是构造函数中某个或某些参数的类型
b. index:用于指定要注入的数据给构造函数中指定索引位置的参数赋值
c. name:用于指定给构造函数中指定名称的参数赋值
[注]以上三个用于指定给构造函数中哪个参数赋值
d. value:用于指定其他的bean类型的数据,它指的就是spring的ioc核心容器中出现过的bean对象
bean对象中,注入数据是必须的操作,否则对象无法创建成功.即通过构造强制依赖关系,不能实例化不完全的或无法使用的bean。但改变了bean对象的实例化方式,使我们在创建对象时,如果用不到这些数据,也必须提供 -
set方法
set方法注入使用property标签并放置在bean标签的内部
property标签的属性有:
a. name: 用于指定注入时所调用的set方法名称
b. value: 用于提供基本类型和String类型的数据
c. ref: 用于指定其他的bean 类型的值,它指的就是spring的ioc核心容器中出现过的bean对象
创建对象时没有明确的限制,可以直接使用默认构造函数,但如果有某个成员必须有值,则获取对象时有可能set方法没有执行,即缺点是无法清晰表达哪些属性是必须的,哪些是可选
-
注解方法
注解方法注入,注解配置和xml配置要实现的功能都是一样的,都是降低程序间的耦合,只是配置的形式不一样。
配置文件的内容可以总结为创建容器对象、 注入数据、改变作用范围、和生命周期相关 四个方面,注解方式则也一一对应配置文件的四个方面
-
创建容器对象
它们的作用就和在xml配置文件中编写一个
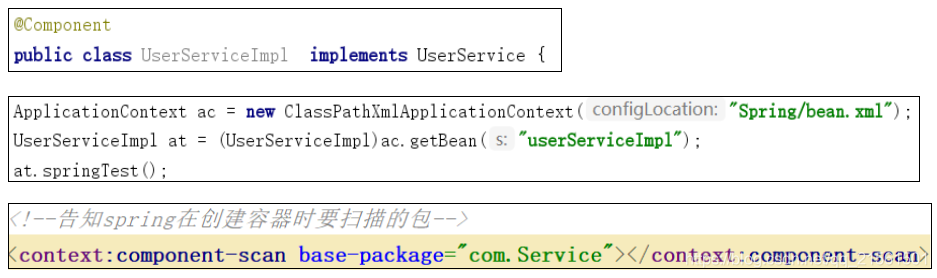
<bean>标签实现的功能是一样的@Component:放置于类之上,用于把当前类对象存入spring容器中,内有value属性用于指定bean的id,当我们不写时,它的默认值是当前类名,且首字母小写
[注]Controller、Service、Repository以上三个注解它们的作用和属性和Component是一模一样的,它们三个是Spring框架为我们提供明确的三层使用的注解,使我们的三层对象更加清晰
-
注入数据
它们的作用就和在xml配置文件中的
<bean>标签中写一个<property>标签是一样的@Autowired:放置于变量、方法,可自动按照类型注入,只要容器中有唯一的一个bean对象类型和要注入的变量类型匹配,就可以注入成功
@Autowired放在属性上,是通过set方法注入,
@Autowired放在构造器上是通过构造方法注入,
类加载顺序规定先加载构造方法,再加载普通方法,
当构造器中使用到属性时,会发现属性还没有被实例化,则会报错,
因此,当构造方法中用到了属性时,应该将注解加在构造器上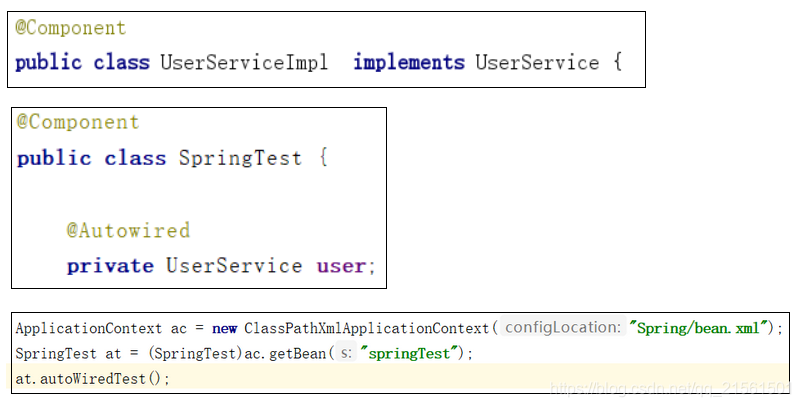
@Qualifier:在按照类中注入的基础上再按照名称注入。它是给类成员注入时使用,不能单独使用,但是在给方法参数注入时可以.用于指定注入的,该注解有value属性,用于指定注入的bean的id@Resource:直接按照bean的id注入,它可以单独使用,该注解有name属性,用于指定bean的id
@Value:用于注入基本类型和String类型的数据,该注解有value属性,用于指定数据的值,它可以使用spring中spEL(也就是spring的el表达式)
-
改变作用范围
它们的作用集合在
<bean>标签中使用scope属性实现的功能是一样的 -
和生命周期相关
它们的作用就和在
<bean>标签中使用init-method和destroy-method的作用是一样的-
注解注入
重要细节-Autowired注解与Resource注解的区别相同点Resource的作用相当于Autowired,均可在字段或属性的setter方法上不同点1. 提供方:Autowired是由org.springframework.beans.factory.annotation.Autowired提供,换句话说就是由spring提供Resource是由javax.annotation.Resource提供,即j2ee提供,且jdk1.6及以上2. 注入方式:Autowired只按照byType注入;Resource默认按byName自动注入,也提供按照byType注入3. 属性:Autowired:按照类型装配依赖对象,默认情况下它要求依赖对象必须存在,如果允许Null值,可以设置它requested属性为false。如果开发者想要使用按名称装配,可以结合Qualifier注解一起使用。Resource:有两个重要的属性:name和type.name属性指定byName,如果没有指定Name属性,当注解标注在字段上,即默认取字段的名称作为bean名称寻找依赖对象。当注解标注在属性的setter方法上,即默认取属性名作为bean名称寻找依赖对象,需要注意的是,Resource如果没有指定name属性,并且按照默认的名称找不到依赖对象时,Resource注解会回退到按类型装配。但一旦指定了Name属性,就只能按照名称装配了========以上三个注入都只能注入其他bean类型的数据,而基本类型和String类型无法使用上述注解实现,以外,集合类型的注入只能通过xml来实现改变作用范围示例scope作用:用于指定bean的作用范围属性:value:指定范围的取值,常用取值:singletion prototype注入后的使用
问题点项目中遇到一个问题:项目启动完成前,在A类中注入B类,并调用B类的某个方法。那么调用B类的这个方法写在哪里呢,我选择写到构造器里,但是构造器先于Spring注入执行,那么执行构造器时,注入B类肯定为null,于是选择了构造器注入,解决问题执行顺序静态变量或静态语句块–>实例变量或初始化语句块–>构造方法–>Spring注入常见的三种使用注入方式注解注入@Controllerpublic class FooController {@Autowiredprivate FooService fooService;//简单的使用例子,下同public List<Foo> listFoo() {return fooService.list();}}这种注入方式应该是笔者目前为止开发中见到的最常见的注入方式.原因很简单:
1.注入方式非常简单:加入要注入的字段,附上@Autowired,即可完成。
2.使得整体代码简洁明了,看起来美观大方。构造器注入@Controllerpublic class FooController {private final FooService fooService;@Autowiredpublic FooController(FooService fooService) {this.fooService = fooService;}//使用方式上同,略}在Spring4.x版本中推荐的注入方式就是这种,相较于上面的注解注入方式而言,就显
得有点难看,特别是当注入的依赖很多(5个以上)的时候,就会明显的发现代码显得很臃肿。对于从注解
注入转过来+有强迫症的开发人员来说,简直可以说是无法忍受。循序渐进示例
写了一个类,分别有两个构造器,一个是注入一个Bean的构造器,一个是注入两个Bean的构造器 public class ConstructorAutowiredTest {private User user;private Role role;public ConstructorAutowiredTest() {}public ConstructorAutowiredTest(User user) {this.user = user;}public ConstructorAutowiredTest(User user, Role role) {this.user = user;this.role = role;}public void test(){System.out.println("user: "+user);System.out.println("role: "+role);}}Spring的配置文件context.xml:<?xml version="1.0" encoding="UTF-8" ?><beans xmlns="http://www.springframework.org/schema/beans"xmlns:xsi="http://www.w3.org/2001/XMLSchema-instance"xmlns:context="http://www.springframework.org/schema/context"xsi:schemaLocation="http://www.springframework.org/schema/beanshttp://www.springframework.org/schema/beans/spring-beans-2.0.xsdhttp://www.springframework.org/schema/contexthttp://www.springframework.org/schema/context/spring-context-4.0.xsd "><!-- 使Spring关注Annotation --><context:annotation-config/><bean class="com.mytest.demo.model.Role" id="role"><property name="name" value="testRole"/><property name="id" value="2"/></bean><bean class="com.mytest.demo.model.User" id="user"><property name="id" value="1"/><property name="name" value="testUser"/></bean><bean class="com.mytest.demo.autowired.ConstructorAutowiredTest" id="test"/></beans>那么,该类三个构造器,Spring会使用哪个构造器初始化ConstructorAutowiredTest这个Bean呢?写个测试便知:public class TestBeanAutowiredConstructor {public static void main(String[] args) {ClassPathXmlApplicationContext context = new ClassPathXmlApplicationContext();context.setConfigLocation("context.xml");context.refresh();ConstructorAutowiredTest test = (ConstructorAutowiredTest) context.getBean("test");test.test();}}
从这里我们可以看出来,此时三个构造器中Spring使用了无参构造器。我们换一个方式,将无参构造器注释掉,看看Spring到底会使用哪个构造器呢?同样执行test方法测试,控制台打印:
此时控制台报错,大致意思是Bean的实例化失败了,没有无参的构造器方法调用。此时有个疑问,明明构造器中的参数都是Bean,为什么不能初始化,一定要使用无参的构造器呢?是否是因为有两个构造器的原因?此时我们再注释掉任意一个构造函数,使测试类只有一个带参构造函数:// public ConstructorAutowiredTest() {// }public ConstructorAutowiredTest(User user) {this.user = user;}// public ConstructorAutowiredTest(User user, Role role) {// this.user = user;// this.role = role;// }再次运行测试类,控制台打印:
如果是注释掉第二个构造函数,则结果是两个对象都有。从这里我们可以看出,如果只有一个构造器,且参数为IOC容器中的Bean,将会执行自动注入。这里又有一个疑问,这也太不科学了吧,强制用户一定只能写一个构造器?这时我们猜想@Autowired注解是否能解决这种问题?来试试吧。我们将构造器全部解除注释,将第三个构造器打上@Autowired注解:public ConstructorAutowiredTest() {}public ConstructorAutowiredTest(User user) {this.user = user;}@Autowiredpublic ConstructorAutowiredTest(User user, Role role) {this.user = user;this.role = role;}
不出所料,@Autowired注解可以解决这种问题,此时Spring将使用有注解的构造函数进行Bean的初始化。那么,如果有两个@Autowired注解呢?结果肯定是报错,因为@Autowired的默认属性required是为true的,也就是说两个required=true的构造器,Spring不知道使用哪一个。但如果是这样写的话:public ConstructorAutowiredTest() {}@Autowired(required = false)public ConstructorAutowiredTest(User user) {this.user = user;}@Autowired(required = false)public ConstructorAutowiredTest(User user, Role role) {this.user = user;this.role = role;}
使用参数最多的那一个构造器来初始化Bean。又如果两个有参构造器顺序调换又是怎样的呢?一个required为false一个为true,结果又是怎样的呢?这里直接给出答案,顺序调换依然使用多参数构造器,并且required只要有一个true就会报错。有兴趣的读者可以自己试试,下面将深入源码分析构造器注入的过程,相信上述所有疑问都能得到解答。setter注入@Controllerpublic class FooController {private FooService fooService;//使用方式上同,略@Autowiredpublic void setFooService(FooService fooService) {this.fooService = fooService;}}在Spring3.x刚推出的时候,推荐使用注入的就是这种,笔者现在也基本没看到过这种
注解方式,写起来麻烦,当初推荐Spring自然也有他的道理,这里我们引用一下Spring当时的原话:
构造器注入参数太多了,显得很笨重,另外setter的方式能够让类在之后重新配置或者重新注入。构造器注入的好处spring文档构造器注入的方式,能够保证注入的组件不可变,并且确保需要的依赖不为空。此外,构造器注入的依赖总是能够在返回客户端(组件)代码的时候保证完全初始化的状态。解释依赖不可变:其实说的就是final关键字,这里不再多解释了。依赖不为空(省去了我们对其检查):当要实例化FooController的时候,由于自己实现了有参数的构造函数,所以不会调用默认构造函数,那么就需要Spring容器传入所需要的参数,所以就两种情况:1、有该类型的参数->传入,OK 。2:无该类型的参数->报错。所以保证不会为空完全初始化的状态:这个可以跟上面的依赖不为空结合起来,向构造器传参之前,要确保注入的内容不为空,那么肯定要调用依赖组件的构造方法完成实例化。而在Java类加载实例化的过程中,构造方法是最后一步(之前如果有父类先初始化父类,然后自己的成员变量,最后才是构造方法,这里不详细展开。)所以返回来的都是初始化之后的状态。总结保证依赖不可变(final关键字)保证依赖不为空(省去了我们对其检查)保证返回客户端(调用)的代码的时候是完全初始化的状态避免了循环依赖提升了代码的可复用性构造器注入的缺点 当注入的依赖很多(5个以上)的时候,就会明显的发现代码显得很臃肿。 set注入的好处 setter的方式能够让类在之后重新配置或者重新注入set注入的缺点 写起来麻烦field注入的缺点 对于IOC容器以外的环境,除了使用反射来提供它需要的依赖之外,无法复用该实现类。而且将一直是个潜在的隐患,因为你不调用将一直无法发现NPE的存在。还值得一提另外一点是:使用field注入可能会导致循环依赖,即A里面注入B,B里面又注入Apublic class A {@Autowiredprivate B b;}public class B {@Autowiredprivate A a;} 如果使用构造器注入,在spring项目启动的时候,就会抛出:BeanCurrentlyInCreationException:Requested bean is currently in creation: Is there an unresolvable circular reference?从而提醒你避免循环依赖,如果是field注入的话,启动的时候不会报错,在使用那个bean的时候才会报错。
-
-
-
通用注解
-
@Order注解(执行bean)
含义@Order或者接口Ordered的作用是定义Spring IOC容器中Bean的执行顺序的优先级,注意,@Order、Ordered不影响类的加载顺序源码@Retention(RetentionPolicy.RUNTIME)@Target({ElementType.TYPE, ElementType.METHOD, ElementType.FIELD})@Documentedpublic @interface Order {/*** 默认是最低优先级,值越小优先级越高*/int value() default Ordered.LOWEST_PRECEDENCE;}分析作用位置:类(接口、枚举)、方法、字段声明(包括枚举常量)优先级:value参数值越小优先级越高,存在默认值问题:IOC容器是如何根据优先级值来先后执行程序的源码分析@SpringBootApplicationpublic class CommonBootStrap {public static void main(String[] args) {SpringApplication.run(CommonBootStrap.class, args);}}(进入run方法)public ConfigurableApplicationContext run(String... args) {StopWatch stopWatch = new StopWatch();stopWatch.start();ConfigurableApplicationContext context = null;Collection<SpringBootExceptionReporter> exceptionReporters = new ArrayList();this.configureHeadlessProperty();SpringApplicationRunListeners listeners = this.getRunListeners(args);listeners.starting();Collection exceptionReporters;try {ApplicationArguments applicationArguments = new DefaultApplicationArguments(args);ConfigurableEnvironment environment = this.prepareEnvironment(listeners, applicationArguments);this.configureIgnoreBeanInfo(environment);Banner printedBanner = this.printBanner(environment);context = this.createApplicationContext();exceptionReporters = this.getSpringFactoriesInstances(SpringBootExceptionReporter.class, new Class[]{ConfigurableApplicationContext.class}, context);this.prepareContext(context, environment, listeners, applicationArguments, printedBanner);this.refreshContext(context);this.afterRefresh(context, applicationArguments);stopWatch.stop();if (this.logStartupInfo) {(new StartupInfoLogger(this.mainApplicationClass)).logStarted(this.getApplicationLog(), stopWatch);}listeners.started(context);//这里是重点,调用具体的执行方法this.callRunners(context, applicationArguments);} catch (Throwable var10) {this.handleRunFailure(context, var10, exceptionReporters, listeners);throw new IllegalStateException(var10);}try {listeners.running(context);return context;} catch (Throwable var9) {this.handleRunFailure(context, var9, exceptionReporters, (SpringApplicationRunListeners)null);throw new IllegalStateException(var9);}}private void callRunners(ApplicationContext context, ApplicationArguments args) {List<Object> runners = new ArrayList();runners.addAll(context.getBeansOfType(ApplicationRunner.class).values());runners.addAll(context.getBeansOfType(CommandLineRunner.class).values());//重点来了,按照定义的优先级顺序排序AnnotationAwareOrderComparator.sort(runners);Iterator var4 = (new LinkedHashSet(runners)).iterator();//循环调用具体方法while(var4.hasNext()) {Object runner = var4.next();if (runner instanceof ApplicationRunner) {this.callRunner((ApplicationRunner)runner, args);}if (runner instanceof CommandLineRunner) {this.callRunner((CommandLineRunner)runner, args);}}}private void callRunner(ApplicationRunner runner, ApplicationArguments args) {try {//执行方法runner.run(args);} catch (Exception var4) {throw new IllegalStateException("Failed to execute ApplicationRunner", var4);}}private void callRunner(CommandLineRunner runner, ApplicationArguments args) {try {//执行方法runner.run(args.getSourceArgs());} catch (Exception var4) {throw new IllegalStateException("Failed to execute CommandLineRunner", var4);}}示例实现CommandLineRunner接口的类会在Spring IOC容器加载完毕后执行,适合预加载类及其它资源;也可以使用ApplicationRunner,使用方法及效果是一样的package com.yaomy.common.order;import org.springframework.boot.CommandLineRunner;import org.springframework.core.annotation.Order;import org.springframework.stereotype.Component;/*** @Description: Description* @ProjectName: spring-parent* @Version: 1.0*/@Component@Order(1)public class BlackPersion implements CommandLineRunner {@Overridepublic void run(String... args) throws Exception {System.out.println("----BlackPersion----");}}package com.yaomy.common.order;import org.springframework.boot.CommandLineRunner;import org.springframework.core.annotation.Order;import org.springframework.stereotype.Component;/*** @Description: Description* @ProjectName: spring-parent* @Version: 1.0*/@Component@Order(0)public class YellowPersion implements CommandLineRunner {@Overridepublic void run(String... args) throws Exception {System.out.println("----YellowPersion----");}}----YellowPersion--------BlackPersion----加载代码的底层要支持优先级执行程序,否则即使配置上Ordered、@Order也是不起任何作用的
-
assert(定位问题)
含义assert的好处就是比较简洁,不用加try catch就可以附加一些预期的提示信息,方便定位问题示例import org.springframework.util.Assert;public class Demo {public static void main(String[] args) {String location = null;Assert.notNull(location, "Location must not be null");System.out.println("location = [" + location + "]");}} Exception in thread "main" java.lang.IllegalArgumentException: Location must not be nullat org.springframework.util.Assert.notNull(Assert.java:115)at Demo.main(Demo.java:9)at sun.reflect.NativeMethodAccessorImpl.invoke0(Native Method)at sun.reflect.NativeMethodAccessorImpl.invoke(NativeMethodAccessorImpl.java:62)at sun.reflect.DelegatingMethodAccessorImpl.invoke(DelegatingMethodAccessorImpl.java:43)at java.lang.reflect.Method.invoke(Method.java:498)at com.intellij.rt.execution.application.AppMain.main(AppMain.java:144)
-
spring事务
事务在企业日常开发中几乎是一定会遇到的,例如一个审核的流程可能涉及到查询、修改、插入等操作,所以保证事务性是很有必要的。一般就是开启事务支持,然后@Transactional,但是事务不仅仅是这些,可以了解一下细节。
首先看一下spring事务的三个要素:
• DataSource:事务的真正处理者,如MySQL等。
• TransactionManager:管理事务的处理过程,如打开、提交、回滚。
• 事务应用和属性配置:作为一个标识符表明哪些方法要参与事务,一些配置:隔离级别、超时时间等。
其中TransactionManager指事务管理器,Spring并不直接管理事务,而是提供了多种事务管理器,他们将事务管理的职责委托给Hibernate或者JTA等持久化机制所提供的相关平台框架的事务来实现。Spring事务设计的接口如下:
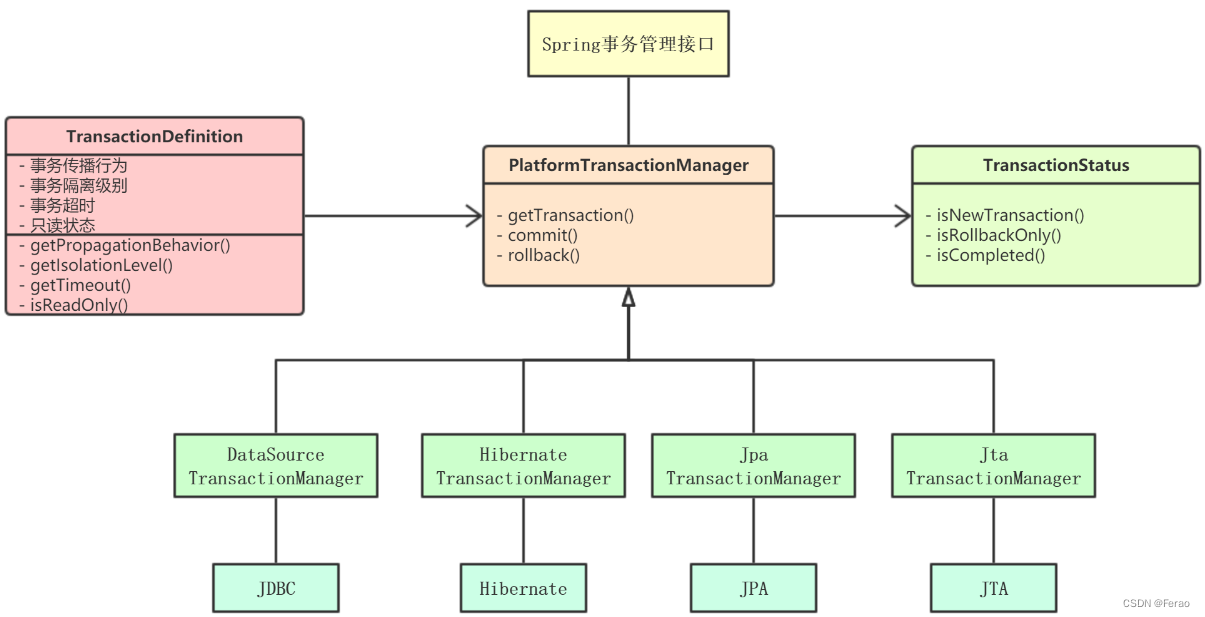
PlatformTransactionManager具体代码:
public interface PlatformTransactionManager {//由TransactionDefinition得到TransactionStatus对象TransactionStatus getTransaction(@Nullable TransactionDefinition definition) throws TransactionException;//提交事务void commit(TransactionStatus status) throws TransactionException;//回滚事务void rollback(TransactionStatus status) throws TransactionException;
}
PlatformTransactionManager是Spring事务管理器的接口,通过这个接口,JDBC、Hibernate等提供了对应的任务管理器,进行具体的实现,下面列出jdbc事务、Hibernate事务、Java持久化API事务(JPA)、Java原生API事务 四种的示例:
①jdbc事务
如果应用程序中直接使用JDBC来进行持久化,DataSourceTransactionManager会为你处理事务边界。为了使用DataSourceTransactionManager,你需要使用如下的XML将其装配到应用程序的上下文定义中:
<bean id="transactionManager" class="org.springframework.jdbc.datasource.DataSourceTransactionManager"><property name="dataSource" ref="dataSource" />
</bean>
实际上,DataSourceTransactionManager是通过调用java.sql.Connection来管理事务,而后者是通过DataSource获取到的。通过调用连接的commit()方法来提交事务,同样,事务失败则通过调用rollback()方法进行回滚。
②Hibernate事务
如果应用程序的持久化是通过Hibernate实现的,那么你需要使用HibernateTransactionManager。对于Hibernate3,需要在Spring上下文定义中添加如下的声明:
<bean id="transactionManager" class="org.springframework.orm.hibernate3.HibernateTransactionManager"><property name="sessionFactory" ref="sessionFactory" />
</bean>
sessionFactory属性需要装配一个Hibernate的session工厂,HibernateTransactionManager的实现细节是它将事务管理的职责委托给org.hibernate.Transaction对象,而后者是从Hibernate Session中获取到的。当事务成功完成时,HibernateTransactionManager将会调用Transaction对象的commit()方法,反之,将会调用rollback()方法。
③Java持久化API事务(JPA)
Hibernate多年来一直是事实上的Java持久化标准,但是现在Java持久化API作为真正的Java持久化标准进入大家的视野。如果你计划使用JPA的话,那你需要使用Spring的JpaTransactionManager来处理事务。你需要在Spring中这样配置JpaTransactionManager:
<bean id="transactionManager" class="org.springframework.orm.jpa.JpaTransactionManager"><property name="sessionFactory" ref="sessionFactory" />
</bean>
JpaTransactionManager只需要装配一个JPA实体管理工厂(javax.persistence.EntityManagerFactory接口的任意实现)。JpaTransactionManager将与由工厂所产生的JPA EntityManager合作来构建事务。
④Java原生API事务
如果你没有使用以上所述的事务管理,或者是跨越了多个事务管理源(比如两个或者是多个不同的数据源),你就需要使用JtaTransactionManager:
<bean id="transactionManager" class="org.springframework.transaction.jta.JtaTransactionManager"><property name="transactionManagerName" value="java:/TransactionManager" />
</bean>
JtaTransactionManager将事务管理的责任委托给javax.transaction.UserTransaction和javax.transaction.TransactionManager对象,其中事务成功完成通过UserTransaction.commit()方法提交,事务失败通过UserTransaction.rollback()方法回滚。
上面讲到的事务管理器接口PlatformTransactionManager通过getTransaction(TransactionDefinition definition)方法来得到事务,这个方法里面的参数是TransactionDefinition类,这个类就定义了一些基本的事务属性。
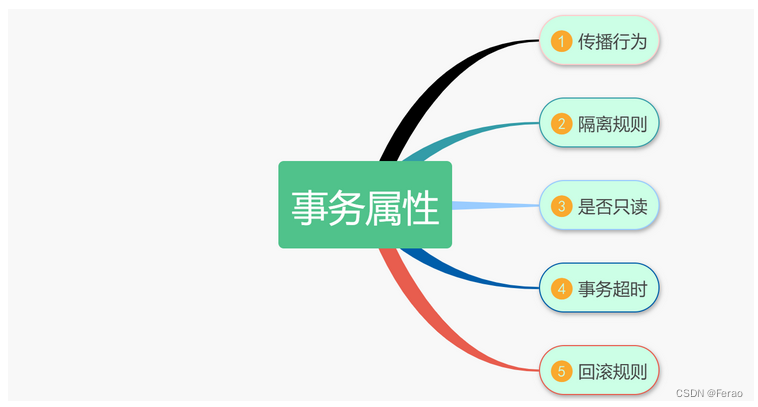
事务属性可以理解成事务的一些基本配置,描述了事务策略如何应用到方法上。事务属性包含了5个方面,如图所示:
TransactionDefinition代码如下:
public interface TransactionDefinition {int getPropagationBehavior();   // 返回事务的传播行为int getIsolationLevel();      // 返回事务的隔离级别,事务管理器根据它来控制另外一个事务可以看到本事务内的哪些数据int getTimeout();          // 返回事务必须在多少秒内完成boolean isReadOnly();       // 事务是否只读,事务管理器能够根据这个返回值进行优化,确保事务是只读的
}
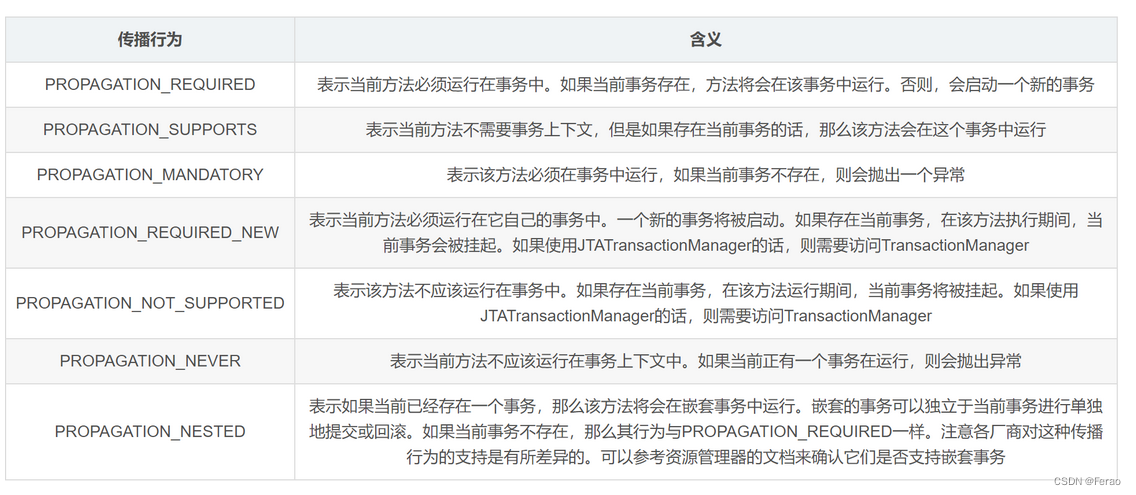
Spring定义了七种传播行为:
在运用中难免遇到事务嵌套的场景,比如一个事务方法里面调用了另外一个事务方法,那么两个方法是各自作为独立的方法提交还是内层的事务合并到外层的事务一起提交,这时就需要spring事务的传播机制进行配置来确定怎么样执行
在Spring中支持编程式事务以及声明式事务两种方式
编程式事务允许用户在代码中精确定义事务的边界,粒度是代码块级别;
而声明式事务(基于AOP)有助于用户将操作与事务规则进行解耦,粒度是方法级别;
编程式事务侵入到了业务代码里面,但是提供了更加详细的事务管理,;而声明式事务由于基于AOP,所以既能起到事务管理的作用,又可以不影响业务代码的具体实现。
-
编程式事务管理
Spring提供两种方式的编程式事务管理,分别是:使用TransactionTemplate和直接使用PlatformTransactionManager。对于编程式事务管理,Spring推荐使用TransactionTemplate。
①使用TransactionTemplate
采用TransactionTemplate和采用其他Spring模板,如JdbcTempalte和HibernateTemplate是一样的方法。它使用回调方法,把应用程序从处理取得和释放资源中解脱出来。如同其他模板,TransactionTemplate是线程安全的。代码片段:
TransactionTemplate tt = new TransactionTemplate(); // 新建一个TransactionTemplateObject result = tt.execute(new TransactionCallback(){ public Object doTransaction(TransactionStatus status){ updateOperation(); return resultOfUpdateOperation(); } }); // 执行execute方法进行事务管理使用TransactionCallback()可以返回一个值。如果使用TransactionCallbackWithoutResult则没有返回值。
②使用PlatformTransactionManager
DataSourceTransactionManager dataSourceTransactionManager = new DataSourceTransactionManager(); //定义一个某个框架平台的TransactionManager,如JDBC、Hibernate dataSourceTransactionManager.setDataSource(this.getJdbcTemplate().getDataSource()); // 设置数据源 DefaultTransactionDefinition transDef = new DefaultTransactionDefinition(); // 定义事务属性 transDef.setPropagationBehavior(DefaultTransactionDefinition.PROPAGATION_REQUIRED); // 设置传播行为属性 TransactionStatus status = dataSourceTransactionManager.getTransaction(transDef); // 获得事务状态 try {// 数据库操作dataSourceTransactionManager.commit(status);// 提交 } catch (Exception e) {dataSourceTransactionManager.rollback(status);// 回滚 } -
声明式事务管理
声明式事务管理建立在AOP之上,其本质是对方法前后进行拦截,然后在目标方法开始之前创建或者加入一个事务,执行完目标方法之后根据执行的情况提交或者回滚。
根据代理机制的不同,总结了五种Spring事务的配置方式,配置文件如下:
-
每个Bean都有一个代理[配置文件]
<?xml version="1.0" encoding="UTF-8"?> <beans xmlns="http://www.springframework.org/schema/beans"xmlns:xsi="http://www.w3.org/2001/XMLSchema-instance"xmlns:context="http://www.springframework.org/schema/context"xmlns:aop="http://www.springframework.org/schema/aop"xsi:schemaLocation="http://www.springframework.org/schema/beanshttp://www.springframework.org/schema/beans/spring-beans-2.5.xsdhttp://www.springframework.org/schema/contexthttp://www.springframework.org/schema/context/spring-context-2.5.xsdhttp://www.springframework.org/schema/aop http://www.springframework.org/schema/aop/spring-aop-2.5.xsd"><bean id="sessionFactory" class="org.springframework.orm.hibernate3.LocalSessionFactoryBean"> <property name="configLocation" value="classpath:hibernate.cfg.xml" /> <property name="configurationClass" value="org.hibernate.cfg.AnnotationConfiguration" /></bean> <!-- 定义事务管理器(声明式的事务) --> <bean id="transactionManager"class="org.springframework.orm.hibernate3.HibernateTransactionManager"><property name="sessionFactory" ref="sessionFactory" /></bean><!-- 配置DAO --><bean id="userDaoTarget" class="com.bluesky.spring.dao.UserDaoImpl"><property name="sessionFactory" ref="sessionFactory" /></bean><bean id="userDao" class="org.springframework.transaction.interceptor.TransactionProxyFactoryBean"> <!-- 配置事务管理器 --> <property name="transactionManager" ref="transactionManager" /> <property name="target" ref="userDaoTarget" /> <property name="proxyInterfaces" value="com.bluesky.spring.dao.GeneratorDao" /><!-- 配置事务属性 --> <property name="transactionAttributes"> <props> <prop key="*">PROPAGATION_REQUIRED</prop></props> </property> </bean> </beans> -
所有Bean共享一个代理基类[配置文件]
<?xml version="1.0" encoding="UTF-8"?> <beans xmlns="http://www.springframework.org/schema/beans"xmlns:xsi="http://www.w3.org/2001/XMLSchema-instance"xmlns:context="http://www.springframework.org/schema/context"xmlns:aop="http://www.springframework.org/schema/aop"xsi:schemaLocation="http://www.springframework.org/schema/beanshttp://www.springframework.org/schema/beans/spring-beans-2.5.xsdhttp://www.springframework.org/schema/contexthttp://www.springframework.org/schema/context/spring-context-2.5.xsdhttp://www.springframework.org/schema/aop http://www.springframework.org/schema/aop/spring-aop-2.5.xsd"><bean id="sessionFactory" class="org.springframework.orm.hibernate3.LocalSessionFactoryBean"> <property name="configLocation" value="classpath:hibernate.cfg.xml" /> <property name="configurationClass" value="org.hibernate.cfg.AnnotationConfiguration" /></bean> <!-- 定义事务管理器(声明式的事务) --> <bean id="transactionManager"class="org.springframework.orm.hibernate3.HibernateTransactionManager"><property name="sessionFactory" ref="sessionFactory" /></bean><bean id="transactionBase" class="org.springframework.transaction.interceptor.TransactionProxyFactoryBean" lazy-init="true" abstract="true"> <!-- 配置事务管理器 --> <property name="transactionManager" ref="transactionManager" /> <!-- 配置事务属性 --> <property name="transactionAttributes"> <props> <prop key="*">PROPAGATION_REQUIRED</prop> </props> </property> </bean> <!-- 配置DAO --><bean id="userDaoTarget" class="com.bluesky.spring.dao.UserDaoImpl"><property name="sessionFactory" ref="sessionFactory" /></bean><bean id="userDao" parent="transactionBase" > <property name="target" ref="userDaoTarget" /> </bean> </beans> -
使用拦截器[配置文件]
<?xml version="1.0" encoding="UTF-8"?> <beans xmlns="http://www.springframework.org/schema/beans"xmlns:xsi="http://www.w3.org/2001/XMLSchema-instance"xmlns:context="http://www.springframework.org/schema/context"xmlns:aop="http://www.springframework.org/schema/aop"xsi:schemaLocation="http://www.springframework.org/schema/beanshttp://www.springframework.org/schema/beans/spring-beans-2.5.xsdhttp://www.springframework.org/schema/contexthttp://www.springframework.org/schema/context/spring-context-2.5.xsdhttp://www.springframework.org/schema/aop http://www.springframework.org/schema/aop/spring-aop-2.5.xsd"><bean id="sessionFactory" class="org.springframework.orm.hibernate3.LocalSessionFactoryBean"> <property name="configLocation" value="classpath:hibernate.cfg.xml" /> <property name="configurationClass" value="org.hibernate.cfg.AnnotationConfiguration" /></bean> <!-- 定义事务管理器(声明式的事务) --> <bean id="transactionManager"class="org.springframework.orm.hibernate3.HibernateTransactionManager"><property name="sessionFactory" ref="sessionFactory" /></bean> <bean id="transactionInterceptor" class="org.springframework.transaction.interceptor.TransactionInterceptor"> <property name="transactionManager" ref="transactionManager" /> <!-- 配置事务属性 --> <property name="transactionAttributes"> <props> <prop key="*">PROPAGATION_REQUIRED</prop> </props> </property> </bean><bean class="org.springframework.aop.framework.autoproxy.BeanNameAutoProxyCreator"> <property name="beanNames"> <list> <value>*Dao</value></list> </property> <property name="interceptorNames"> <list> <value>transactionInterceptor</value> </list> </property> </bean> <!-- 配置DAO --><bean id="userDao" class="com.bluesky.spring.dao.UserDaoImpl"><property name="sessionFactory" ref="sessionFactory" /></bean> </beans> -
使用tx标签配置的拦截器[配置文件]
<?xml version="1.0" encoding="UTF-8"?> <beans xmlns="http://www.springframework.org/schema/beans"xmlns:xsi="http://www.w3.org/2001/XMLSchema-instance"xmlns:context="http://www.springframework.org/schema/context"xmlns:aop="http://www.springframework.org/schema/aop"xmlns:tx="http://www.springframework.org/schema/tx"xsi:schemaLocation="http://www.springframework.org/schema/beanshttp://www.springframework.org/schema/beans/spring-beans-2.5.xsdhttp://www.springframework.org/schema/contexthttp://www.springframework.org/schema/context/spring-context-2.5.xsdhttp://www.springframework.org/schema/aop http://www.springframework.org/schema/aop/spring-aop-2.5.xsdhttp://www.springframework.org/schema/tx http://www.springframework.org/schema/tx/spring-tx-2.5.xsd"><context:annotation-config /><context:component-scan base-package="com.bluesky" /><bean id="sessionFactory" class="org.springframework.orm.hibernate3.LocalSessionFactoryBean"> <property name="configLocation" value="classpath:hibernate.cfg.xml" /> <property name="configurationClass" value="org.hibernate.cfg.AnnotationConfiguration" /></bean> <!-- 定义事务管理器(声明式的事务) --> <bean id="transactionManager"class="org.springframework.orm.hibernate3.HibernateTransactionManager"><property name="sessionFactory" ref="sessionFactory" /></bean><tx:advice id="txAdvice" transaction-manager="transactionManager"><!--配置事务传播性,隔离级别以及超时回滚等问题 --><tx:attributes><tx:method name="*" propagation="REQUIRED" /></tx:attributes></tx:advice><aop:config><!--配置事务切点 --><aop:pointcut id="interceptorPointCuts"expression="execution(* com.bluesky.spring.dao.*.*(..))" /><aop:advisor advice-ref="txAdvice"pointcut-ref="interceptorPointCuts" /> </aop:config> </beans> -
全注解[配置文件]
<?xml version="1.0" encoding="UTF-8"?>
<beans xmlns="http://www.springframework.org/schema/beans"xmlns:xsi="http://www.w3.org/2001/XMLSchema-instance"xmlns:context="http://www.springframework.org/schema/context"xmlns:aop="http://www.springframework.org/schema/aop"xmlns:tx="http://www.springframework.org/schema/tx"xsi:schemaLocation="http://www.springframework.org/schema/beanshttp://www.springframework.org/schema/beans/spring-beans-2.5.xsdhttp://www.springframework.org/schema/contexthttp://www.springframework.org/schema/context/spring-context-2.5.xsdhttp://www.springframework.org/schema/aop http://www.springframework.org/schema/aop/spring-aop-2.5.xsdhttp://www.springframework.org/schema/tx http://www.springframework.org/schema/tx/spring-tx-2.5.xsd"><context:annotation-config /><context:component-scan base-package="com.bluesky" /><tx:annotation-driven transaction-manager="transactionManager"/><bean id="sessionFactory" class="org.springframework.orm.hibernate3.LocalSessionFactoryBean"> <property name="configLocation" value="classpath:hibernate.cfg.xml" /> <property name="configurationClass" value="org.hibernate.cfg.AnnotationConfiguration" /></bean> <!-- 定义事务管理器(声明式的事务) --> <bean id="transactionManager"class="org.springframework.orm.hibernate3.HibernateTransactionManager"><property name="sessionFactory" ref="sessionFactory" /></bean></beans>
此时在DAO上需加上@Transactional注解
package com.bluesky.spring.dao;import java.util.List;import org.hibernate.SessionFactory;
import org.springframework.beans.factory.annotation.Autowired;
import org.springframework.orm.hibernate3.support.HibernateDaoSupport;
import org.springframework.stereotype.Component;import com.bluesky.spring.domain.User;@Transactional
@Component("userDao")
public class UserDaoImpl extends HibernateDaoSupport implements UserDao {public List<User> listUsers() {return this.getSession().createQuery("from User").list();}
}
使用@Transactional 注解时,该注解可以添加到类级别上、也可以添加到方法级别上。
当把@Transactional 注解放在类级别时,表示所有该类的公共方法都配置相同的事务属性信息。
当把@Transactional 注解放在方法级别时,表示仅该公共方法支持事务。
当类级别配置了@Transactional,方法级别也配置了@Transactional,应用程序会以方法级别的事务属性信息来管理事务,换言之,方法级别的事务属性信息会覆盖类级别的相关配置信息。在进行事务支持时,Spring只需要使用者在需要事务支持的bean上使用@Transactional注解即可,如果需要修改事务的隔离级别和传播特性的属性,则使用该注解中的属性进行指定。这里默认的隔离级别与各个数据库一致,比如MySQL是Repeatable Read,而传播特性默认则为Propagation.REQUIRED,即只需要当前操作具有事务即可。
@Transactional 注解管理事务的实现步骤很简单。但是如果对 Spring 中的 @transaction 注解的事务管理理解的不够透彻,就很容易出现错误,比如事务应该回滚(rollback)而没有回滚事务的问题。这时需要分析 Spring 的注解方式的事务实现机制,然后列出相关的注意事项,以最终达到帮助开发人员准确而熟练的使用 Spring 的事务的目的。
@Transactional 注解管理事务的实现步骤
第一步,在 xml 配置文件中添加事务配置信息
<tx:annotation-driven transaction-manager="transactionManager" order="200"/><bean id="transactionManager"
class="org.springframework.jdbc.datasource.DataSourceTransactionManager">
<property name="dataSource" ref="dataSource" />
</bean>
除了用配置文件的方式,@EnableTransactionManagement 注解也可以启用事务管理功能
第二步,将@Transactional 注解添加到合适的方法上,并设置合适的属性信息
@Transactional(value = "transactionManager", propagation = Propagation.REQUIRED, rollbackFor =
RuntimeException.class)
public boolean insertEntry(BaseRequest request) {
... ...
}
@Transactional 注解的属性信息
属性名 说明 name 当在配置文件中有多个 TransactionManager , 可以用该属性指定选择哪个事务管理器 propagation 事务的传播行为,默认值为 REQUIRED, 如果有事务, 那么加入事务, 没有的话新建一个(默认情况下),@Transactional(propagation=Propagation.REQUIRED) isolation 事务的隔离度,默认值采用 DEFAULT,@Transactional(isolation = Isolation.READ_UNCOMMITTED) , ,未提交读,就是一个事务可以读取另一个未提交事务的数据。读取未提交数据(会出现脏读, 不可重复读) 基本不使用;@Transactional(isolation = Isolation.READ_COMMITTED),已提交读,就是一个事务要等另一个事务提交后才能读取数据。可以解决脏读,可能会出现不可重复读问题;@Transactional(isolation = Isolation.REPEATABLE_READ),重复读,就是在开始读取数据(事务开启)时,不再允许修改操作,重复读可以解决不可重复读问题。不可重复读对应的是修改,即UPDATE操作。但是可能还会有幻读问题。因为幻读问题对应的是插入INSERT操作,而不是UPDATE操作。@Transactional(isolation = Isolation.SERIALIZABLE) ,是最高的事务隔离级别,在该级别下,事务串行化顺序执行,可以避免脏读、不可重复读与幻读。但是这种事务隔离级别效率低下,比较耗数据库性能,一般不使用。 timeout 事务的超时时间,默认值为-1。如果超过该时间限制但事务还没有完成,则自动回滚事务,@Transactional(timeout=30) //默认是30秒,注意这里说的是事务的超时性而不是Connection的超时性,这两个是有区别的 read-only 该属性用于设置当前事务是否为只读事务,设置为true表示只读,false则表示可读写,默认值为false,@Transactional(readOnly=true) rollback-for 用于指定能够触发事务回滚的异常类型,如果有多个异常类型需要指定,各类型之间可以通过逗号分隔,指定单一异常类:@Transactional(rollbackFor=RuntimeException.class),指定多个异常类:@Transactional(rollbackFor={RuntimeException.class, Exception.class}) no-rollback- for 抛出 no-rollback-for 指定的异常类型,不回滚事务
-
传播规则总结回答了这样一个问题:一个新的事务应该被启动还是被挂起,或者是一个方法是否应该在事务性上下文中运行。
在配置了事务的传播机制后一段时间,应用中的事务逐渐增多,此时会出现多个事务同时运行,经常会为了完成他们的工作而操作同一个数据。并发虽然是必需的,但是会导致以下问题:
-
脏读(Dirty read)
脏读发生在一个事务读取了被另一个事务改写但尚未提交的数据时。如果这些改变在稍后被回滚了,那么第一个事务读取的数据就会是无效的。
-
不可重复读(Nonrepeatable read)
不可重复读发生在一个事务执行相同的查询两次或两次以上,但每次查询结果都不相同时。这通常是由于另一个并发事务在两次查询之间更新了数据。(不可重复读重点在修改)
-
幻读(Phantom reads)
幻读和不可重复读相似。当一个事务(T1)读取几行记录后,另一个并发事务(T2)插入了一些记录时,幻读就发生了。在后来的查询中,第一个事务(T1)就会发现一些原来没有的额外记录。(幻读重点在新增或删除)
在理想状态下,事务之间将完全隔离,从而可以防止这些问题发生。然而,完全隔离会影响性能,因为隔离经常涉及到锁定在数据库中的记录(甚至有时是锁表)。完全隔离要求事务相互等待来完成工作,会阻碍并发。因此,可以根据业务场景选择不同的隔离级别。
-
ISOLATION_DEFAULT
使用后端数据库默认的隔离级别
-
ISOLATION_READ_UNCOMMITTED
允许读取尚未提交的更改。可能导致脏读、幻读或不可重复读
-
ISOLATION_READ_COMMITTED
(Oracle 默认级别)允许从已经提交的并发事务读取。可防止脏读,但幻读和不可重复读仍可能会发生。
-
ISOLATION_REPEATABLE_READ
(MYSQL默认级别)对相同字段的多次读取的结果是一致的,除非数据被当前事务本身改变。可防止脏读和不可重复读,但幻读仍可能发生
-
ISOLATION_SERIALIZABLE
完全服从ACID的隔离级别,确保不发生脏读、不可重复读和幻影读。这在所有隔离级别中也是最慢的,因为它通常是通过完全锁定当前事务所涉及的数据表来完成的
[注]可以把事务的隔离级别想象为这个事务对于事物处理数据的自私程度。
在了解了spring事务管理方式、spring事务的传播机制、事务隔离级别后,接下来进行具体的用例搭建部分,流程思路图如下:
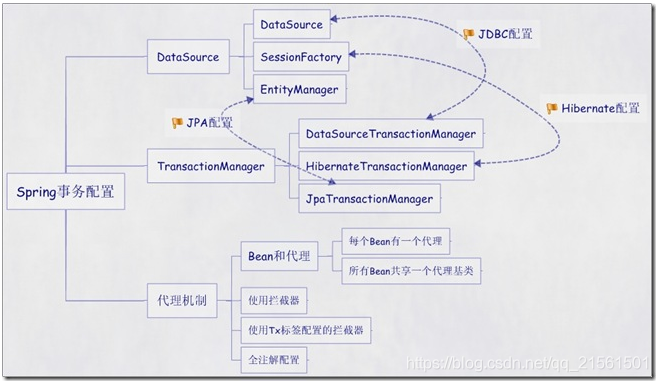
Spring配置文件中关于事务配置总是由三个组成部分,分别是DataSource、TransactionManager和代理机制这三部分,无论哪种配置方式,一般变化的只是代理机制这部分。
DataSource、TransactionManager这两部分只是会根据数据访问方式有所变化,比如使用Hibernate进行数据访问时,DataSource实际为SessionFactory,TransactionManager的实现为org.springframework.orm.hibernate3.HibernateTransactionManager
使用mybatis 进行数据访问时,DataSource实际为DataSource,TransactionManager的实现为org.springframework.jdbc.datasource.DataSourceTransactionManager【具体如上图】。
事务常规名词
只读
如果一个事务只对数据库执行读操作,那么该数据库就可能利用那个事务的只读特性,采取某些优化措施。通过把一个事务声明为只读,可以给后端数据库一个机会来应用那些它认为合适的优化措施。由于只读的优化措施是在一个事务启动时由后端数据库实施的, 因此,只有对于那些具有可能启动一个新事务的传播行为(PROPAGATION_REQUIRES_NEW、PROPAGATION_REQUIRED、 ROPAGATION_NESTED)的方法来说,将事务声明为只读才有意义。
事务超时
为了使一个应用程序很好地执行,它的事务不能运行太长时间。因此,声明式事务的下一个特性就是它的超时。
假设事务的运行时间变得格外的长,由于事务可能涉及对数据库的锁定,所以长时间运行的事务会不必要地占用数据库资源。这时就可以声明一个事务在特定秒数后自动回滚,不必等它自己结束。
由于超时时钟在一个事务启动的时候开始的,因此,只有对于那些具有可能启动一个新事务的传播行为(PROPAGATION_REQUIRES_NEW、PROPAGATION_REQUIRED、ROPAGATION_NESTED)的方法来说,声明事务超时才有意义。
回滚规则
在默认设置下,事务只在出现运行时异常(runtime exception)时回滚,而在出现受检查异常(checked exception)时不回滚(这一行为和EJB中的回滚行为是一致的)。
不过,可以声明在出现特定受检查异常时像运行时异常一样回滚。同样,也可以声明一个事务在出现特定的异常时不回滚,即使特定的异常是运行时异常。
spring事务回滚规则
默认配置下,spring只有在抛出的异常为运行时unchecked异常时才回滚该事务,也就是抛出的异常为RuntimeException的子类(Errors也会导致事务回滚),而抛出checked异常则不会导致事务回滚。
可以明确配置在抛出那些异常时回滚事务,包括checked异常。也可以明确定义那些异常抛出时不回滚事务。
spring事件监听
需求是用户在京西商城下单成功后,平台要发送短信通知用户下单成功。开发者最直观的想法是直接在order()方法中添加发送短信的业务代码:
public void order(){// 下单成功System.out.println("下单成功...");// 发送短信sendSms();
}
乍一看没什么不妥,但是如果我们加上一根时间轴,那么代码就有问题了:一个月后,京西搞了自建物流体系,用户下单成功后,需要通知物流系统发货,于是开发者又要打开OrderService修改order()方法:
public void order(){// 下单成功System.out.println("下单成功...");// 发送短信sendSms();// 通知车队发货 notifyCar();
}
又过了一个月,东哥被抓了,股价暴跌,决定卖掉自己的车队,所以下单后就不用通知车队了,重新修改OrderService:
public void order(){// 下单成功System.out.println("下单成功...");// 发送短信sendSms();// 车队没了,注释掉这行代码 // notifyCar();
}
又过了一个月,东哥明尼苏达州荣耀归来:回来做我的兄弟一起开车吧。
public void order(){// 下单成功System.out.println("下单成功...");// 发送短信sendSms();// 车队买回来了notifyCar()
}
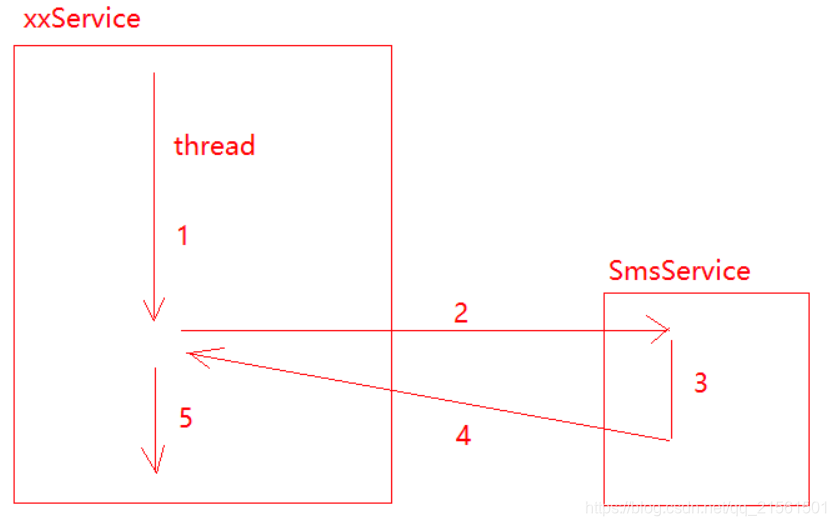
车队回来了,开发者却受不了这大起大落异常刺激的生活,决定离职。就在这时候,组长拉住了你,语重心长地和你说:小伙子,知道什么叫“以增量的方式应对变化的需求”吗?听过Spring监听机制吗?说时迟那时快,组长拿来一支笔和一张纸,唰唰唰画了一张图。
你顿时心领神会,扑通一声跪在了地上,开始敲起了代码。
/*** 订单服务(利用Spring事件机制完成需求示例)*/
@Service
public class OrderService {@Autowiredprivate ApplicationContext applicationContext;public void order() {// 下单成功System.out.println("下单成功...");// 发布通知applicationContext.publishEvent(new OrderSuccessEvent(this));System.out.println("main线程结束...");}
}
继承ApplicationEvent,自定义事件:
public class OrderSuccessEvent extends ApplicationEvent {/*** Create a new ApplicationEvent.** @param source the object on which the event initially occurred (never {@code null})*/public OrderSuccessEvent(Object source) {super(source);}
}
实现ApplicationListener,监听OrderSuccessEvent:
/*** 短信服务,监听OrderSuccessEvent*/
@Service
public class SmsService implements ApplicationListener<OrderSuccessEvent> {@Overridepublic void onApplicationEvent(OrderSuccessEvent event) {this.sendSms();}/*** 发送短信*/public void sendSms() System.out.println("发送短信...");}
}
测试:
@RunWith(SpringRunner.class)
@SpringBootTest
public class Test {@Autowiredprivate OrderService orderService;@Testpublic void testSpringEvent() {orderService.order();}
}
输出:
下单成功…
发送短信…
main线程结束…
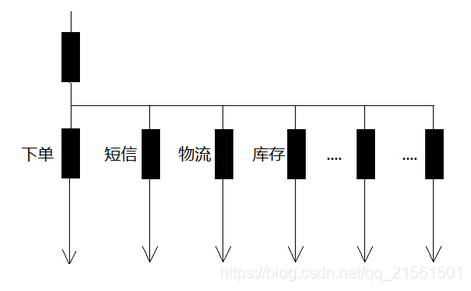
如果后期针对下单成功有新的操作,可以新写一个事件监听类:
如增加物流服务
/*** 物流服务*/
@Service
public class CarService  implements ApplicationListener<OrderSuccessEvent> {@Overridepublic void onApplicationEvent(OrderSuccessEvent event) {this.dispatch();}public void dispatch() {System.out.println("发车咯...");}
}
这就是“以增量的方式应对变化的需求”,而不是去修改已有的代码。假设有B接口调用了C接口,你修改了C接口,那么B接口可能业务结果就错了,此时调用B接口的A接口也可能受到影响,是连锁反应。所以,一般我们都提倡“对扩展开放,对修改关闭”的原则。
上面SmsService既是一个服务,还是一个Listener,因为它既有@Service又实现了ApplicationListener接口。但是仅仅是为了一个监听回调方法而实现一个接口,未免麻烦,所以Spring提供了注解的方式:
监听LendSuccessEvent,但不用实现ApplicationListener
/*** 短信服务*/
@Service
public class SmsService {/*** 发送短信 @EventListener指定监听的事件*/@EventListener(LendSuccesssEvent.class)public void sendSms() {try {Thread.sleep(1000L * 5);} catch (InterruptedException e) {e.printStackTrace();}System.out.println("发送短信...");}}
上述看似很完美了,但是开发者需要注意Spring默认的事件机制是同步的:如果针对OrderService下单成功的操作越来越多,比如下单后需要完成的对应操作有十几个,那么等十几个其他服务都调用完毕,东哥可能又去明尼苏达州了。所以,你必须想办法把Spring的事件机制改成异步的,尽可能快地返回下单的结果本身,而不是等其他附属服务全部完成(涉及到其他问题暂时按下不表)。
Spring发布异步事件,要想把Spring事件机制改造成异步通知,最粗暴的方法是:
/*** 订单服务*/
@Service
public class OrderService {@Autowiredprivate ApplicationContext applicationContext;public void order() {// 下单成功System.out.println("下单成功...");// 发布通知new Thread(() ->{applicationContext.publishEvent(new LendSuccesssEvent(this));}).start();System.out.println("main线程结束...");// 等SmsService结束try {Thread.sleep(1000L * 5);} catch (InterruptedException e) {e.printStackTrace();}}
}
监听OrderSuccessEvent:
/*** 短信服务,*/
@Service
public class SmsService implements ApplicationListener<OrderSuccessEvent> {@Overridepublic void onApplicationEvent(OrderSuccessEvent event) {this.sendSms();}/*** 发送短信*/public void sendSms() try {Thread.sleep(1000L * 3);} catch (InterruptedException e) {e.printStackTrace();}System.out.println("发送短信...");}
}
当然,这种做法其实违背了Spring事件机制的设计初衷。人家会想不到你要搞异步通知?
@Configuration
public class AsyncEventConfig {@Bean(name = "applicationEventMulticaster")public ApplicationEventMulticaster simpleApplicationEventMulticaster() {SimpleApplicationEventMulticaster eventMulticaster= new SimpleApplicationEventMulticaster();eventMulticaster.setTaskExecutor(new SimpleAsyncTaskExecutor());return eventMulticaster;}}

```java
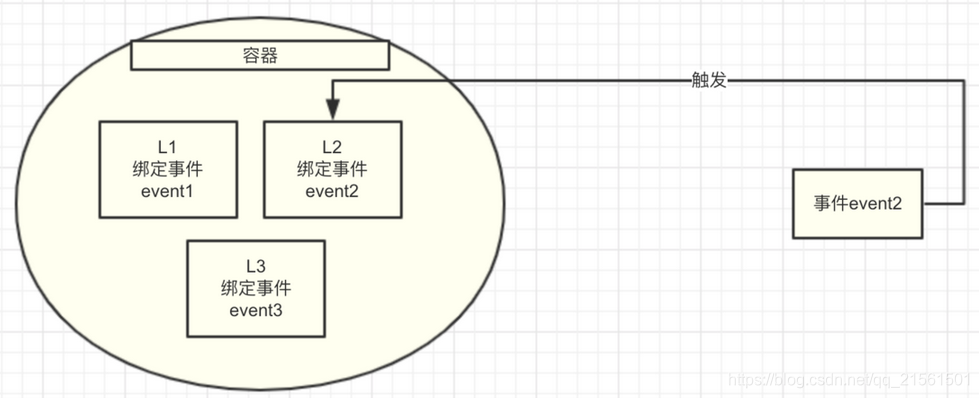
监听含义一个事物根据另一个事物的变化自发的作出响应,而且每次都作出同样的响应。就像点击按钮一样。每次点击登入按钮,都会访问登入接口url,这就是监听。三要素1.事件2.监听器3.触发动作举例点击按钮就是事件,点击之后要怎么处理,就是监听器的事了。监听器肯定有很多个,每个监听器职责不一样,它们要知道监听哪个事件的。需要事先就告诉它们了。总结一句话,在发布事件的时候,所有监听器就已经准备就绪,然后根据事件类型匹配对应监听器。
```
在这里插入代码片```java
spring监听原理在IOC的容器的启动过程,当所有的bean都已经处理完成之后,spring ioc容器会有一个发布事件的动作。从 AbstractApplicationContext 的源码中就可以看出。换句话说,当ioc容器加载处理完相应的bean之后,也给我们提供了一个机会先有InitializingBean,后有ApplicationListener<ContextRefreshedEvent>),可以去做一些自己想做的事。其实这也就是spring ioc容器给提供的一个扩展的地方。我们可以这样使用这个扩展机制。简单实现原理让我们的bean实现ApplicationListener接口,这样当发布事件时,[spring]的ioc容器就会以容器的实例对象作为事件源类,并从中找到事件的监听者,此时ApplicationListener接口实例中的onApplicationEvent(E event)方法就会被调用,我们的逻辑代码就会写在此处。这样我们的目的就达到了
```
<font size=2 color=red>org.springframework.context.support.AbstractApplicationContext 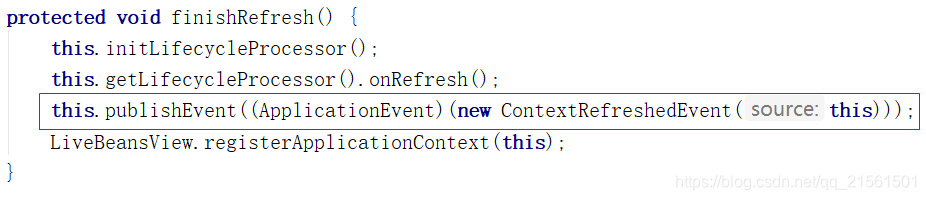
```java细节问题系统会存在两个容器,一个是root application context ,另一个就是我们自己的 projectName-servlet context(作为root application context的子容器)这种情况下,就会造成onApplicationEvent方法被执行两次。为了避免上面提到的问题,我们可以只在root application context初始化完成后调用逻辑代码,其他的容器的初始化完成,则不做任何处理
```
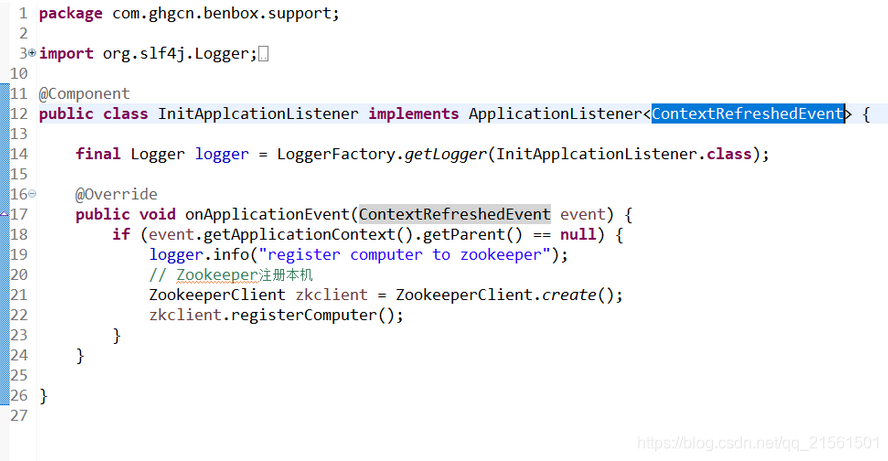
```javaif (event.getApplicationContext().getParent() == null) { //root application context 没有parent//其它逻辑logger.info("register computer to zookeeper");// Zookeeper注册本机ZookeeperClient zkclient = ZookeeperClient.create();zkclient.registerComputer();}
``````java最简单实现方式1.创建一个监听器,实现ApplicationListener接口,泛型中指定事件类型public class PrintListener implements ApplicationListener<DemoEvent> {@Overridepublic void onApplicationEvent(DemoEvent event) {System.out.println("调用DemoEvent的print方法输出其内容:");event.print();}}2.创建一个事件,继承ApplicationEvent抽象类public class DemoEvent extends ApplicationEvent {private String text;/*** Create a new ApplicationEvent.** @param source the object on which the event initially occurred (never {@code null})*/public DemoEvent(Object source) {super(source);}public DemoEvent(Object source, String text) {super(source);this.text = text;}public void print() {System.out.println("print event content:" + this.text);}}3.注册监听器到容器中,发布事件。@SpringBootApplicationpublic class DemoApplication {public static void main(String[] args) {ConfigurableApplicationContext context = SpringApplication.run(DemoApplication.class, args);//注册监听器context.addApplicationListener(new PrintListener());//发布事件context.publishEvent(new DemoEvent(new Object(),"hello world."));}}
``````java
监听-事件ApplicationListener(监听)含义ApplicationListener可以监听某个事件event通过实现这个接口,传入一个泛型事件,在run方法中就可以监听这个事件,从而做出一定的逻辑比如在等所有bean加载完之后执行某些操作示例public class SystemListener implements ApplicationListener<ContextRefreshedEvent> {@Overridepublic void onApplicationEvent(ContextRefreshedEvent event) {if (event.getApplicationContext().getParent() == null) {System.out.println("do something");}}}Spring内置事件1、ContextRefreshedEventApplicationContext 被初始化或刷新时,该事件被发布。这也可以在 ConfigurableApplicationContext接口中使用 refresh() 方法来发生。此处的初始化是指:所有的Bean被成功装载,后处理Bean被检测并激活,所有Singleton Bean 被预实例化,ApplicationContext容器已就绪可用2、ContextStartedEvent当使用 ConfigurableApplicationContext (ApplicationContext子接口)接口中的 start() 方法启动 ApplicationContext 时,该事件被发布。你可以调查你的数据库,或者你可以在接受到这个事件后重启任何停止的应用程序3、ContextStoppedEvent当使用 ConfigurableApplicationContext 接口中的 stop() 停止 ApplicationContext 时,发布这个事件。你可以在接受到这个事件后做必要的清理的工作4、ContextClosedEvent当使用 ConfigurableApplicationContext 接口中的 close() 方法关闭 ApplicationContext 时, 该事件被发布。一个已关闭的上下文到达生命周期末端;它不能被刷新或重启5、RequestHandledEvent这是一个 web-specific 事件,告诉所有 bean HTTP 请求已经被服务。只能应用于使用DispatcherServlet的Web应用。在使用Spring作为前端的MVC控制器时,当Spring处理用户请求结束后,系统会自动触发该事件```
springaop面向切面编程
AOP(Aspect Oriented Programming),直译过来就是 面向切面编程,AOP 是一种编程思想,是面向对象编程(OOP)的一种补充。它可以理解为一个拦截器,拦截一些过程,例如,当一个方法执行时,aop可以劫持这个执行的方法,在方法执行之前或之后添加额外的功能。
AOP 实现分类
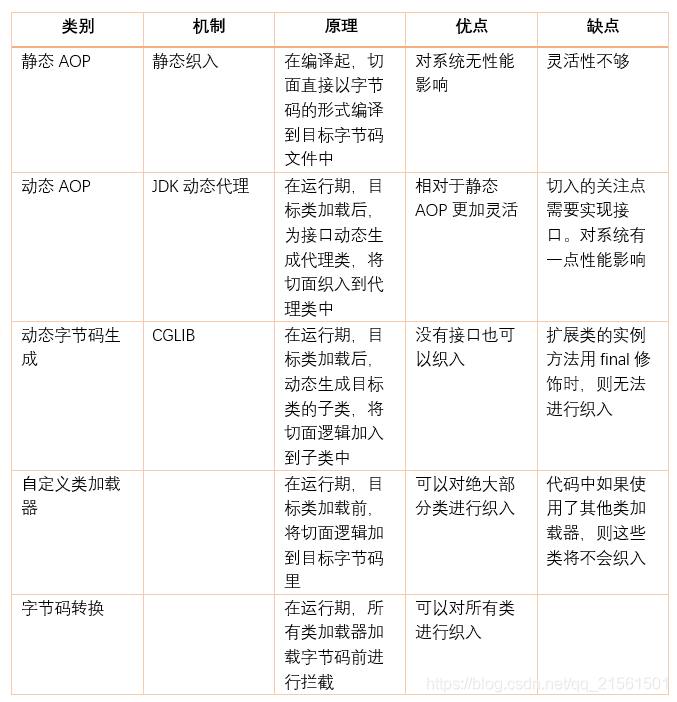
AOP 的本质是由 AOP 框架修改业务组件的多个方法的源代码,按照 AOP 框架修改源代码的时机,可以将其分为两类:
①静态 AOP 实现: AOP 框架在编译阶段对程序源代码进行修改,生成了静态的 AOP 代理类(生成的 *.class 文件已经被改掉了,需要使用特定的编译器),比如 AspectJ。
②动态 AOP 实现:AOP 框架在运行阶段对动态生成代理对象(在内存中以 JDK 动态代理,或 CGlib 动态地生成 AOP 代理类),如 SpringAOP。
[下面给出常用 AOP 实现比较]
通知类型
| 类型 | 连接点 | 实现接口 |
|---|---|---|
| 前置通知 | 该方法执行前运行 | org.springframework.aop.MethodBeforeAdvice |
| 后置通知 | 通知方法会在目标方法返回或异常后调用 | org.springframework.aop.AfterReturningAdvice |
| 引入通知 | 在不改变原有方法的基础上却可以增加新的方法 | org.springframework.aop.IntroductionInterceptor |
| 异常通知 | 运行方法抛出异常后 | org.springframework.aop.ThrowsAdvice |
| 环绕通知 | 通知方法会将目标方法封装起来, 环绕方法执行运行,结合以上这三个通知 | org.aop.alliance.intercept.MethodInterceptor |
Spring AOP 的特点
AOP 框架有很多种,上面介绍了 AOP 框架的实现方式有可能不同, Spring 中的 AOP 是通过动态代理实现的。
不同的 AOP 框架支持的连接点也有所区别,例如,AspectJ 和 JBoss,除了支持方法切点,它们还支持字段和构造器的连接点。而 Spring AOP 不能拦截对对象字段的修改,也不支持构造器连接点,我们无法在 Bean 创建时应用通知。
在Spring AOP中,有 4 种类型通知(advices)的支持,前置通知、后置通知、异常通知、环绕通知。
大部分的 Spring 开发者都只是实现了“环绕通知”,因为它可以对所有通知类型,但更好的做法应该是选择最合适的通知类型来满足要求。
操作术语
| 术语 | 内容 |
|---|---|
| 连接点(jointPoint) | 类里面哪些方法可以被增强,这些方法称为连接点 |
| 切入点(pointCut) | 实际被真正增强的方法,称为切入点 |
| 通知(advice) | 实际增强的逻辑部分称为通知(增强) |
| 前置通知 | 通知的种类:@Before() |
| 后置通知 | 通知的种类:@AfterReturning() (也叫做返回通知) |
| 环绕通知 | 通知的种类:@Around |
| 异常通知 | 通知的种类:@AfterThrowing() |
| 最终通知 | 通知的种类:@After()(相当于finally) |
| 切面(aspect) | 把通知应用到切入点的过程叫做切面 |
| 横关注点 | 对哪些方法进行拦截,拦截后怎么处理,这些关注点称之为横切关注点 |
| 目标(target) | 被通知对象 |
| 代理(proxy) | 向目标对象应用通知之后创建的对象 |
| 织入(weave) | 将增强处理添加到目标对象中,并创建一个被增强的对象,这个过程就是织入 |
| AOP代理(AOP Proxy) | AOP框架创建的对象,代理就是目标对象的加强。Spring中的AOP代理可以使JDK动态代理,也可以是CGLIB代理,前者基于接口,后者基于子类 |
切入点表达式
语法:execution( [权限修饰符] [返回类型] [方法名称] ([参数列表]))
细节:返回类型可以省略
示例:
对com.yy.test.BookService类里的add方法增强:execution(* com.yy.test.BookService.add(..))
对com.yy.test.BookService类里的所有方法增强:execution(* com.yy.test.BookService.*(..))
对com.yy.test包里的所有类的所有方法增强:execution(* com.yy.test. * . * (..))
@Aspect注解用法:
☼依赖环境:
<dependency><groupId>org.aspectj</groupId><artifactId>aspectjweaver</artifactId><version>1.9.5</version></dependency>
☼开启包扫描和@Aspect注解
<?xml version="1.0" encoding="UTF-8"?>
<beans xmlns="http://www.springframework.org/schema/beans"xmlns:xsi="http://www.w3.org/2001/XMLSchema-instance"xmlns:context="http://www.springframework.org/schema/context"xmlns:aop="http://www.springframework.org/schema/aop"xsi:schemaLocation="http://www.springframework.org/schema/beanshttp://www.springframework.org/schema/beans/spring-beans.xsdhttp://www.springframework.org/schema/contexthttp://www.springframework.org/schema/context/spring-context.xsdhttp://www.springframework.org/schema/aophttp://www.springframework.org/schema/aop/spring-aop.xsd"><!--开启包扫描--><context:component-scan base-package="com.yy.aspect"/><!--开启aspectJ注解--><aop:aspectj-autoproxy/>
</beans>
☼设置增强类的优先级
如果多个增强类对同一个方法(或多个方法)增强,设置增强类的优先级,即在增强类上添加注解@Order(数字),数字越小优先级越高。
☼创建需要增强的的类User
package com.yy.aspect;import org.springframework.stereotype.Component;@Component
public class User {public void addUser(){System.out.println("成功添加一个用户");}
}
☼创建代理类CommonAspect
package com.yy.aspect;import org.aspectj.lang.annotation.Aspect;
import org.aspectj.lang.annotation.Before;
import org.springframework.stereotype.Component;@Component
@Aspect
public class CommonAspect {//前置通知@Before(value = "execution(* com.yy.aspect.User.addUser(..))")public void before(){System.out.println("前置通知");}//后置通知(返回结果之后执行)@AfterReturning(value = "execution(* com.yy.aspect.User.addUser(..))")public void afterReturning(){System.out.println("AfterReturning...");}//最终通知(不管有没有发生异常)@After(value = "execution(* com.yy.aspect.User.addUser(..))")public void after(){System.out.println("最终通知");}//异常通知@AfterThrowing(value = "execution(* com.yy.aspect.User.addUser(..))")public void afterThrowing(){System.out.println("AfterThrowing...");}//环绕通知@Around(value = "execution(* com.yy.aspect.User.addUser(..))")public void around(ProceedingJoinPoint proceedingJoinPoint) throws Throwable {System.out.println("环绕通知前");proceedingJoinPoint.proceed();//被增强的方法执行System.out.println("环绕通知后");}
}
☼多个通知使用了相同的切点表达式使用 @Pointcut注解声明切点表达式,然后使用表达式。
package com.yy.aspect;import org.aspectj.lang.ProceedingJoinPoint;
import org.aspectj.lang.annotation.*;
import org.springframework.stereotype.Component;@Component
@Aspect
public class CommonAspect {//抽取相同切入点@Pointcut(value = "execution(* com.yy.aspect.User.addUser(..))")public void pointCut(){}{}//前置通知@Before(value = "pointCut()")public void before(){System.out.println("前置通知");}//后置通知(返回结果之后执行)@AfterReturning(value = "pointCut()")public void afterReturning(){System.out.println("AfterReturning...");}//最终通知(不管有没有发生异常)@After(value = "pointCut()")public void after(){System.out.println("最终通知");}//异常通知@AfterThrowing(value = "pointCut()")public void afterThrowing(){System.out.println("AfterThrowing...");}//环绕通知@Around(value = "pointCut()")public void around(ProceedingJoinPoint proceedingJoinPoint) throws Throwable {System.out.println("环绕通知前");proceedingJoinPoint.proceed();//被增强的方法执行System.out.println("环绕通知后");}
}
测试效果(程序正常执行):
package com.yy.test;import com.yy.aspect.User;
import org.junit.Test;
import org.springframework.context.ApplicationContext;
import org.springframework.context.support.ClassPathXmlApplicationContext;public class TestAspect {@Testpublic void testMethod(){ApplicationContext applicationContext = new ClassPathXmlApplicationContext("beans.xml");User user = applicationContext.getBean(User.class);user.addUser();}
}
结果1:(结果可以发现没有异常通知)
环绕通知前
前置通知
成功添加一个用户
环绕通知后
最终通知
AfterReturning…
测试效果(程序执行异常):
@Component
public class User {public void addUser(){int i= 10/0;System.out.println("成功添加一个用户");}
}
结果2:
环绕通知前
前置通知
最终通知
AfterThrowing…
java.lang.ArithmeticException: / by zero
at com.yy.aspect.User.addUser(User.java:9)
…
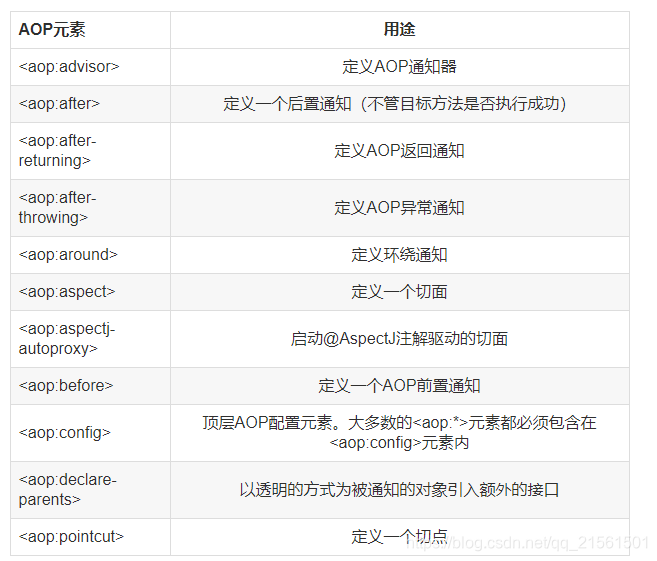
注解声明切点指示器
Spring AOP 所支持的 AspectJ 切点指示器(如下图),当我们查看这些spring支持的指示器时,注意只有execution指示器是唯一的执行匹配,而其他的指示器都是用于限制匹配的。这说明execution指示器是我们在编写切点定义时最主要使用的指示器,在此基础上,我们使用其他指示器来限制所匹配的切点。

注解处理通知中的参数
上面的例子进行增强处理的目标方法没有参数,下面来说说有参数的情况,并且在增强处理中使用该参数。下面我们给接口增加一个参数,表示购买所花的金钱。通过AOP 增强处理,如果女孩买衣服超过了 68 元,就可以赠送一双袜子。
更改代码如下:
public interface IBuy {String buy(double price);
}@Component
public class Girl implements IBuy {@Overridepublic String buy(double price) {System.out.println(String.format("女孩花了%s元买了一件漂亮的衣服", price));return "衣服";}
}@Component
public class Boy implements IBuy {@Overridepublic String buy(double price) {System.out.println(String.format("男孩花了%s元买了一个游戏机", price));return "游戏机";}
}
@Aspect
@Component
public class BuyAspectJ {@Pointcut("execution(String com.sharpcj.aopdemo.test1.IBuy.buy(double)) && args(price) && bean(girl)")public void gif(double price) {}@Around("gif(price)")public String hehe(ProceedingJoinPoint pj, double price){try {pj.proceed();if (price > 68) {System.out.println("女孩买衣服超过了68元,赠送一双袜子");return "衣服和袜子";}} catch (Throwable throwable) {throwable.printStackTrace();}return "衣服";}
}
注意环绕通知的结构,见下方
/*** 环绕通知结构*/
public Object aroundPrintLog(ProceedingJoinPoint pjp){Object rtValue = null;try {System.out.println("前置通知");Object[] args = pjp.getArgs();rtValue= pjp.proceed(args);System.out.println("后置通知");return rtValue;} catch (Throwable t) {System.out.println("异常通知");throw new RuntimeException(t);}finally {System.out.println("最终通知");}}
@Around("execution(String com.unfair.service.impl.*.*(com.unfair.api.dto.LoginInfoDTO,..)) && args(dto,a)")
public String around(ProceedingJoinPoint jp , LoginInfoDTO dto,String a) throws Throwable {System.out.println("ferao aop around1 anntation success ..");//unfairSystem.out.println(a);//执行被环绕通知封装的切入方法Object proceed = jp.proceed();System.out.println("proceed content :" +proceed);//proceed content :原方法返回//获得访问该方法的参数内容,默认是数组,即入参是多个Object[] args = jp.getArgs();for (Object arg : args) {//args content :LoginInfoDTO{username='username', password='password'}//args content :unfairSystem.out.println("args content :" +arg);}//获取签名,即:全路径.类名.方法(参数类型名)Signature signature = jp.getSignature();//signature content :String com.unfair.service.LoginService.checkUserInfo(LoginInfoDTO,String)System.out.println("signature content :" +signature);if (dto == null){System.out.println("参数为空");System.out.println("ferao aop around2 anntation success ..");return "aop为空返回";}else{System.out.println("参数不为空");System.out.println(dto);System.out.println("ferao aop around3 anntation success ..");return "aop不为空返回";}
}
前面提到,当不关心方法返回值的时候,我们在编写切点指示器的时候使用了 * ,当不关心方法参数的时候,我们使用了 ..。
现在如果我们需要传入参数,并且有返回值的时候,则需要使用对应的类型。在编写通知的时候,我们也需要声明对应的返回值类型和参数类型。
public class AppTest {public static void main(String[] args) {AnnotationConfigApplicationContext context = new AnnotationConfigApplicationContext(AppConfig.class);Boy boy = context.getBean("boy",Boy.class);Girl girl = (Girl) context.getBean("girl");String boyBought = boy.buy(35);String girlBought = girl.buy(99.8);System.out.println("男孩买到了:" + boyBought);System.out.println("女孩买到了:" + girlBought);}
}
//男孩花了35.0元买了一个游戏机
//女孩花了99.8元买了一件漂亮的衣服
//女孩买衣服超过了68元,赠送一双袜子
//男孩买到了:游戏机
//女孩买到了:衣服和袜子
注解配置织入的方式
前面还有一个遗留问题,在配置文件中,我们用注解 @EnableAspectJAutoProxy() 启用Spring AOP 的时候,我们给参数 proxyTargetClass 赋值为 true,如果我们不写参数,默认为 false。这个时候运行程序,程序抛出异常

这是一个强制类型转换异常。为什么会抛出这个异常呢?或许已经能够想到,这跟Spring AOP 动态代理的机制有关,这个 proxyTargetClass 参数决定了代理的机制。当这个参数为 false 时,
通过jdk的基于接口的方式进行织入,这时候代理生成的是一个接口对象,将这个接口对象强制转换为实现该接口的一个类,自然就抛出了上述类型转换异常。
反之,proxyTargetClass 为 true,则会使用 cglib 的动态代理方式。这种方式的缺点是拓展类的方法被final修饰时,无法进行织入。测试一下,将 proxyTargetClass 参数设为 true,同时将 Girl.java 的 Buy 方法用 final 修饰
@Configuration
@ComponentScan(basePackageClasses = {com.sharpcj.aopdemo.test1.IBuy.class})
@EnableAspectJAutoProxy(proxyTargetClass = true)
public class AppConfig {
}
@Component
public class Girl implements IBuy {@Overridepublic final String buy(double price) {System.out.println(String.format("女孩花了%s元买了一件漂亮的衣服", price));return "衣服";}
}
public class AppTest {public static void main(String[] args) {AnnotationConfigApplicationContext context = new AnnotationConfigApplicationContext(AppConfig.class);Boy boy = context.getBean("boy",Boy.class);Girl girl = (Girl) context.getBean("girl");String boyBought = boy.buy(35);String girlBought = girl.buy(99.8);System.out.println("男孩买到了:" + boyBought);System.out.println("女孩买到了:" + girlBought);}
}
//男孩花了35.0元买了一个游戏机
//女孩花了99.8元买了一件漂亮的衣服
//男孩买到了:游戏机
//女孩买到了:衣服
切面并没有织入生效
spring注解大全
@ConfigurationProperties
PropertyPlaceholderConfigurer(获取变量)
-
@ConfigurationProperties
在 SpringBoot 中,当想需要获取到配置文件数据时,除了可以用 Spring 自带的 @Value 注解外,SpringBoot 还提供了一种更加方便的方式:@ConfigurationProperties。
只要在 Bean 上添加上了这个注解,指定好配置文件的前缀,那么对应的配置文件数据就会自动填充到 Bean 中。
例:application.properties
config.username=jay.zhou
config.password=3333
TestBean.java
import org.springframework.boot.context.properties.ConfigurationProperties; import org.springframework.stereotype.Component;@Component @ConfigurationProperties(prefix = "config") public class TestBean{private String username;private String password; } -
PropertyPlaceholderConfigurer(获取变量)
org.springframework.beans.factory.config.PropertyPlaceholderConfigurer类
作用是将properties(key/value形式)文件中一些动态设定的值(value),在xml中替换为占位该键
($key$)的值。而properties文件可以根据客户需求,自定义一些相关的参数,这样的设计可提供程序的灵活性。在spring中,使用PropertyPlaceholderConfigurer可以在xml配置文件中加入外部属性,当然也可以指定外部文件的编码。
-
引入单一外部属性文件
<bean id="propertyConfigurerForAnalysis" class="org.springframework.beans.factory.config.PropertyPlaceholderConfigurer"> <property name="location"> <value>classpath:/spring/include/dbQuery.properties</value> </property> <property name="fileEncoding"> <value>UTF-8</value> </property> </bean> -
引入多个外部属性文件
<bean id="propertyConfigurer" class="org.springframework.beans.factory.config.PropertyPlaceholderConfigurer">  <property name="locations">  <list>  <value>classpath:/spring/include/jdbc-parms.properties</value>  <value>classpath:/spring/include/base-config.properties</value>  <value>classpath*:config/jdbc.properties</value>  </list>  </property>
</bean>
[注]根据示例案例可以看出,PropertyPlaceholderConfigurer起的作用是将占位符指向数据库配置信息放在bean中定义的工具
示例
properties文件:
url=jdbc:mysql://localhost:3306/db1?useUnicode=true&characterEncoding=UTF-8&zeroDateTimeBehavior=round;
user=root
password=root
beans.xml
<bean id="propertyConfigurer" class="org.springframework.beans.factory.config.PropertyPlaceholderConfigurer"><property name="order" value="1" /><property name="systemPropertiesModeName" value="SYSTEM_PROPERTIES_MODE_OVERRIDE" /><property name="ignoreResourceNotFound" value="true" /><property name="fileEncoding" value="UTF-8" /><property name="locations"><list><value>classpath:runtime.properties</value></list></property><property name="placeholderPrefix" value="@[" /><property name="placeholderSuffix" value="]" />
</bean><!-- 数据库连接池 -->
<bean id="dataSource" class="com.mchange.v2.c3p0.ComboPooledDataSource"><!-- 配置连接池属性 --><property name="driverClass" value="com.mysql.jdbc.Driver"/><property name="jdbcUrl" value="@[url]"/><property name="user" value="@[user]"/><property name="password" value="@[password]"/>
[注]
1.order属性代表其加载顺序
2.ignoreResourceNotFound是否忽略找不到的resource,如果配置多个resource,则需要设置为true
3.ignoreUnresolvablePlaceholders是否忽略不可解析的Placeholder,如果配置多个PropertyPlaceholderConfigurer,则需设置为true
4.一定要在properties文件中&写为&因为在xml文件中不识别&,必须是&
-
-
@Configuration(用户定义配置类)
从spring3.0,开始出现用户定义配置类(@Configuration),可替换xml配置文件.
被注解的类内部包含一个或多个被@bean注解的方法,这些注解将会被AnnotationConfigApplicationContext或AnnotationConfigWebApplicationContext类进行扫描,用于构建bean定义,初始化Spring容器
@Configuration标注在类上,相当于把该类作为spring的xml配置文件中的
<beans>,作为spring容器,示例如下:@Configuration public class TestConfiguration {public TestConfiguration() {System.out.println("TestConfiguration容器启动初始化。。。");} }<?xml version="1.0" encoding="UTF-8"?> <beans xmlns="http://www.springframework.org/schema/beans" xmlns:xsi="http://www.w3.org/2001/XMLSchema-instance"xmlns:context="http://www.springframework.org/schema/context" xmlns:jdbc="http://www.springframework.org/schema/jdbc" xmlns:jee="http://www.springframework.org/schema/jee" xmlns:tx="http://www.springframework.org/schema/tx"xmlns:util="http://www.springframework.org/schema/util" xmlns:task="http://www.springframework.org/schema/task" xsi:schemaLocation="http://www.springframework.org/schema/beans http://www.springframework.org/schema/beans/spring-beans-4.0.xsdhttp://www.springframework.org/schema/context http://www.springframework.org/schema/context/spring-context-4.0.xsdhttp://www.springframework.org/schema/jdbc http://www.springframework.org/schema/jdbc/spring-jdbc-4.0.xsdhttp://www.springframework.org/schema/jee http://www.springframework.org/schema/jee/spring-jee-4.0.xsdhttp://www.springframework.org/schema/tx http://www.springframework.org/schema/tx/spring-tx-4.0.xsdhttp://www.springframework.org/schema/util http://www.springframework.org/schema/util/spring-util-4.0.xsdhttp://www.springframework.org/schema/task http://www.springframework.org/schema/task/spring-task-4.0.xsd" default-lazy-init="false"></beans>public class TestMain {public static void main(String[] args) {// @Configuration注解的spring容器加载方式,用AnnotationConfigApplicationContext替换ClassPathXmlApplicationContextApplicationContext context = new AnnotationConfigApplicationContext(TestConfiguration.class);// 如果加载spring-context.xml文件:// ApplicationContext context = new// ClassPathXmlApplicationContext("spring-context.xml");} } -
@Bean(返回值作bean对象)
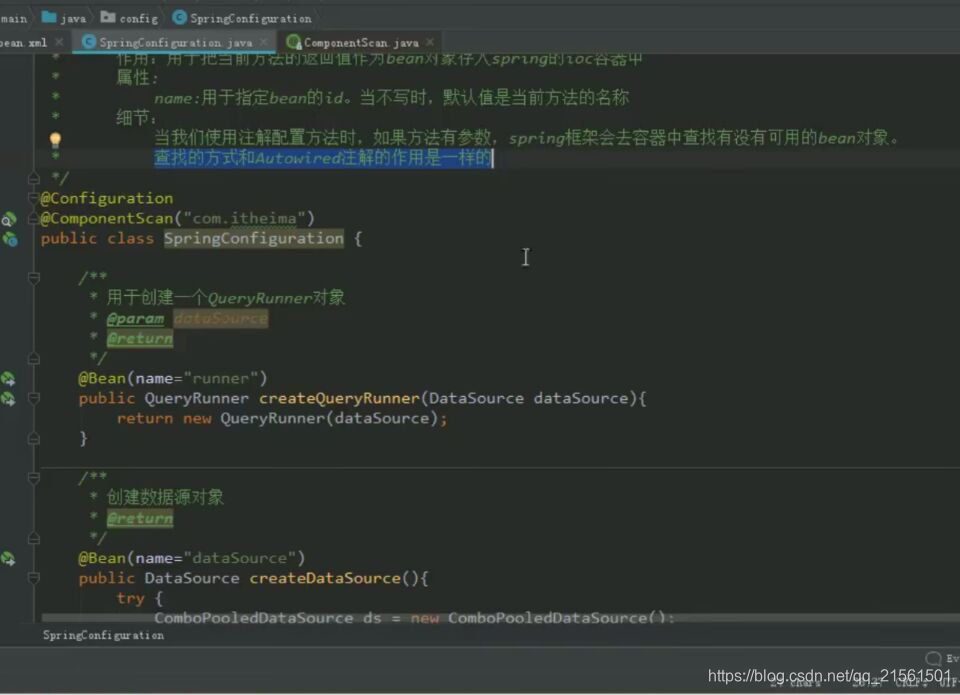
用于把当前方法的返回值作为bean对象存入spring的容器中,name属性用于指定bean的id ,当不写时,默认值是当前方法的名称
当我们使用注解配置方法时,如果方法有参数,Spring 框架会去容器中查找有没有可用的bean对象。查找的方式和Autowrited注解是一样的
-
@ComponentScan(指定扫描位置)
用于通过注解指定spring在创建容器时要扫描的包。
@ComponentScan有value属性,它和beanPackages的作用是一样的,都是用于指定创建容器时要扫描的包我们使用此注解就等同于在xml中配置了
<context:component-scan base-package="com.tt"></context:component-scan> -
@RestControllerAdvice(清洗请求)
在spring3.2中新增的注解,放置于类前,用于定义@ExceptionHandler、@InitBinder、@ModelAttribute,使得在所有controller中接收到的请求都经过被此注解所标注的类中请求
这里要注意,@ExceptionHandler该注解处于被@RestControllerAdvice标注的类中时,该项目所有请求存在异常时都经过该注解来处理,属性value指定需要拦截的异常类型,value可省略不写如拦截exception,只需写@ExceptionHandler(value=MyException.class)
public class ControllerAdvice {/*** 应用到所有@RequestMapping注解方法,在其执行之前初始化数据绑定器* @param binder*/@InitBinderpublic void initBinder(WebDataBinder binder) {}/*** 把值绑定到Model中,使全局@RequestMapping可以获取到该值* @param model*/@ModelAttributepublic void addAttributes(Model model) {model.addAttribute("author", "ferao-system");}/*** 全局异常捕捉处理* @param ex* @return*/@ResponseBody@ExceptionHandler(value = Exception.class)public Map errorHandler(Exception ex) {Map map = new HashMap();map.put("code", 100);map.put("msg", ex.getMessage());return map;}
}