文章目录
- 一、前文
- 二、特征提取流程
- 三、界面布局
- 四、功能实现
- 4.1 打开图片
- 4.2 特征提取—源码
- 4.3 特征提取—参数讲解
- 4.4 特征提取—Detect和DetectRegions
- 五、运行效果图
- 六、发现并解决问题
- 七、其他问题
一、前文
MSER = Maximally Stable Extremal Regions
最大极值稳定区
业界认为是性能最好的仿射不变区域,MSER是当使用不同的灰度阈值对图像进行二值化时得到的最稳定的区域,特点:
1.对于图像灰度的仿射变化具有不变性
2.稳定性,区域的支持集相对灰度变化稳定
3.可以检测不同精细程度的区域
二、特征提取流程
- 使用一系列灰度阈值对图像进行二值化处理
- 对于每个阈值得到的二值图像,得到相应的黑色区域与白色区域
- 在比较宽的灰度阈值范围内保持形状稳定的区域就是MSERs
- 评判标准:
dA/dt,A: 二值图像区域面积,t: 灰度
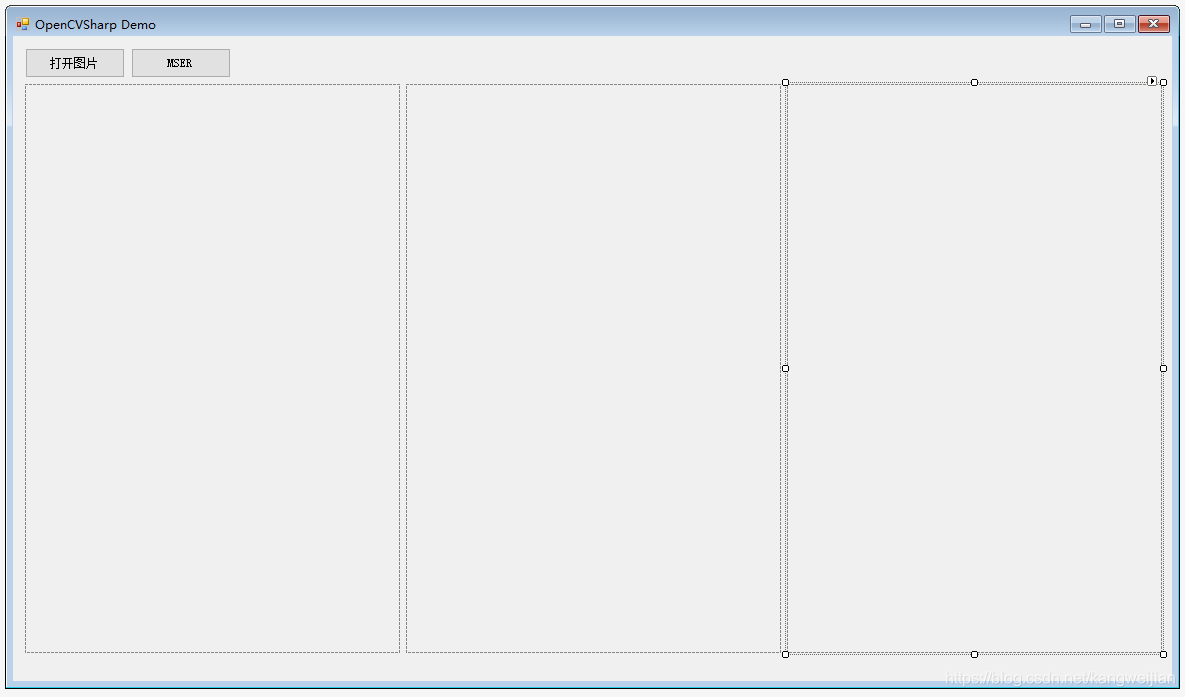
三、界面布局
- 一个
Label - 两个
Button - 三个
Picture
四、功能实现
4.1 打开图片
private void openFileBtn_Click(object sender, EventArgs e){OpenFileDialog openfiledialog = new OpenFileDialog();openfiledialog.Filter = "PNG Files (*.png)|*.png|JPG Files (*.jpg)|*.jpg|GIF Files (*.gif)|*.gif";openfiledialog.RestoreDirectory = true;if (openfiledialog.ShowDialog() == DialogResult.OK){Console.WriteLine(openfiledialog.FileName);fileName = openfiledialog.FileName;//Mat src = new Mat("foo.png", LoadMode.Color);Mat src = new Mat(fileName);//Mat src = new Mat(fileName, ImreadModes.Color);var frameBitmap = BitmapConverter.ToBitmap(src);pictureBox1.Image?.Dispose();pictureBox1.Image = frameBitmap;}}
4.2 特征提取—源码
private void mserBtn_Click(object sender, EventArgs e)
{if (String.IsNullOrEmpty(fileName)){MessageBox.Show("请先打开一个图片");return;}Mat src = new Mat(fileName);Mat gray = new Mat();Mat dst = src.Clone();Cv2.CvtColor(src, gray, ColorConversionCodes.BGR2GRAY);int delta = 5;int minArea = 60;int maxArea = 14400;//int maxArea = 100000;double maxVariation = 0.25;MSER mser = MSER.Create(delta, minArea, maxArea, maxVariation);DateTime currentTime = DateTime.Now;KeyPoint[] contours = mser.Detect(gray, null); resultLabel.Text = "Detect耗时:" + (System.DateTime.Now - currentTime).TotalMilliseconds + "ms";Console.WriteLine("contours len="+ contours.Length);currentTime = DateTime.Now;Point[][] outPoint;Rect[] bboxes;InputArray input = InputArray.Create(gray);mser.DetectRegions(input, out outPoint, out bboxes);resultLabel.Text += ",  DetectRegions耗时:" + (System.DateTime.Now - currentTime).TotalMilliseconds + "ms";Console.WriteLine("bboxes len=" + bboxes.Length);gray = src.Clone();foreach (KeyPoint pts in contours){gray.Circle((int)pts.Pt.X, (int)pts.Pt.Y, (int)pts.Size, Scalar.Black);gray.Circle((int)pts.Pt.X, (int)pts.Pt.Y, (int)1, Scalar.Black, 2);Console.WriteLine("("+pts.Pt.X+" , "+pts.Pt.Y+") Size="+pts.Size+", Angle="+pts.Angle+", Response="+pts.Response + ", ClassId=" + pts.ClassId);}foreach (Point[] pts in outPoint){foreach (Point p in pts){dst.Circle(p, 1, Scalar.Black);}}foreach (Rect b in bboxes){dst.Rectangle(b, Scalar.Black, 2);}srcPictureBox.Image = BitmapConverter.ToBitmap(src); grayPictureBox.Image = BitmapConverter.ToBitmap(gray); dstPictureBox.Image = BitmapConverter.ToBitmap(dst);
}
4.3 特征提取—参数讲解
MSER在
detect的时候不需要传特别的参数
只需要在Create的时候传递参数
//
// 摘要:
//     Creates MSER parameters
//
// 参数:
//   delta:
//     delta, in the code, it compares (size_{i}-size_{i-delta})/size_{i-delta}
//
//   minArea:
//     prune the area which smaller than min_area
//
//   maxArea:
//     prune the area which bigger than max_area
//
//   maxVariation:
//     prune the area have simliar size to its children
//
//   minDiversity:
//     trace back to cut off mser with diversity < min_diversity
//
//   maxEvolution:
//     for color image, the evolution steps
//
//   areaThreshold:
//     the area threshold to cause re-initialize
//
//   minMargin:
//     ignore too small margin
//
//   edgeBlurSize:
//     the aperture size for edge blur
public static MSER Create(int delta = 5, int minArea = 60, int maxArea = 14400, double maxVariation = 0.25, double minDiversity = 0.2, int maxEvolution = 200, double areaThreshold = 1.01, double minMargin = 0.003, int edgeBlurSize = 5);
delta,区域的灰度差minArea,检测区域面积(像素数)的下限maxArea,检测区域面积(像素数)的上限maxVariation,区域与子区域间的偏差的上限
剩下的参数是
MSCR使用,这个C是Color的C
若输入的是灰度图像,则使用MSER
若输入的是彩色图像,则使用MSCR
minDiversity,For color image, trace back to cut off mser with diversity less than min_diversitymaxEvolution,For color image, the evolution stepsareaThreshold, For color image, the area threshold to cause re-initializeminMargin,For color image, ignore too small marginedgeBlurSize,For color image, the aperture size for edge blur
4.4 特征提取—Detect和DetectRegions
OpenCV库中存在两个检测方法,Detect和DetectRegions
Detect返回的是KeyPoint数组,包含了:
- 中心点
Point2f - 特征大小
Size - 特征角度
Angle - 特征强度
Response Octave、ClassId等
DetectRegions返回的是二维数组Point和一位数组Rect
- 二位数组
Point,有N个区域,每个区域的所有点Point - 一位数组
Rect,有N个区域,每个区域的Rect
五、运行效果图
- 从左到右
- 第一张是原图
- 第二张是
Detect结果图- 将检测发现的结果的中间描黑,按照结果的
size画个圆
- 将检测发现的结果的中间描黑,按照结果的
- 第三张是
DetectRegions结果图- 将检测发现的区域全部描黑
- 将检测发现的区域Rect框起来

六、发现并解决问题
这时候会发现一个问题,为啥右上角的绿色长方形没有被识别出来
思考了一下,大胆猜测是因为面积太大了。
因为,也想不到别的因素了,小正方形的绿色都识别出来了,为啥更大的长方形绿色没有被识别出来。颜色因素排除,那只有面积了。
更改了下代码
//int maxArea = 14400;int maxArea = 100000;
运行:

堪称完美
七、其他问题
当然还是存在其他问题没解决
- 最后两张,是一样的图,but一个是
jpg,一个是png,但是提取的效果就完全不一样 - 猜测可能是数据转换过程有不一样的地方
- 仅仅是猜测后续再花时间验证,如有大佬看到并晓得原因,不吝赐教


觉得好,就一键三连呗(点赞+收藏+关注)


![python从小白到大牛百度云盘_Java从小白到大牛 (关东升著) 中文pdf+mobi版[36MB]](https://img.jbzj.com/do/uploads/litimg/190528/1H5032I915.jpg)


![python从小白到大牛pdf 下载 资源共享_Kotlin从小白到大牛 (关东升著) 中文pdf高清版[12MB]...](https://img.jbzj.com/do/uploads/litimg/190516/1HZ62M442.jpg)