1 背景
一般Unity都是RGB直接渲染的,但是总有特殊情况下,需要渲染YUV数据。比如,Unity读取Android的Camera YUV数据,并渲染。本文就基于这种情况,来展开讨论。
Unity读取Android的byte数组,本身就耗时,如果再把YUV数据转为RGB也在脚本中实现(即CPU运行),那就很卡了。
一种办法,就是这个转换,放在GPU完成,即,在shader实现!
接下来,分2块来贴出源码和实现。
2 YUV数据来源 ---- Android 侧
Android的Camera数据,一般是YUV格式的,最常用的就是NV21。其像素布局如下:
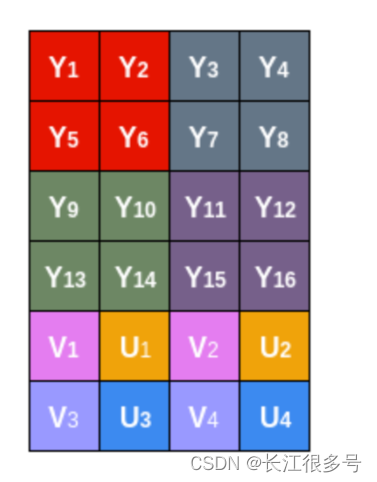
即数据排列是YYYYVUVU…
现在,Android就做一项工作,打开Camera,随便渲染到一个空纹理,然后呢,获得Preview的帧数据。
用一个SimpleCameraPlugin作为Unity调用Android的接口类:
代码如下:
package com.chenxf.unitycamerasdk;import android.app.Activity;
import android.content.Context;
import android.graphics.Point;
import android.graphics.SurfaceTexture;
import android.hardware.Camera;
import android.opengl.GLES11Ext;
import android.opengl.GLES20;
import android.os.Handler;
import android.os.Looper;
import android.os.Message;
import android.util.Log;
import android.util.Size;/**** 直接读取YUV数据,在unity渲染的方案*/
public class SimpleCameraPlugin implements SurfaceTexture.OnFrameAvailableListener,  Camera.PreviewCallback {private static final String TAG = "qymv#CameraPlugin";private final static int REQUEST_CODE = 1;private final static int MSG_START_PREVIEW = 1;private final static int MSG_SWITCH_CAMERA = 2;private final static int MSG_RELEASE_PREVIEW = 3;private final static int MSG_MANUAL_FOCUS = 4;private final static int MSG_ROCK = 5;private SurfaceTexture mSurfaceTexture;private boolean mIsUpdateFrame;private Context mContext;private Handler mCameraHanlder;private Size mExpectedPreviewSize;private Size mPreviewSize;private boolean isFocusing;private int mWidth;private int mHeight;private byte[] yBuffer = null;private byte[] uvBuffer = null;public SimpleCameraPlugin() {Log.i(TAG, " create");initCameraHandler();}private void initCameraHandler() {mCameraHanlder = new Handler(Looper.getMainLooper()) {@Overridepublic void handleMessage(Message msg) {switch (msg.what) {case MSG_START_PREVIEW:startPreview();break;case MSG_RELEASE_PREVIEW:releasePreview();break;case MSG_SWITCH_CAMERA://switchCamera();break;case MSG_MANUAL_FOCUS://manualFocus(msg.arg1, msg.arg2);break;case MSG_ROCK:autoFocus();break;default:break;}}};}public void releasePreview() {CameraUtil.releaseCamera();
//        mCameraSensor.stop();
//        mFocusView.cancelFocus();Log.e(TAG, "releasePreview releaseCamera");}public void startPreview() {//if (mPreviewSize != null && requestPermission() ) {if (mExpectedPreviewSize != null) {if (CameraUtil.getCamera() == null) {CameraUtil.openCamera();Log.e(TAG, "openCamera");//CameraUtil.setDisplay(mSurfaceTexture);}Camera.Size previewSize = CameraUtil.startPreview((Activity) mContext, mExpectedPreviewSize.getWidth(), mExpectedPreviewSize.getHeight());CameraUtil.setCallback(this);if(previewSize != null) {mWidth = previewSize.width;mHeight = previewSize.height;mPreviewSize = new Size(previewSize.width, previewSize.height);initSurfaceTexture(previewSize.width, previewSize.height);initBuffer(previewSize.width, previewSize.height);CameraUtil.setDisplay(mSurfaceTexture);}}}private void initBuffer(int width, int height) {yBuffer = new byte[width * height];uvBuffer = new byte[width * height / 2];}public void autoFocus() {if (CameraUtil.isBackCamera() && CameraUtil.getCamera() != null) {focus(mWidth / 2, mHeight / 2, true);}}private void focus(final int x, final int y, final boolean isAutoFocus) {Log.i(TAG, "focus, position: " + x + " " + y);if (CameraUtil.getCamera() == null || !CameraUtil.isBackCamera()) {return;}if (isFocusing && isAutoFocus) {return;}if (mWidth == 0 || mHeight == 0)return;isFocusing = true;Point focusPoint = new Point(x, y);Size screenSize = new Size(mWidth, mHeight);if (!isAutoFocus) {//mFocusView.beginFocus(x, y);}CameraUtil.newCameraFocus(focusPoint, screenSize, new Camera.AutoFocusCallback() {@Overridepublic void onAutoFocus(boolean success, Camera camera) {isFocusing = false;if (!isAutoFocus) {//mFocusView.endFocus(success);}}});}/*** 初始化* 调用该函数需要EGL 线程,否则会出现如下错误* libEGL  : call to OpenGL ES API with no current context** @param context           android的context,最好传递activity的上下文* @param width             纹理宽* @param height            纹理高*/public void start(Context context, int width, int height) {Log.w(TAG, "Start  context " + context);mContext = context;mWidth = width;mHeight = height;callStartPreview(width, height);}private void callStartPreview(int width, int height) {mExpectedPreviewSize = new Size(width, height);mCameraHanlder.sendEmptyMessage(MSG_START_PREVIEW);mCameraHanlder.sendEmptyMessageDelayed(MSG_ROCK, 2000);}public void resume() {}public void pause() {mCameraHanlder.sendEmptyMessage(MSG_RELEASE_PREVIEW);}private void initSurfaceTexture(int width, int height) {Log.i(TAG, "initSurfaceTexture " + " width " + width + " height " + height);//生成CAMERA输出的纹理idint videoTextureId = createOESTextureID();//根据创建的纹理id生成一个SurfaceTexture, 视频播放输出到surface texturemSurfaceTexture = new SurfaceTexture(videoTextureId);mSurfaceTexture.setDefaultBufferSize(width, height);mSurfaceTexture.setOnFrameAvailableListener(this);}@Overridepublic void onFrameAvailable(SurfaceTexture surfaceTexture) {Log.i(TAG, "onFrameAvailable");//视频播放开始有输出mIsUpdateFrame = true;if (frameListener != null) {frameListener.onFrameAvailable();}}/*** Unity调用,更新视频纹理,然后绘制FBO*/public void updateTexture() {Log.i(TAG, "onFrameAvailable");mIsUpdateFrame = false;mSurfaceTexture.updateTexImage();}public boolean isUpdateFrame() {return mIsUpdateFrame;}@Overridepublic void onActivityResume() {resume();}@Overridepublic void onActivityPause() {pause();}private FrameListener frameListener;public void setFrameListener(FrameListener listener) {frameListener = listener;}private synchronized boolean copyFrame(byte[] bytes) {Log.i(TAG, "copyFrame start");if(yBuffer != null && uvBuffer != null) {System.arraycopy(bytes, 0, yBuffer, 0, yBuffer.length);int uvIndex = yBuffer.length;System.arraycopy(bytes, uvIndex, uvBuffer, 0, uvBuffer.length);Log.i(TAG, "copyFrame end");return true;}return false;}public synchronized byte[] readYBuffer() {Log.i(TAG, "readYBuffer");return yBuffer;}public synchronized byte[] readUVBuffer() {Log.i(TAG, "readUVBuffer");return uvBuffer;}public int getPreviewWidth() {Log.i(TAG, "getPreviewWidth " + mWidth);return mWidth;}public int getPreviewHeight() {Log.i(TAG, "getPreviewWidth " + mHeight);return mHeight;}@Overridepublic void onPreviewFrame(byte[] bytes, Camera camera) {if(copyFrame(bytes)) {UnityMsgBridge.notifyGotFrame();}}public interface FrameListener {void onFrameAvailable();}public static int createOESTextureID() {int[] texture = new int[1];GLES20.glGenTextures(texture.length, texture, 0);GLES20.glBindTexture(GLES11Ext.GL_TEXTURE_EXTERNAL_OES, texture[0]);GLES20.glTexParameteri(GLES11Ext.GL_TEXTURE_EXTERNAL_OES, GLES20.GL_TEXTURE_MIN_FILTER, GLES20.GL_LINEAR);GLES20.glTexParameteri(GLES11Ext.GL_TEXTURE_EXTERNAL_OES, GLES20.GL_TEXTURE_MAG_FILTER, GLES20.GL_LINEAR);GLES20.glTexParameteri(GLES11Ext.GL_TEXTURE_EXTERNAL_OES, GLES20.GL_TEXTURE_WRAP_S, GLES20.GL_CLAMP_TO_EDGE);GLES20.glTexParameteri(GLES11Ext.GL_TEXTURE_EXTERNAL_OES, GLES20.GL_TEXTURE_WRAP_T, GLES20.GL_CLAMP_TO_EDGE);return texture[0];}
}
依赖很少,有个CameraUtils来打开摄像头:
package com.qiyi.unitycamerasdk;import android.app.Activity;
import android.content.Context;
import android.content.pm.PackageManager;
import android.graphics.Point;
import android.graphics.Rect;
import android.graphics.SurfaceTexture;
import android.hardware.Camera;
import android.os.Build;
import android.util.Log;
import android.util.Size;
import android.view.Surface;import java.io.IOException;
import java.util.ArrayList;
import java.util.Collections;
import java.util.Comparator;
import java.util.List;/*** Created By Chengjunsen on 2018/8/23*/
public class CameraUtil {private static final String TAG = "qymv#CameraUtil";private static Camera mCamera = null;private static int mCameraID = Camera.CameraInfo.CAMERA_FACING_FRONT;public static void openCamera() {mCamera = Camera.open(mCameraID);if (mCamera == null) {throw new RuntimeException("Unable to open camera");}}public static Camera getCamera() {return mCamera;}public static void releaseCamera() {if (mCamera != null) {mCamera.stopPreview();mCamera.release();mCamera = null;}}public static void setCameraId(int cameraId) {mCameraID = cameraId;}public static void switchCameraId() {mCameraID = isBackCamera() ? Camera.CameraInfo.CAMERA_FACING_FRONT : Camera.CameraInfo.CAMERA_FACING_BACK;}public static boolean isBackCamera() {return mCameraID == Camera.CameraInfo.CAMERA_FACING_BACK;}public static void setDisplay(SurfaceTexture surfaceTexture) {try {if (mCamera != null) {mCamera.setPreviewTexture(surfaceTexture);}} catch (IOException e) {e.printStackTrace();}}public static Camera.Size startPreview(Activity activity, int width, int height) {if (mCamera != null) {int mOrientation = getCameraPreviewOrientation(activity, mCameraID);//int mOrientation = 90;mCamera.setDisplayOrientation(mOrientation);Camera.Parameters parameters = mCamera.getParameters();Camera.Size bestPreviewSize = getOptimalSize(parameters.getSupportedPreviewSizes(), width, height);parameters.setPreviewSize(bestPreviewSize.width, bestPreviewSize.height);Camera.Size bestPictureSize = getOptimalSize(parameters.getSupportedPictureSizes(), width, height);parameters.setPictureSize(bestPictureSize.width, bestPictureSize.height);parameters.setFocusMode(Camera.Parameters.FOCUS_MODE_AUTO);mCamera.setParameters(parameters);mCamera.startPreview();Log.d(TAG, "camera startPreview: (" + width + " x " + height +")" + " bestPreviewSize " + bestPreviewSize.width + "X" + bestPreviewSize.height );return bestPreviewSize;}return null;}public static Camera.Size getPreviewSize() {if(mCamera != null && mCamera.getParameters() != null) {return mCamera.getParameters().getPreviewSize();}return null;}public static void setCallback(Camera.PreviewCallback callback) {if(mCamera != null) {mCamera.setPreviewCallback(callback);}}/*** 获取最合适的尺寸* @param supportList* @param width* @param height* @return*/private static Camera.Size getOptimalSize(List<Camera.Size> supportList, int width, int height) {// camera的宽度是大于高度的,这里要保证expectWidth > expectHeightint expectWidth = Math.max(width, height);int expectHeight = Math.min(width, height);// 根据宽度进行排序Collections.sort(supportList, new Comparator<Camera.Size>() {@Overridepublic int compare(Camera.Size pre, Camera.Size after) {if (pre.width > after.width) {return 1;} else if (pre.width < after.width) {return -1;}return 0;}});Camera.Size result = supportList.get(0);boolean widthOrHeight = false; // 判断存在宽或高相等的Size// 辗转计算宽高最接近的值for (Camera.Size size: supportList) {// 如果宽高相等,则直接返回if (size.width == expectWidth && size.height == expectHeight) {result = size;break;}// 仅仅是宽度相等,计算高度最接近的sizeif (size.width == expectWidth) {widthOrHeight = true;if (Math.abs(result.height - expectHeight)> Math.abs(size.height - expectHeight)) {result = size;}}// 高度相等,则计算宽度最接近的Sizeelse if (size.height == expectHeight) {widthOrHeight = true;if (Math.abs(result.width - expectWidth)> Math.abs(size.width - expectWidth)) {result = size;}}// 如果之前的查找不存在宽或高相等的情况,则计算宽度和高度都最接近的期望值的Sizeelse if (!widthOrHeight) {if (Math.abs(result.width - expectWidth)> Math.abs(size.width - expectWidth)&& Math.abs(result.height - expectHeight)> Math.abs(size.height - expectHeight)) {result = size;}}}return result;}public static int getCameraPreviewOrientation(Activity activity, int cameraId) {if (mCamera == null) {throw new RuntimeException("mCamera is null");}Camera.CameraInfo info = new Camera.CameraInfo();Camera.getCameraInfo(cameraId, info);int result;int degrees = getRotation(activity);//前置if (info.facing == Camera.CameraInfo.CAMERA_FACING_FRONT) {result = (info.orientation + degrees) % 360;result = (360 - result) % 360;}//后置else {result = (info.orientation - degrees + 360) % 360;}return result;}/*** 对焦* @param focusPoint 焦点位置* @param screenSize 屏幕尺寸* @param callback 对焦成功或失败的callback* @return*/public static boolean newCameraFocus(Point focusPoint, Size screenSize, Camera.AutoFocusCallback callback) {if (mCamera == null) {throw new RuntimeException("mCamera is null");}Point cameraFoucusPoint = convertToCameraPoint(screenSize, focusPoint);Rect cameraFoucusRect = convertToCameraRect(cameraFoucusPoint, 100);Camera.Parameters parameters = mCamera.getParameters();if (Build.VERSION.SDK_INT > 14) {if (parameters.getMaxNumFocusAreas() <= 0) {return focus(callback);}clearCameraFocus();List<Camera.Area> focusAreas = new ArrayList<Camera.Area>();// 100是权重focusAreas.add(new Camera.Area(cameraFoucusRect, 100));parameters.setFocusAreas(focusAreas);// 设置感光区域parameters.setMeteringAreas(focusAreas);try {mCamera.setParameters(parameters);} catch (Exception e) {e.printStackTrace();return false;} }return focus(callback);}private static boolean focus(Camera.AutoFocusCallback callback) {if (mCamera == null) {return false;}mCamera.cancelAutoFocus();mCamera.autoFocus(callback);return true;}/*** 清除焦点*/public static void clearCameraFocus() {if (mCamera == null) {throw new RuntimeException("mCamera is null");}mCamera.cancelAutoFocus();Camera.Parameters parameters = mCamera.getParameters();parameters.setFocusAreas(null);parameters.setMeteringAreas(null);try {mCamera.setParameters(parameters);} catch (Exception e) {e.printStackTrace();}}/*** 将屏幕坐标转换成camera坐标* @param screenSize* @param focusPoint* @return cameraPoint*/private static Point convertToCameraPoint(Size screenSize, Point focusPoint){int newX = focusPoint.y * 2000/screenSize.getHeight() - 1000;int newY = -focusPoint.x * 2000/screenSize.getWidth() + 1000;return new Point(newX, newY);}private static Rect convertToCameraRect(Point centerPoint, int radius) {int left = limit(centerPoint.x - radius, 1000, -1000);int right = limit(centerPoint.x + radius, 1000, -1000);int top = limit(centerPoint.y - radius, 1000, -1000);int bottom = limit(centerPoint.y + radius, 1000, -1000);return new Rect(left, top, right, bottom);}private static int limit(int s, int max, int min) {if (s > max) { return max; }if (s < min) { return min; }return s;}public static int getRotation(Activity activity) {int rotation = activity.getWindowManager().getDefaultDisplay().getRotation();int degrees = 0;switch (rotation) {case Surface.ROTATION_0:degrees = 0;break;case Surface.ROTATION_90:degrees = 90;break;case Surface.ROTATION_180:degrees = 180;break;case Surface.ROTATION_270:degrees = 270;break;}return degrees;}
}
1.1 重点代码说明
关键代码在onPreviewFrame,这个是Camera回调的数据。bytes数组的长度是width * height * 1.5。
@Overridepublic void onPreviewFrame(byte[] bytes, Camera camera) {if(copyFrame(bytes)) {UnityMsgBridge.notifyGotFrame();}}
每次得到回调,先拷贝bytes,分成Y数据和UV数据(具体见copyFrame)。然后,通知Unity,说一帧到了,赶紧来读取了。方法如下。
public static void notifyGotFrame() {JSONObject jsonObject = new JSONObject();try {jsonObject.put("type", 2);} catch (JSONException e) {e.printStackTrace();}String msg = jsonObject.toString();UnityPlayer.UnitySendMessage("Canvas", "OnJavaMessage", msg);}
如果想更深入了解有关Unity跟Android如何交互,请参考Unity同步或异步调用Android的方法
。
3 Unity读取并渲染
首先,Unity在Canvas节点下, 搞一个RawImage,用于渲染数据。
然后,新建一个shader,代码如下:
// Upgrade NOTE: replaced 'mul(UNITY_MATRIX_MVP,*)' with 'UnityObjectToClipPos(*)'Shader "Custom/UI/YUVRender"
{Properties{_YTex("Texture", 2D) = "white" {}_UVTex("Texture", 2D) = "white" {}}SubShader{// No culling or depthCull Off ZWrite Off ZTest AlwaysPass{CGPROGRAM#pragma vertex vert#pragma fragment frag#include "UnityCG.cginc"struct appdata{float4 vertex : POSITION;float2 uv : TEXCOORD0;};struct v2f{float2 uv : TEXCOORD0;float4 vertex : SV_POSITION;};v2f vert(appdata v){v2f o;o.vertex = UnityObjectToClipPos(v.vertex);o.uv = v.uv;return o;}sampler2D _YTex;sampler2D _UVTex;fixed4 frag(v2f i) : SV_Target{fixed4 col = tex2D(_YTex, i.uv);fixed4 uv4 = tex2D(_UVTex, i.uv);float y = 1.1643 * (col.r - 0.0625);float u = uv4.g - 0.5;float v = uv4.r - 0.5;float r = y + 1.403 * v;float g = y - 0.344 * u - 0.714 * v;float b = y + 1.770 * u;col.rgba = float4(r, g, b, 1.f);return col;}ENDCG}}
}
shader的主要工作,就是从2个纹理中,分别读取Y数据和UV数据。
再新建一个材质,如YUVMateiral,该材质使用上面的shader。
然后,材质赋值给RawImage。
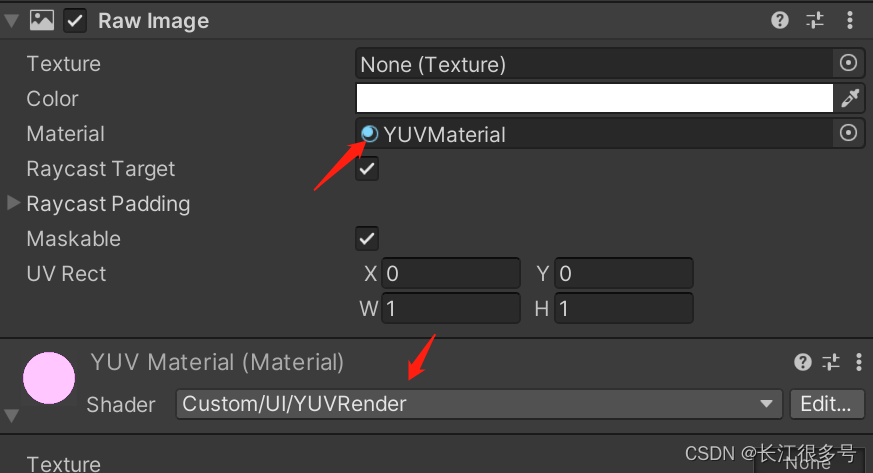
从shader可知,我们把Y数据作为一个纹理,把UV数据作为一个纹理,然后从纹理中提取yuv,转化为RGB,然后渲染。
因为这个转化在GPU完成,所以可以大大提高性能。
接下来看如何读取Android的YUV数据。
搞一个脚本,挂在Canvas下,具体实现如下:
using System.Collections;
using System.Collections.Generic;
using UnityEngine;
using UnityEngine.UI;
using System;
using System.IO;public class TestGetRawYUV : BaseUIController
{private const string TAG = "qymv#Main";public GameObject YUVRawImage;public GameObject StartBtn;public GameObject GetDataBtn;private AndroidJavaObject nativeObject;private int width, height;private Texture2D texture2D;private AndroidJavaObject activity;public Image mYUVImage;int ImageXSize = 0;int ImageYSize = 0;Texture2D m_YImageTex = null;Texture2D m_UVImageTex = null;// Use this for initializationvoid Start(){Debug.Log(TAG + "Start");YUVRawImage = findObjectByPath("YUVRawImage");setBtnClickListener("StartBtn", Click);nativeObject = new AndroidJavaObject("com.qiyi.unitycamerasdk.SimpleCameraPlugin");width = 1600;height = 900;Debug.Log(TAG + " size: " + width + ", " + height);}public void OnJavaMessage(string message){Debug.Log("OnJavaMessage " + message);JSONObject msgObj = new JSONObject(message);float type = -1;if(msgObj.HasField("type")){type = msgObj["type"].n;}if(type == 2){GetData();}}// Update is called once per framevoid Update(){if (texture2D != null && nativeObject != null && nativeObject.Call<bool>("isUpdateFrame")){Debug.Log(TAG + " updateTexture");nativeObject.Call("updateTexture");GL.InvalidateState();}}public void Click(){Debug.Log(TAG + "Click");if(nativeObject == null){Debug.LogError(TAG + "invalid obj!!!");return;}nativeObject.Call("start", activity, width, height);}public void GetData(){if(nativeObject != null){Debug.Log("GetData start");byte[] yData = nativeObject.Call<byte[]>("readYBuffer");byte[] uvData = nativeObject.Call<byte[]>("readUVBuffer");if (yData != null){Debug.Log("get yData, size " + yData.Length);//File.WriteAllBytes("/sdcard/yData.y", yData);}else{Debug.Log("invalid yData");return;}if (uvData != null){Debug.Log("get uvData, size " + uvData.Length);//File.WriteAllBytes("/sdcard/uvData.uv", uvData);}else{Debug.Log("invalid uvData");return;}if(ImageXSize <= 0){ImageXSize = nativeObject.Call<int>("getPreviewWidth");ImageYSize = nativeObject.Call<int>("getPreviewHeight");}if (ImageXSize <= 0 || ImageYSize <= 0)return;if(m_YImageTex == null){m_YImageTex = new Texture2D(ImageXSize, ImageYSize, TextureFormat.R8, false);}m_YImageTex.LoadRawTextureData(yData);m_YImageTex.Apply();if(m_UVImageTex == null){m_UVImageTex = new Texture2D(ImageXSize / 2, ImageYSize / 2, TextureFormat.RG16, false);}m_UVImageTex.LoadRawTextureData(uvData);m_UVImageTex.Apply();YUVRawImage.GetComponent<RawImage>().material.SetTexture("_YTex", m_YImageTex);YUVRawImage.GetComponent<RawImage>().material.SetTexture("_UVTex", m_UVImageTex);Debug.Log("GetData done");}}}总共就2个函数,一个是Click,开始调用Android,打开Camera。
一个GetData,每次收到Android消息都调用,读取Android Y数据和UV数据,上传2个纹理。然后作为材质设置给RawImage。
注意,Y纹理一个像素只有一个字节,所以纹理类型是TextureFormat.R8,大小就是width * height。 UV纹理,一个像素,2个字节,所以纹理类型为TextureFormat.RG16。 UV纹理的大小,只有Y数据的1/4。但这不重要,到shader中,都归一化为0~1的大小了。不影响计算。
最后
最后,把android的代码,编译成一个aar,放到Unity工程的Plugin/Android目录,然后运行,就可以跑起来了!(Camera权限逻辑不再赘述)。