java实现单点登陆(SSO)
网络域名必须完全一致,才代表同一站点。
域名映射 :访问后面的 会跳转到前面
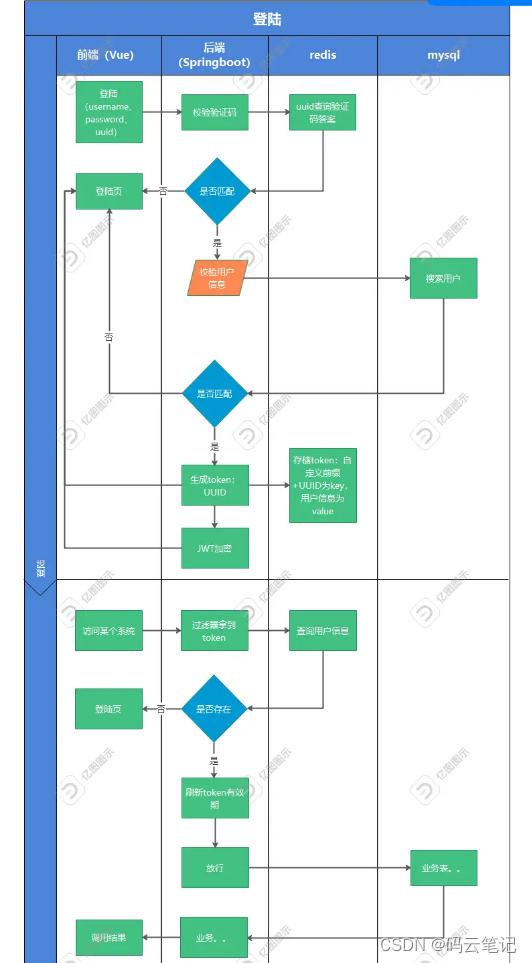
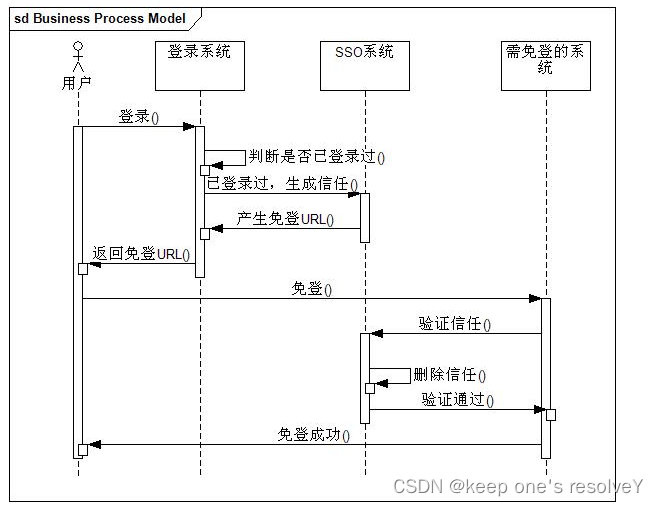
单点登陆概念:
多系统,单一位置登录,实现多系统同时登陆。常出现在互联网和企业级平台中。
单点登陆一般是用于互相授信的系统,实现单一位置登录,全系统有效。
三方登录:某系统使用其他系统的用户,实现本系统登录的方式,如在jd上使用wx登录。解决信息孤岛(共享用户的名字,而不是密码,用户在每个系统都有自己的密码)和用户不对等的实现方案。
登录方式:
session跨域
摒弃系统(tomcat)提供的session,使用自定义的类似session的机制来保存客户端数据的一种解决方案。
如:通过设置cookie的domain实现cookie的跨域传递,在cookie中传递一个自定义的session id,这个session id 是客户端的,将这个标记作为key,将客户端需要保存的数据作为value,在服务端进行保存(数据库保存或者在nosql保存)。
什么是跨域:客户端请求的时候,请求的服务器,不是同一个IP、端口、域名、主机名的时候,都称为跨域。
什么是域:在应用模型,一个完整的,有独立访问路径的功能集合称为一个域,如:百度称为一个应用系统,百度下有若干域,搜索引擎(www.baidu.com)百度贴吧(tieba.baidu.com)百度知道(zhidao.baidu.com)。域信息、有时也称为多级域名。域的划分,以IP、端口、域名、主机名
整个项目采用springboot+maven,只实现了单点登陆而已哦~
maven包(放在父工程即可):
<?xml version="1.0" encoding="UTF-8"?>
<project xmlns="http://maven.apache.org/POM/4.0.0"xmlns:xsi="http://www.w3.org/2001/XMLSchema-instance"xsi:schemaLocation="http://maven.apache.org/POM/4.0.0 http://maven.apache.org/xsd/maven-4.0.0.xsd"><modelVersion>4.0.0</modelVersion><groupId>com.sso</groupId><artifactId>sso-use-cookie</artifactId><packaging>pom</packaging><version>1.0-SNAPSHOT</version><modules><module>sso-main</module><module>sso-vip</module><module>sso-cart</module><module>sso-login</module></modules><dependencies><dependency><groupId>org.springframework.boot</groupId><artifactId>spring-boot-starter-web</artifactId><version>2.2.4.RELEASE</version></dependency><dependency><groupId>org.springframework.boot</groupId><artifactId>spring-boot-starter-thymeleaf</artifactId><version>2.2.4.RELEASE</version></dependency><dependency><groupId>org.springframework.boot</groupId><artifactId>spring-boot-autoconfigure</artifactId><version>2.2.4.RELEASE</version></dependency><dependency><groupId>org.projectlombok</groupId><artifactId>lombok</artifactId><version>1.18.6</version></dependency></dependencies></project>
项目整体:

登录模块(port=9000):

LoginController:
package com.sso.login.controller;import com.sso.login.poho.User;
import com.sso.login.utils.LoginCacheUtil;
import org.springframework.http.HttpStatus;
import org.springframework.http.ResponseEntity;
import org.springframework.stereotype.Controller;
import org.springframework.web.bind.annotation.*;
import org.thymeleaf.util.StringUtils;import javax.servlet.http.Cookie;
import javax.servlet.http.HttpServletResponse;
import javax.servlet.http.HttpSession;
import java.util.HashSet;
import java.util.Optional;
import java.util.Set;
import java.util.UUID;@Controller
@RequestMapping("/login")
public class LoginController {private static Set<User> dbUsers;static {dbUsers = new HashSet<>();dbUsers.add(new User(0,"zhangsan","123456"));dbUsers.add(new User(1,"lisi","123456"));dbUsers.add(new User(0,"wangwu","123456"));}@PostMappingpublic String doLogin(User user, HttpSession session, HttpServletResponse response){String target = (String) session.getAttribute("target");//模拟从数据库中通过登陆的用户名和密码去查找数据库中用户Optional<User> first = dbUsers.stream().filter(dbUser -> dbUser.getUsername().equals(user.getUsername()) &&dbUser.getPassword().equals(user.getPassword())).findFirst();//判断用户是否登陆if(first.isPresent()){//保存用户的登录信息String token = UUID.randomUUID().toString();Cookie cookie = new Cookie("TOKEN",token);cookie.setDomain("codeshop.com");response.addCookie(cookie);LoginCacheUtil.loginUser.put(token,first.get());}else{//登陆失败session.setAttribute("msg","用户名或密码错误");return "login";}//重定向到target地址return "redirect:" + target;}@GetMapping("info")@ResponseBodypublic ResponseEntity<User> getUserInfo(String token){if(!StringUtils.isEmpty(token)){User user = LoginCacheUtil.loginUser.get(token);return ResponseEntity.ok(user);}else {return new ResponseEntity<>(null, HttpStatus.BAD_REQUEST);}}
}
ViewController:
package com.sso.login.controller;import com.sso.login.poho.User;
import com.sso.login.utils.LoginCacheUtil;
import org.springframework.stereotype.Controller;
import org.springframework.web.bind.annotation.CookieValue;
import org.springframework.web.bind.annotation.GetMapping;
import org.springframework.web.bind.annotation.RequestMapping;
import org.springframework.web.bind.annotation.RequestParam;
import org.thymeleaf.util.StringUtils;import javax.servlet.http.Cookie;
import javax.servlet.http.HttpSession;/*** 页面跳转逻辑*/
@Controller
@RequestMapping("/view")
public class ViewController {/*** 跳转到登录页面* @return*/@GetMapping("/login")public String toLogin(@RequestParam(required = false,defaultValue = "")String target,HttpSession session,@CookieValue(required = false,value = "TOKEN")Cookie cookie){if(StringUtils.isEmpty(target)){target = "http://www.codeshop.com:9010";}//如果是已经登陆的用户再次访问登录页面,需要重定向if(cookie != null){//tokenString value = cookie.getValue();User user = LoginCacheUtil.loginUser.get(value);if(user != null){return "redirect:" + target;}}//TODO:要做target地址是否合法的校验//重定向地址session.setAttribute("target",target);return "login";}
}
User:
package com.sso.login.poho;import lombok.AllArgsConstructor;
import lombok.Data;
import lombok.NoArgsConstructor;
import lombok.experimental.Accessors;@Data//添加getter/setter
@NoArgsConstructor
@AllArgsConstructor
@Accessors(chain = true)//添加链式调用
public class User {private Integer id;private String username;private String password;
}
LoginCacheUtil:
package com.sso.login.utils;import com.sso.login.poho.User;import java.util.HashMap;
import java.util.Map;public class LoginCacheUtil {public static Map<String , User> loginUser = new HashMap<>();
}
LoginApp :
package com.sso.login;import org.springframework.boot.SpringApplication;
import org.springframework.boot.autoconfigure.SpringBootApplication;@SpringBootApplication
public class LoginApp {public static void main(String[] args) {SpringApplication.run(LoginApp.class,args);}
}
index.html:
<!DOCTYPE html>
<html lang="en" xmlns:th="http://www.w3.org/1999/xhtml">
<head><meta charset="UTF-8"/><title>Login Module</title>
</head>
<body><h1>欢迎来到登录页面</h1><p style="color: red;" th:text="${session.msg}"></p><form action="/login" method="POST">用户名:<input name="username" value=""/>密码:<input name="password" value=""/><button type="submit">登录</button></form>
</body>
</html>
aoolication.yml:
server:port: 9000主页模块(port=9010)

ViewController :
package com.sso.main.controller;import org.springframework.beans.factory.annotation.Autowired;
import org.springframework.stereotype.Controller;
import org.springframework.web.bind.annotation.CookieValue;
import org.springframework.web.bind.annotation.GetMapping;
import org.springframework.web.bind.annotation.RequestMapping;
import org.springframework.web.client.RestTemplate;
import org.thymeleaf.util.StringUtils;import javax.servlet.http.Cookie;
import javax.servlet.http.HttpSession;
import java.util.Map;@Controller
@RequestMapping("/view")
public class ViewController {@Autowiredprivate RestTemplate restTemplate;private final String LOGIN_INFO_ADDRESS = "http://login.codeshop.com:9000/login/info?token=";@GetMapping("/index")public String toIndex(@CookieValue(required = false,value = "TOKEN")Cookie cookie, HttpSession session){if(cookie != null){String token = cookie.getValue();if(!StringUtils.isEmpty(token)){Map result =  restTemplate.getForObject(LOGIN_INFO_ADDRESS + token, Map.class);session.setAttribute("loginUser",result);}}return "index";}}
MainApp :
package com.sso.main;import org.springframework.boot.SpringApplication;
import org.springframework.boot.autoconfigure.SpringBootApplication;
import org.springframework.context.annotation.Bean;
import org.springframework.web.client.RestTemplate;@SpringBootApplication
public class MainApp {public static void main(String[] args) {SpringApplication.run(MainApp.class,args);}@Beanpublic RestTemplate restTemplate(){return new RestTemplate();}
}
index.html:
<!DOCTYPE html>
<html lang="en" xmlns:th="http://www.w3.org/1999/xhtml" xmlns:http="http://www.w3.org/1999/xhtml">
<head><meta charset="UTF-8"><title>首页</title>
</head>
<body><h1>欢迎来到Code Shop</h1><span><a th:if="${session.loginUser == null}" href="http://login.codeshop.com:9000/view/login?target=http://www.codeshop.com:9010/view/index">登录</a><a th:unless="${session.loginUser == null}" href="#">退出</a></span><p th:unless="${session.loginUser == null}"><span style="color: deepskyblue;" th:text="${session.loginUser.username}"></span>已登录</p>
</body>
</html>
application.yml:
server:port: 9010vip模块(port=9011)

ViewController :
package com.oss.vip.controller;import org.springframework.beans.factory.annotation.Autowired;
import org.springframework.stereotype.Controller;
import org.springframework.web.bind.annotation.CookieValue;
import org.springframework.web.bind.annotation.GetMapping;
import org.springframework.web.bind.annotation.RequestMapping;
import org.springframework.web.client.RestTemplate;
import org.thymeleaf.util.StringUtils;import javax.servlet.http.Cookie;
import javax.servlet.http.HttpSession;
import java.util.Map;@Controller
@RequestMapping("/view")
public class ViewController {@Autowiredprivate RestTemplate restTemplate;private final String USER_INFO_ADDRESS = "http://login.codeshop.com:9000/login/info?token=";@GetMapping("/index")public String toIndex(@CookieValue(required = false,value = "TOKEN")Cookie cookie,HttpSession session){if(cookie != null){String token = cookie.getValue();if(!StringUtils.isEmpty(token)){Map result = restTemplate.getForObject(USER_INFO_ADDRESS + token, Map.class);session.setAttribute("loginUser",result);}}return "index";}
}
VipApp :
package com.oss.vip;import org.springframework.boot.SpringApplication;
import org.springframework.boot.autoconfigure.SpringBootApplication;
import org.springframework.context.annotation.Bean;
import org.springframework.web.client.RestTemplate;@SpringBootApplication
public class VipApp {public static void main(String[] args) {SpringApplication.run(VipApp.class,args);}@Beanpublic RestTemplate restTemplate(){return new RestTemplate();}
}
index.html:
<!DOCTYPE html>
<html lang="en" xmlns:th="http://www.w3.org/1999/xhtml">
<head><meta charset="UTF-8"><title>Vip</title>
</head>
<body>
<h1>欢迎来到Vip系统</h1>
<span><a th:if="${session.loginUser == null}" href="http://login.codeshop.com:9000/view/login?target=http://vip.codeshop.com:9011/view/login">登录</a><a th:unless="${session.loginUser == null}" href="#">退出</a></span>
<p th:unless="${session.loginUser == null}"><span style="color: deepskyblue;" th:text="${session.loginUser.username}"></span>已登录</p>
</body>
</html>
application.yml:
server:port: 9011购物车模块(port=9012)

ViewController :
package com.oss.cart.controller;import org.springframework.beans.factory.annotation.Autowired;
import org.springframework.stereotype.Controller;
import org.springframework.web.bind.annotation.CookieValue;
import org.springframework.web.bind.annotation.GetMapping;
import org.springframework.web.bind.annotation.RequestMapping;
import org.springframework.web.client.RestTemplate;
import org.thymeleaf.util.StringUtils;import javax.servlet.http.Cookie;
import javax.servlet.http.HttpSession;
import java.util.Map;@Controller
@RequestMapping("/view")
public class ViewController {@Autowiredprivate RestTemplate restTemplate;private final String USER_INFO_ADDRESS = "http://login.codeshop.com:9000/login/info?token=";@GetMapping("/index")public String toIndex(@CookieValue(required = false,value = "TOKEN") Cookie cookie,HttpSession session){if(cookie != null){String token = cookie.getValue();if(!StringUtils.isEmpty(token)){Map result = restTemplate.getForObject(USER_INFO_ADDRESS + token,Map.class);session.setAttribute("loginUser",result);}}return "index";}
}
CartApp :
package com.oss.cart;import org.springframework.boot.SpringApplication;
import org.springframework.boot.autoconfigure.SpringBootApplication;
import org.springframework.context.annotation.Bean;
import org.springframework.web.client.RestTemplate;@SpringBootApplication
public class CartApp {public static void main(String[] args) {SpringApplication.run(CartApp.class,args);}@Beanpublic RestTemplate restTemplate(){return new RestTemplate();}
}
index.html:
<!DOCTYPE html>
<html lang="en" xmlns:th="http://www.w3.org/1999/xhtml">
<head><meta charset="UTF-8"><title>Cart</title>
</head>
<body>
<h1>欢迎来到Cart页面</h1>
<span><a th:if="${session.loginUser == null}" href="http://login.codeshop.com:9000/view/login?target=http://cart.codeshop.com:9012/view/login">登录</a><a th:unless="${session.loginUser == null}" href="#">退出</a></span>
<p th:unless="${session.loginUser == null}"><span style="color: deepskyblue;" th:text="${session.loginUser.username}"></span>已登录</p>
</body>
</html>
application.yml:
server:port: 9012