文章目录
- 一、背景
- 二、具体实施
- 2.1 tfcomfile 是什么?
- 2.2 tfcompile 的功能是什么?
- 2.3使用tfcompile
- 三、总结
一、背景
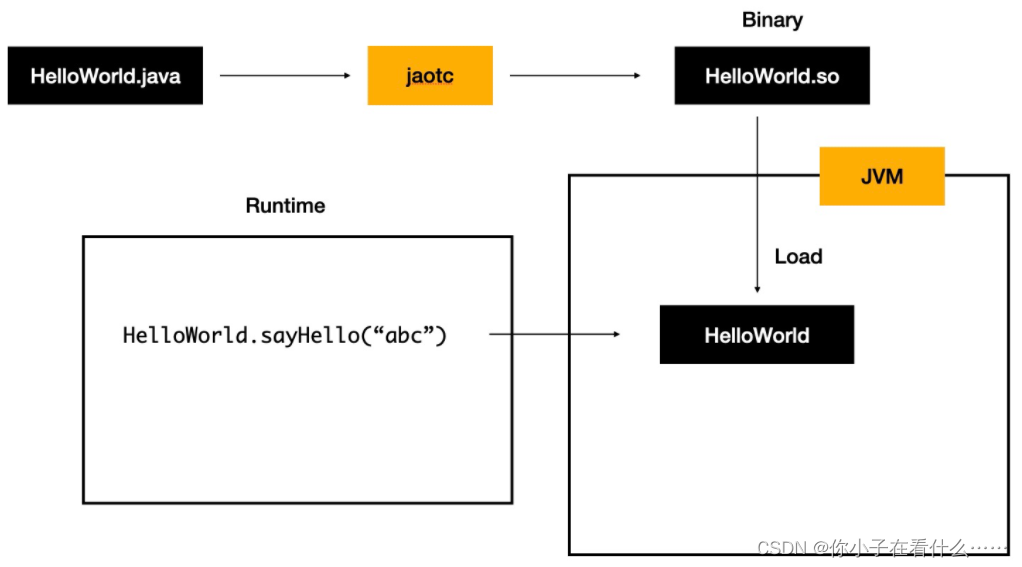
前边已经了解了JIT和AOT的基本概念,AOT(提前编译)方式就是在代码执行阶段之前全部编译成目标指令,进入执行阶段后,不再有编译过程发生。通过TensorFlow自带的实例来加深对AOT的理解,使用AOT编译。
note: JIT相对好理解,可以自动实现操作,但是AOT不是很理解具体实现过程。
二、具体实施
AOT的核心工具是tfcomfil。 示例: tensorflow\compiler\aot\tests。我们先深入了解一下tfcomfile的功能,看看它是干啥的。
2.1 tfcomfile 是什么?
tfcompile 是一个可将 TensorFlow 计算图提前 (AOT) 编译为可执行代码的独立工具。它可以缩减二进制文件的总大小,也可以避免一些运行时开销。tfcompile 的典型用例是将推断计算图编译为适用于移动设备的可执行代码。
TensorFlow 计算图通常由 TensorFlow 运行时执行。在执行计算图中的每个节点时,均会产生一定的运行时开销。这也会导致二进制文件更大,因为除了计算图本身以外,还需包含 TensorFlow 运行时(runtime)代码。由 tfcompile 生成的可执行代码不会使用 TensorFlow 运行时(runtime),而仅仅依赖于计算实际使用的内核。
2.2 tfcompile 的功能是什么?
tfcompile 接受由 TensorFlow 的 feed 和 fetch 概念标识的子计算图,并生成实现该子计算图的函数。feeds 为函数的输入参数,fetches 为函数的输出参数。生成的函数将打包为 cc_library,其中带有导出函数签名的头文件和包含实现的对象文件。用户编写代码以适当调用生成的函数。
2.3使用tfcompile
在TensorFlow中,tensorflow\compiler\aot\tests中有实例,我们利用给出的实例进行AOT编译。
 函数tfmatmul构建了一个简单的网络,定义两个节点分别是x,y,然后进行相乘。
我们将使用XLA的AOT方式将这计算图编译成可执行文件,需要四步。
第一步:编写配置
配置网络的输入和输出节点,对应生成函数的输入输出参数。(也可以通过运行 tensorflow\compiler\aot\tests\make_test_graphs.py自动生成。) .\tensorflow\compiler\aot\tests\test_graph_tfmatmul.config.pbtxt
# Text form of tensorflow.tf2xla.Config proto.
#每个feed都是生成函数的位置输入参数。 每个条目的顺序与每个输入参数的顺序匹配。 这里的“x_hold”和“y_hold”是指图中定义的占位符节点的名称。
feed {id { node_name: "x_hold" }shape {dim { size: 2 }dim { size: 3 }}
}
feed {id { node_name: "y_hold" }shape {dim { size: 3 }dim { size: 2 }}
}
#每个fetch都是生成函数的位置输出参数。 每个条目的顺序与每个输出参数的顺序匹配。 这里的“x_y_prod”是指图中定义的矩阵节点的名称。
fetch {id { node_name: "x_y_prod" }
}
第二步:使用tf_library构建宏来编译子图为静态链接库
在BUILD中添加脚本,生成C++头文件
.tensorflow\compiler\aot\tests\BUILD
load("//tensorflow/compiler/aot:tfcompile.bzl", "tf_library")# Use the tf_library macro to compile your graph into executable code.
tf_library(name = "test_graph_tfmatmul",testonly = 1,config = "test_graph_tfmatmul.config.pbtxt",cpp_class = "foo::bar::MatMulComp",graph = "test_graph_tfmatmul.pb",mlir_components = "None",tags = ["manual",],
)
/*
# Use the tf_library macro to compile your graph into executable code.
tf_library(
#name用于生成以下基础构建规则:<name>:cc_library包装生成的标头和对象文件<name> _test:cc_test包含一个简单
的测试和基准测试<name> _benchmark:cc_binary包含具有最小deps的独立基准;可以在移动设备上运行name = "test_graph_tfmatmul",
#CPP_CLASS指定生成的C ++类的名称,并允许使用名称空间。该类将在给定的名称空间中生成,
或者如果没有名称空间给出,在全局名称空间内。cpp_class = "foo::bar::MatMulComp",
# 图是GraphDef Proto的输入,默认情况下以二进制格式预期。至改用文本格式,只需使用“ .pbtxt”后缀。
子图将是由此输入图创建,并将输入作为输入和获取作为输出。# config is the input Config proto, by default expected in binary format.  To use the text format instead, use the ‘.pbtxt’ suffix.
This is where the feeds and fetches were specified above, in the previous step.配置是Config proto的输入,默认情况下,
以二进制格式预期。要使用文本格式,请使用“ .pbtxt”后缀。这是上面在上面的步骤中指定的提要和提取的地方。config = "test_graph_tfmatmul.config.pbtxt",
)
*/
然后编译
bazel build :test_graph_tfmatmul
在bazel-bin中会生成对应的头文件和object 文件。 (D:\work\work_code\bazel_2.7_1\tensorflow-r2.7\bazel-bin\tensorflow\compiler\aot\tests)
test_graph_tfmatmul.h部分文代码,全部文件:test_graph_tfmatmul.h


生成的 C++ 类在 foo::bar 命名空间中称为 MatMulComp,因为它是在 tf_library 宏中指定的 cpp_class。所有生成的类都有相似的 API,唯一区别在于处理参数和结果缓冲区的方法。这些方法因缓冲区的数量和类型而异,缓冲区的数量和类型通过 feed 和 fetch 参数对 tf_library 宏指定。
#include "tensorflow/compiler/tf2xla/xla_compiled_cpu_function.h"
#include "tensorflow/core/platform/types.h"namespace Eigen { struct ThreadPoolDevice; }
namespace xla { class ExecutableRunOptions; }// (Implementation detail) Entry point to the function in the object file.
extern "C" void __xla_tensorflow_compiler_aot_tests__test_graph_tfmatmul(void* result, const ::xla::ExecutableRunOptions* run_options,const void** args, void** temps, int64_t* profile_counters);namespace foo {
namespace bar {// MatMulComp represents a computation previously specified in a
// TensorFlow graph, now compiled into executable code. This extends the generic
// XlaCompiledCpuFunction class with statically type-safe arg and result
// methods. Usage example:
//
//   MatMulComp computation;
//   // ...set args using computation.argN methods
//   CHECK(computation.Run());
//   // ...inspect results using computation.resultN methods
//
// The Run method invokes the actual computation, with inputs read from arg
// buffers, and outputs written to result buffers. Each Run call may also use
// a set of temporary buffers for the computation.
//
// By default each instance of this class manages its own arg, result and temp
// buffers. The AllocMode constructor parameter may be used to modify the
// buffer allocation strategy.
//
// Under the default allocation strategy, this class is thread-compatible:
// o Calls to non-const methods require exclusive access to the object.
// o Concurrent calls to const methods are OK, if those calls are made while it
//   is guaranteed that no thread may call a non-const method.
//
// The logical function signature is:
//   (arg0: f32[2,3], arg1: f32[3,2]) -> (f32[2,2])
//
// Memory stats:
//   arg bytes total:    48
//   arg bytes aligned:  128
//   temp bytes total:   24
//   temp bytes aligned: 128
class MatMulComp final : public tensorflow::XlaCompiledCpuFunction {public:// Number of input arguments for the compiled computation.static constexpr size_t kNumArgs = 2;// Number of variables for the compiled computation.static constexpr size_t kNumVariables = 0;// Byte size of each argument buffer. There are kNumArgs entries.static const ::int64_t ArgSize(::tensorflow::int32 index) {return BufferInfos()[ArgIndexToBufferIndex()[index]].size();}// Returns static data used to create an XlaCompiledCpuFunction.static const tensorflow::XlaCompiledCpuFunction::StaticData& StaticData() {static XlaCompiledCpuFunction::StaticData* kStaticData = [](){XlaCompiledCpuFunction::StaticData* data =new XlaCompiledCpuFunction::StaticData;set_static_data_raw_function(data, __xla_tensorflow_compiler_aot_tests__test_graph_tfmatmul);set_static_data_buffer_infos(data, BufferInfos());set_static_data_num_buffers(data, kNumBuffers);set_static_data_arg_index_table(data, ArgIndexToBufferIndex());set_static_data_num_args(data, kNumArgs);set_static_data_num_variables(data, kNumVariables);set_static_data_result_index(data, kResultIndex);set_static_data_arg_names(data, StaticArgNames());set_static_data_variable_names(data, StaticVariableNames());set_static_data_result_names(data, StaticResultNames());set_static_data_program_shape(data, StaticProgramShape());set_static_data_hlo_profile_printer_data(data, StaticHloProfilePrinterData());return data;}();return *kStaticData;}
第三步:编写代码调用子计算图(测试)
在tensorflow\compiler\aot\tests写代码,引用头文件,编写使用端代码 my_code.cc。
#define EIGEN_USE_THREADS
#define EIGEN_USE_CUSTOM_THREAD_POOL#include <iostream>
#include "third_party/eigen3/unsupported/Eigen/CXX11/Tensor"
#include "tensorflow/compiler/aot/tests/test_graph_tfmatmul.h" // generatedint main(int argc, char** argv) {Eigen::ThreadPool tp(2);  // Size the thread pool as appropriate.Eigen::ThreadPoolDevice device(&tp, tp.NumThreads());foo::bar::MatMulComp matmul;matmul.set_thread_pool(&device);// Set up args and run the computation.const float args[12] = {1, 2, 3, 4, 5, 6, 7, 8, 9, 10, 11, 12};std::copy(args + 0, args + 6, matmul.arg0_data());std::copy(args + 6, args + 12, matmul.arg1_data());matmul.Run();// Check resultif (matmul.result0(0, 0) == 58) {std::cout << "Success" << std::endl;} else {std::cout << "Failed. Expected value 58 at 0,0. Got:"<< matmul.result0(0, 0) << std::endl;}return 0;
}
第 4 步:创建最终的二进制文件
在此步骤中,将对由 tf_library 生成的库以及第 3 步中编写的代码进行结合,从而创建最终的二进制文件。以下为示例 bazel BUILD 文件。

# 添加cc_binary,#TF_Library生成的可执行代码然后可以链接到您的代码中。
cc_binary(name = "my_binary",testonly=1,srcs = ["my_code.cc",  # include test_graph_tfmatmul.h to access the generated header],deps = [":test_graph_tfmatmul",  # link in the generated object file"//third_party/eigen3"],linkopts = ["-lpthread"]
)
然后进行编译, bazel build :my_binary 生成二进制可执行文件 my_binary.exe。


第五步: 运行 my_binary.exe
输出 Seccess代表成功
bazel run my_binary

三、总结
以上就是AOT编译的全过程。和前边调研的AOT流程一样,第一步的配置写好。然后交给tfcompile,经过一系列的编译得到可执行的二进制文件。
编译过程错误百出还耗时,保持耐心。耐心。耐心。。。。


![subprocess.CalledProcessError: Command ‘[where, cl]‘ returned non-zero exit status 1](https://img-blog.csdnimg.cn/e4abadd3aad94bffb5c545540edc270b.png?x-oss-process=image/watermark,type_ZHJvaWRzYW5zZmFsbGJhY2s,shadow_50,text_Q1NETiBA56iL5bqP5bCPSw==,size_20,color_FFFFFF,t_70,g_se,x_16)