一、QtDBus简介
QtDBus是一个使用D-Bus协议进行进程间通信的仅在Unix运行的库,是对D-Bus底层API的封装实现。
QtDBus模块提供了使用Qt信号槽机制扩展的接口。要使用QtDBus模块,需要在代码中加入以下代码:
#include <QtDBus>
如果使用qmake构建程序,需要在工程文件中增加下列代码来链接QtDBus库:
QT += qdbus
二、QtDBus类型系统
1、QtDBus类型系统简介
D-Bus有一种基于几种原生与在数组和结构中的原生类型组成的复合类型的扩展类型系统。QtDBus模块通过QDBusArgument类实现了类型系统,允许用户通过总线发送和接收每一种C++类型。
2、原生类型
QtDBus通过QDBusArgument支持原生类型,不需要特殊的定制。
Qt类型 D-Bus类型
uchar BYTEbool BOOLEANshort INT16ushort UINT16int INT32uint UINT32qlonglong INT64qulonglong UINT64double DOUBLEQString STRINGQDBusVariant VARIANTQDBusObjectPath OBJECT_PATHQDBusSignature SIGNATURE除了原生类型,QDBusArgument也支持在Qt应用中广泛使用的两种非原生类型,QStringList和QByteArray。
3、复合类型
D-Bus指定由原生类型聚合而成的三种复合类型:ARRAY、STRUCT和 maps/dictionaries。ARRAY零个或多个相同元素的集合,STRUCT是由不同类型的固定数量的元素组成的集合,Maps or dictionaries是元素对的数组,一个map中可以有零个或多个元素。
4、扩展类型系统
为了在QtDBus模块使用自定义类型,自定义类性必须使用Q_DECLARE_METATYPE()声明为Qt元类型,使用qDBusRegisterMetaType()函数注册。流操作符会被注册系统自动找到。
QtDBus模块为Qt容器类使用数组和map提供了模板特化,例如QMap和QList,不必实现流操作符函数。对于其它的类型,流操作符必须显示实现。
5、类型系统使用
QtDBus定义的所有类型能用于通过总线发送和接收消息。不能使用上述类型之外的任何类型,包括typedefs定义的列表类型,如QList<QVariant>和QMap<QString, QVariant>。
三、QtDBus常用类
1、QDBusMessage
QDBusMessage类表示D-Bus总线发送或接收的一个消息。
QDBusMessage对象代表总线上四种消息类型中的一种,四种消息类型如下:
A、Method calls
B、Method return values
C、Signal emissions
D、Error codes
可以使用静态函数createError()、createMethodCall()、createSignal()创建消息。使用QDBusConnection::send函数发送消息。
2、QDBusConnection
QDBusConnection代表到D-Bus总线的一个连接,是一个D-Bus会话的起始点。通过QDBusConnection连接对象,可以访问远程对象、接口,连接远程信号到本地槽函数,注册对象等。
D-Bus连接通过connectToBus()函数创建,connectToBus()函数会创建一个到总线服务端的连接,完成初始化工作,并关联一个连接名到连接。
使用disconnectFromBus()函数会断开连接。一旦断开连接后,调用connectToBus()函数将不会重建连接,必须创建新的QDBusConnection实例。
作为两种最常用总线类型的辅助,sessionBus()和systemBus()函数分别创建到会话在总线和系统总线的连接并返回,会在初次使用时打开,在QCoreApplication析构函数调用时断开。
D-Bus支持点对点通信,不必使用总线服务。两个应用程序可以直接交流和交换消息。可以通过传递一个地址到connectToBus()函数实现。
QDBusConnection connectToBus(BusType type, const QString & name)打开一个type类型的连接,并关联name连接名,返回关联本连接的QDBusConnection对象。
QDBusConnection connectToBus(const QString & address, const QString & name)打开一个地址为address的私有总线,并关联name连接名,返回关联本连接的QDBusConnection对象。
QDBusConnection connectToPeer(const QString & address, const QString & name)打开一个点对点的连接到address地址,并关联name连接名,返回关联本连接的QDBusConnection对象。
void disconnectFromBus(const QString & name)关闭名为name的总线连接
void disconnectFromPeer(const QString & name)关闭名为name的对等连接
QByteArray localMachineId()返回一个D-Bus总线系统知道的本机ID
QDBusConnection sender()返回发送信号的连接
QDBusConnection sessionBus()返回一个打开到session总线的QDBusConnection对象
QDBusConnection systemBus()返回一个打开到system总线的QDBusConnection对象
QDBusPendingCall asyncCall(const QDBusMessage & message, int timeout = -1)const发送message消息到连接,并立即返回。本函数只支持method调用。返回一个用于追踪应答的QDBusPendingCall对象。
QDBusMessage call(const QDBusMessage & message, QDBus::CallMode mode = QDBus::Block, int timeout = -1 ) const通过本连接发送消息message,并且阻塞,等待应答。
bool registerObject(const QString & path, QObject * object, RegisterOptions options = ExportAdaptors)注册object对象到路径path,options选项指定由多少对象会被暴露到D-Bus总线,如果注册成功,返回true。
bool registerService(const QString & serviceName)试图在D-Bus总线上注册serviceName服务,如果注册成功,返回true;如果名字已经在其它应用被注册,则注册失败。
3、QDBusInterface
QDBusInterface是远程对象接口的代理。
QDBusInterface是一种通用的访问器类,用于调用远程对象,连接到远程对象导出的信号,获取/设置远程属性的值。当没有生成表示远程接口的生成代码时时,QDBusInterface类对远程对象的动态访问非常有用。
调用通常是通过使用call()函数来实现,call函数构造消息,通过总线发送消息,等待应答并解码应答。信号使用QObject::connect函数进行连接。最终,使用QObject::property和QObject::setProperty函数对属性进行访问。
4、QDBusReply
QDBusReply类用于存储对远程对象的方法调用的应答。
一个QDBusReply对象是方法调用的应答QDBusMessage对象的一个子集。QDBusReply对象只包含第一个输出参数或错误代码,并由QDBusInterface派生类使用,以允许将错误代码返回为函数的返回参数。
QDBusReply<QString> reply = interface->call("RemoteMethod");if (reply.isValid())// use the returned valueuseValue(reply.value());else// call failed. Show an error condition.showError(reply.error());对于没有输出参数或返回值的远程调用,使用isValid()函数测试应答是否成功。
5、QDBusAbstractAdaptor
QDBusAbstractAdaptor类使用D-Bus Adaptor基类。
QDBusAbstractAdaptor类是用于使用D-Bus向外部提供接口的所有对象的起点。可以通过将一个或多个派生自QDBusAbstractAdaptor的类附加到一个普通QObject对象上,使用QDBusConnection::registerObject注册QObject对象可以实现。QDBusAbstractAdaptor是一个轻量级封装,主要用于中继调用实际对象及其信号。
每个QDBusAbstractAdaptor派生类都应该使用类定义中的Q_CLASSINFO宏来定义D-Bus接口。注意,这种方式只有一个接口可以暴露。
QDBusAbstractAdaptor使用了信号、槽、属性的标准QObject机制来决定哪些信号、槽、属性被暴露到总线。任何QDBusAbstractAdaptor派生类发送的信号通过任何D-Bus连接自动中继到注册的对象上。
QDBusAbstractAdaptor派生类对象必须使用new创建在堆上,不必由用户删除。
6、QDBusAbstractInterface
QDBusAbstractInterface是QtDBus模块中允许访问远程接口的所有D-Bus接口的基类。
自动生成的代码类也继承自QDBusAbstractInterface,此描述的所有方法在生成的代码中也有效。除了此处的描述,生成代码类为远程方法提供了成员函数,允许在编译时检查正确参数和返回值,以及匹配的属性类型和匹配的信号参数。
QDBusPendingCall asyncCall(const QString & method, const QVariant & arg1 = QVariant(), const QVariant & arg2 = QVariant(), const QVariant & arg3 = QVariant(), const QVariant & arg4 = QVariant(),const QVariant & arg5 = QVariant(), const QVariant & arg6 = QVariant(), const QVariant & arg7 = QVariant(), const QVariant & arg8 = QVariant())调用本接口中的method方法,传递参数到远程的method。
要调用的参数会通过D-Bus输入参数传递到远程方法,返回的QDBusPendingCall对象用于定义应答信息。
本函数最多有8个参数,如果参数多于8个,或是传递可变数量的参数,使用asyncCallWithArgumentList函数。
QString value = retrieveValue();
QDBusPendingCall pcall = interface->asyncCall(QLatin1String("Process"), value);QDBusPendingCallWatcher *watcher = new QDBusPendingCallWatcher(pcall, this);QObject::connect(watcher, SIGNAL(finished(QDBusPendingCallWatcher*)),this, SLOT(callFinishedSlot(QDBusPendingCallWatcher*)));7、QDBusArgument
QDBusArgument类用于整理和分发D-Bus参数。QDBusArgument用于通过D-Bus发送参数到远程应用,并接收返回。
QDBusArgument是QtDBus类型系统的核心类,QtDBus类型系统用于解析和原生类型。复合类型可以通过在数组、词典或结构中使用一个或多个原生类型创建。
下列代码展示了使用QtDBus类型系统构造的包含一个整数和字符串的结构。
struct MyStructure
{int count;QString name;
};Q_DECLARE_METATYPE(MyStructure)
// Marshall the MyStructure data into a D-Bus argument
QDBusArgument &operator<<(QDBusArgument &argument, const MyStructure &mystruct)
{argument.beginStructure();argument << mystruct.count << mystruct.name;argument.endStructure();return argument;
}// Retrieve the MyStructure data from the D-Bus argument
const QDBusArgument &operator>>(const QDBusArgument &argument, MyStructure &mystruct)
{argument.beginStructure();argument >> mystruct.count >> mystruct.name;argument.endStructure();return argument;
}
在QDBusArgument使用这个结构前,必须使用qDBusRegisterMetaType()函数进行注册。因此,在程序中应该则增加如下代码:
qDBusRegisterMetaType<MyStructure>();
一旦注册,类型可以在呼出方法调用(QDBusAbstractInterface::call())、来自注册对象的信号发射或来自远程应用的传入调用。
8、QDBusConnectionInterface
QDBusConnectionInterface类提供了对D-Bus总线服务的访问。
D-Bus总线服务端中提供了一个特殊的接口org.freedesktop.DBus,允许客户端运行访问总线的某些属性,例如当前连接的客户端列表,QDBusConnectionInterface类提供对org.freedesktop.DBus接口的访问。
本类中最常用的是使用registerService()和unregisterService()在总线上注册和注销服务名。
QDBusConnectionInterface类定义四个信号,在总线上有服务状态变化时发送。
void callWithCallbackFailed(const QDBusError & error, const QDBusMessage & call)
void serviceOwnerChanged(const QString & name, const QString & oldOwner, const QString & newOwner)
void serviceRegistered(const QString & serviceName)
void serviceUnregistered(const QString & serviceName)
9、QDBusVariant
QDBusVariant类使程序员能够识别由D-Bus类型系统提供的Variant类型。一个使用整数、D-Bus变体类型和字符串作为参数的D-Bus函数可以使用如下的参数列表调用。
QList<QVariant> arguments;arguments << QVariant(42) << QVariant::fromValue(QDBusVariant(43)) << QVariant("hello");myDBusMessage.setArguments(arguments);当D-Bus函数返回一个D-Bus变体类型时,可以使用如下方法获取:
// call a D-Bus function that returns a D-Bus variant
QVariant v = callMyDBusFunction();// retrieve the D-Bus variant
QDBusVariant dbusVariant = qvariant_cast<QDBusVariant>(v);// retrieve the actual value stored in the D-Bus variant
QVariant result = dbusVariant.variant();
QDBusVariant中的QVariant需要区分一个正常的D-Bus值和一个QDBusVariant中的值。
四、QtDBus工具
1、qdbusviewer
qdbusviewer用于查看D-Bus总线上的服务、对象、接口以及接口的method。使用方法直接在命令行执行:qdbusviewer

2、qdbuscpp2xml
qdbuscpp2xml会解析QObject派生类的C++头文件或是源文件,生成D-Bus的内省xml文件。qdbuscpp2xml 会区分函数的输入输出,如果参数声明为const则会是输入,否则可能会被当作输出。
qdbuscpp2xml使用语法如下:
qdbuscpp2xml [options...] [files...]Options参数如下:
-p|-s|-m:只解析脚本化的属性、信号、方法(槽函数)
-P|-S|-M:解析所有的属性、信号、方法(槽函数)
-a:输出所有的脚本化内容,等价于-psm
-A:输出所有的内容,等价于-PSM
-o <filename>:输出内容到filename文件
解析所有的方法输出到com.scorpio.test.xml文件命令如下:
qdbuscpp2xml -M test.h -o com.scorpio.test.xml<!DOCTYPE node PUBLIC "-//freedesktop//DTD D-BUS Object Introspection 1.0//EN" "http://www.freedesktop.org/standards/dbus/1.0/introspect.dtd"><node><interface name="com.scorpio.test.value"><method name="maxValue"><arg type="i" direction="out"/></method><method name="minValue"><arg type="i" direction="out"/></method><method name="value"><arg type="i" direction="out"/></method><method name="setValue"><arg name="value" type="i" direction="in"/></method></interface></node>3、qdbusxml2cpp
qdbusxml2cpp根据输入文件中定义的接口,生成C++实现代码。
qdbusxml2cpp可以辅助自动生成继承于QDBusAbstractAdaptor和QDBusAbstractInterface两个类的实现代码,用于进程通信服务端和客户端,简化了开发者的代码设计。
qdbusxml2cpp使用语法如下:
qdbusxml2cpp [options...] [xml-or-xml-file] [interfaces...]Options参数如下:
-a <filename>:输出Adaptor代码到filename
-c <classname>:使用classname作为生成类的类名
-i <filename>:增加#include到输出
-l <classname>:当生成Adaptor代码时,使用classname作为父类
-m:在cpp文件中包含 #include "filename.moc"语句
-N:不使用名称空间
-p <filename>:生成Proxy代码到filename文件
解析com.scorpio.test.xml文件,生成Adaptor类ValueAdaptor,文件名称为valueAdaptor.h、valueAdaptor.cpp命令行如下:
qdbusxml2cpp com.scorpio.test.xml -i test.h -a valueAdaptor解析com.scorpio.test.xml文件,生成Proxy类ComScorpioTestValueInterface,文件名称为testInterface.h、testInterface.cpp命令行如下:
qdbusxml2cpp com.scorpio.test.xml -p testInterface五、QtDBus编程
1、创建服务并注册对象
test.h文件:
#ifndef TEST_H
#define TEST_H#include <QObject>class test: public QObject
{Q_OBJECT//定义Interface名称为com.scorpio.test.valueQ_CLASSINFO("D-Bus Interface", "com.scorpio.test.value")
public:test(int value);
public slots:int maxValue();int minValue();int value();
private:int m_value;
};#endif // TEST_H
test.cpp文件:
#include "test.h"test::test(int value)
{m_value = value;
}int test::maxValue()
{return 100;
}int test::minValue()
{return 0;
}int test::value()
{return m_value;
}
main.cpp文件:
#include <QCoreApplication>
#include <QDBusConnection>
#include <QDebug>
#include <QDBusError>#include "test.h"int main(int argc, char *argv[])
{QCoreApplication a(argc, argv);//建立到session bus的连接QDBusConnection connection = QDBusConnection::sessionBus();//在session bus上注册名为com.scorpio.test的服务if(!connection.registerService("com.scorpio.test")){qDebug() << "error:" << connection.lastError().message();exit(-1);}test object(60);//注册名为/test/objects的对象,把类Object所有槽函数导出为object的methodconnection.registerObject("/test/objects", &object,QDBusConnection::ExportAllSlots);return a.exec();
}
启动程序后,在命令行打开qdbusviewer,查看session bus。

双击Method方法会调用该方法。
2、通过QDBusMessage访问Service
确保com.scorpio.test服务运行在总线上。
编写一个控制台程序,使用消息访问com.scorpio.test服务。
#include <QCoreApplication>
#include <QDBusMessage>
#include <QDBusConnection>
#include <QDebug>int main(int argc, char *argv[])
{QCoreApplication a(argc, argv);//构造一个method_call消息,服务名称为:com.scorpio.test,对象路径为:/test/objects//接口名称为com.scorpio.test.value,method名称为valueQDBusMessage message = QDBusMessage::createMethodCall("com.scorpio.test","/test/objects","com.scorpio.test.value","value");//发送消息QDBusMessage response = QDBusConnection::sessionBus().call(message);//判断method是否被正确返回if (response.type() == QDBusMessage::ReplyMessage){//从返回参数获取返回值int value = response.arguments().takeFirst().toInt();qDebug() << QString("value =  %1").arg(value);}else{qDebug() << "value method called failed!";}return a.exec();
}
3、通过QDBusInterface 访问Service
编写一个控制台程序,使用接口访问com.scorpio.test服务。
#include <QCoreApplication>
#include <QDBusMessage>
#include <QDBusConnection>
#include <QDBusReply>
#include <QDBusInterface>
#include <QDebug>int main(int argc, char *argv[])
{QCoreApplication a(argc, argv);// 创建QDBusInterface接口QDBusInterface interface("com.scorpio.test", "/test/objects","com.scorpio.test.value",QDBusConnection::sessionBus());if (!interface.isValid()){qDebug() << qPrintable(QDBusConnection::sessionBus().lastError().message());exit(1);}//调用远程的value方法QDBusReply<int> reply = interface.call("value");if (reply.isValid()){int value = reply.value();qDebug() << QString("value =  %1").arg(value);}else{qDebug() << "value method called failed!";}return a.exec();
}4、从D-Bus XML自动生成Proxy类
Proxy Object提供了一种更加直观的方式来访问Service,如同调用本地对象的方法一样。
生成Proxy类的流程如下:
A、使用工具qdbuscpp2xml从object.h生成XML文件;
qdbuscpp2xml -M test.h -o com.scorpio.test.xml<!DOCTYPE node PUBLIC "-//freedesktop//DTD D-BUS Object Introspection 1.0//EN" "http://www.freedesktop.org/standards/dbus/1.0/introspect.dtd"><node><interface name="com.scorpio.test.value"><method name="maxValue"><arg type="i" direction="out"/></method><method name="minValue"><arg type="i" direction="out"/></method><method name="value"><arg type="i" direction="out"/></method></interface></node>B、使用工具qdbusxml2cpp从XML文件生成继承自QDBusInterface的类
qdbusxml2cpp com.scorpio.test.xml -p valueInterface生成两个文件:valueInterface.cpp和valueInterface.h
valueInterface.h文件:
/** This file was generated by qdbusxml2cpp version 0.7* Command line was: qdbusxml2cpp com.scorpio.test.xml -p testInterface** qdbusxml2cpp is Copyright (C) 2013 Digia Plc and/or its subsidiary(-ies).** This is an auto-generated file.* Do not edit! All changes made to it will be lost.*/#ifndef TESTINTERFACE_H_1526737677
#define TESTINTERFACE_H_1526737677#include <QtCore/QObject>
#include <QtCore/QByteArray>
#include <QtCore/QList>
#include <QtCore/QMap>
#include <QtCore/QString>
#include <QtCore/QStringList>
#include <QtCore/QVariant>
#include <QtDBus/QtDBus>/** Proxy class for interface com.scorpio.test.value*/
class ComScorpioTestValueInterface: public QDBusAbstractInterface
{Q_OBJECT
public:static inline const char *staticInterfaceName(){ return "com.scorpio.test.value"; }public:ComScorpioTestValueInterface(const QString &service, const QString &path, const QDBusConnection &connection, QObject *parent = 0);~ComScorpioTestValueInterface();
public Q_SLOTS: // METHODSinline QDBusPendingReply<int> maxValue(){QList<QVariant> argumentList;return asyncCallWithArgumentList(QLatin1String("maxValue"), argumentList);}inline QDBusPendingReply<int> minValue(){QList<QVariant> argumentList;return asyncCallWithArgumentList(QLatin1String("minValue"), argumentList);}inline QDBusPendingReply<int> value(){QList<QVariant> argumentList;return asyncCallWithArgumentList(QLatin1String("value"), argumentList);}Q_SIGNALS: // SIGNALS
};namespace com {namespace scorpio {namespace test {typedef ::ComScorpioTestValueInterface value;}}
}#endif
valueInterface.cpp文件:
/** This file was generated by qdbusxml2cpp version 0.7* Command line was: qdbusxml2cpp com.scorpio.test.xml -p testInterface** qdbusxml2cpp is Copyright (C) 2013 Digia Plc and/or its subsidiary(-ies).** This is an auto-generated file.* This file may have been hand-edited. Look for HAND-EDIT comments* before re-generating it.*/#include "testInterface.h"/** Implementation of interface class ComScorpioTestValueInterface*/ComScorpioTestValueInterface::ComScorpioTestValueInterface(const QString &service, const QString &path, const QDBusConnection &connection, QObject *parent): QDBusAbstractInterface(service, path, staticInterfaceName(), connection, parent)
{}ComScorpioTestValueInterface::~ComScorpioTestValueInterface()
{}
调用Proxy类访问Service如下:
#include <QCoreApplication>
#include <QDBusMessage>
#include <QDBusConnection>
#include <QDBusReply>
#include <QDBusInterface>
#include <QDebug>
#include "testInterface.h"int main(int argc, char *argv[])
{QCoreApplication a(argc, argv);// 初始化自动生成的Proxy类com::scorpio::test::valuecom::scorpio::test::value test("com.scorpio.test","/test/objects",QDBusConnection::sessionBus());// 调用value方法QDBusPendingReply<int> reply = test.value();//qdbusxml2cpp生成的Proxy类是采用异步的方式来传递Message,//所以需要调用waitForFinished来等到Message执行完成reply.waitForFinished();if (reply.isValid()){int value = reply.value();qDebug() << QString("value =  %1").arg(value);}else{qDebug() << "value method called failed!";}return a.exec();
}
5、使用Adapter注册Object
可以直接把test类注册为消息总线上的一个Object,但QT4不推荐。QT4推荐使用Adapter来注册Object。
大多数情况下,可能只需要把自定义的类里的方法有选择的发布到消息总线上,使用Adapter可以很方便的实现选择性发布。
生成Adapter类的流程如下:
A、使用工具 qdbuscpp2xml从test.h生成XML文件
qdbuscpp2xml -M test.h -o com.scorpio.test.xml B、编辑com.scorpio.test.xml,选择需要发布的method,不需要发布的删除。
C、使用工具qdbusxml2cpp从XML文件生成继承自QDBusInterface的类
qdbusxml2cpp com.scorpio.test.xml -i test.h -a valueAdaptor生成两个文件:valueAdaptor.cpp和valueAdaptor.h
valueAdaptor.h文件:
/** This file was generated by qdbusxml2cpp version 0.7* Command line was: qdbusxml2cpp com.scorpio.test.xml -i test.h -a valueAdaptor** qdbusxml2cpp is Copyright (C) 2013 Digia Plc and/or its subsidiary(-ies).** This is an auto-generated file.* This file may have been hand-edited. Look for HAND-EDIT comments* before re-generating it.*/#ifndef VALUEADAPTOR_H_1526742670
#define VALUEADAPTOR_H_1526742670#include <QtCore/QObject>
#include <QtDBus/QtDBus>
#include "test.h"
class QByteArray;
template<class T> class QList;
template<class Key, class Value> class QMap;
class QString;
class QStringList;
class QVariant;/** Adaptor class for interface com.scorpio.test.value*/
class ValueAdaptor: public QDBusAbstractAdaptor
{Q_OBJECTQ_CLASSINFO("D-Bus Interface", "com.scorpio.test.value")Q_CLASSINFO("D-Bus Introspection", ""
"  <interface name=\"com.scorpio.test.value\">\n"
"    <method name=\"maxValue\">\n"
"      <arg direction=\"out\" type=\"i\"/>\n"
"    </method>\n"
"    <method name=\"minValue\">\n"
"      <arg direction=\"out\" type=\"i\"/>\n"
"    </method>\n"
"  </interface>\n""")
public:ValueAdaptor(QObject *parent);virtual ~ValueAdaptor();public: // PROPERTIES
public Q_SLOTS: // METHODSint maxValue();int minValue();
Q_SIGNALS: // SIGNALS};#endif
valueAdaptor.cpp文件:
/** This file was generated by qdbusxml2cpp version 0.7* Command line was: qdbusxml2cpp com.scorpio.test.xml -i test.h -a valueAdaptor** qdbusxml2cpp is Copyright (C) 2013 Digia Plc and/or its subsidiary(-ies).** This is an auto-generated file.* Do not edit! All changes made to it will be lost.*/#include "valueAdaptor.h"
#include <QtCore/QMetaObject>
#include <QtCore/QByteArray>
#include <QtCore/QList>
#include <QtCore/QMap>
#include <QtCore/QString>
#include <QtCore/QStringList>
#include <QtCore/QVariant>/** Implementation of adaptor class ValueAdaptor*/ValueAdaptor::ValueAdaptor(QObject *parent): QDBusAbstractAdaptor(parent)
{// constructorsetAutoRelaySignals(true);
}ValueAdaptor::~ValueAdaptor()
{// destructor
}int ValueAdaptor::maxValue()
{// handle method call com.scorpio.test.value.maxValueint out0;QMetaObject::invokeMethod(parent(), "maxValue", Q_RETURN_ARG(int, out0));return out0;
}int ValueAdaptor::minValue()
{// handle method call com.scorpio.test.value.minValueint out0;QMetaObject::invokeMethod(parent(), "minValue", Q_RETURN_ARG(int, out0));return out0;
}
调用Adaptor类注册Object对象如下:
#include <QCoreApplication>
#include <QDBusConnection>
#include <QDebug>
#include <QDBusError>
#include "test.h"
#include "valueAdaptor.h"int main(int argc, char *argv[])
{QCoreApplication a(argc, argv);QDBusConnection connection = QDBusConnection::sessionBus();test object(60);//ValueAdaptor是qdbusxml2cpp生成的Adaptor类ValueAdaptor valueAdaptor(&object);if (!connection.registerService("com.scorpio.test")){qDebug() << connection.lastError().message();exit(1);}connection.registerObject("/test/objects", &object);return a.exec();
}
使用qdbusviewer查看发布的method。

6、自动启动Service
D-Bus系统提供了一种机制可以在访问某个service时,自动把应用程序运行起来。
需要在/usr/share/dbus-1/services下面建立com.scorpio.test.service文件,文件的内容如下:
[D-BUS Service]Name=com.scorpio.testExec=/path/to/scorpio/test在访问test的method前,不必手动运行应用程序。

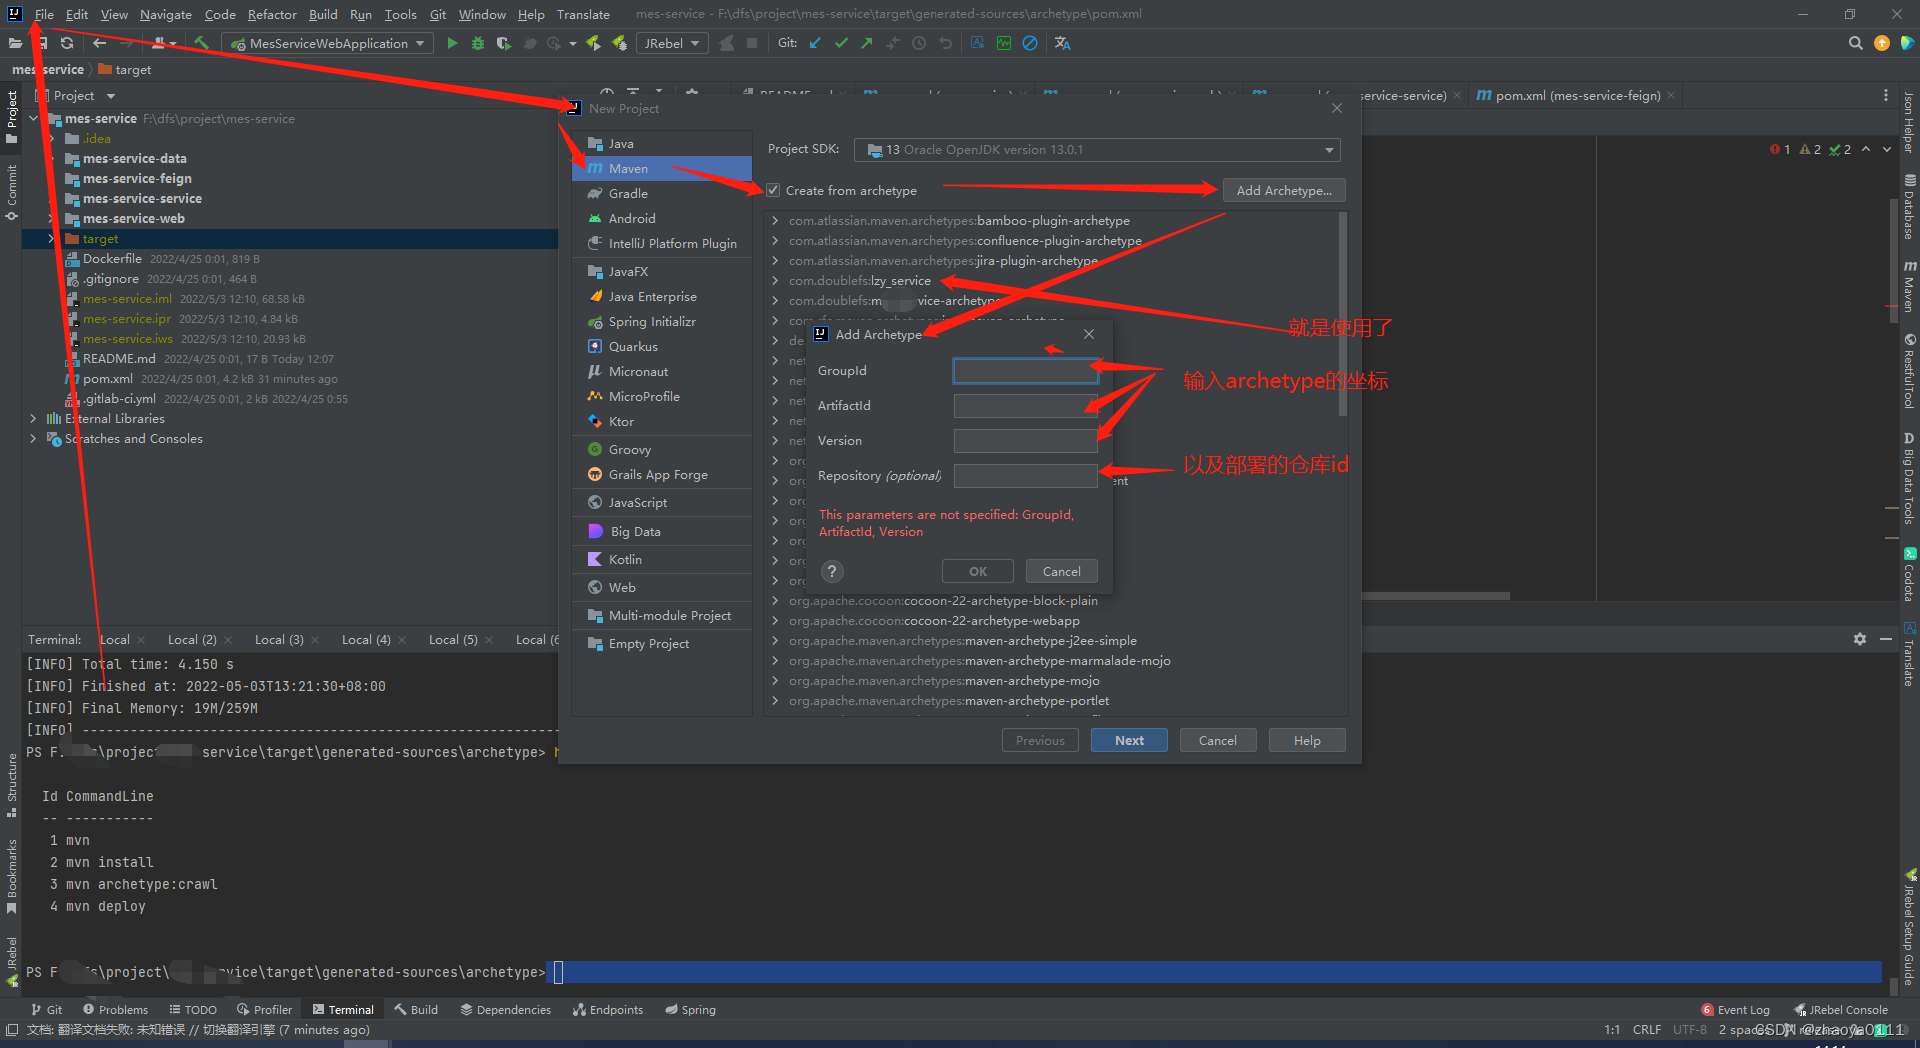
![[WARNING] No archetype found in remote catalog. Defaulting to internal catalog(已解决)](https://img-blog.csdnimg.cn/a888fd453f6d4d1ca823579e97614598.png)