一.创建应用
创建应用的目的是获取app-key和app-secret,并设置授权回调页。
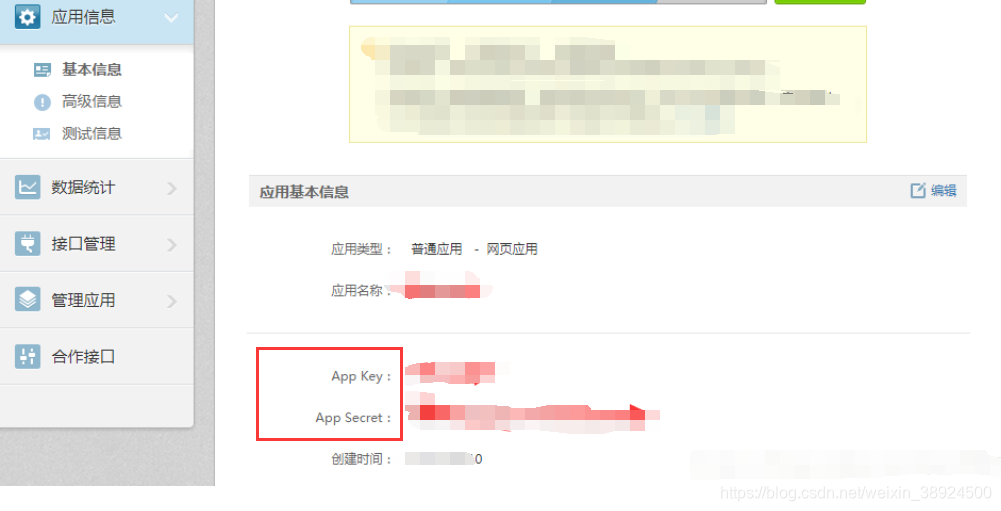
(1)获取app-key和app-secret
登陆微博开放平台创建应用http://open.weibo.com/apps/new?sort=web
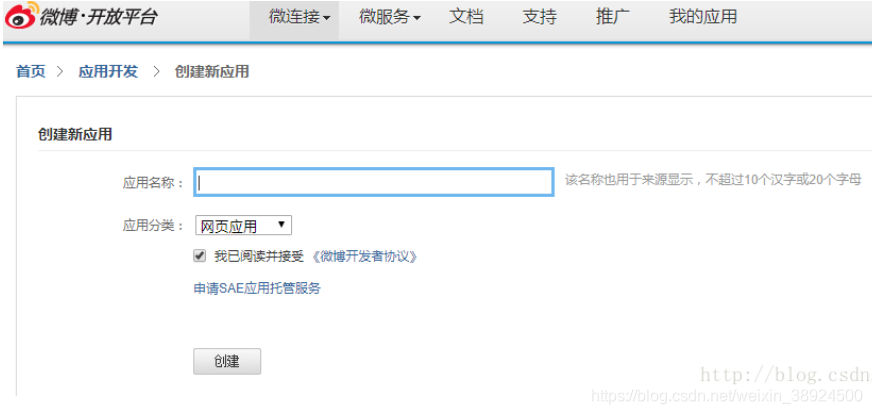
应用名称以及后续的信息随便填,填写完毕后,不需要提交审核,需要的只是那个app-key和app-secret。应用创建成功后可以在“我的应用”里面看到刚刚创建的应用的详细信息,在“应用信息”里面可以找到App Key和App Secret,这些信息在后面会用到。
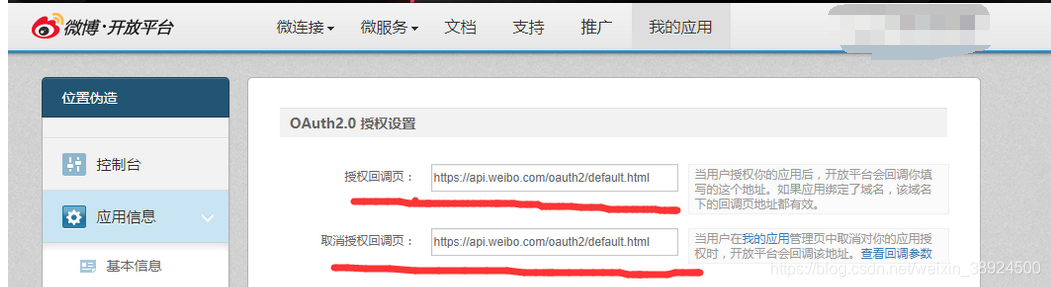
(2)设置授权回调页
接着上面的打开“应用信息”里面的“高级信息”,然后点击“高级信息”里面的“编辑”按钮,将“授权回调页面”设置为:https://api.weibo.com/oauth2/default.html,将“取消授权回调页”也设置为:https://api.weibo.com/oauth2/default.html。至此第一步工作已完成。
二.安装微博SDK
(1)授权机制
http://open.weibo.com/wiki/%E6%8E%88%E6%9D%83%E6%9C%BA%E5%88%B6%E8%AF%B4%E6%98%8E
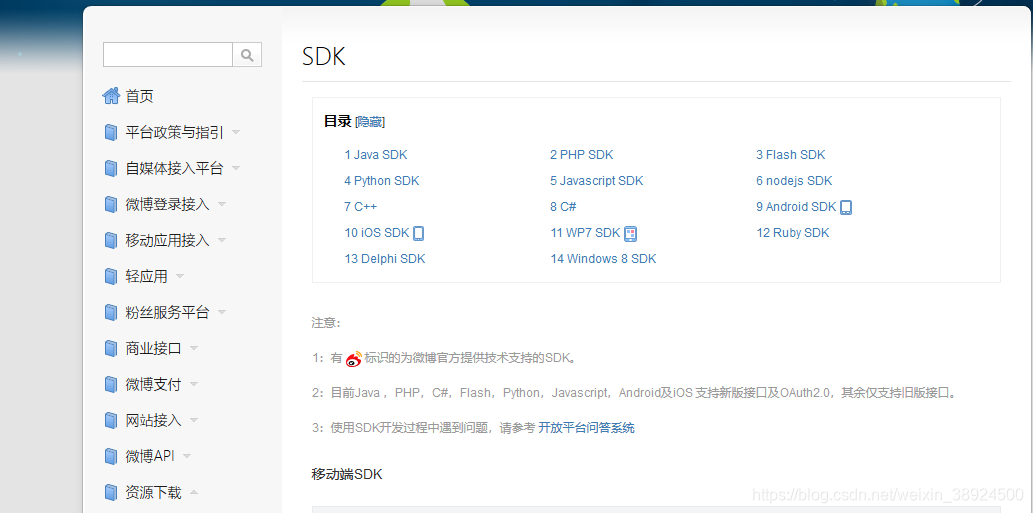
(2)下载微博SDK
微博 SDK支持多种语言,本文以python的sdk为例来说明操作,微博sdk链接http://open.weibo.com/wiki/SDK,点击进入之后选择自己熟悉语言的SDK即可,如下所示:
安装python版微博sdk:
直接在命令行下键入
pip install sinaweibopy3
或者去Gethub上边下载库
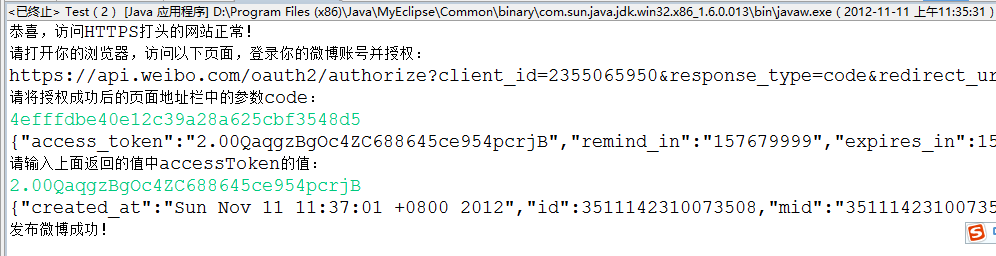
获取code、token信息
from weibo import APIClient# 1.配置
APP_KEY = '你的APP_KEY'
APP_SECRET = '你的APP_SECRET'
CALLBACK_URL = '你的CALLBACK_URL'  # 回调授权页面,用户完成授权后返回的页面# 2.调用APIClient生成client实例
client = APIClient(app_key=APP_KEY, app_secret=APP_SECRET, redirect_uri=CALLBACK_URL)# 3.得到授权页面的url
url = client.get_authorize_url()
print(url)# 4.点击访问url,在浏览器端获得code
code = '6ecdbf350f0680a6f00cc8c34ae721a6'
req = client.request_access_token(code)
client.set_access_token(req.get('access_token'), req.get('expires_in'))# 5.调用微博普通读取接口,返回最新的公共微博。
# 接口详情见 https://open.weibo.com/wiki/2/statuses/public_timeline
statuses = client.statuses__public_timeline()['statuses']
print(len(statuses))
# 6.输出部分信息
for i in range(0, len(statuses)):print(u'昵称:' + statuses[i]['user']['screen_name'])print(u'简单介绍:' + statuses[i]['user']['description'])print(u'位置:' + statuses[i]['user']['location'])print(u'微博:' + statuses[i]['text'])print(statuses[i])
通过模拟登陆获取code
from weibo import APIClient
from selenium import webdriver
import time
APP_KEY='填入你的key'
APP_SECRET='填入你的secret'
CALLBACK_URL = 'https://api.weibo.com/oauth2/default.html
# callback url#在网站放置“使用微博账号登录”的链接,当用户点击链接后,引导用户跳转至如下地址:
#利用官方微博SDK
client = APIClient(app_key=APP_KEY, app_secret=APP_SECRET, redirect_uri=CALLBACK_URL)
#得到授权页面的url,利用webbrowser打开这个url
url = client.get_authorize_url()
river.get(url)
time.sleep(3)
#填充用户名 密码
driver.find_elements_by_id("userId")[0].send_keys("自己的账户")
driver.find_elements_by_id("passwd")[0].send_keys("密码")
time.sleep(5)
driver.find_element_by_class_name("WB_btn_login").click()
# print(driver.page_source)
if '验证码:' in driver.page_source:img_ele=driver.find_element_by_xpath('//img[@node-type="pincode"]')image_url = img_ele.get_attribute('src')print(image_url)if image_url != None:import requestsresponse=requests.get(image_url)with open('pincode.jpg', 'wb') as f:f.write(response.content)vares_img=input('请输入:\n')driver.find_element_by_class_name('WB_iptxt').send_keys(vares_img)driver.find_element_by_class_name("WB_btn_login").click()print('成功登录微博')time.sleep(5)content = driver.current_url# 设置得到的access_tokenprint(content)#获取code=后面的内容
用正则匹配
code = re.complish(r"code=")findall(comtent)r = client.request_access_token(code)
access_token = r.access_token # 新浪返回的token,类似abc123xyz456
expires_in = r.expires_in# 设置得到的access_token
client.set_access_token(access_token, expires_in)#可以打印下看看里面都有什么东西
statuses = client.statuses__friends_timeline()['statuses'] #获取当前登录用户以及所关注用户(已授权)的微博</span>length = len(statuses)
print length
#输出了部分信息
for i in range(0,length):print u'昵称:'+statuses[i]['user']['screen_name']print u'位置:'+statuses[i]['user']['location']print u'微博:'+statuses[i]['text']