写在前面
以下内容是基于Redis 6.2.6 版本整理总结
一、Redis 数据结构hash的编码格式
Redis中hash数据类型使用了两种编码格式:ziplist(压缩列表)、hashtable(哈希表)
在redis.conf配置文件中,有以下两个参数,意思为:当节点数量小于512并且字符串的长度小于等于64时,会使用ziplist编码。
hash-max-ziplist-entries 512
hash-max-ziplist-value 64
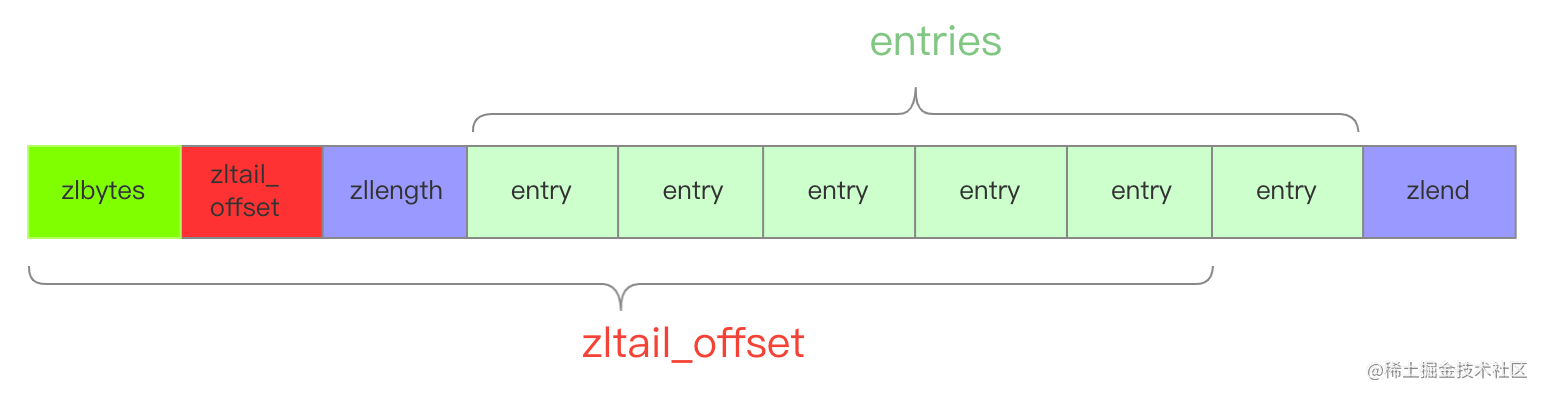
二、压缩链表(ziplist)
ziplist 我们整理在下一篇文章。
三、哈希表(hashtable)
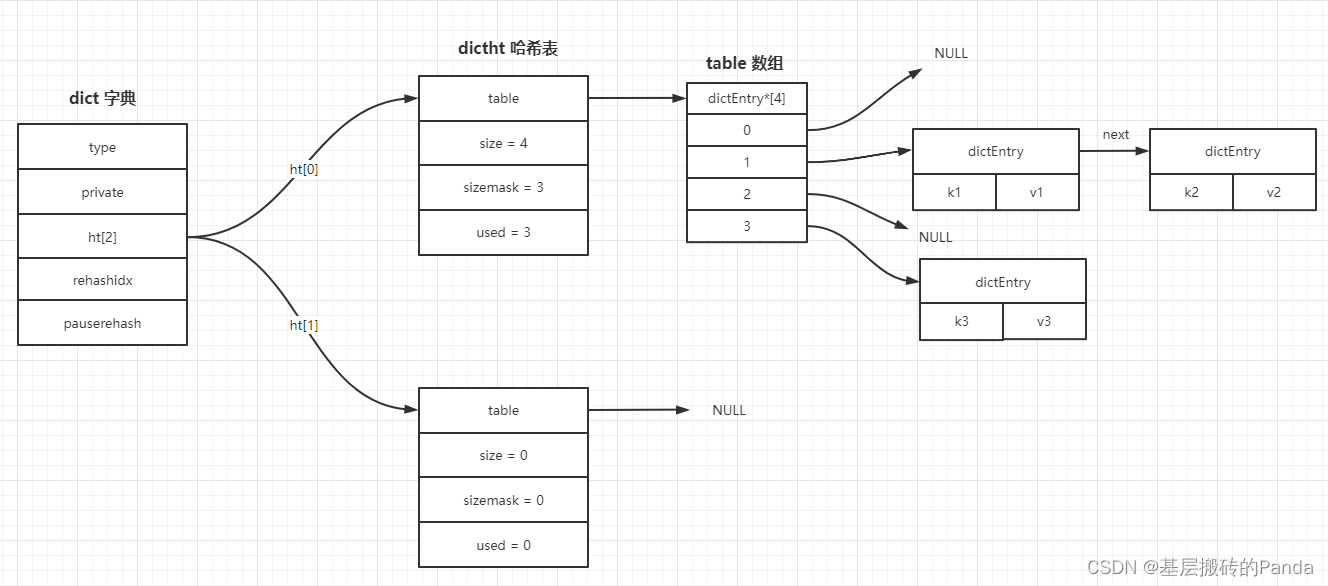
Redis中的字典(dict)使用哈希表作为的底层实现,一个哈希表里可以有多个哈希表的节点,每个节点保存字典中的一个键值对。
哈希表结构定义如下:
typedef struct dictht {dictEntry **table;  // 哈希表数组 每个元素都是 dictEntry 的指针,指向 dictEntry;unsigned long size; // 哈希表大小unsigned long sizemask; // 用来计算索引值 always: sizemask = size - 1unsigned long used; // 哈希表已有节点的数量
} dictht;
哈希表节点定义如下:
哈希表节点使用 dictEntry 结构表示,每个 dictEntry 结构都保存着一个键值对和冲突后的链表的下一个节点。
typedef struct dictEntry {void *key;union {void *val;uint64_t u64;int64_t s64;double d;} v;struct dictEntry *next; // 保存下一个 dictEntry 的地址,形成链表
} dictEntry;
其中,value 是一个联合体,可以保存多种数据类型。当value类型为 uint64_t 、int64_t 或 double时可以直接存储。其他类型需要在其他位置申请一段空间来存放,并用val指向这段空间来使用。
字典结构定义如下:
// location: dict.h
typedef struct dict {dictType *type;  // 指向 dictType 结构的指针void *privdata;  // 存储私有数据的指针,在 dictType 里面的函数会用到dictht ht[2];    // 两个哈希表,扩容时使用,后面会结合源码详细说明long rehashidx;  // 值为-1时,表示没有进行rehash,否则保存rehash执行到那个元素的数组下标 int16_t pauserehash; // >0 表示rehash暂停,<0 表示编码错误
} dict;
dictType 结构定义如下
dictType 结构体定义了一系列操作key-value键值对的方法的函数指针,在实际运行时传入指定函数,就能实现预期的功能,有点运行时多态绑定的味道。
// 操作特性键值对的函数簇
typedef struct dictType {uint64_t (*hashFunction)(const void *key); // 计算哈希值的函数void *(*keyDup)(void *privdata, const void *key);  // 复制key的函数void *(*valDup)(void *privdata, const void *obj);  // 复制value的函数int (*keyCompare)(void *privdata, const void *key1, const void *key2); // 对比key的函数void (*keyDestructor)(void *privdata, void *key);  // 销毁key的函数void (*valDestructor)(void *privdata, void *obj);  // 销毁value的函数int (*expandAllowed)(size_t moreMem, double usedRatio); // 扩容
} dictType;
字典整体结构可以用下图来描述:
3.1 hash冲突
当两个或两个以上的键被分配到哈希数组的同一个索引上面时,我们称这些键发生了冲突。Redis的哈希表使用拉链法解决hash冲突。
3.2 负载因子
负载因子 = used / size ; used 是哈希数组存储的元素个数,size 是哈希数组的长度。
负载因子越小,冲突越小;负载因子越大,冲突越大。
3.3 rehash
随着命令的不断执行,哈希表保存的减值对会逐渐增加或者减少,为了让哈希表的负载因子维持在一个合理的范围内,当哈希表中的键值对过多或过少时,需要对哈希表的大小进行相应的扩展和收缩。而哈希表的扩展和收缩可以通过rehash来执行。rehash 就是将 ht[0] 中的节点,通过重新计算哈希值和索引值放到 ht[1] 哈希表指定的位置上。
扩容
- 如果负载因子大于1,就会触发扩容,扩容的规则是每次翻倍;
- 如果正在fork,执行持久化则不会扩容,但是,如果负载因子大于5,会立马扩容。
缩容
如果负载因子小于0.1,就会触发缩容。缩容的规则是:恰好包含used的2^n。
3.4 渐进式rehash
当哈希表中的元素过多时,如果一次性rehash到ht[1],庞大的计算量,可能导致redis服务在一段时间不可用。为了避免rehash对服务器带来的影响,redis分多次、慢慢的将ht[0]哈希表中的键值对rehash到ht[1]哈希表,这就是渐进式rehash。
核心思想:将整个rehash过程均摊到每次命令的执行中。
rehash的详细步骤:
- 为 ht[1] 哈希表分配空间,此时字典同时拥有ht[0] 和 ht[1] 两个字典
- 将字典中的rehashidx设置为0,表示开始rehash
- 在rehash期间,每次对字典的增删改查,除了执行指定的命令外,还会顺带将ht[0] 中 rehashidx 索引上的所有键值对都rehash到ht[1]中,执行完rehash,rehashidx属性加一。注意:新增的键值对只能插入到ht[1]哈希表中,保证ht[0]的键值对只减不增。
- 随着操作的不断进行,最终ht[0]哈希表中的所有键值对都被rehash到ht[1]中。此时,将ht[0]释放掉,让ht[0] 指向ht[1],并设置rehashidx 为 -1,表示rehash完成。
四、字典常用 API
// 创建字典
dict *dictCreate(dictType *type, void *privDataPtr);
// 将键值对 key-val 插入到字典
int dictAdd(dict *d, void *key, void *val);
// 删除字典中指定 key 的键值对
int dictDelete(dict *d, const void *key);
// 获取指定key的value值
void *dictFetchValue(dict *d, const void *key);
// 将键值对 key-val 插入到字典,如果该key已经存在,则只更新val
int dictReplace(dict *d, void *key, void *val);
五、Rehash源码分析
5.1 添加元素步骤
// 1. 通过hash函数得到hash值
hash = dict->type->hashFunction(key);
// 2. 将hash值与对应哈希表的sizemask 进行 & 操作得到index
index= hash & d->ht[x].sizemask; // x = 0 or 1
// 3. 创建 dictEntry 节点,头插法插入到对应哈希表的index的位置
entry = zmalloc(sizeof(*entry));
entry->next = ht->table[index];
ht->table[index] = entry;
添加元素源码分析
redis使用 dictAdd() 方法往哈希表中添加元素。dictAdd 调用的是 dictAddRaw 方法,它会先通过_dictKeyIndex() 函数计算出table的index;再通过头插法将该节点插入到目标位置。
dictAdd() 函数
/* Add an element to the target hash table */
int dictAdd(dict *d, void *key, void *val)
{dictEntry *entry = dictAddRaw(d,key,NULL);if (!entry) return DICT_ERR;// 将 val 保存到 entry 节点dictSetVal(d, entry, val);return DICT_OK;
}
dictAddRaw() 函数
dictEntry *dictAddRaw(dict *d, void *key, dictEntry **existing)
{long index;dictEntry *entry;dictht *ht;if (dictIsRehashing(d)) _dictRehashStep(d);/* Get the index of the new element, or -1 if* the element already exists. */// 计算indexif ((index = _dictKeyIndex(d, key, dictHashKey(d,key), existing)) == -1)return NULL;/* Allocate the memory and store the new entry.* Insert the element in top, with the assumption that in a database* system it is more likely that recently added entries are accessed* more frequently. */ht = dictIsRehashing(d) ? &d->ht[1] : &d->ht[0];entry = zmalloc(sizeof(*entry));// 头插法 最快entry->next = ht->table[index];ht->table[index] = entry;ht->used++;// 将 key 保存在 entry 节点中dictSetKey(d, entry, key);return entry;
}
其中,在_dictKeyIndex() 函数计算index的时候,会调用 _dictExpandIfNeeded() 函数判断是否满足扩容的条件。其中有个条件是依赖于 dictTypeExpandAllowed(d) 的返回值。
_dictKeyIndex() 函数
static long _dictKeyIndex(dict *d, const void *key, uint64_t hash, dictEntry **existing)
{unsigned long idx, table;dictEntry *he;if (existing) *existing = NULL;/* Expand the hash table if needed */if (_dictExpandIfNeeded(d) == DICT_ERR)return -1;for (table = 0; table <= 1; table++) {idx = hash & d->ht[table].sizemask;/* Search if this slot does not already contain the given key */he = d->ht[table].table[idx];while(he) {if (key==he->key || dictCompareKeys(d, key, he->key)) {if (existing) *existing = he;return -1;}he = he->next;}if (!dictIsRehashing(d)) break;}return idx;
}
_dictExpandIfNeeded() 函数
/* Expand the hash table if needed */
static int _dictExpandIfNeeded(dict *d)
{/* Incremental rehashing already in progress. Return. */if (dictIsRehashing(d)) return DICT_OK;/* If the hash table is empty expand it to the initial size. */if (d->ht[0].size == 0) return dictExpand(d, DICT_HT_INITIAL_SIZE);/* If we reached the 1:1 ratio, and we are allowed to resize the hash* table (global setting) or we should avoid it but the ratio between* elements/buckets is over the "safe" threshold, we resize doubling* the number of buckets. */if (d->ht[0].used >= d->ht[0].size &&(dict_can_resize ||d->ht[0].used/d->ht[0].size > dict_force_resize_ratio) &&dictTypeExpandAllowed(d)){return dictExpand(d, d->ht[0].used + 1);}return DICT_OK;
}
dictTypeExpandAllowed() 函数
static int dictTypeExpandAllowed(dict *d) {if (d->type->expandAllowed == NULL) return 1;return d->type->expandAllowed(_dictNextPower(d->ht[0].used + 1) * sizeof(dictEntry*),(double)d->ht[0].used / d->ht[0].size);
}
可以看到,如果 dictType 中没有设置 expandAllowed 函数,则直接返回真;如果设置了expandAllowed 函数,就需要执行完相应的函数才能确定是否可以扩缩容。这就是 dictType 的一个典型的应用场景。
5.2 rehash 源码分析
该函数每次从rehashidx开始的位置,固定扫描 10 个bucket,如果对应的bucket中有数据就 rehash 到 ht[1]中。
static void _dictRehashStep(dict *d) {if (d->pauserehash == 0) dictRehash(d,1);
}int dictRehash(dict *d, int n) {int empty_visits = n*10; /* Max number of empty buckets to visit. */if (!dictIsRehashing(d)) return 0;while(n-- && d->ht[0].used != 0) {dictEntry *de, *nextde;/* Note that rehashidx can't overflow as we are sure there are more* elements because ht[0].used != 0 */assert(d->ht[0].size > (unsigned long)d->rehashidx);// 跳过空的槽位while(d->ht[0].table[d->rehashidx] == NULL) {d->rehashidx++;// 如果 经过 n*10 次,还是为空,本次rehash结束if (--empty_visits == 0) return 1;}// 找到要rehash的bucketde = d->ht[0].table[d->rehashidx];// 遍历该bucket对应的dictEntry链表while(de) {uint64_t h;nextde = de->next;// 为该dictEntry 获取在ht[1]中的index h = dictHashKey(d, de->key) & d->ht[1].sizemask;// 头插法 de->next 指向 ht[1].table[h]的第一个元素 (可能为NULL,可能有元素)de->next = d->ht[1].table[h];// 更新ht[1].table[h]的值指向该 dictEntryd->ht[1].table[h] = de;d->ht[0].used--;d->ht[1].used++;de = nextde; // 更新de,继续遍历,直至为空}// 将ht[0]中 d->rehashidx 对应的bucket清空d->ht[0].table[d->rehashidx] = NULL;// 更新rehashidxd->rehashidx++;}// 检查整个ht[0]表,rehash是否完成if (d->ht[0].used == 0) {zfree(d->ht[0].table); // 释放ht[0]d->ht[0] = d->ht[1];   // 让ht[0] 指向 rehash后的 ht[1]_dictReset(&d->ht[1]); // 重置 ht[0], 以备下次rehashd->rehashidx = -1;return 0;}/* More to rehash... */return 1;
}
文章参考与<零声教育>的C/C++linux服务期高级架构系统教程学习