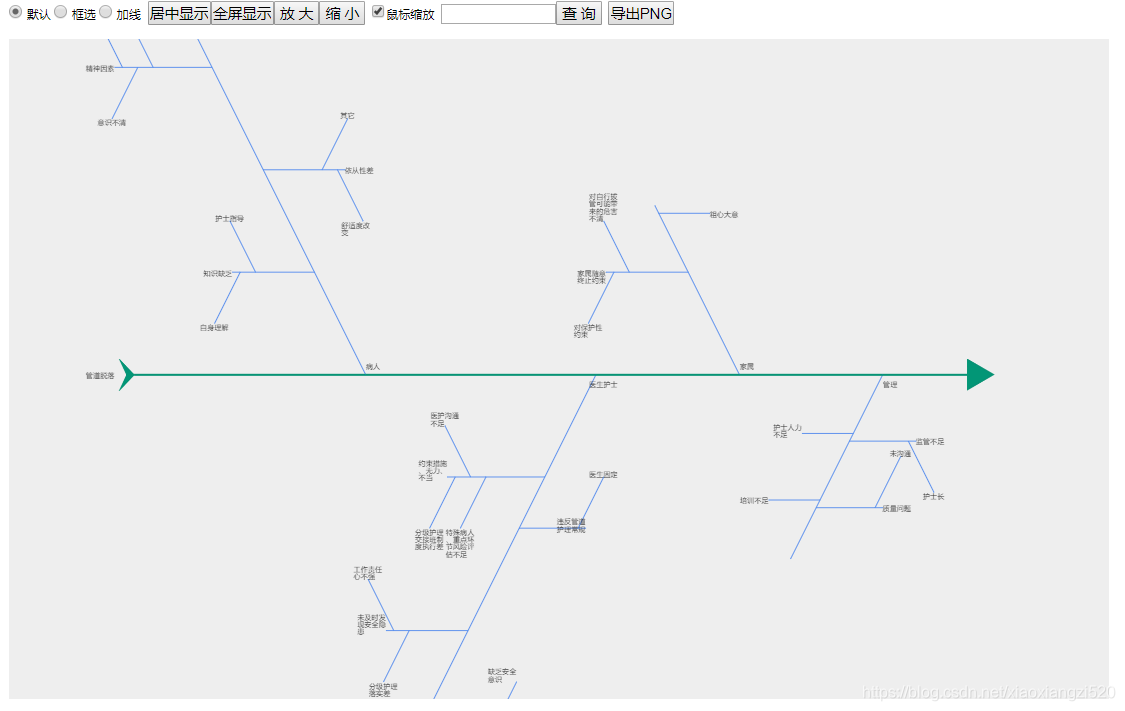
效果如下图所示:
一、文件目录结构:

二、绘制png的鱼头、鱼尾图片
fish_head.png:![]() fish_tail.png:
fish_tail.png: 
三、下载js文件
jquery、jtopo请到官网下载。
四、编写鱼骨图核心文件:MakFishBone.js
let MakFishBone = (function (window) {let MakFishBone = function (canvas, options) {return new MakFishBone.fn.init(canvas, options)}MakFishBone.fn = MakFishBone.prototype = {constructor: MakFishBone,init: function (canvas, options) {this.canvas = canvaslet dpr = window.devicePixelRatio || 1canvas.width = parseInt(canvas.style.width) * dprcanvas.height = parseInt(canvas.style.height) * dprthis.ctx = canvas.getContext('2d')let defaultConfig = {/*json数据*/data: null,/*是否可以拖动,默认是true */dragable: true,/*是否显示工具条 */showToolbar: true,/* debug模式 */debug: true,//交错显示stagger: true,//背景sceneBackgroundImage: null,//单击节段回调clickNodeCallback: null}this.cfg = $.extend(defaultConfig, options)let stage = new JTopo.Stage(canvas)this.stage = stage//显示工具栏showJTopoToobar(stage)this.scene = new JTopo.Scene(stage)},getFishBoneNode: function (position, text) {let jNode = new JTopo.Node(text || '')jNode.shadow = false// jNode.showSelected = false;jNode.dragable = falseif (position) {jNode.setLocation(position.x, position.y)}jNode.setSize(0, 0)if (this.cfg.debug) {jNode.setSize(1, 1)}return jNode},getNodeTextRect: function (node, text) {this.ctx.font = node.fontlet textArray = text.split('\n')let maxLength = 0maxText = textArray[0]for (let i = 0; i < textArray.length; i++) {let rowwidth = this.ctx.measureText(textArray[i]).widthif (rowwidth > maxLength) {maxLength = rowwidthmaxText = textArray[i]}}let lineHeight = this.ctx.measureText('田').widthreturn {width: maxLength,height: lineHeight * textArray.length,lineHeight: lineHeight}},//格式化文本节点值getFormatText: function (text) {//每行文本字符数let textNumberRow = 11let tmptext = ''if (text) {for (let i = 0; i < text.length; i++) {if (i > 0 && i % textNumberRow == 0) {tmptext += '\n'}tmptext += text[i]}}return tmptext},getNewTextNode: function (PntA, text, PntZ, depth) {let tmptextif (depth == 1) {tmptext = text} else {tmptext = this.getFormatText(text)}let nodeText = new JTopo.TextNode(tmptext || '')nodeText.shadow = false//nodeText.showSelected = false;nodeText.dragable = falsenodeText.fontColor = '40,40,40'nodeText.font = '12px 微软雅黑'nodeText.paint = function (a) {a.beginPath()a.font = this.fonta.strokeStyle = 'rgba(' + this.fontColor + ', ' + this.alpha + ')'a.fillStyle = 'rgba(' + this.fontColor + ', ' + this.alpha + ')'let textArray = this.text.split('\n')let maxLength = 0maxText = textArray[0]for (let i = 0; i < textArray.length; i++) {let rowwidth = a.measureText(textArray[i]).widthif (rowwidth > maxLength) {maxLength = rowwidthmaxText = textArray[i]}}this.width = maxLengthlet lineHeight = a.measureText('田').widththis.height = lineHeight * textArray.lengthlet x = -this.width / 2let y = -this.height / 2 + lineHeightfor (let j = 0; j < textArray.length; j++) {a.fillText(textArray[j], x, y)y += lineHeight}a.closePath()}let size = this.getNodeTextRect(nodeText, tmptext)nodeText.textSize = sizelet tx = 0, ty = 0//设置中骨文本节点坐标if (depth == 1) {tx = PntZ.x + 15, ty = PntZ.y - 15} else {tx = PntA.x, ty = PntA.y}if (PntA.y == PntZ.y) {//横线tx -= size.widthty -= size.lineHeight / 2} else {//斜线tx -= size.width / 2ty -= size.height}nodeText.setLocation(tx, ty)this.scene.add(nodeText)let nodeA = this.getFishBoneNode(PntA)let nodeZ = this.getFishBoneNode(PntZ)if (depth == 0) {//获取鱼骨图,设置根节点x,y坐标let img = new Image()img.src = '/static/image/fish_head.png'//图片加载完成之后执行img.onload = function () {nodeA.y = nodeA.y - img.height / 2nodeZ.y = nodeZ.y - img.height / 2nodeA.setImage('/static/image/fish_tail.png', true)nodeZ.setImage('/static/image/fish_head.png', true)}}this.scene.add(nodeA)this.scene.add(nodeZ)nodeZ.assPnt = nodeAnodeA.assPnt = nodeZlet link = new JTopo.Link(nodeA, nodeZ, '')link.bundleOffset = 60 // 折线拐角处的长度link.bundleGap = 20 // 线条之间的间隔link.textOffsetY = 3 // 文本偏移量(向下3个像素)if (depth == 0) {link.lineWidth = 6 // 线宽link.strokeColor = '8,147,117'} else {link.lineWidth = 2 // 线宽link.strokeColor = '100,149,237'}this.scene.add(link)return {nodeA: nodeA, nodeZ: nodeZ, link: link, text: nodeText}},resetX: function (node, x) {node.nodes.nodeA.x += xnode.nodes.nodeZ.x += xnode.nodes.text.x += xif (node.children) {for (let i = 0; i < node.children.length; i++) {this.resetX(node.children[i], x)}}},resetY: function (node, x, y) {node.nodes.nodeA.x += xnode.nodes.nodeA.y += ynode.nodes.nodeZ.x += xnode.nodes.nodeZ.y += ynode.nodes.text.x += xnode.nodes.text.y += yif (node.children) {for (let i = 0; i < node.children.length; i++) {this.resetY(node.children[i], x, y)}}},//水平翻转HorizontalFlip: function (node) {node.nodes.nodeA.x = -node.nodes.nodeA.xnode.nodes.nodeZ.x = -node.nodes.nodeZ.xnode.nodes.text.x = node.nodes.nodeA.xif (node.children) {for (let i = 0; i < node.children.length; i++) {this.HorizontalFlip(node.children[i])}}},//垂直翻转VerticalFlip: function (node) {let sizeif (node.name) {let tmptext = this.getFormatText(node.name)size = this.getNodeTextRect(node, tmptext)}node.nodes.nodeA.y = -node.nodes.nodeA.ynode.nodes.nodeZ.y = -node.nodes.nodeZ.ynode.nodes.text.y = -node.nodes.text.y + (size ? -size.height : 0)if (node.children) {for (let i = 0; i < node.children.length; i++) {this.VerticalFlip(node.children[i])}}},//根据节点level值画节点drawLevel: function (depth) {if (depth < 0) {return}let clevels = this.flatData.filter(x => x.level == depth)//depth最小为0,偶数为横线,奇数为斜线let isHorizontal = (depth % 2) === 0for (let i = 0; i < clevels.length; i++) {let arow = clevels[i]let lineLength = 100//筛选子节点let chilnodes = []let tnodes = []for (let k = 0; k < this.AllTmpNode.length; k++) {if (this.AllTmpNode[k].path.indexOf(arow.path + '_') === 0) {chilnodes.push(this.AllTmpNode[k])} else {tnodes.push(this.AllTmpNode[k])}}this.AllTmpNode = tnodes//固定间隔let fixedInterval = 40if (isHorizontal) {//横线//先计算子节点宽度(分斜线左边部分,和斜线右边部分let width_left = []let width_right = []let widthtotal = 0for (let j = 0; j < chilnodes.length; j++) {let subnode = chilnodes[j]if (subnode.children) {if (subnode.children.length === 0) {//没有子节点(固定间隔)width_left.push(fixedInterval), width_right.push(fixedInterval)} else if (subnode.children.length === 1) {//1个子节点(半幅width_left.push(Math.abs(subnode.children[0].nodes.nodeA.x))width_right.push(0)} else {//多个子节点let xleft = subnode.children[0].nodes.nodeA.xlet xright = subnode.children[0].nodes.nodeA.xfor (let k = 1; k < subnode.children.length; k++) {let growNode = subnode.children[k].nodes.nodeAif (growNode.x < xleft) {xleft = growNode.x}if (growNode.x > xright) {xright = growNode.x}}width_left.push(Math.abs(xleft)), width_right.push(Math.abs(xright))}widthtotal += width_left[j] + width_right[j]}}lineLength += widthtotal//计算斜线的基础位置(0,0)作为目标点let PntA = {x: -lineLength, y: 0}let PntZ = {x: 0, y: 0}arow.lineLength = lineLength//返回4个节点arow.nodes = this.getNewTextNode(PntA, arow.name, PntZ, depth)this.AllTmpNode.push(arow)//把它的子节点全部放到当前节点上let newX = PntA.xfor (let j = 0; j < chilnodes.length; j++) {let subnode = chilnodes[j]newX += width_left[j]this.resetX(subnode, newX)newX += width_right[j]}if (i % 2 != 0) {//右边(水平翻转整颗树)this.HorizontalFlip(arow)}} else {//斜线//先计算子节点的高度(子节点的高度,上半部分和下半部分分开计算let height_up = []let height_down = []let heighttotal = 0for (let j = 0; j < chilnodes.length; j++) {let subnode = chilnodes[j]if (subnode.children) {if (subnode.children.length === 0) {//没有子节点(固定间隔)height_up.push(fixedInterval), height_down.push(fixedInterval)} else if (subnode.children.length === 1) {//1个子节点(半幅height_up.push(subnode.children[0].lineLength)height_down.push(0)} else {//多个子节点let yTop = subnode.children[0].nodes.nodeA.ylet yBottom = subnode.children[0].nodes.nodeA.yfor (let k = 1; k < subnode.children.length; k++) {let growNode = subnode.children[k].nodes.nodeAif (growNode.y < yTop) {yTop = growNode.y}if (growNode.y > yBottom) {yBottom = growNode.y}}height_up.push(Math.abs(yTop)), height_down.push(Math.abs(yBottom))}heighttotal += height_up[j] + height_down[j]}}lineLength += heighttotal//计算斜线的基础位置(0,0)作为目标点let PntA = {x: -lineLength / 2, y: -lineLength}let PntZ = {x: 0, y: 0}arow.lineLength = lineLength//返回4个节点arow.nodes = this.getNewTextNode(PntA, arow.name, PntZ, depth)this.AllTmpNode.push(arow)//把它的子节点全部放到当前节点上let newX = PntA.xlet newY = PntA.yfor (let j = 0; j < chilnodes.length; j++) {newY += height_up[j]newX += height_up[j] / 2this.resetY(chilnodes[j], newX, newY)newY += height_down[j]newX += height_down[j] / 2}if (i % 2 != 0) {//右上斜(垂直翻转整颗树)this.VerticalFlip(arow)}}}//子元素花完了,画根元素this.drawLevel(depth - 1)},start: function () {let flatData = []let maxdepth = 0function dofloatdata (d, path, depth) {d.level = depthd.path = pathflatData.push(d)if (depth > maxdepth) {maxdepth = depth}if (d.children) {for (let i = 0; i < d.children.length; i++) {dofloatdata(d.children[i], path + '_' + i, depth + 1)}}}dofloatdata(this.cfg.data, '0', 0)this.flatData = flatDataif (this.cfg.debug) {console.log('maxdepth:' + maxdepth)console.log(flatData)}this.AllTmpNode = []this.drawLevel(maxdepth)this.movePntS((this.cfg.data.lineLength + this.canvas.width) / 2, this.canvas.height / 2)//居中显示this.stage.centerAndZoom()},movePntS: function (x, y) {for (let i = 0; i < this.scene.childs.length; i++) {let a = this.scene.childs[i]a.x += xa.y += y}},}MakFishBone.fn.init.prototype = MakFishBone.fnreturn MakFishBone
})(window)
五、jtopo工具栏toolbar.js
// 页面工具栏
function showJTopoToobar(stage){var toobarDiv = $('<div class="jtopo_toolbar">').html(''+'<input type="radio" name="modeRadio" value="normal" checked id="r1"/>'+'<label for="r1"> 默认</label>'+' <input type="radio" name="modeRadio" value="select" id="r2"/><label for="r2"> 框选</label>'+' <input type="radio" name="modeRadio" value="edit" id="r4"/><label for="r4"> 加线</label>'+' <input type="button" id="centerButton" value="居中显示"/>'+'<input type="button" id="fullScreenButton" value="全屏显示"/>'+'<input type="button" id="zoomOutButton" value=" 放 大 " />'+'<input type="button" id="zoomInButton" value=" 缩 小 " />'+' <input type="checkbox" id="zoomCheckbox"/><label for="zoomCheckbox">鼠标缩放</label>'+' <input type="text" id="findText" style="width: 100px;" value="" onkeydown="enterPressHandler(event)">'+ '<input type="button" id="findButton" value=" 查 询 ">'+' <input type="button" id="exportButton" value="导出PNG">');$('#content').prepend(toobarDiv);// 工具栏按钮处理$("input[name='modeRadio']").click(function(){stage.mode = $("input[name='modeRadio']:checked").val();});$('#centerButton').click(function(){stage.centerAndZoom(); //缩放并居中显示});$('#zoomOutButton').click(function(){stage.zoomOut();});$('#zoomInButton').click(function(){stage.zoomIn();});$('#cloneButton').click(function(){stage.saveImageInfo();});$('#exportButton').click(function() {stage.saveImageInfo();});$('#printButton').click(function() {stage.saveImageInfo();});$('#zoomCheckbox').click(function(){if($('#zoomCheckbox').is(':checked')){stage.wheelZoom = 1.2; // 设置鼠标缩放比例}else{stage.wheelZoom = null; // 取消鼠标缩放比例}});$('#fullScreenButton').click(function(){runPrefixMethod(stage.canvas, "RequestFullScreen")});window.enterPressHandler = function (event){if(event.keyCode == 13 || event.which == 13){$('#findButton').click();}};// 查询$('#findButton').click(function(){var text = $('#findText').val().trim();//var nodes = stage.find('node[text="'+text+'"]');var scene = stage.childs[0];var nodes = scene.childs.filter(function(e){return e instanceof JTopo.Node;});nodes = nodes.filter(function(e){if(e.text == null) return false;return e.text.indexOf(text) != -1;});if(nodes.length > 0){var node = nodes[0];node.selected = true;var location = node.getCenterLocation();// 查询到的节点居中显示stage.setCenter(location.x, location.y);function nodeFlash(node, n){if(n == 0) {node.selected = false;return;};node.selected = !node.selected;setTimeout(function(){nodeFlash(node, n-1);}, 300);}// 闪烁几下nodeFlash(node, 6);}});
}var runPrefixMethod = function(element, method) {var usablePrefixMethod;["webkit", "moz", "ms", "o", ""].forEach(function(prefix) {if (usablePrefixMethod) return;if (prefix === "") {// 无前缀,方法首字母小写method = method.slice(0,1).toLowerCase() + method.slice(1);}var typePrefixMethod = typeof element[prefix + method];if (typePrefixMethod + "" !== "undefined") {if (typePrefixMethod === "function") {usablePrefixMethod = element[prefix + method]();} else {usablePrefixMethod = element[prefix + method];}}}
);return usablePrefixMethod;
};六、index.html引入js
<!DOCTYPE html>
<html>
<head><meta charset="utf-8"><meta name="viewport" content="width=device-width,initial-scale=1.0"><script src="/static/lib/jtopo-0.4.8-min.js"></script><script src="/static/lib/MakFishBone.js"></script><script src="/static/lib/jquery-3.3.1.js"></script><script src="/static/lib/toolbar.js"></script>
</head>
<body>
<div id="app"></div>
</body>
</html><style>body {margin: 0px;padding: 0px}
</style>
七、组件封装:src\components\Jtopo.vue
<template><div id="content" ref="content" style="width:100%"><canvas id="canvas" ref="canvas" :style="{width:canvasW, height:canvasH}"></canvas></div>
</template><script>export default {name: 'Jtopo',data () {return {canvasW: '0px',canvasH: '0px'}},props: {fishboneData: {type: Object,default () {return {name: '',children: null}}}},mounted () {//设置canvas宽高let contentW = this.$refs.content.offsetWidththis.canvasW = contentW + 'px'let bodyH = document.body.offsetHeight - 40this.canvasH = bodyH + 'px'},created () {setTimeout(() => {this.initTopo()}, 1000)},watch: {fishboneData (newVal, oldVal) {if (newVal.children && newVal.children.length > 0) {this.initTopo()}}},methods: {initTopo () {let canvas = this.$refs.canvasif (this.fishboneData) {let mfb = new MakFishBone(canvas, {data: this.fishboneData})mfb.start()}}}}
</script>
<style scoped>>>> .jtopo_toolbar {height: 35px;line-height: 35px;background-color: rgb(216, 231, 242);}
</style>
八、测试页面
<template><div><Jtopo :fishboneData="fishboneData"/></div>
</template><script>import Jtopo from '../../components/Jtopo'export default {data () {return {fishboneData: null}},name: 'Fishbone',components: {Jtopo},created () {this.fishboneData = {'children': [{'children': [{'children': [{'children': [], 'name': '睡眠中迷糊', fontColor: '', lineColor: '', link: ''},{'children': [], 'name': '意识不清', fontColor: '', lineColor: '', link: ''},{'children': [], 'name': '精神异常', fontColor: '', lineColor: '', link: ''},], 'name': '精神因素', fontColor: '', lineColor: '', link: 'http://www.baidu.com'},{'children': [{'children': [], 'name': '舒适度改变', fontColor: '', lineColor: '', link: ''},{'children': [], 'name': '其它', fontColor: '', lineColor: '', link: ''}], 'name': '依从性差', fontColor: '', lineColor: '', link: ''},{'children': [{'children': [], 'name': '自身理解', fontColor: '', lineColor: '', link: ''},{'children': [], 'name': '护士指导', fontColor: '', lineColor: '', link: ''}], 'name': '知识缺乏', fontColor: '', lineColor: '', link: ''},], 'name': '病人', fontColor: '', lineColor: '', link: ''},{'children': [{'children': [{'children': [], 'name': '缺乏安全意识', fontColor: '', lineColor: '', link: ''},{'children': [], 'name': '自身知识不足', fontColor: '', lineColor: '', link: ''}], 'name': '安全告知不到位', fontColor: '', lineColor: '', link: ''},{'children': [{'children': [], 'name': '工作责任心不强', fontColor: '', lineColor: '', link: ''},{'children': [], 'name': '分级护理落实差', fontColor: '', lineColor: '', link: ''}], 'name': '未及时发现安全隐患', fontColor: '', lineColor: '', link: ''},{'children': [{'children': [], 'name': '医生固定', fontColor: '', lineColor: '', link: ''}], 'name': '违反管道护理常规', fontColor: '', lineColor: '', link: ''},{'children': [{'children': [], 'name': '分级护理交接班制度执行差', fontColor: '', lineColor: '', link: ''},{'children': [], 'name': '医护沟通不足', fontColor: '', lineColor: '', link: ''},{'children': [], 'name': '特殊病人、重点环节风险评估不足', fontColor: '', lineColor: '', link: ''}], 'name': '约束措施、无力、不当', fontColor: '', lineColor: '', link: ''}], 'name': '医生护士', fontColor: '', lineColor: '', link: ''},{'children': [{'children': [], 'name': '粗心大意', fontColor: '', lineColor: '', link: ''},{'children': [{'children': [], 'name': '对保护性约束', fontColor: '', lineColor: '', link: ''},{'children': [], 'name': '对自行拔管可能带来的危害不清', fontColor: '', lineColor: '', link: ''}], 'name': '家属随意终止约束', fontColor: '', lineColor: '', link: ''}], 'name': '家属', fontColor: '', lineColor: '', link: ''},{'children': [{'children': [{'children': [], 'name': '未沟通', fontColor: '', lineColor: '', link: ''}], 'name': '质量问题', fontColor: '', lineColor: '', link: ''},{'children': [], 'name': '培训不足', fontColor: '', lineColor: '', link: ''},{'children': [{'children': [], 'name': '护士长', fontColor: '', lineColor: '', link: ''}], 'name': '监管不足', fontColor: '', lineColor: '', link: ''},{'children': [], 'name': '护士人力不足', fontColor: '', lineColor: '', link: ''}], 'id': '1004', 'fid': '1', 'name': '管理', fontColor: '', lineColor: '', link: ''}], 'name': '管道脱落', fontColor: '', lineColor: '', link: ''}},}
</script>