这几天在学习了shiro权限管理框架,在刚开始的时候学的时候因为这个配置问题困扰了我很长时间,所以在这篇文章我整合了自己用SSM搭建shiro权限框架的过程。
1.配置
1.1jar包
在项目配置开始前需要先导入shiro的相关jar包,下载地址:https://mvnrepository.com/:

如果你的项目时maven项目的话只需要在pom.xml中添加以下几个依赖:
<!-- shiro核心包 --><dependency><groupId>org.apache.shiro</groupId><artifactId>shiro-core</artifactId><version>1.3.2</version></dependency><!-- 添加shiro web支持 --><dependency><groupId>org.apache.shiro</groupId><artifactId>shiro-web</artifactId><version>1.3.2</version></dependency><!-- 添加shiro spring支持 --><dependency><groupId>org.apache.shiro</groupId><artifactId>shiro-spring</artifactId><version>1.3.2</version></dependency>其他版本的依赖自行从https://mvnrepository.com/查找。
1.2web.xml配置
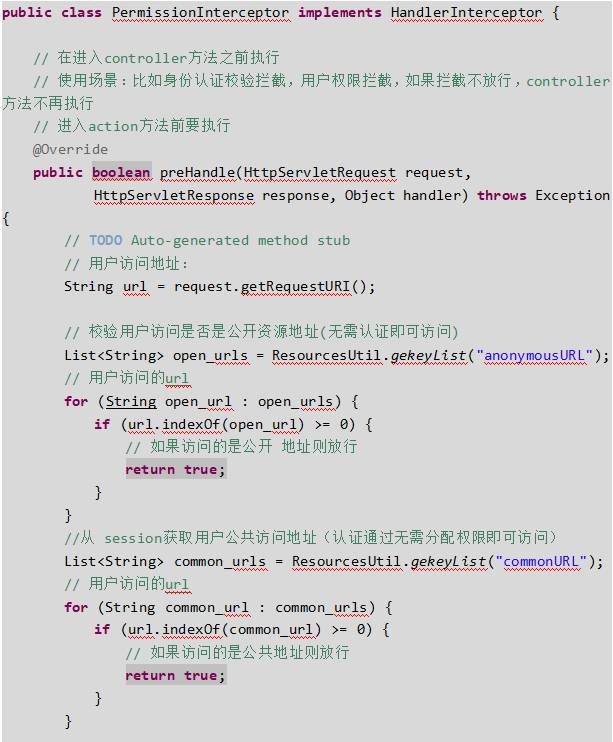
其实shiro权限控制就是通过拦截器来进行判断用户权限的,因此shiro拦截器的配置跟springMVC的拦截器配置是类似的。
在web.xml文件中配置shiro的filter拦截器:
<!-- 上下文的位置 --><param-name>contextConfigLocation</param-name><param-value>classpath:applicationContext.xml</param-value></context-param><!-- Spring的监听器 --><listener><listener-class>org.springframework.web.context.ContextLoaderListener</listener-class></listener>
<!-- 添加shiro过滤器 --><filter><filter-name>shiroFilter</filter-name><filter-class>org.springframework.web.filter.DelegatingFilterProxy</filter-class><init-param><!-- 该值缺省为false,表示声明周期由SpringApplicationContext管理,设置为true表示ServletContainer管理 --><param-name>targetFilterLifecycle</param-name><param-value>true</param-value></init-param><!-- 设置spring容器filter的bean id,如果不设置则找与filter-name一致的bean--><init-param><param-name>targetBeanName</param-name><param-value>shiroFilter</param-value></init-param></filter>
<!-- POST提交过滤器 UTF-8 --><filter><filter-name>encoding</filter-name><filter-class>org.springframework.web.filter.CharacterEncodingFilter</filter-class><init-param><param-name>encoding</param-name><param-value>UTF-8</param-value></init-param></filter><filter-mapping><filter-name>shiroFilter</filter-name><url-pattern>*.action</url-pattern></filter-mapping><!-- 前端控制器 --><servlet><servlet-name>shirodemo</servlet-name><servlet-class>org.springframework.web.servlet.DispatcherServlet</servlet-class><init-param><param-name>contextConfigLocation</param-name><!-- 此处不配置 默认找 /WEB-INF/[servlet-name]-servlet.xml --><param-value>classpath:springmvc-config.xml</param-value></init-param><load-on-startup>1</load-on-startup></servlet><servlet-mapping><servlet-name>shirodemo</servlet-name><!-- 1:*.do *.action 拦截以.do结尾的请求 (不拦截 jsp png jpg .js .css) 2:/ 拦截所有请求 (不拦截.jsp) 建议使用此种 方式 (拦截 .js.css .png) (放行静态资源) 3:/* 拦截所有请求(包括.jsp) 此种方式 不建议使用 --><url-pattern>*.action</url-pattern></servlet-mapping>
这里需要注意的一点是targetBeanName下面的shiroFilter这个value要记牢,后面在配置shiro和spring的时候会用到。
1.3配置applicationContext.xml
类似springmvc一样,需要写一个配置文件来配置拦截器。
<!--自定义Realm,注入认证凭证器--><bean id="userRealm" class="cn.lijiahao.demo.realm.UserRealm"><property name="credentialsMatcher" ref="credentialsMatcher"/></bean><!--securityManager管理--><bean id="securityManager" class="org.apache.shiro.web.mgt.DefaultWebSecurityManager"><property name="realm" ref="userRealm"></property></bean><!--shiro 过滤器--><bean id="shiroFilter" class="org.apache.shiro.spring.web.ShiroFilterFactoryBean"><!-- Shiro过滤器的核心安全接口,这个属性是必须的--><property name="securityManager" ref="securityManager"/><!--身份认证失败,则跳转到登录页面的配置--><property name="loginUrl" value="/login.action"/><property name="successUrl" value="/index.action"></property><!--权限认证失败,则跳转到指定页面--><property name="unauthorizedUrl" value="/unauthorized.action"/><!-- Shiro连接约束配置,即过滤链的定义--><property name="filterChainDefinitions"><value>/index.action=anon/index.html=anon/logout.action=logout/register.action=anon/login.jsp=anon/test.action=authc/assets/**=anon/admin/**=roles[admin]/user/**=roles[user]/**=authc</value></property></bean>上面的id="shiroFilder"就是刚刚在web.xml里的argetBeanName下面的shiroFilter的value,这里必须要保持一致。
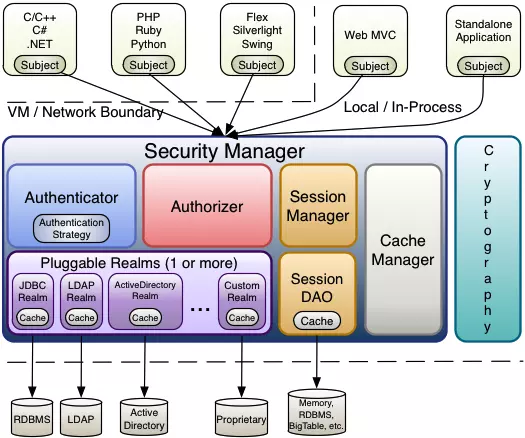
shiro的过滤拦截器需要加载一个securityManager安全管理器,这个必须要有的。
<!--securityManager管理--><bean id="securityManager" class="org.apache.shiro.web.mgt.DefaultWebSecurityManager"><property name="realm" ref="userRealm"></property><!--注入自定义realm,若果没有自定义realm,可以不注入--></bean>定义拦截的内容在value标签里:
<!-- Shiro连接约束配置,即过滤链的定义--><property name="filterChainDefinitions"><value>/index.action=anon<!-- 定义/index.action可以匿名访问-->/index.html=anon/logout.action=logout/register.action=anon/login.jsp=anon/test.action=authc/assets/**=anon/admin/**=roles[admin]/user/**=roles[user]/**=authc</value></property>shiro的过滤器总结如下:
过滤器简称
对应的java类
anon
org.apache.shiro.web.filter.authc.AnonymousFilter
authc
org.apache.shiro.web.filter.authc.FormAuthenticationFilter
authcBasic
org.apache.shiro.web.filter.authc.BasicHttpAuthenticationFilter
perms
org.apache.shiro.web.filter.authz.PermissionsAuthorizationFilter
port
org.apache.shiro.web.filter.authz.PortFilter
rest
org.apache.shiro.web.filter.authz.HttpMethodPermissionFilter
roles
org.apache.shiro.web.filter.authz.RolesAuthorizationFilter
ssl
org.apache.shiro.web.filter.authz.SslFilter
user
org.apache.shiro.web.filter.authc.UserFilter
logout
org.apache.shiro.web.filter.authc.LogoutFilter
anon:例子/admins/**=anon 没有参数,表示可以匿名使用。
authc:例如/admins/user/**=authc表示需要认证(登录)才能使用,FormAuthenticationFilter是表单认证,没有参数
roles:例子/admins/user/**=roles[admin],参数可以写多个,多个时必须加上引号,并且参数之间用逗号分割,当有多个参数时,例如admins/user/**=roles["admin,guest"],每个参数通过才算通过,相当于hasAllRoles()方法。
perms:例子/admins/user/**=perms[user:add:*],参数可以写多个,多个时必须加上引号,并且参数之间用逗号分割,例如/admins/user/**=perms["user:add:*,user:modify:*"],当有多个参数时必须每个参数都通过才通过,想当于isPermitedAll()方法。
rest:例子/admins/user/**=rest[user],根据请求的方法,相当于/admins/user/**=perms[user:method] ,其中method为post,get,delete等。
port:例子/admins/user/**=port[8081],当请求的url的端口不是8081是跳转到schemal://serverName:8081?queryString,其中schmal是协议http或https等,serverName是你访问的host,8081是url配置里port的端口,queryString
是你访问的url里的?后面的参数。
authcBasic:例如/admins/user/**=authcBasic没有参数表示httpBasic认证
ssl:例子/admins/user/**=ssl没有参数,表示安全的url请求,协议为https
user:例如/admins/user/**=user没有参数表示必须存在用户, 身份认证通过或通过记住我认证通过的可以访问,当登入操作时不做检查
注:
anon,authcBasic,auchc,user是认证过滤器,
perms,roles,ssl,rest,port是授权过滤器
以上是配置过程
2.shiro认证
上面是我在用shiro的权限管理时的配置过程,项目配置过程要根据具体的项目来,可能会有点细节不同,但是总体不变,遇到不会的多去百度百度,因为是第一次接触shiro,所以我当时就一个配置过程就用了三天,所以不要急,遇到不会的多上网查查。
当你拦截器设置好了,可以成功拦截用户的操作,然后我们需要对用户进行权限验证。所以我们需要继承shiro的AuthorizingRealm拦截器,重写两个方法。
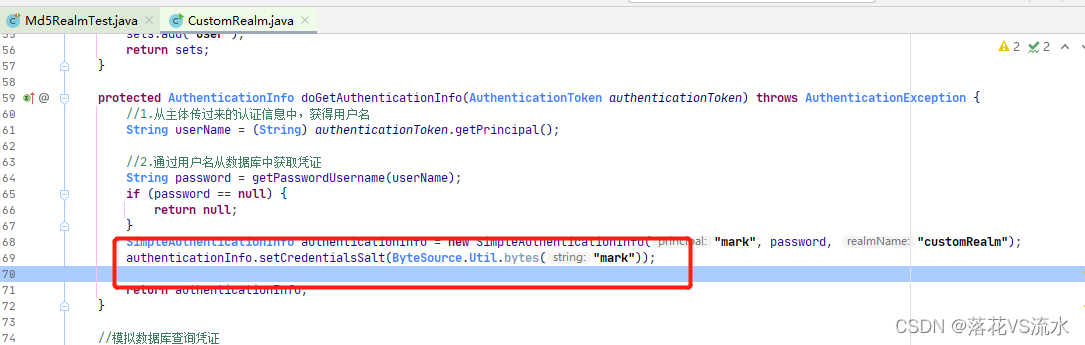
- 重写doGetAuthenticationInfo方法是:登录验证,当需要登录的时候,就会调用该方法进行验证。
- 重写doGetAuthorizationInfo方法:这个是授权验证,与上面的过滤器相结合。
思路如下:
- 登录验证: 根据账号从数据库获取账号密码进行比较,如果一致则登录成功,就会保存到,否则登录失败
- 授权验证:在登录成功后,根据用户id获取到该用户的权限,并把权限保存在安全管理器之中,当用户访问的时候,会从管理器中判断该用户是否有权限去访问该url。
我这里只写了认证过程:
2.1自定义realm
public class UserRealm extends AuthorizingRealm{@Autowiredprivate UserService userService;@Overridepublic String getName() {return "userRealm";}// 支持什么类型的token@Overridepublic boolean supports(AuthenticationToken token) {return token instanceof UsernamePasswordToken;}/****@Description 自定义授权方法*@param *@author 李佳浩*@Date 2018年10月14日 下午12:16:34*/@Overrideprotected AuthorizationInfo doGetAuthorizationInfo(PrincipalCollection token) {// TODO Auto-generated method stubSystem.out.println("111");return null;}/****@Description 自定义的认证方法*@param *@author 李佳浩*@Date 2018年10月14日 下午12:15:57*/@Overrideprotected AuthenticationInfo doGetAuthenticationInfo(AuthenticationToken token) throws AuthenticationException {//从token中获取用户身份信息String username = (String)token.getPrincipal();System.out.println("principal:"+username);//从数据库中查询usernameUser user = userService.selectByUsername(username);//如果查询不到则返回nullif(user==null) return null;String password = user.getPassword();//String salt = user.getSalt();//盐// 返回认证信息由父类AuthenticatingRealm进行认证//SimpleAuthenticationInfo simpleAuthenticationInfo = new SimpleAuthenticationInfo(user, password,ByteSource.Util.bytes(salt), getName());SimpleAuthenticationInfo simpleAuthenticationInfo = new SimpleAuthenticationInfo(user, password, getName());return simpleAuthenticationInfo;}}2.2controller层
/*** @Description 用户登录* @return* @author 李佳浩* @Date 2018年10月13日 下午6:39:01*/@RequestMapping("/login.action")public String login(HttpServletRequest request)throws Exception{// shiro在认证过程中出现错误后将异常类路径通过request返回String exceptionClassName = (String) request.getParameter("shiroLoginFailure");if(exceptionClassName!=null){if (UnknownAccountException.class.getName().equals(exceptionClassName)) {throw new CacheException("账号不存在");} else if (IncorrectCredentialsException.class.getName().equals(exceptionClassName)) {throw new CacheException("用户名/密码错误");} else{throw new Exception();//最终在异常处理器生成未知错误}}//认证失败会回到login.jspreturn "login";}2.3dao层
我的项目用的是mybatis
代码如下:
public interface UserDao {User selectByid(@Param("id")String id);User selectByUsername(@Param("username")String username);List<User> selectAll();List<User> selectAllOrderPag(@Param("begin")int begin,@Param("size")int size);int selectCountOfRows();int add(User user);int deleteById(@Param("id")String id);int update(User user);
}
UserDao.xml
<?xml version="1.0" encoding="UTF-8"?>
<!DOCTYPE mapper PUBLIC "-//mybatis.org/DTD Mapper 3.0" "http://mybatis.org/dtd/mybatis-3-mapper.dtd">
<mapper namespace="cn.lijiahao.demo.dao.UserDao"><!-- 通过用户名查询用户 --><select id="selectByUsername" parameterType="String" resultType="user">select *from sys_userwhere username = #{username}</select><!-- 通过id查找用户 --><select id="selectById" parameterType="Integer" resultType="user">select *from sys_userwhere id = #{id}</select><!-- 添加用户 --><insert id="add" parameterType="user">insert into sys_user(id,username,password,name,dataOfBirth,age,gender)values(#{id},#{username},#{password},#{name},#{dataOfBirth},#{age},#{gender})</insert><!-- 查询所有用户 --><select id="selectAll" resultType="user">select * from sys_user</select><!-- 根据begin,size来返回用户list列表 --><select id="selectAllOrderPage" parameterType="Integer" resultType="user">select * from sys_user limit #{begin},#{size}</select><!-- 返回所有信息的行数 --><select id="selectCountOfRows" resultType="Integer">select count(*) from sys_user</select><!-- 更新用户信息 --><update id="update" parameterType="user">update sys_user<set><if test="username !=null and username !=''">username=#{username},</if><if test="password !=null and password !=''">password=#{password},</if><if test="dataOfBirth !=null">dataOfBirth=#{dataOfBirth},</if><if test="name !=null and name !=''">name=#{name},</if><if test="age !=null and age !=''">age=#{age},</if><if test="gender !=null and gender !=''">gender=#{gender},</if></set>where id=#{id}</update><!-- 通过id删除用户 --><delete id="deleteById" parameterType="Integer">delete from sys_user where id = #{id}</delete>
</mapper>
2.4service层
service层就省略了,service层就是调用dao层实现。
2.5pojo层
public class User implements Serializable{private String id;private String username;private String password;private String name;private Timestamp dataOfBirth;//出生日期private int age;private String gender;private String salt;//盐private String locked;//省略set,get和构造方法方法
}
2.6数据库
数据库参照这篇文章https://blog.csdn.net/hzw2312/article/details/54612962
数据库结构现在地址:https://download.csdn.net/download/codehaohao/10722315
文章参考文章:
《spring整合shiro权限管理与数据库设计》
《Shiro实现(一): SSM整合笔记实现登录,授权功能》