本文分享自华为云社区《CTPN+CRNN 算法端到端实现文字识别》,作者:HWCloudAI。
OCR介绍
光学字符识别(英语:Optical Character Recognition,OCR)是指对文本资料的图像文件进行分析识别处理,获取文字及版面信息的过程。发展时间较长,使用很普遍。OCR作为计算机视觉中较早使用深度学习技术的领域,有很多优秀的模型出现。普遍的深度学习下的OCR技术将文字识别过程分为:文本区域检测以及字符识别。
文本区域检测——CTPN模型
文字区域检测:将图片中出现的文本位置检测出来,可能存在不同语言,不同文字大小,不同角度倾斜,不同程度遮挡等情况。CTPN网络结合了CNN与LSTM深度网络,通过固定宽度的anchor提取proposal,能有效的检测出复杂场景的横向分布的文字区域,不定长度文本识别效果较好,是目前使用广泛的文字检测算法。
字符序列检测——CRNN模型
字符识别算法:将文本区域的字符识别出来。通过深度神经网络对目标区域进行特征提取,然后对固定特征进行提取和比对,得出识别结果。采用文本识别网络CRNN+CTC。CRNN全称为卷积循环神经网络,将特征提取,序列建模以及转录整合到统一的模型框架中。主要用于端到端地对不定长的文本序列进行识别,不用先对单个文字进行切割,而是将文本识别转化为时序依赖的序列学习问题,就是基于图像的序列识别。如下图,CRNN网络分为:卷积层、循环层和转录层三部分,CTC为无词典的转录方式, 不会被局限在预定义词汇范围中。
完整的端到端OCR流程
了解了文本区域检测以及字符识别后,下面详细讲解完整的端到端OCR流程:
(1)准备一张含有文字的原图;
(2)对原图进行文字位置的检测,检测结果可能是水平矩形框,也可能是倾斜矩形框;
(3)从原图中把文字框对应的图片切下来,并旋转正,得到水平的文字块切片图;
(4)对每个文字块切片图依次进行字符识别,每个切片图的识别结果汇总起来,就得到原图的文字识别结果。
因此完整的端到端OCR流程是:输入原图 -> 文字检测 -> 文字块切片 -> 字符识别 -> 识别结果汇总。
理论部分到此告一段落,下面开始在ModelArts中体验实战项目开发!
注意事项:
-
本案例使用框架**:** TensorFlow-1.8
-
本案例使用硬件规格**:** 8 vCPU + 64 GiB + 1 x Tesla V100-PCIE-32GB
-
进入运行环境方法:点此链接进入AI Gallery,点击Run in ModelArts按钮进入ModelArts运行环境,如需使用GPU,您可以在ModelArts JupyterLab运行界面右边的工作区进行切换
-
运行代码方法**:** 点击本页面顶部菜单栏的三角形运行按钮或按Ctrl+Enter键 运行每个方块中的代码
-
JupyterLab的详细用法**:** 请参考《ModelAtrs JupyterLab使用指导》
-
碰到问题的解决办法**:** 请参考《ModelAtrs JupyterLab常见问题解决办法》
1. 下载代码和模型
本案例中已经将CTPN和CRNN的代码模型都整合到一起
import os
from modelarts.session import Session
sess = Session()if sess.region_name == 'cn-north-1':bucket_path="modelarts-labs/notebook/DL_ocr_crnn_sequence_recognition/E2E_ocr.zip"
elif sess.region_name == 'cn-north-4':bucket_path="modelarts-labs-bj4/notebook/DL_ocr_crnn_sequence_recognition/E2E_ocr.zip"
else:print("请更换地区到北京一或北京四")if not os.path.exists('E2E_ocr'):sess.download_data(bucket_path=bucket_path, path="./E2E_ocr.zip")if os.path.exists('./E2E_ocr.zip'):status = os.system("unzip -q E2E_ocr.zip")if status == 0:os.system("rm E2E_ocr.zip")
Successfully download file modelarts-labs-bj4/notebook/DL_ocr_crnn_sequence_recognition/E2E_ocr.zip from OBS to local ./E2E_ocr.zip2. CTPN相关模块导入
import shutil
import cv2
import numpy as np
import datetime
import os
import sys
import time
import json
import codecs
from PIL import Image
import tensorflow as tf
sys.path.append(os.getcwd() + '/E2E_ocr')
sys.path.append(os.getcwd() + '/E2E_ocr/CRNN/')
from collections import OrderedDict
from tensorflow.contrib import slimfrom CTPN import data_provider as data_provider
from CTPN.model import mean_image_subtraction,Bilstm,lstm_fc,loss
from CTPN import vgg
from CTPN import model
from CTPN.utils.rpn_msr.proposal_layer import proposal_layer
from CTPN.utils.text_connector.detectors import TextDetector
from CTPN.utils.image import resize_image
/home/ma-user/anaconda3/envs/TensorFlow-1.8/lib/python3.6/site-packages/tensorflow/python/framework/dtypes.py:519: FutureWarning: Passing (type, 1) or '1type' as a synonym of type is deprecated; in a future version of numpy, it will be understood as (type, (1,)) / '(1,)type'._np_qint8 = np.dtype([("qint8", np.int8, 1)])/home/ma-user/anaconda3/envs/TensorFlow-1.8/lib/python3.6/site-packages/tensorflow/python/framework/dtypes.py:520: FutureWarning: Passing (type, 1) or '1type' as a synonym of type is deprecated; in a future version of numpy, it will be understood as (type, (1,)) / '(1,)type'._np_quint8 = np.dtype([("quint8", np.uint8, 1)])/home/ma-user/anaconda3/envs/TensorFlow-1.8/lib/python3.6/site-packages/tensorflow/python/framework/dtypes.py:521: FutureWarning: Passing (type, 1) or '1type' as a synonym of type is deprecated; in a future version of numpy, it will be understood as (type, (1,)) / '(1,)type'._np_qint16 = np.dtype([("qint16", np.int16, 1)])/home/ma-user/anaconda3/envs/TensorFlow-1.8/lib/python3.6/site-packages/tensorflow/python/framework/dtypes.py:522: FutureWarning: Passing (type, 1) or '1type' as a synonym of type is deprecated; in a future version of numpy, it will be understood as (type, (1,)) / '(1,)type'._np_quint16 = np.dtype([("quint16", np.uint16, 1)])/home/ma-user/anaconda3/envs/TensorFlow-1.8/lib/python3.6/site-packages/tensorflow/python/framework/dtypes.py:523: FutureWarning: Passing (type, 1) or '1type' as a synonym of type is deprecated; in a future version of numpy, it will be understood as (type, (1,)) / '(1,)type'._np_qint32 = np.dtype([("qint32", np.int32, 1)])/home/ma-user/anaconda3/envs/TensorFlow-1.8/lib/python3.6/site-packages/tensorflow/python/framework/dtypes.py:528: FutureWarning: Passing (type, 1) or '1type' as a synonym of type is deprecated; in a future version of numpy, it will be understood as (type, (1,)) / '(1,)type'.np_resource = np.dtype([("resource", np.ubyte, 1)])3. CRNN相关模块安装与导入
!pip install -i https://pypi.tuna.tsinghua.edu.cn/simple keras==2.1.6
!pip install -i https://pypi.tuna.tsinghua.edu.cn/simple keras_applications==1.0.5
Requirement already satisfied: keras==2.1.6 in /home/ma-user/anaconda3/envs/TensorFlow-1.8/lib/python3.6/site-packagesRequirement already satisfied: numpy>=1.9.1 in /home/ma-user/anaconda3/envs/TensorFlow-1.8/lib/python3.6/site-packages (from keras==2.1.6)Requirement already satisfied: six>=1.9.0 in /home/ma-user/anaconda3/envs/TensorFlow-1.8/lib/python3.6/site-packages (from keras==2.1.6)Requirement already satisfied: scipy>=0.14 in /home/ma-user/anaconda3/envs/TensorFlow-1.8/lib/python3.6/site-packages (from keras==2.1.6)Requirement already satisfied: pyyaml in /home/ma-user/anaconda3/envs/TensorFlow-1.8/lib/python3.6/site-packages (from keras==2.1.6)Requirement already satisfied: h5py in /home/ma-user/anaconda3/envs/TensorFlow-1.8/lib/python3.6/site-packages (from keras==2.1.6)[33mYou are using pip version 9.0.1, however version 21.0.1 is available.You should consider upgrading via the 'pip install --upgrade pip' command.[0mRequirement already satisfied: keras_applications==1.0.5 in /home/ma-user/anaconda3/envs/TensorFlow-1.8/lib/python3.6/site-packagesRequirement already satisfied: h5py in /home/ma-user/anaconda3/envs/TensorFlow-1.8/lib/python3.6/site-packages (from keras_applications==1.0.5)Requirement already satisfied: keras>=2.1.6 in /home/ma-user/anaconda3/envs/TensorFlow-1.8/lib/python3.6/site-packages (from keras_applications==1.0.5)Requirement already satisfied: numpy>=1.9.1 in /home/ma-user/anaconda3/envs/TensorFlow-1.8/lib/python3.6/site-packages (from keras_applications==1.0.5)Requirement already satisfied: six in /home/ma-user/anaconda3/envs/TensorFlow-1.8/lib/python3.6/site-packages (from h5py->keras_applications==1.0.5)Requirement already satisfied: pyyaml in /home/ma-user/anaconda3/envs/TensorFlow-1.8/lib/python3.6/site-packages (from keras>=2.1.6->keras_applications==1.0.5)Requirement already satisfied: scipy>=0.14 in /home/ma-user/anaconda3/envs/TensorFlow-1.8/lib/python3.6/site-packages (from keras>=2.1.6->keras_applications==1.0.5)[33mYou are using pip version 9.0.1, however version 21.0.1 is available.You should consider upgrading via the 'pip install --upgrade pip' command.[0mfrom keras.layers import Flatten, BatchNormalization, Permute, TimeDistributed, Dense, Bidirectional, GRU
from keras.layers import Input, Conv2D, MaxPooling2D, ZeroPadding2D,Lambda
from keras.models import Model
from keras.optimizers import SGD
from keras import backend as Kimport keys as keys
from CRNN_model import decodeUsing TensorFlow backend.
4. 加载CTPN模型
checkpoint_path = './E2E_ocr/models/checkpoints/'  # 训练模型保存路径
vgg_path = "./E2E_ocr/models/vgg_16.ckpt"          # vgg16预训练模型
image_path = './E2E_ocr/data/CTW-200'              # 训练集图片路径CHECKPOINT_PATH = './E2E_ocr/models/checkpoints'   # 测试模型保存路径
os.environ['CUDA_VISIBLE_DEVICES'] = '0' #计算设备调用,空值为CPU计算,数字为GPU的序号tf.reset_default_graph()
# 定义模型输入信息占位符
input_image = tf.placeholder(tf.float32, shape=[None, None, None, 3], name='input_image')
input_im_info = tf.placeholder(tf.float32, shape=[None, 3], name='input_im_info')
init_op = tf.initialize_all_variables()
# 定义模型训练步骤数
global_step = tf.variable_scope('global_step', [], initializer=tf.constant_initializer(0))# 加载预训练模型
bbox_pred, cls_pred, cls_prob = model.model(input_image)
variable_averages = tf.train.ExponentialMovingAverage(0.997, global_step)
# 将变量存储到saver中
saver = tf.train.Saver(variable_averages.variables_to_restore())ctpn_sess = tf.Session(config=tf.ConfigProto(allow_soft_placement=True))
with ctpn_sess.as_default():# 加载预训练模型权重信息ckpt_state = tf.train.get_checkpoint_state(CHECKPOINT_PATH)model_path = os.path.join(CHECKPOINT_PATH, os.path.basename(ckpt_state.model_checkpoint_path))saver.restore(ctpn_sess, model_path)
print('CTPN model load success')
WARNING:tensorflow:From /home/ma-user/anaconda3/envs/TensorFlow-1.8/lib/python3.6/site-packages/tensorflow/python/util/tf_should_use.py:118: initialize_all_variables (from tensorflow.python.ops.variables) is deprecated and will be removed after 2017-03-02.Instructions for updating:Use `tf.global_variables_initializer` instead.
CTPN model load successCTPN为了更好检测出文本区域,anchor为 宽度固定为16 , 高度为[11, 16, 23, 33, 48, 68, 97, 139, 198, 283] 的文本框,共10个anchor。
这样的设计是为了更好检测出文字区域的水平位置,在文字检测中,检测文字的水平范围比较垂直范围要更困难。将anchor的宽度固定,只检测10个高度的anchor,尤其在面对多个分离的文本的情况时,能够更好检测文字的范围。
不同的anchor得到了边界框,利用nms(非极大值抑制)进行边界框回归计算,最终得到细粒度的文本区域。
5. 加载CRNN模型
下图给出CRNN的结构参考:
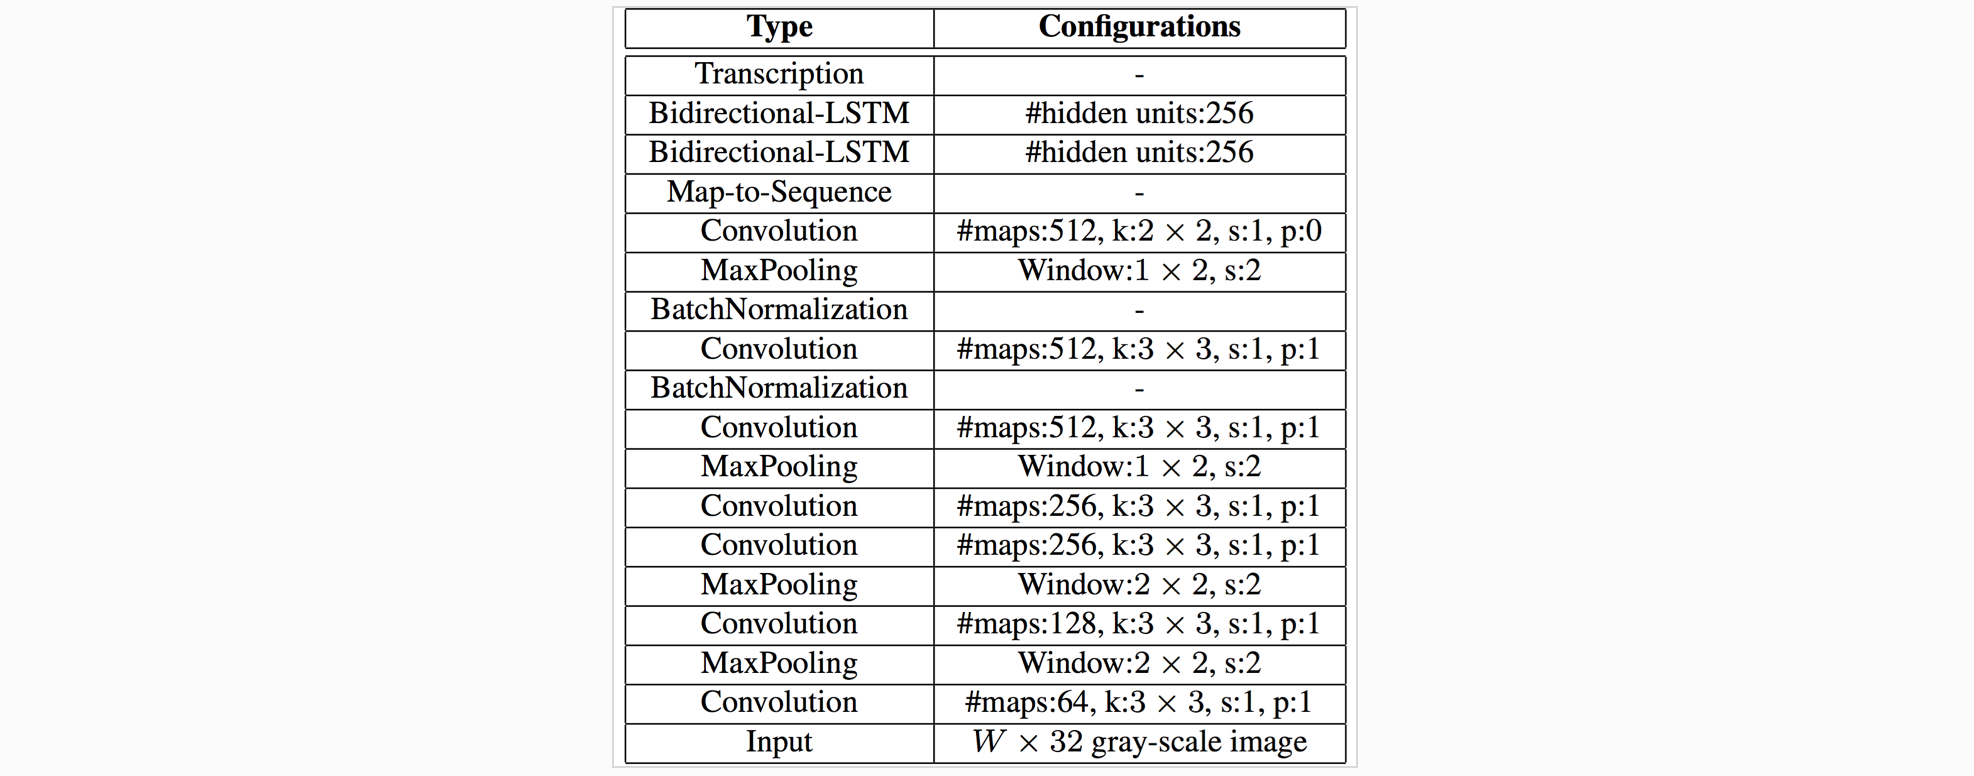
characters = keys.alphabet[:]
nclass=len(characters)+1input = Input(shape=(32, None, 1), name='the_input')
# CNN卷积层部分
m = Conv2D(64, kernel_size=(3, 3), activation='relu', padding='same', name='conv1')(input)
m = MaxPooling2D(pool_size=(2, 2), strides=(2, 2), name='pool1')(m)
m = Conv2D(128, kernel_size=(3, 3), activation='relu', padding='same', name='conv2')(m)
m = MaxPooling2D(pool_size=(2, 2), strides=(2, 2), name='pool2')(m)
m = Conv2D(256, kernel_size=(3, 3), activation='relu', padding='same', name='conv3')(m)
m = Conv2D(256, kernel_size=(3, 3), activation='relu', padding='same', name='conv4')(m)m = ZeroPadding2D(padding=(0, 1))(m)
m = MaxPooling2D(pool_size=(2, 2), strides=(2, 1), padding='valid', name='pool3')(m)m = Conv2D(512, kernel_size=(3, 3), activation='relu', padding='same', name='conv5')(m)
m = BatchNormalization(axis=1)(m)
m = Conv2D(512, kernel_size=(3, 3), activation='relu', padding='same', name='conv6')(m)
m = BatchNormalization(axis=1)(m)
m = ZeroPadding2D(padding=(0, 1))(m)
m = MaxPooling2D(pool_size=(2, 2), strides=(2, 1), padding='valid', name='pool4')(m)
m = Conv2D(512, kernel_size=(2, 2), activation='relu', padding='valid', name='conv7')(m)m = Permute((2, 1, 3), name='permute')(m)
m = TimeDistributed(Flatten(), name='timedistrib')(m)
# RNN循环层部分
m = Bidirectional(GRU(256, return_sequences=True), name='blstm1')(m)
m = Dense(256, name='blstm1_out', activation='linear')(m)
m = Bidirectional(GRU(256, return_sequences=True), name='blstm2')(m)
y_pred = Dense(nclass, name='blstm2_out', activation='softmax')(m)basemodel = Model(inputs=input, outputs=y_pred)
basemodel.load_weights('./E2E_ocr/CRNN/model_crnn.h5')
print("CRNN model load success")
CRNN model load success6. 定义文字位置检测函数
from CTPN.utils.text_connector.text_connect_cfg import Config as TextLineCfgdef ctpn_text_detection(img_path):"""CTPN文字位置检测函数:param img_path: 图片路径:return: img: 需要进行文字检测的图片:return: boxes: 图片上检测到的文字框"""try:im = cv2.imread(img_path)[:, :, ::-1]except Exception as e:raise Exception("打开图片文件失败,图片路径:", img_path)img, (rh, rw) = resize_image(im) #对图片进行形状调整h, w, c = img.shapeim_info = np.array([h, w, c]).reshape([1, 3])#将图片信息传入模型得出预测结果,分别为文字区域坐标以及其得分bbox_pred_val, cls_prob_val = ctpn_sess.run([bbox_pred, cls_prob],feed_dict={input_image: [img],input_im_info: im_info})textsegs_total, _ = proposal_layer(cls_prob_val, bbox_pred_val, im_info)scores = textsegs_total[:, 0]textsegs = textsegs_total[:, 1:5]"""文本框合并策略""" TextLineCfg.MAX_HORIZONTAL_GAP = 50 # 两个框之间的距离小于50,才会被判定为临近框。该值越小,两个框之间要进行合并的要求就越高TextLineCfg.TEXT_PROPOSALS_MIN_SCORE = 0.7 # 单个小文本框的置信度,高于这个置信度的框才会被合并。该值越大,越多的框就会被丢弃掉TextLineCfg.TEXT_PROPOSALS_NMS_THRESH = 0.2 # 非极大值抑制阈值。该值越大,越多的框就会被丢弃掉TextLineCfg.MIN_V_OVERLAPS = 0.7 # 两个框之间的垂直重合度大于0.7,才会被判定为临近框。该值越大,两个在垂直方向上有偏差的框进行合并的可能性就越小textdetector = TextDetector(DETECT_MODE='H') # DETECT_MODE有两种取值:'H'和'O','H'模式适合检测水平文字,'O'模式适合检测有轻微倾斜的文字"""文本框合并策略""" boxes = textdetector.detect(textsegs, scores[:, np.newaxis], img.shape[:2])boxes = np.array(boxes, dtype=np.int)return img, boxes7. 定义文字块切片函数
def img_transform_perspective(image, points, w_pad_rate=(0.0, 0.0), h_pad_rate=(0.0, 0.0)):"""根据四个点进行透视变换,将四个点表示的四边形图变换成水平矩形图:param image: 原图:param points: 参考的四个点,坐标顺序是xmin, ymin, xmax, ymin, xmax, ymax, xmin, ymax:param w_pad_rate: 数组(rate1, rate2),对图像宽度左右两边的扩宽比例:param h_pad_rate: 数组(rate1, rate2),对图像宽度上下两边的扩宽比例:return: persp_img: 变换后的图:return: points2: 变换后的四点"""if not isinstance(points, np.ndarray):points = np.array(points)points = points.reshape((4, 2))widths = np.linalg.norm(points[::2] - points[1::2], axis=1) # points的4点组成的四边形的上下两边的长度width = int(round(widths.mean()))heights = np.linalg.norm(points[:2] - points[3:1:-1], axis=1) # points的4点组成的四边形的左右两边的长度height = int(round(heights.mean()))points2 = np.array([[0, 0], [width - 1, 0],[width - 1, height - 1], [0, height - 1]], np.float32)points2 += np.array([int(width * w_pad_rate[0]), int(height * h_pad_rate[0])]).reshape(1, 2)size = (int(width * (1 + w_pad_rate[0] + w_pad_rate[1])),int(height * (1 + h_pad_rate[0] + h_pad_rate[1])))mat = cv2.getPerspectiveTransform(points.astype(np.float32), points2)persp_img = cv2.warpPerspective(image, mat, size,borderMode=cv2.BORDER_CONSTANT,borderValue=(255, 255, 255))return persp_img, points28. 定义CRNN字符识别函数
def crnn_ocr(img):"""CRNN字符识别函数:param img: 需要进行字符识别的图片:return: ocr_result: 图片的字符识别结果,数据类型为字符串"""img = img.convert('L')img = img.convert('L') # 图片灰度化scale = img.size[1] * 1.0 / 32 # 图片尺寸调整,把图片高度调整为32w = img.size[0] / scalew = int(w)img = img.resize((w, 32))img = np.array(img).astype(np.float32) / 255.0X = img.reshape((32, w, 1))X = np.array([X])y_pred = basemodel.predict(X) # 预测ocr_result = decode(y_pred) # 处理预测结果return ocr_result9. 查看原图
img = Image.open('./E2E_ocr/test_dataset/text.png')
img

10. 开始图片测试
test_dir = './E2E_ocr/test_dataset'  # 待测试图片目录
save_results = True
output_dir = test_dir + '_output'
if not os.path.exists(output_dir):os.mkdir(output_dir)
ocr_results = OrderedDict()
files = os.listdir(test_dir)
for file_name in files:if not (file_name.endswith('jpg') or file_name.endswith('png')or file_name.endswith('JPG') or file_name.endswith('PNG')):continueprint(file_name, 'ocr result:')file_path = os.path.join(test_dir, file_name)img, boxes = ctpn_text_detection(file_path)  # step1, 检测文字位置sorted_boxes = sorted(boxes.tolist(), key = lambda x: (x[1], x[0]))  # step2, 对文字框进行排序,优先按文字框左上顶点的y坐标升序排序,其次按x坐标升序排序for index, box in enumerate(sorted_boxes):cut_text_img, _ = img_transform_perspective(img, box[:8])  # step3, 从原图上切割出各个文字块,并将倾斜的文字块变换为水平矩形文字块ocr_result = crnn_ocr(Image.fromarray(cut_text_img))  # step4, 对每个文字块进行字符识别ocr_results[str(index)] = ocr_resultprint(str(index) + ',', ocr_result)if save_results:draw_img = img[:, :, ::-1].copy()for i, box in enumerate(boxes):cv2.polylines(draw_img, [box[:8].astype(np.int32).reshape((-1, 1, 2))], True, color=(0, 0, 255), thickness=2)cv2.imwrite(os.path.join(output_dir, file_name), draw_img)#将输出结果转为json格式with codecs.open(os.path.join(output_dir, file_name.split('.')[0] + '.json'), 'w', 'utf-8') as f:json.dump(ocr_results, f, indent=4, ensure_ascii=False)
print('end')
text.png ocr result:0, A1正在改变我们的生活,1, 正在改变我们身边的各行各业,2, 但是这条通往智能世界的路并不平坦,3, 其中一个巨大鸿沟就是AI人才的稀缺。4, 在中国庞大的I从业群体,5, A开发者缺口达百万级。6, A1将成为全民普及性的技能,7, 所以今天华为云El为大家带来《2020华为云AI实战营》免费课程,8, 大幅降低A1拳习门]椤,9, 帮助庞大的软件开发者群体快速拳握A1技能,10, 把AI用起来。end点击关注,第一时间了解华为云新鲜技术~